Planning a Bushcraft Trip: How to Plan a Camping Trip Step by Step
If you wonder how to plan a camping trip that is safe, legal and actually fun, the answer is a fixed order: decide the goal and the group, check the area and its rules, work out route and timing, look at the weather, then plan water, food, shelter, fire and kit, and finally write a trip plan and leave it with someone. Most trips that go wrong were not unlucky; one of those steps was skipped.
This guide is the hub that connects the whole site: every step links to the detailed guide or calculator for that part, so you can plan a first overnighter or a multi-day bushcraft trip in one sitting. It builds on your first night out and the basics in bushcraft for beginners.
Step by step
-
1

Set goal and group
Decide what the trip is for and who comes. Plan for the slowest and least experienced person, including children, fitness and skills.
-
2

Check area and rules
Find out where camping, fire and wood collecting are allowed. Rules differ by country and region, so check the official source.
-
3

Plan route and timing
Measure distance and height, calculate walking time, add breaks and reserve, mark bail-out points and set a turnaround time.
-
4

Plan weather, water, food, kit
Pick a weather window, then plan water, food, shelter, fire and a kit list. Weigh the full pack before you go.
-
5

Write the plan, leave it
Write who, where, route, return and alarm time on one page and leave it with a person who knows what to do if you do not come back.
-
6

Check in, then debrief
Message at the agreed time, turn back at the turnaround time if needed, and afterwards write down what to change next time.
The trip planning workflow in one picture
Good bushcraft trip planning is a loop of small decisions, each one limiting the next. The area decides the route, the route decides the time, the time decides the weather window, and the weather decides the kit. Planning in this order saves you from the classic mistake of packing first and thinking later.
From idea to departure
- Goal and groupWhat, with whom, how long, how hard.
- Area and rulesCamping, fire, wood, dogs, access.
- Route and timingDistance, height, hours, daylight.
- Weather and suppliesWindow, water, food, shelter, fire, kit.
- Safety planWritten plan, alarm time, bail-outs.
- Go, check in, debriefMessage home, learn, adjust.
The rest of this page walks through each step once, summarises the key rules and sends you to the detailed guide for the full method. If you only have ten minutes, do three things: check the rules for your spot, set a turnaround time, and send your plan to somebody.
Step 1: Goal and group – who is this trip for?
A trip has a purpose: practise a skill, sleep under a tarp, reach a lake, or simply spend time outside. Write that purpose in one sentence, because it tells you what to cut when time or weather run short. A trip to practise fire lighting can be shortened; a trip to reach a summit cannot.
Plan for the slowest person
The group sets the limits, not the strongest member. Ask honestly about fitness, experience with a loaded pack, and how people cope with cold, rain and discomfort. A group moves at the pace of its slowest member, and a tired group makes poor decisions.
| Group | What to adjust | Where to read more |
|---|---|---|
| Solo, experienced | More margin and a firm check-in routine, because nobody else is there to notice a problem | Navigation and the safety plan below |
| Beginners | Short distance, easy terrain, a close bail-out, one night only | First overnighter |
| With children | Shorter days, more breaks, a warm and early camp, fewer firsts at once | Bushcraft with kids |
| Mixed fitness | Share the load, set the pace by the weakest, plan an extra rest day or a shorter loop | Roles section below |
| With a dog | Leash rules, water for the dog, wildlife and livestock | Wildlife encounters |
Choose the right difficulty
Change only one major thing per trip: a new place, a longer distance, a new shelter or a colder season. When everything is new at once, a small problem becomes a big one. Skills you need on the trip should be practised at home first; your camp setup, knots and stove handling should not be experiments in the dark.
Step 2: Choosing the area and checking the rules
The same forest can be open to wild camping, closed for fire and protected for wildlife, depending on the country, region and landowner. Rules differ by country, state and land type, and this page is not legal advice. Always check the current official source for the exact area.
What to check before you commit
Rules checklist for the area
- Is camping or sleeping outside allowed here, and for how many nights?
- Is it a nature reserve, national park, water protection zone or military area with extra rules?
- Are open fires and stoves allowed, and what is the current fire-danger level or ban?
- May you collect dead wood, or is wood collecting restricted? Cutting living trees is almost never allowed.
- Are dogs allowed, and do they need to be on a lead (nesting season, grazing animals)?
- Who owns or manages the land, and who can you ask for permission?
- Is hunting or forestry work planned on your dates?
Start with the official website of the park, forest authority or municipality, and ask the landowner or ranger when in doubt. The overview in wild camping rules explains the typical situations; fire safety covers fire bans and safe practice; and if you carry a knife or axe, read knife laws for bushcraft, because carrying rules differ widely and are stricter in some countries than people expect.
Picking the area
- Match the area to the group. A first trip belongs in familiar terrain with phone signal and a road within reach.
- Look at the access. How do you reach the start, where do you park, how do you get home if you must stop early?
- Look at the water. Are there streams or lakes on the route, and how reliable are they late in the season? More in finding water.
- Look at the hazards. Steep ground, river crossings, bogs, cliffs, hunting seasons and livestock.
Step 3: Route and timing – how long will it really take?
Route planning answers three questions: how far, how high and how long. Use a topographic map or a mapping app, and read the contour lines, not only the distance. The map and compass guide explains scale, contours and bearings, and a printed map plus compass should stay in the pack even when you navigate with a phone.
Turn distance and height into hours
A common planning rule is about 5 km per hour on flat ground plus roughly one extra hour for every 600 m of ascent. A heavy pack, rough ground, children or mud slow that down, so treat the figure as a starting point. The hiking time calculator does this for you and lets you adjust for pack weight and pace. For the first trip with a new group, measure your real speed on a short test walk.
From map to timetable in four moves
 1Mark start, camp and the line between
Draw the route on the map and note the trailhead, the camp and landmarks such as bridges and junctions. These become your checkpoints and the words in your trip plan.
 2Add up the time
Walking time from the hiking time calculator, plus breaks, plus a reserve of about an hour or 25–30 percent. The total is the time you plan with, not the optimistic one.
 3Mark the bail-out points
Find places where a path leads quickly to a road or village. Mark them on the map before you leave. A bail-out you found in advance costs a minute; one you have to look for costs an hour.
 4Set the turnaround time
Choose a clock time at which you stop going forward and turn back or take a bail-out, wherever you are. Decide it at home, when you are calm.
Daylight sets the frame
Look up sunrise and sunset with the daylight calculator and plan to arrive at camp at least an hour or two before sunset, so shelter, water and fire are done in light. In autumn and winter the walking day is short, which can shrink a route by half. Walking in the dark is a skill of its own; see moving safely at night if a late arrival is possible.
Check distance on the ground
Under tree cover and in fog, time and distance drift. Count your steps with the pace count calculator to know how far you have walked between two landmarks, and check the time at each checkpoint against your timetable. If you are 30 minutes behind at the first checkpoint, that is information, not failure: shorten the route or move the turnaround time.
| Factor | Effect | What to do |
|---|---|---|
| Heavy pack | Slower on ascents and tiring over the day | Weigh and trim the pack, enter pack weight in the calculator |
| Children or beginners | Frequent stops, shorter days | Plan half the distance you would do alone |
| Rough ground, bog, scree | Much slower than the map suggests | Add 25–50 percent or choose a different route |
| Rain, wind, snow | Slower walking, more clothing stops | Check the forecast; plan an easier route as Plan B |
| Late start | Less daylight for camp tasks | Start earlier or shorten the route |
Step 4: Finding a weather window
Weather decides whether a trip is pleasant, miserable or dangerous. Look at the forecast several days ahead to pick the date, then again the evening before and on the morning of departure. Compare more than one source, check the hourly forecast for the night, and pay attention to wind, rain probability, thunderstorm warnings and the overnight low.
Learn what the sky is telling you in reading the weather. Wind makes cold air feel much colder, so use the wind chill calculator when the forecast shows low temperatures and gusts. Cold, wet and windy combined are the setup for hypothermia.
| Forecast | Decision | Reason |
|---|---|---|
| Dry, light wind, mild night | Go as planned | Normal kit is enough |
| Showers possible, cool night | Go with a lower, closer plan and good rain gear | Wet kit is the main risk |
| Strong wind, gusts, heavy rain | Postpone or move to a sheltered area or campsite | Falling branches and poor sleep |
| Thunderstorms forecast | Postpone | Lightning and trees are a real danger in woodland |
| Heat wave or fire-danger warning | Postpone or skip fire and cooking on the ground | Wildfire risk and dehydration |
| Below-freezing night with a summer kit | Postpone or upgrade the sleep system | See the sleep system step below |
Decide your weather limits at home: for example, the maximum wind speed and the minimum temperature you accept with this group and this kit. Then it is a rule, not a negotiation at the trailhead.
Step 5: Water plan and food plan
Water plan
List where water is available along the route and how reliable each source is: a river is more dependable than a small spring in late summer. The water calculator estimates how much each person needs for the weather, walking effort and cooking, and a normal active day needs several litres in total. Plan to carry enough to reach the next safe source, plus a reserve.
- Treat all natural water. Boil, filter or chemically treat it. See water purification, filtering and the boiling time calculator.
- Know the carrying capacity. Two litres weigh two kilograms. Containers are covered in water containers.
- Drink before you are thirsty. The habits are in hydration outdoors.
Food plan
Count meals, not days: breakfast, trail snacks, lunch, dinner and an extra emergency ration. The food planner estimates amounts per person, and trail meal planning shows simple menus. Plan food that matches your cooking method: if a fire ban is possible, take a stove or cold food (see camp stoves). Foil packets need only coals, and a small camp coffee kit adds just a few grams. Pack and store food safely using food storage at camp.
Water and food check
- Water sources marked on the map, with a back-up option
- Carrying capacity for the longest dry stretch plus a reserve
- Treatment method packed and tested (filter, tablets, pot)
- Meals counted per person, plus one extra snack day
- Allergies and dislikes checked for everyone
- Fuel for the stove matched to the number of hot meals
Step 6: Shelter, sleep system and fire plan
Choose the shelter (tent, tarp or hammock) for the forecast and the terrain, then match the sleep system to the lowest expected temperature. The tarp size calculator helps you pick the right tarp size for the number of people, and the sleep system calculator checks whether your bag and mat are enough for the night. Practise any pitch at home: tarp shelter setups, bivouac and hammock camping all behave differently in wind. If rain is likely, read rain camping; if you pick a tent, see choosing a tent.
Fire plan – with a decision
Fire is a privilege, not a given. Decide before the trip whether you will cook on a fire, a stove or not at all. If a fire is legal and safe, the fire lay calculator and firewood calculator estimate wood needs, and fire lays explains how to build it. In dry weather, with a ban or in protected areas, use the stove or cold food.
Fire, stove or cold food?
Are open fires clearly allowed here and now (no ban, low danger level)?
Yes → Continue to the next question.No → No fire. Use a stove if stoves are allowed, otherwise cold food.Is there a safe, bare fire spot with water nearby and no wind problem?
Yes → A small fire is possible. Plan wood with the firewood calculator.No → Use a stove or skip hot food.Do you need a fire, or is it only for atmosphere?
Yes → Keep it small and put it out completely.No → A stove is cheaper, faster and safer.
The basics are in fire starting and fire safety. Bring a reliable second ignition source even if you plan to use a ferro rod or a hand drill, and never rely on a fire for survival-critical warmth in a plan that you can avoid.
Step 7: Kit list and pack weight
Build the kit list from your plan, not from habit. Every item should answer a need: sleep, shelter, water, food, warmth, navigation, light, fire, first aid or communication. The Kit Builder creates a list for your season and trip length, and the bushcraft kit list explains each item. On a budget, a budget bushcraft kit shows where to spend and where to save, and backpacks helps you pick a pack that fits.
Weigh the loaded pack, including water and food. A pack that is too heavy slows you, tires you and makes everything harder. Consider the total weight in relation to your own body and the length of the trip, and trim anything that you did not use on the last trip. Weigh the same set of items separately so you know where the weight sits.
From list to loaded pack
 1Lay it all out
Put every item on the floor and tick it off your list. Anything on the floor that is not on the list needs a reason; anything on the list that is missing from the floor is a gap.
 2Weigh the full pack
Hang the packed rucksack on a luggage scale, with water and food. Write the number on your trip plan. Next time you can compare and see what changed.
 3Pack in zones
Light, bulky items such as the sleeping bag go at the bottom, heavy items such as food, water and stove close to your back and in the middle, and rain gear, snacks and first aid at the top where you can reach them.
 4Power and maps
Charge the phone and power bank, download offline maps and carry the printed map. Keep the phone in a pocket or drybag and use flight mode to save battery on the walk.
Clothing and footwear
Dress in layers and pack a warm, dry set for camp that stays dry in a bag. See clothing and footwear. Break in new boots before the trip, not on it, and carry a lighting setup as described in lighting, with spare batteries.
Cut the weight
- Check each item: used on the last trip, or needed for safety? If not, leave it.
- Share group gear such as tarp, stove and first aid kit so nobody carries two.
- Repackage food to the right amounts and leave packaging at home.
Step 8: The safety plan – write it down and leave it
The written trip plan is the most important safety measure, and it costs nothing. It tells someone who is not on the trip where you are, when you should be back and when to call for help. Without it, a search starts late and in the wrong place.
Turnaround time and alarm time
Two times belong on every plan, and they are often confused:
- Turnaround time is for you. It is the clock time at which you stop going forward and head back or to a bail-out, wherever you are. It protects you from pushing on in worsening conditions or losing daylight.
- Alarm time is for your contact. It is the clock time after which, if they have heard nothing, they start to call for help. Set it with a margin after your planned return, ideally with daylight left for a search.

What goes on the trip plan

From note to alarm in four moves
 1Write it all down
Fill in who, where, route, planned return and alarm time. Add vehicle details, the phone numbers of everyone and any medical issue that rescuers should know about.
 2Send the route and a pin
Share the route as a screenshot, a file or a location pin, and a photo of the plan. A contact who can see the map can describe your position to a dispatcher.
 3Check in at the agreed time
Send a short message at the agreed time, even if only “all fine”. If you have no signal, say in advance when you expect to be reachable again.
 4No message, no answer: act
When the alarm time passes and the contact cannot reach you, they do not wait “just a bit longer”. They call the emergency number and read out the plan.
Tell your contact explicitly what to do: whom to call first (a group member’s family, then the emergency number), what to say and what information the dispatcher will ask for. Also agree that you will tell them when you are back, so nobody is searching for a hiker who is already at home. If your plan changes, update it, because an outdated plan is worse than none.
Emergency numbers, first aid, bail-outs and phone power
Emergency numbers and what to tell a dispatcher
In the European Union and many other countries, 112 is the general emergency number; other countries use 911, 999 or others. Write the numbers for your area on the plan, and check whether the area has a mountain-rescue or other special number. A call is easier if you prepare the facts: who you are, where you are (coordinates, nearest landmark, trail name), what happened, how many people are hurt and what help you need. Stay on the line and follow instructions. More on signals and getting found in emergency signals.
First aid
Pack a first aid kit that matches the group and the terrain, with personal medication, and know how to use it. See the first aid kit guide and consider a first aid course. If someone is cold, wet and shivering, treat it early, as described in hypothermia and cold injuries. Check for ticks after the trip; see ticks and mosquitoes.
Escape routes and bail-out points
For each stage of the route, ask: if something goes wrong here, where do we go? A good bail-out is a path to a road, a hut, a village or a campsite that you can reach in under an hour or two. Mark them on the map and write them on the plan.

| Role | Job | Why it helps |
|---|---|---|
| Navigator | Follows the map, calls the checkpoints, checks against the timetable | One person is responsible instead of everyone assuming |
| Timekeeper | Watches the clock, calls breaks and the turnaround time | Prevents drifting past the limit |
| First aid | Knows the kit, checks on the group for cold, blisters and fatigue | Problems are found early |
| Sweep | Walks last so nobody is left behind | Keeps the group together |
Phone power and communication
A phone is a map, a camera, a torch and a way to call for help, so protect its battery. Fully charge it before the trip, carry a power bank and short cable, download offline maps, keep the phone warm because cold drains batteries faster, and switch to flight mode when you do not need signal. Do not rely only on a phone: a printed map, a compass, a whistle and a headlamp work without a battery. Signal can be missing in valleys and forests, so find out in advance where it is likely and tell your contact.
A sample filled-in trip plan
This is an example for an easy overnighter for two adults. Every field is something that a person at home, a search team or a dispatcher needs. Copy the structure and replace the numbers with your own.
| Field | Example entry |
|---|---|
| Who | Anna (phone …) and Ben (phone …), both healthy, Ben has a nut allergy; kit: tarp, two sleeping bags, stove |
| Vehicle | Grey estate car, registration …, parked at the forest car park at the trailhead |
| Where | Forest area north of the village; camp on the hillside above the river |
| Route | Car park, forest track, footbridge, path up the hill to camp; 9 km, about 300 m of ascent |
| Timing | Start Saturday 10:00; walking about 3 h, breaks about ½ h, reserve 1 h; planned arrival at camp 14:30 |
| Turnaround time | Saturday 14:00: if not close to camp by then, turn back or take the nearest bail-out |
| Bail-outs | At the footbridge and at the path junction below the camp, both lead down to the road |
| Return | Sunday by 12:00 back at the car |
| Check-in | Message Saturday 18:00 and Sunday on arrival; if no signal, Sunday 12:00 at the latest |
| Alarm time | Sunday 14:00: if no message by then, call 112 and give this plan |
| Emergency numbers | 112; local rescue number; family contact … |
| Notes | Weather checked Friday evening: dry, light wind, low of 8 °C; fire only if allowed and not banned |
Print it or write it by hand. Send a photo to your contact as well, and keep a copy in the pack. The same plan works for longer trips; add a line per day and a check-in time per day.
Timeline: from one week before to the morning of departure
Spread the work so that nothing is left for the last evening. This is a realistic order for a weekend trip; for long trips start two or more weeks ahead.

The countdown
- 7 days beforeChoose area, check rules, draw the route, book campsite or ask permission.
- 3 days beforeCheck the forecast, decide go or postpone, finalise water and food plan.
- 1 day beforePack, weigh, charge devices, test stove and filter, print map.
- Evening beforeFinal forecast, send the trip plan and the alarm time to your contact.
- Morning of departureFill water, check weather once more, set the phone, say goodbye, and go.
Do a quick “pocket check” at the door: keys, phone, map, headlamp, lighter, knife only if legally carried, and the plan sent. For daylight, see the daylight calculator; for timing, the hiking time calculator.
Plan B: weather, illness and changed conditions
A plan is only good if it can change. Write the alternative into the plan, not into your head, and agree in advance who decides. The best Plan B is one that you are happy with, so that using it does not feel like losing.
| Problem | Plan B | Who decides |
|---|---|---|
| Forecast turns bad | Shorter route, lower campsite, official campsite or go home | The group, using the limits agreed at home |
| Someone is ill or injured | Rest, treat, take the nearest bail-out; call for help if serious | The first aid person, with the group |
| Behind schedule | Shorten the route, skip the summit, use the turnaround time | The timekeeper and navigator |
| Water source dry | Use the back-up source, ration water, shorten the route | The navigator |
| Fire ban announced | Use stove or cold food, check that stoves are permitted | Whoever checks the rules |
| Gear failure (pack, shoe, stove) | Repair, share gear, shorten the trip | The group |
Tell your contact whenever the plan changes: new place, new return time or a bail-out taken. Turning around is a normal part of bushcraft, not a failure.
After the trip: debrief and gear notes
A trip teaches you only if you write it down. Within a day, while it is still fresh, make notes on the following and keep them with your kit list:
- Timing. How long did each stage take compared with the plan? Where did the plan fail?
- Kit. What did you carry without using it, and what did you miss? What was the final pack weight?
- Food and water. Too much, too little, what was eaten?
- Weather and sleep. Was the sleep system right for the real temperature?
- Group. Did the roles work, was the pace right, were people comfortable?
- Safety. Did the check-in work? Did the contact know what to do?
Then do the dull jobs: tell your contact you are home, dry and clean the gear, repair what broke, refill the first aid kit, restock the fuel and check for ticks. See tool care for knives and axes. Change one thing for the next trip, and the planning gets better each time. Ready for more? The skills hub and gear hub show where to go next.
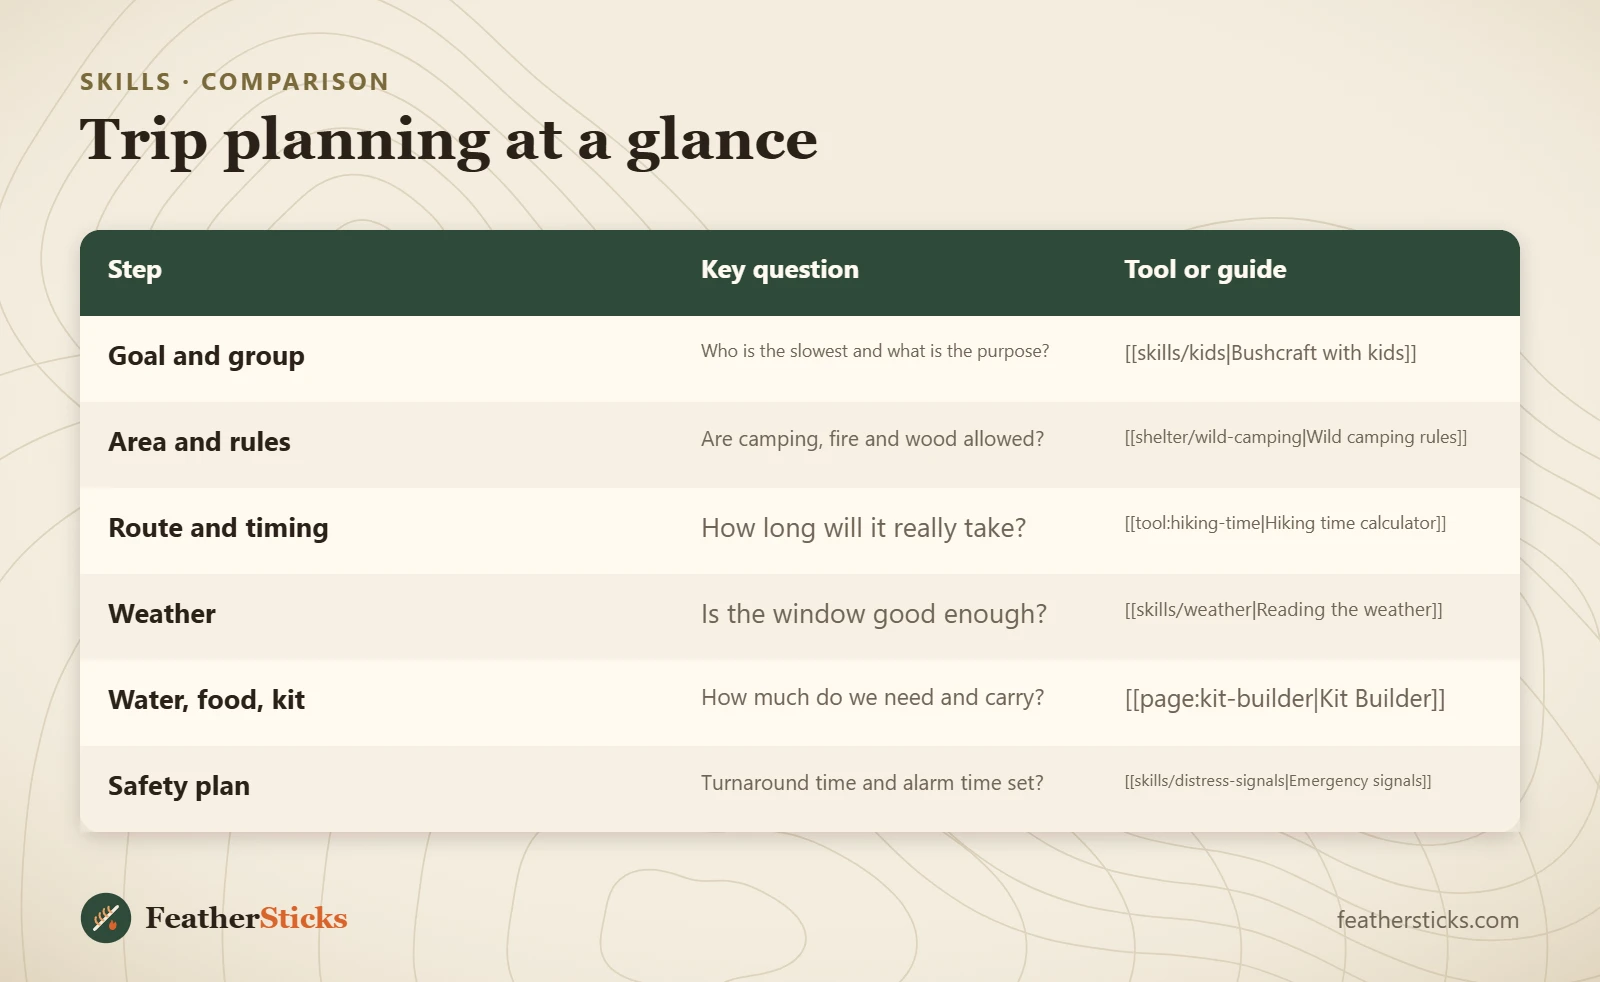
| Step | Key question | Tool or guide |
|---|---|---|
| Goal and group | Who is the slowest and what is the purpose? | [[skills/kids|Bushcraft with kids]] |
| Area and rules | Are camping, fire and wood allowed? | [[shelter/wild-camping|Wild camping rules]] |
| Route and timing | How long will it really take? | [[tool:hiking-time|Hiking time calculator]] |
| Weather | Is the window good enough? | [[skills/weather|Reading the weather]] |
| Water, food, kit | How much do we need and carry? | [[page:kit-builder|Kit Builder]] |
| Safety plan | Turnaround time and alarm time set? | [[skills/distress-signals|Emergency signals]] |
Common mistakes
- Choosing the destination first and checking the rules afterwards, then camping or lighting a fire where it is not allowed.
- Planning for the strongest person instead of the slowest, so the group arrives late and tired.
- Using the optimistic walking time with no breaks and no reserve, then arriving in the dark.
- Having no turnaround time, so there is no moment when turning back is the plan instead of a defeat.
- Telling someone “I’m going to the woods” without a route, a return time or an alarm time.
- Packing from habit instead of from the plan, and never weighing the pack.
- Relying on one phone with a half-empty battery and no printed map.
What you need
- Printed topographic map and compass
- Phone with offline maps, power bank and cable
- Written trip plan (printed or handwritten) and a pen
- Headlamp with spare batteries and a whistle
- First aid kit and personal medication
- Water containers and a water treatment method
- Stove or other cooking plan matched to the fire rules
- Sleep system and shelter matched to the forecast low
Calculators for this topic
FAQ
How do I plan a camping trip step by step?
What should a trip plan include?
What is the difference between turnaround time and alarm time?
How far should I plan to walk per day?
Who should I give my trip plan to?
What do I do if the weather turns bad?
How heavy should my pack be?
Check yourself
Completed6 quick questions from this guide. Nothing is sent anywhere.
Related step-by-step guides
-
 1
-
 1
-
 1