Water
How to Find Water in the Wild: Terrain, Springs and Signs
Knowing how to find water in the wild starts with one rule: water runs downhill and collects where the ground stops it. Valley bottoms, the foot of slopes and cliffs, bands of lush green vegetation and converging animal trails all point towards it. Your map will usually show you more water than your eyes can, so plan your sources before you leave.
This guide covers terrain reading, springs, streams and lakes, plant and animal signs, rain and dew collection, and an honest look at transpiration bags and solar stills. Finding water is only step one: every wild source must still be treated — see our guide to water purification methods and the complete water section.
Step by step
-
1
Study the map before you go
Mark springs, streams and lakes along your route, note which blue lines are dashed (seasonal) and plan how much to carry between sources.
-
2
Head for low ground
Follow valleys, gullies and the foot of slopes and cliffs. Water collects where the ground stops falling.
-
3
Read plants and animals
Look for bands of willow, alder, reeds or rushes, converging game trails and birds flying low at dawn or dusk.
-
4
Choose the cleanest spot
Prefer springs and fast, clear water upstream of trails, camps and pasture. Skip stagnant pools and water with scum or algae.
-
5
Collect rain when it falls
Angle a tarp into a pot: every millimetre of rain on one square metre gives about one litre of water.
-
6
Treat every drop
Filter, boil or disinfect all water from the wild, however clear it looks. Finding water is only step one.
Where does water collect? Reading the terrain
Water is lazy: it always takes the lowest path and pools wherever the ground or the rock underneath stops it. Once you think like water, most of the landscape starts pointing you in the right direction. High, dry ridges shed water; slopes carry it downhill as surface run-off or as groundwater just beneath the surface; valley floors gather it into streams, marshes and lakes.
The most productive places to look are valley bottoms, the inside of the V where two gullies meet, the foot of steep slopes and cliffs where groundwater seeps out, and hollows and basins with no visible outlet. On a topographic map, contour lines that form a V pointing uphill mark a gully or stream valley — the tip of the V points upstream. Learn to read these shapes in our guide to map and compass navigation.


How water moves through the landscape
- Ridge & summitSheds water. Rarely a source except snowfields and rock pools after rain.
- SlopeWater runs off or seeps underground. Look for wet patches and moss lines.
- Foot of slope / cliffGroundwater emerges as springs and seeps — often the cleanest water.
- Valley floorStreams, rivers, marsh and lakes collect everything from above.
| Feature | What to look for | Typical water | Quality |
|---|---|---|---|
| Gully / V-shaped valley | Contour Vs pointing uphill, damp soil, ferns | Small stream, often seasonal | Good if upstream of pasture |
| Foot of cliff or steep slope | Dark wet rock, moss, lush green strip | Springs, seeps, drips | Often very good |
| Outside bend of a dry stream bed | Damp sand, green plants in the bed | Water under the surface (dig) | Fair — treat |
| Basin without outlet | Reeds, flat ground, midges | Pond, marsh | Poor — stagnant |
| Valley floor | Line of trees, birds, trails | Stream, river, lake | Variable — depends on land use upstream |
| Rock hollows on ridges | Pools after rain | Rainwater, short-lived | Fair — may hold bird droppings |
Geology matters too. In limestone country (Swabian Alb, Peak District, parts of the Alps) water sinks fast into cracks, so the high plateau can be bone-dry while large springs burst out at the valley edges. On granite and slate, water stays at the surface and small streams are everywhere. On sandy heath and pine forest, streams are rare, but the water table may be close under damp hollows.
Springs and seeps: the best natural water source
A spring is where groundwater reaches the surface. Because it has trickled through soil and rock, spring water is usually clearer and colder than surface water and carries fewer germs — but not zero. Animals drink and die near springs, shallow springs can be fed by surface water only a few metres uphill, and farmland above can leach nitrate and pesticides into them. Treat spring water like any other wild water.
Look for springs at the foot of slopes, along the line where a hillside meets flat ground, and where rock layers change. Signs include a strip of unusually lush green vegetation below a certain height, water-loving plants in otherwise dry woodland, iron-orange staining on stones, and small wet patches that stay wet days after rain. In mountain areas many springs are marked on maps and some are captured in stone troughs or pipes. A sign reading "not drinking water" means exactly that — it has not been tested, not that it is necessarily contaminated, but it must be treated.
How to turn a seep into usable water
 1Find the wettest point
Follow the damp, unusually green strip uphill to where the ground is wettest and the plants are greenest — that is where the water comes out.
 2Dig a small basin
Scoop out a hole about 30 cm wide and deep with a stick or trowel, just below the seep, so the water can run into it.
 3Let it fill and settle
Wait 15–30 minutes. The first water will be muddy — bail it out and let the hole refill; each filling comes out clearer.
 4Line it if you can
Stones or gravel around the rim stop the walls collapsing and keep your feet and the cup from stirring up mud.
 5Collect from the top
Skim clear water from the surface with a cup without touching the bottom, prefilter it through cloth and then treat it.
Cold is a clue: spring water keeps a roughly constant temperature close to the average annual air temperature — in Central Europe often about 8–10 °C. Water that feels noticeably cold on a warm day is probably groundwater. That is a good sign, but still no guarantee of safety.
Streams, rivers and lakes: where to collect
Moving water is generally a better bet than still water, because stagnant water warms up and lets bacteria and algae multiply. But a stream is only as clean as everything upstream of it: a cattle pasture, a village, a hut with a septic tank or a busy trail crossing can load a crystal-clear stream with germs. Before you fill up, look and think upstream.
Choosing the collection point
- Go upstream of trails, fords, campsites, bridges and huts wherever possible.
- Collect from the main current, just below the surface — not the scummy edge or the silt on the bottom.
- Small side streams from forested slopes are often cleaner than the main river below settlements.
- Lakes: collect away from the shore, from a rock or with a bottle on a cord, and away from inflows that drain fields or roads.
- Avoid after heavy rain: run-off washes soil, droppings and farm chemicals into streams. Cloudy brown water needs settling or prefiltering before any treatment.
Flowing vs standing water
Flowing water
- Colder, more oxygen, fewer algae
- Easy to collect clear water from the current
- Carries anything from upstream — check the catchment
- Can turn muddy fast after rain
Standing water
- Warms up, bacteria and algae multiply
- Risk of toxic blue-green algae in summer
- Often clogs filters quickly
- Use only if nothing better — prefilter and treat thoroughly
When you camp, pitch at least 50–60 m from the water. It protects the bank, keeps your camp out of cold air and insects, and keeps washing and toilet waste away from the source. Our guide to choosing a camp site explains how to balance water access against safety.
Plant and animal signs that point to water
Plants and animals need water too, and many of them betray where it is. Plant signs tell you where the ground is wet; animal signs tell you where they go to drink. Neither tells you whether the water is safe — only that it exists.
Vegetation
Water-loving trees and plants grow in a visible line along streams and around springs: willows, alders, poplars and birch in temperate regions, cottonwoods and sycamores in North America. Reeds, rushes, sedges, horsetails, mosses and ferns show wet soil. In dry country, a thin ribbon of darker green winding through pale grass or scrub often marks a stream bed that holds water at least below the surface. From a high point, look for these colour differences — they are visible from kilometres away, especially in late summer.
Animals and insects
Game trails that merge and run downhill often lead to water; trails that fan out uphill lead away from it. Tracks and droppings concentrate at drinking spots — something you can read with basic animal tracking skills. Many birds fly low and direct towards water at dawn and dusk. Mosquitoes, midges and dragonflies breed in still water and rarely stray far from it. Frogs calling at night mean a pond or marsh nearby.
| Sign | What it means | Reliability |
|---|---|---|
| Line of willow, alder, reeds | Wet soil or a stream right there | High |
| Lush green strip below a slope | Seep or spring line | High |
| Converging game trails going downhill | Drinking spot ahead | Medium–high |
| Birds flying low at dawn/dusk | Water within a few km | Medium |
| Mosquitoes, midges, dragonflies | Still water close by | Medium — and usually stagnant |
| Frogs calling at night | Pond or marsh nearby | Medium — quality often poor |
| Green plants in a dry stream bed | Water below the surface | Medium — dig at the outside bend |
Wet does not mean safe. An animal drinking from a pond tells you nothing about its safety for you. Wildlife carries parasites such as Giardia and Cryptosporidium and often defecates near water, so treat every drop.
Rainwater collection: the easiest water in wet climates
Rain is the cleanest natural water you will find, and in much of Europe it is also the most reliable. The maths is simple: 1 mm of rain on 1 m² produces 1 litre of water. A tarp you already carry for shelter becomes a large catchment in minutes — see our tarp shelter setups for pitches that you can angle to drain into one corner.
| Catchment | Area | 2 mm shower | 5 mm rain | 10 mm heavy rain |
|---|---|---|---|---|
| Poncho | ≈ 2 m² | 4 L | 10 L | 20 L |
| 2 × 2 m tarp | 4 m² | 8 L | 20 L | 40 L |
| 3 × 3 m tarp | 9 m² | 18 L | 45 L | 90 L |
| 4 × 4 m tarp | 16 m² | 32 L | 80 L | 160 L |
How to collect rain with a tarp
 1Pitch with a low corner
Tension the tarp so one corner or edge sits clearly lower than the rest. The fabric should be taut — sagging pockets collect water and can tear the tarp.
 2Add a drip line
Tie a short cord to the low point; water follows it into your pot instead of splashing off in the wind.
 3Let the first flush run off
The first minutes wash dust, pollen, bird droppings and needles off the fabric. Let that water run onto the ground and keep the pot aside.
 4Collect in clean containers
Now fill pots, bottles and a bladder. Set the pot on a stone or log so no splashes from the ground get in.
 5Treat before drinking
Rain collected from surfaces picks up germs from droppings and dirt; boil or disinfect it like any other wild water.
Checkpoints for a good rain catch
- The water runs to one point and leaves the tarp as a single stream or steady drip.
- No puddle forms in the middle of the fabric.
- The collected water is clear, without needles, dust or a greasy film.
- The pot stands firmly and does not collect splash from the ground.
Rain running off tree trunks and leaves can also be caught: tie a strip of cloth around a smooth trunk so it leads water into a container. Avoid run-off from roofs of huts or sheds you do not know (lead flashing, bitumen, moss killers) and from treated tarps whose coating is flaking. Knots that hold under load in the wind are covered in our essential knots guide.
Dew collection: small but real
On clear, calm nights the ground cools and moisture condenses on grass and leaves. At dawn you can collect it by wiping or dragging an absorbent cloth — a cotton bandana, a microfibre towel or a clean sock — through tall grass and wringing it into a pot. Some people tie cloth around their lower legs and walk through a meadow.
Be honest about the yield. On a good morning with heavy dew, patient wiping can produce a few hundred millilitres in an hour; on a windy or cloudy night you may get nothing. Dew disappears quickly once the sun is up. Avoid grass along roads and fields that may have been sprayed, and treat dew water like any surface water. Dew is a supplement to drink on the spot, not a way to fill bottles for a day.
Collecting dew at dawn
 1Cloth through wet grass
Before sunrise, drag an absorbent cloth through tall grass or tie cloth around your lower legs and walk slowly through the meadow.
 2Wring it into a pot
When the cloth is soaked, twist it over a clean pot. Repeat until the dew is gone — usually soon after the sun reaches the grass.
 3Honest yield, still treat
Expect a few hundred millilitres per hour on a good morning. Avoid grass by roads and sprayed fields, and treat the water before drinking.
Transpiration bags and solar stills: an honest look
Survival books love the solar still: dig a pit, place a container in the middle, cover it with plastic and weight the centre with a stone so condensation drips into the cup. In practice, a solar still in temperate climates produces very little — often less water than you sweat while digging it. Use one only if you already have plastic, time and no better option, and never as a plan.
A transpiration bag works better. Tie a clear plastic bag over a leafy, sun-facing branch of a non-toxic tree or shrub, seal the opening around the branch and tilt it so one corner hangs low. Leaves release water vapour, which condenses inside the bag and collects in the corner. On a warm, sunny day a bag might gather a small cup of water — sometimes a few hundred millilitres, often less. The water may taste of plant compounds; avoid plants you cannot identify as non-poisonous, and never use toxic species such as yew.

Realistic yield per effort — rough orders of magnitude, highly variable
Sweat less, find more: in heat, the water you do not lose matters as much as the water you find. Search in the cool morning and evening, rest in the shade at midday and keep your clothing on to reduce evaporation.
Finding water in dry seasons and winter
In late summer, many small streams shown on maps dry up — dashed blue lines usually mark seasonal water. If a stream bed is dry, walk downstream and look at the outside of bends and below rock steps, where water often lingers or sits just under the gravel. Dig 30–50 cm into damp sand at the lowest point and wait; water may seep in slowly. Pools in shaded rock hollows can survive weeks after the last rain.
In winter, liquid water becomes scarce above the snow line, but the snow itself is a huge reservoir — as long as you have fuel to melt it. Our guide to water from snow and ice covers the technique and the fuel you need. Fast-flowing streams often stay open under ice bridges; approach them carefully, never walk on ice of unknown thickness, and listen for running water under the snow.
Finding water in a dry stream bed
 1Look at the outside of bends
Walk downstream and check the outside of bends and the foot of rock steps. Green plants or damp, dark sand in the bed are the best hints.
 2Dig at the lowest point
Dig 30–50 cm into damp sand at the lowest spot. Stop if the sand stays completely dry at that depth — try the next bend instead.
 3Wait for the seep
Give the hole time: water may seep in slowly from the sides. Let it settle, skim the clear top, prefilter and treat it.
Which water sources should you avoid?
Some water should not be drunk even after treatment, because the problem is chemical rather than biological. Boiling, filters and tablets deal with germs; most of them do nothing against pesticides, fertiliser, fuel, heavy metals or algal toxins. The only real protection against chemical pollution is choosing a different source.
| Source | Main risk | What to do |
|---|---|---|
| Downstream of fields, pasture, villages | Germs, nitrate, pesticides | Go upstream or find a side stream |
| Near roads, car parks, rail lines | Fuel, oil, de-icing salt, tyre wear | Avoid |
| Old mining or industrial areas | Heavy metals, acidic water, orange sludge | Avoid completely |
| Green scum, "paint" films, blooms | Cyanobacteria toxins — not removed by boiling | Avoid completely |
| Stagnant, warm, smelly water | High germ load, algae | Only in emergencies: prefilter + treat |
| Dead animal nearby | Heavy contamination | Move well upstream |
| Seawater, brackish water | Salt dehydrates you | Never drink; only distillation works |
| Glacial meltwater with silt | Fine rock flour clogs filters, irritates the gut | Let settle for hours, then treat |

The 60-second source check
Before you fill up, run through the same questions every time — it takes a minute and becomes a habit after a few trips:
- Look upstream: any trail crossing, hut, pasture, road or camp within sight? Then walk above it or find a side stream.
- Look at the water: flowing or stagnant, clear or cloudy, any film, foam, scum or strange colour?
- Look at the banks: animal droppings, trampled mud, dead animals, rubbish?
- Smell it: rotten, oily or chemical smells rule the source out.
- Decide the treatment: clear and remote — filter or tablets; near people — boil or filter plus chlorine dioxide; cloudy — settle, prefilter, boil.
Plan your water before you walk
The best water-finding skill is planning. Before a trip, mark every spring, stream and lake on your map, note which are seasonal and estimate the hours between them with the hiking time calculator. Then use the water needs calculator to work out how much you drink per day and how much to carry between two sources, including a 20 % reserve. A typical adult hiking six hours on a mild day needs around 4 litres to drink, plus cooking water.
Carry enough capacity for the longest dry stretch: at least one bottle you can boil in and a collapsible bladder for camp. Our guide to water containers compares materials and weights, and the bushcraft kit list shows where water gear fits in your pack.
Is this water source worth using?
Is there any sign of chemical pollution (mines, roads, farms, oily film, algae scum)?
Yes → Do not use it — look for another source, even if it costs time.No → Continue.Is it flowing, or a spring?
Yes → Good choice — collect upstream of trails and camps.No → Standing water: use only if nothing else is available.Is it clear?
Yes → Treat directly: filter, boil or disinfect.No → Let it settle and prefilter it first, then treat.
After finding water: treat, store, repeat
Once you have water, the chain continues: prefilter if cloudy, then treat by filtering, boiling or chemical disinfection, and store it in clean containers. Never assume clear water is safe — the germs that cause most trouble are invisible. If you are cooking anyway, boiling in your camp cookware treats water at no extra effort, and a good fire-starting kit makes boiling possible even without a stove.
Finding water is one of the core skills in our bushcraft for beginners guide. Practise it on day hikes: look at a map, predict where water will be, then walk there and check. After a few trips you will read valleys, vegetation and animal trails almost without thinking.
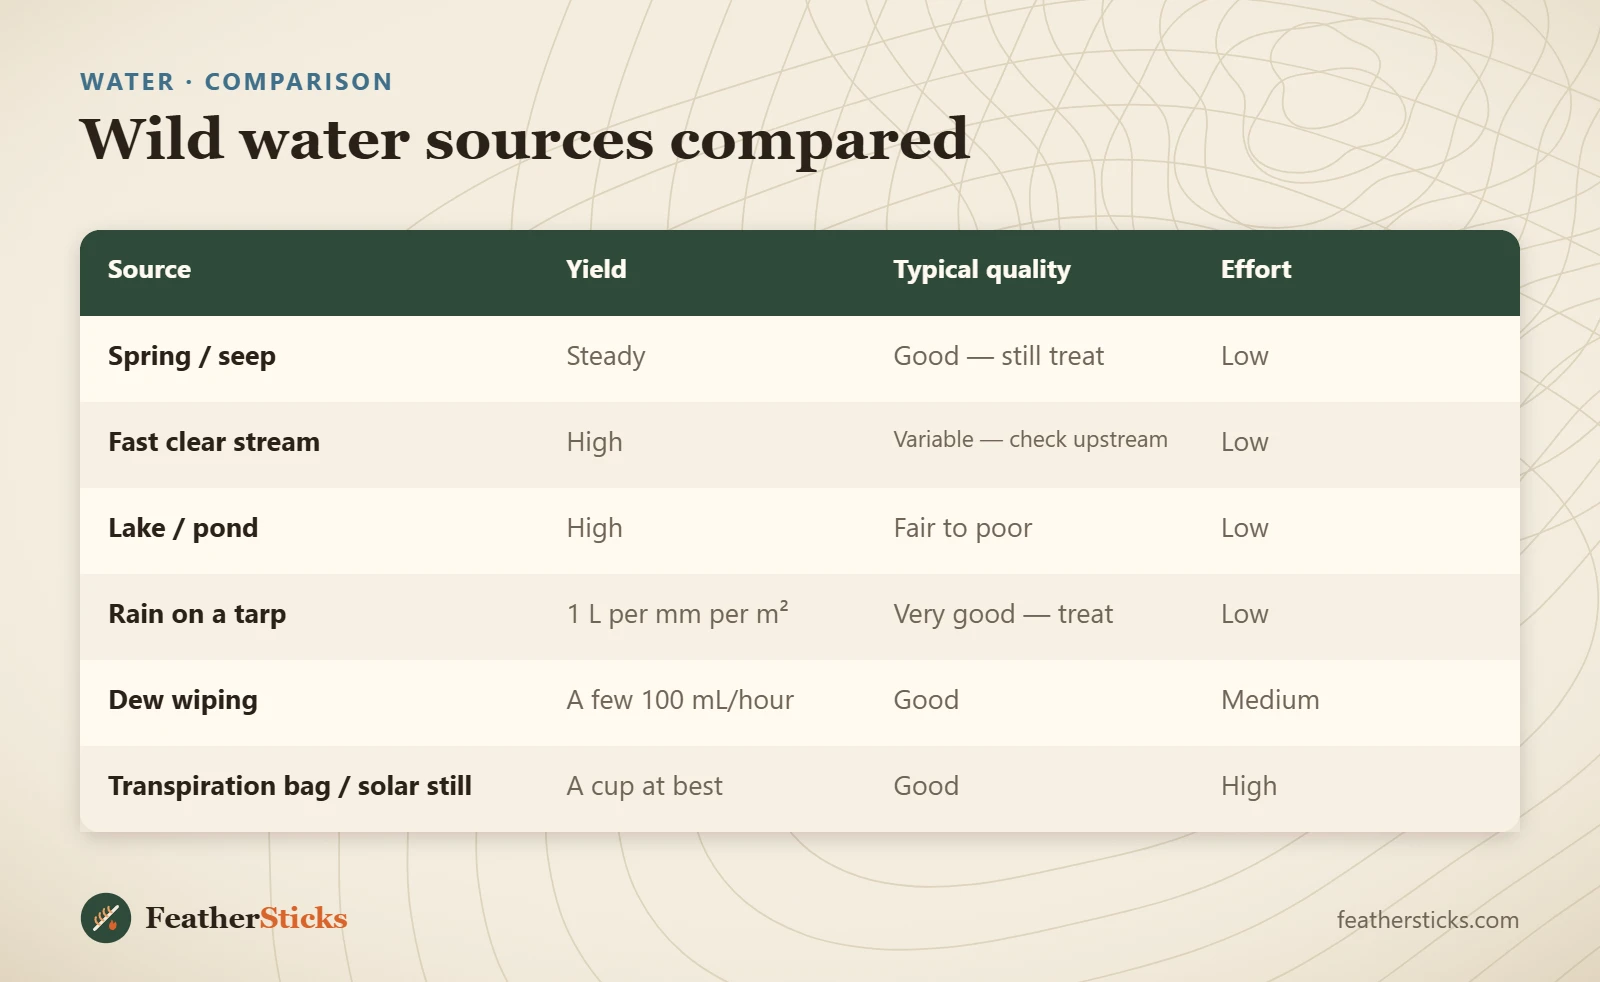
| Source | Yield | Typical quality | Effort |
|---|---|---|---|
| Spring / seep | Steady | Good — still treat | Low |
| Fast clear stream | High | Variable — check upstream | Low |
| Lake / pond | High | Fair to poor | Low |
| Rain on a tarp | 1 L per mm per m² | Very good — treat | Low |
| Dew wiping | A few 100 mL/hour | Good | Medium |
| Transpiration bag / solar still | A cup at best | Good | High |
Common mistakes
- Trusting clear, cold water without treating it.
- Collecting downstream of trails, camps, pasture or villages.
- Relying on dashed blue lines on the map in late summer.
- Planning on solar stills or transpiration bags as a real water supply.
- Filling up right after heavy rain when streams carry run-off.
- Using water with algae scum or near mines and roads — treatment will not fix chemical pollution.
- Camping right next to the water instead of 50–60 m away.
What you need
- Topographic map and compass
- Water filter or purification tablets (plus a backup)
- Metal pot or single-wall steel bottle for boiling
- Collapsible water bladder (2–10 L)
- Tarp and cord for rain collection
- Bandana or cotton cloth
- Small trowel