Skills
Bushcraft for Beginners: The Complete Guide
Bushcraft for beginners starts with one idea: the more you know, the less you need to carry. Bushcraft is the craft of living comfortably in the woods with simple tools and a lot of skill: lighting a fire in the rain, pitching a dry shelter, making water safe, cooking over flames, using a knife and saw well, tying the right knot and finding your way back.
This guide is the hub of the whole site. It explains what bushcraft is (and is not), walks through the seven core skill areas with links to every in-depth guide, gives you a first kit, a 12-week learning plan, a step-by-step first overnight, the safety and legal basics, and a season-by-season overview. Bookmark it and come back whenever you are ready for the next step — or jump straight to essential knots and fire starting, the two skills most beginners learn first.
Step by step
-
1
Learn what bushcraft really is
Bushcraft is skill-based comfort outdoors, not extreme survival. Set yourself a goal: one relaxed night in the woods.
-
2
Master knife safety and knots
Practise safe carving grips and five core knots at home. They underpin fire, shelter and camp craft.
-
3
Pack a simple first kit
Knife, ferro rod, tarp, cord, metal pot, water filter, sleep system, first aid kit. Skills first, gear second.
-
4
Practise fire, water and shelter
Work through one skill per week: feather sticks, tarp pitches, filtering and boiling water, safe fire lays.
-
5
Spend your first night out
Pick a legal site close to home, arrive three hours before sunset, keep it simple and leave no trace.
What is bushcraft? (and how it differs from survival and camping)
Bushcraft is the practical knowledge of living in natural surroundings with minimal equipment: making fire, shelter, water, food and tools from what you carry and what the land provides. The word comes from the Australian and Canadian "bush" and the old sense of "craft" as skilled handwork. Today it describes a hobby that sits somewhere between hiking, woodworking and outdoor education.
The key difference to survival is intent. Survival is what you do when things go wrong: you are lost, injured or stranded and the only goal is to get home alive. Bushcraft is voluntary. You go into the woods on purpose, with time to practise, and your goal is comfort and understanding. Many bushcraft skills are also survival skills, but the mindset is calm, curious and unhurried rather than urgent.
The difference to camping is dependence on gear. A camper brings a tent, stove, chairs and cooler and interacts with nature mostly as scenery. A bushcrafter carries less and interacts more: carving a pot hanger instead of packing one, reading the ground before choosing a pitch, knowing which wood burns hot and which smokes. In practice the lines blur — most bushcrafters happily use a modern tarp, a water filter and a good sleeping bag.
| Aspect | Bushcraft | Survival | Camping |
|---|---|---|---|
| Goal | Comfort through skill | Stay alive, get rescued | Relaxation and scenery |
| Situation | Voluntary, planned | Emergency, unplanned | Voluntary, planned |
| Gear | Few, versatile tools | Whatever you have | Lots of specialised gear |
| Time frame | A night to several weeks | Hours to days until rescue | A weekend to a holiday |
| Mindset | Patient, curious, craft-focused | Priorities and urgency | Leisure |
| Typical skills | Carving, fire by friction, natural shelters, cordage | Signalling, first aid, priorities | Setting up a tent, cooking on a stove |
Why learn bushcraft?
People come to bushcraft for different reasons: to feel more at home outdoors, to slow down, to teach children where things come from, to become more self-reliant on hiking trips, or simply because making a spoon from a branch is deeply satisfying. There is no single "right" style. Some focus on traditional skills like the bow drill and natural cordage; others use modern gear and focus on comfortable, low-impact overnights. Both are bushcraft.
The bushcraft mindset: slow is smooth, smooth is fast
Before any skill comes attitude. The woods reward patience and punish hurry: a rushed fire uses up your best tinder, a rushed knife cut ends in the first aid kit, a rushed pitch leaks at 2 a.m. These principles help every beginner:
- Preparation beats improvisation. Gather three times more tinder and kindling than you think you need before you strike a spark. Check the weather and the sunset time before you leave.
- Skills weigh nothing. Every skill you master replaces an item you would otherwise carry, or gives you a backup when an item fails.
- Two is one, one is none. Carry redundancy for critical items: two ways to make fire, two ways to treat water, a spare layer.
- Work with nature, not against it. Pitch where the wind and water let you, burn dead wood, not living trees, and leave the place as you found it.
- Practise at home first. Your garden, a local park or your living room are the best classrooms. Knots, carving grips and tarp pitches can all be learned without a forest.
- Know when to stop. Cold, wet, tired and hungry make a dangerous combination. Turning back or going home early is a skill, not a failure.
The 7 core bushcraft skill areas
Everything in bushcraft falls into seven areas. This site is organised the same way — each area has a hub page and in-depth guides. You do not need to master them in order, but the diagram below shows how they build on each other: gear and tools enable fire and shelter, water and food keep you going, and skills like knots and navigation hold it all together.
How the seven skill areas build on each other
- Knots, carving, navigation, tracking, camp setup, cordage — the glue
- Turning fire and water into hot food — cooking guides
- Finding and purifying safe drinking water — water guides
- Warmth, light, cooking and water treatment — fire guides
- Staying dry and warm, the first priority in bad weather — shelter guides
- Knife, axe and saw: using and maintaining them — tool guides
- Pack, tarp, sleep system, clothing and first aid — gear guides
The following seven sections summarise each area and link to every guide in it. Use them as a map: read the summary, pick one guide, practise it, and come back.
Skill area 1: Fire — warmth, light and cooking
Fire is the heart of bushcraft. It warms you, dries your clothes, boils water, cooks food and lifts your mood on a dark evening. Learning to make fire reliably — not just on a sunny afternoon but in drizzle with cold hands — is the skill most beginners want first. The good news: fire follows simple rules. It needs heat, fuel and oxygen, and fuel must go from very fine to thick in small steps.
Start with the fire starting basics: the fire triangle, preparing tinder, kindling and fuel, and the "pencil lead, pencil, thumb, wrist" sizing rule. Then learn to use a ferro rod, the most reliable spark-based igniter for beginners, and practise with natural tinder like birch bark, dry grass and cattail fluff. Carving feather sticks turns a wet branch into fire-ready curls and trains your knife skills at the same time. Resin-soaked fatwood from old pine stumps is the best natural fire starter in wet weather.
Once you can light a fire, learn to build the right one. Different fire lays suit different purposes: a teepee for fast heat, a log cabin for coals, a star fire for slow overnight burning, a platform fire on wet or snowy ground. The Fire Lay Picker suggests the best lay for your purpose and conditions, and the Firewood Calculator tells you how much wood to gather before dark.
Traditional methods come next. Flint and steel with char cloth teaches you about ember management, and the bow drill is the classic friction fire — hard at first, hugely rewarding once it works. For real-world conditions, study fire in wet weather. And before any of it, read campfire safety and Leave No Trace: where fires are allowed, how to site them and how to put them out cold.
Fire in five steps
 1Check the rules and the spot
Only where fire is allowed and fire danger is low. Look for bare mineral soil or an existing fire ring, open sky with no branches above, and a full water bottle within reach before you gather anything — campfire safety.
 2Gather three sizes, all dry
From fine tinder through matchstick and pencil sticks to thumb and wrist thickness. Collect three times more than you think you need, and sort it into piles before you strike a spark.
 3Build the lay
For a first fire, a small teepee: tinder inside, the thinnest sticks leaning closest, thicker ones outside. Leave a door on the side the breeze comes from so air can reach the tinder. Other jobs need other fire lays.
 4Spark into fine tinder
Rest the ferro rod tip in the tinder, hold the striker still and pull the rod back towards you. The sparks land where the tip points, and the tinder stays put.
 5Feed, then put it out cold
Add sticks one size up only when the smaller ones burn well. To finish, drown the fire, stir the ashes, drown again and feel with the back of your hand: nothing may be warm.
What a good first fire looks like
- Before the spark: three sorted piles, a fist-sized ball of fine tinder, water next to the fire site, no dry grass, leaves or gear close to it.
- After 30 seconds: flames climb from the tinder into the matchstick-thin sticks; there is more flame than smoke.
- After 5 minutes: pencil- and thumb-thick wood burns on its own; the fire stays small enough that you could put it out with one bottle.
| Symptom | Likely cause | Fix |
|---|---|---|
| Sparks land but nothing catches | Tinder too coarse or slightly damp | Fluff it finer, add birch bark or feather-stick curls, shield it from the wind |
| Sparks fly everywhere except the tinder | Striker moved instead of the rod | Tip in the tinder, striker still, pull the rod back |
| Tinder flares up, then the fire dies | Jump from tinder to sticks that are too thick | Add a big handful of matchstick-thin twigs first, then pencil size |
| Thick white smoke, little flame | Damp wood or a lay packed too tightly | Split sticks to reach the dry core, leave air gaps, open the door |
| Fire burns but collapses | Fuel added too early or too heavy | Wait for a bed of coals, then add one log at a time |
Skill area 2: Shelter — staying dry and warm
In bad weather, shelter matters before fire, water or food. Wind and rain steal body heat far faster than still air, and a wet, cold night can turn dangerous even in mild temperatures. A good shelter keeps you dry, blocks the wind, insulates you from the ground and lets you sleep — and sleep is what makes the next day enjoyable.
Almost every bushcraft shelter starts with the right place. Choosing a camp site means looking up for dead branches ("widowmakers"), down for drainage and ant nests, around for wind and water, and checking that camping is allowed at all. For beginners the most versatile option is a tarp: learning a few tarp shelter setups — A-frame, lean-to, diamond, plough point — prepares you for almost any weather. The Tarp Pitch Planner calculates ridge height, cord length and stakes for your tarp size and conditions.
Natural shelters teach you to read the forest. A lean-to shelter of poles and brush reflects a fire's heat back at you. A debris shelter (a leaf hut) insulates with a thick layer of leaves and can keep you warm without a sleeping bag — at the cost of hours of work and a lot of material, which is why it is mostly a practice or emergency skill in managed forests. In winter, snow shelters like the quinzhee use snow's insulating power.
Many bushcrafters sleep off the ground: hammock camping is comfortable on slopes and rocky or wet ground, but needs an underquilt or pad in cool weather. Finally, know the law. Our guide to wild camping rules in Germany shows how strict European rules can be; other countries — from Scotland to Scandinavia to US public lands — have very different traditions of access.
The four-way site check
 1Look up
Scan every tree within falling distance for dead branches, hanging deadwood and dead trunks ("widowmakers"). One is enough to move on — wind can drop them without warning.
 2Look down
A hollow looks sheltered but collects rainwater under your pad. Choose level, slightly raised ground without roots, stones, ant nests or animal trails.
 3Look around
Turn the closed side of your shelter to the wind and keep your sleeping spot about 50–60 m from streams and lakes: less damp, less flood risk, less disturbance for wildlife.
 4Check the rules
Is camping allowed here, and is fire? A trekking site or landowner permission answers both. If fire is banned, cook on a stove — see wild camping rules.
Checkpoint: a good pitch is one where you can lie down, look straight up and see only living branches or open sky; where a bottle of water poured on the ground runs away from your bed, not towards it; and where you could explain to the landowner why you are there. Drill: on every walk, choose the best pitch within five minutes and say out loud why you rejected two others.
| Shelter | Setup time | Weather protection | Best for |
|---|---|---|---|
| Tarp A-frame | 10–20 min | Good all-round | First nights, rain — how to pitch |
| Tarp lean-to | 10 min | One open side | Dry nights with a fire |
| Hammock + tarp | 20–30 min | Good, needs insulation below | Slopes, wet ground — guide |
| Natural lean-to | 1–3 h | Moderate | Practice, reflector fire — guide |
| Debris hut | 3–6 h | Very warm if thick | Emergency skill — guide |
| Quinzhee | 3–4 h + settling | Very warm in snow | Deep snow — guide |
Skill area 3: Water — finding it and making it safe
You need roughly two to four litres of water a day, more in heat or with hard work, plus water for cooking and washing. The Water Needs Calculator estimates your personal needs by body weight, temperature, effort and altitude. Carrying all of it is heavy, so bushcraft means knowing where to find water and how to make it safe.
Finding water starts with the map: streams, springs and lakes, then reading the land — valley bottoms, green vegetation, animal trails heading downhill. Even clear mountain water can contain bacteria, viruses and protozoa, so all natural water should be treated. Filtering water with a hollow-fibre or ceramic filter removes bacteria and protozoa and clears sediment. Boiling water is the most reliable way to kill pathogens; a rolling boil for one minute is the widely cited guidance (three minutes above about 2,000 m), and the Boiling Point Calculator shows the boiling point and fuel needed at your altitude. Our overview of water purification methods compares boiling, filters, chemical tablets and UV.
A DIY water filter of sand, charcoal and gravel is a great lesson in how filtration works, but it only clarifies water — it does not make it safe to drink without boiling or treating afterwards. In winter you may need water from snow and ice, which takes a lot of fuel and a trick or two to avoid scorching your pot. And choose sensible water containers: a single-wall metal bottle can go straight into the fire to boil, while soft bottles save weight.
Is this water ready to drink?
Is it from a treated tap supply?
Yes → Drink it.No → Treat all natural water.Is it cloudy or full of debris?
Yes → Pre-filter through cloth, let it settle, then filter.No → Go straight to filtering or boiling.Could viruses be present (near farms, settlements)?
Yes → Boil or use chemical treatment — most filters do not stop viruses.No → A 0.1–0.2 micron filter is usually adequate; boiling is the safe default.
Skill area 4: Cooking and food — fuel for body and morale
Food is less urgent than shelter or water, but hot meals make the difference between enduring a night out and enjoying it. Bushcraft cooking is simple by design: one pot, a fire and a few ingredients. The Trail Food & Calorie Planner estimates how many calories you need per day and how much food that means in your pack — typically more than you expect in cold weather.
Campfire cooking is mostly about heat management: cook over coals, not flames, and build your fire early so it has burned down when you want to cook. Choose bushcraft cookware that can take direct flame — a stainless or titanium pot with a bail handle hangs from a tripod or pot hanger. Once you have the basics, try spit cooking over a steady bed of coals, or a cast-iron Dutch oven for stews and bread on longer car-camping trips.
The classic first bushcraft meal is bannock or campfire bread — flour, water, salt and baking powder wrapped around a stick or baked in a pan. Our collection of bushcraft recipes adds one-pot stews, porridge and simple fish and vegetable dishes. And learn storing food at camp: hanging food away from your sleeping spot protects it from mice, foxes, raccoons and — where they live — bears.
Skill area 5: Tools — knife, axe and saw
A sharp knife is the single most important bushcraft tool. With it you carve feather sticks, make tent pegs and pot hangers, prepare food and process cordage. Our guide to bushcraft knives explains blade length (around 9–11 cm is ideal for most tasks), steel types, the popular Scandi grind and safe carrying. Keep it sharp: sharpening in the field with a small whetstone or ceramic rod and a leather strop is a core skill, because a dull knife is the dangerous one — it slips instead of biting.
For firewood, a folding or bow saw is safer, quieter and more efficient than an axe for most beginners. It cuts dead branches to length cleanly and with little effort. Axes and hatchets shine when you need to split larger rounds or work a lot of wood, but they demand respect: a glancing blow ends at your shin. Without an axe, batoning — driving a knife through a log with a wooden club — splits small logs to reach the dry core, provided you use a sturdy full-tang knife and keep the wood short.
When you get into carving spoons, bowls and cups, dedicated carving tools like a hook knife and a small sloyd knife make the work easier and safer. The foundation for all of this is carving basics: the safe grips (forehand, chest lever, thumb push, knee brace) and the "blood circle" rule — nobody within arm-plus-blade reach when you are cutting.
Safe knife work in four habits
 1Clear the blood circle
Stretch out your arm with the sheathed knife and turn once: nobody — child, friend, dog — may be inside that circle while you cut. Sit, so the circle does not move around with you.
 2Free hand above the blade
Brace the stick on a block or chopping round and hold it at the top. Push the blade down and away, so the stroke ends in the wood or the block, never in your hand, thigh or knee.
 3Pause = sheathe
Every time you put the work down, the knife goes back into its sheath — not on the ground, not stuck in a log. A knife lying in the leaves is easy to kneel on, lose or grab by the blade.
 4Never walk with an open blade
Sheathed on the belt in camp, in the pack on the way there. If you stumble with an open knife in your hand, the blade decides where it goes.

| Symptom | Likely cause | Fix |
|---|---|---|
| Blade skates off the surface | Angle too flat or edge dull | Raise the spine a little, touch up the edge |
| Blade digs in and stops | Angle too steep or cutting against the grain | Lower the angle, turn the stick and cut downhill with the grain |
| Hand tires after a few minutes | Gripping too hard, working from the wrist | Relax the grip, lock the wrist, move from the shoulder |
| Cuts end near your leg | Working over the lap | Carve beside the knee or over a block, never between the thighs |
Saw or axe for beginners?
Folding saw
- Light (200–400 g), safe to use
- Clean cuts to length
- Little skill needed
- Cannot split wood
Axe / hatchet
- Splits rounds quickly
- Heavier (600–1,200 g)
- Needs training and focus
- Higher injury risk
Skill area 6: Craft skills — knots, carving, navigation and camp craft
The craft skills tie everything else together, and most of them can be practised at home. Essential knots come first: with a bowline, clove hitch, trucker's hitch, taut-line hitch and prusik you can pitch any tarp, hang a pot and lash a tripod. The Knot Finder tells you which knot suits a job. Carving builds safe knife habits and leads to useful camp items. Making natural cordage from nettle, lime bast or willow bark connects you with a skill that is tens of thousands of years old.
Finding your way is a safety skill. Map and compass navigation means reading contour lines, taking and following bearings and measuring distance by pace count — the Pace Count Calculator converts distances to steps, and the Hiking Time Calculator estimates how long a route really takes with a loaded pack. Navigation without a compass — the sun, stars, wind and vegetation — is a fascinating backup and sharpens your observation. Animal tracking trains the same eye: reading prints, trails and signs tells you who shares the forest with you.
Finally, camp setup brings every skill together: kitchen downwind of the sleeping area, fire at a safe distance, water and firewood organised, tools stored safely, and a routine that makes evenings relaxed. Use the Sunset & Daylight Calculator to plan when to stop walking and start building camp.

The distances in the plan are the ones our camp setup guide works with: keep 2–3 m between the fire and any nylon or polyester tarp (more on windy nights — synthetic fabric melts from a single spark), sleep about 50–60 m from the water source, and dig the latrine at least 60 m from water, camp and paths. What it should look like: you can walk from bed to fire to kitchen without stepping over guylines, and every tool has one fixed place.
| Skill | Why it matters | Practise at home? | Guide |
|---|---|---|---|
| Knots | Shelter, hanging, lashing | Yes — daily | Essential knots |
| Carving | Safe knife use, camp tools | Yes, outdoors | Carving basics |
| Map & compass | Safety, route planning | Yes, in a park | Navigation |
| Natural navigation | Backup, observation | Partly | Without a compass |
| Tracking | Reading the landscape | Parks, beaches, snow | Tracking |
| Camp setup | Comfort, safety, efficiency | Garden | Camp setup |
| Cordage | Self-reliance, repairs | Yes | Natural cordage |
Skill area 7: Gear — pack, sleep system, clothing and first aid
Bushcraft does not mean going without gear — it means choosing a few good, versatile pieces and knowing how to use them. The bushcraft kit list covers everything for a first overnight, and the interactive Kit Builder creates a weighted packing list for your trip length, season and shelter type.
Your bushcraft backpack should carry 12–15 kg comfortably; 45–65 litres suits most overnighters, and a hip belt matters more than extra pockets. A good tarp of about 3 × 3 m is the most versatile shelter you can buy. The sleeping gear you choose decides whether you sleep: insulation below you (pad R-value) is as important as the bag above. The Sleeping Bag & Pad Calculator matches comfort rating and R-value to the expected night low.
Bushcraft clothing follows the layering principle — base layer, insulation, weather shell — and favours materials that tolerate sparks, such as wool and cotton-poly blends for outer layers near the fire. Check the Wind Chill Calculator before cold, windy trips. And never go without a first aid kit that covers cuts, burns, blisters and splinters — the most common bushcraft injuries — plus the knowledge to use it.
The layering system (outside first)
- Wind- and rainproof jacket and trousers
- Fleece, wool or synthetic jacket — add at rest
- Durable, spark-tolerant shirt and trousers
- Merino or synthetic, wicks sweat, no cotton in the cold
Priorities outdoors: the rule of threes
When conditions turn bad, what should you do first? Outdoor instructors often teach the rule of threes as a memory aid. It is a rough rule of thumb, not physiology — real limits vary enormously with temperature, health, age and activity — but it gets the order right.
| You can survive roughly… | Without | What it means for bushcraft |
|---|---|---|
| 3 minutes | Air | Avoid danger: water, cliffs, smoke in enclosed shelters, carbon monoxide from stoves |
| 3 hours | Shelter in harsh conditions | Wind, rain and cold are the real threat — shelter and clothing first |
| 3 days | Water | Plan water sources and treatment; dehydration hurts judgement long before it is lethal |
| 3 weeks | Food | Food is comfort and energy, not the first priority |
Figures are approximate teaching aids. In cold, wet, windy weather, hypothermia can set in far faster; in extreme heat, water becomes urgent within hours.

For a planned bushcraft trip, the priorities translate into a practical sequence on arrival: first make sure the site is safe, then pitch your shelter and lay out the sleep system while it is dry and light, then sort water, then gather firewood and cook. Many beginners do it the other way around — fire first because it is fun — and end up pitching a tarp in the dark and rain. Before the trip, the first priority is always information: weather forecast, sunset time, fire danger, the legal situation and someone at home who knows your plan and return time.
Your first bushcraft kit: what you really need
You do not need to spend a fortune. Many beginners buy expensive knives and axes and forget the items that decide comfort: a warm sleep system and dry clothes. Start with what you have — your hiking backpack, a warm sleeping bag, rain gear — and add a few bushcraft basics. Use the Kit Builder to generate a packing list with weights, and the detailed bushcraft kit list for recommendations and variants.
Beginner kit for a summer overnight
- Fixed-blade knife, 9–11 cm, Scandi grind — how to choose
- Ferro rod plus lighter as backup — ferro rod guide
- Tarp about 3 × 3 m, 6–8 stakes, 20–30 m of 3–4 mm cord — choosing a tarp
- Sleeping bag rated for the night low, insulated pad — sleep system
- Metal pot or single-wall bottle (0.8–1.2 l) — cookware
- Water filter or purification tablets, 2 l capacity — methods
- Folding saw — saw guide
- First aid kit and headlamp — first aid
- Rain jacket, warm layer, spare socks — clothing
- Map, compass, charged phone — navigation
- Food for the trip plus an extra snack, trash bag
What to leave at home (for now)
Large "survival" knives with sawback spines, heavy axes, multi-tool gadgets, and elaborate survival kits in tins add weight without adding much capability for a beginner. A sharp, simple knife, a folding saw and good cordage do more. Buy the axe when you know you need it — usually for winter fires or when working a lot of wood on longer trips.
Where the weight goes (typical 3-season overnight)
How to learn bushcraft: a 12-week plan for beginners
The fastest way to learn bushcraft is steady, focused practice: one skill per week, a few evenings of practice at home and a couple of hours outdoors at the weekend. This plan takes you from zero to a confident first overnight in about three months. Adjust the order to the season — fire practice is easier in dry weather, shelter practice is most useful when it rains.
| Week | Focus | Practice goal | Guides & tools |
|---|---|---|---|
| 1 | Knife safety & carving | Learn 4 safe grips, carve a tent peg and a pot hook | Knives, Carving |
| 2 | Five core knots | Tie bowline, clove, trucker's, taut-line, prusik 20× each | Knots, Knot Finder |
| 3 | Tarp pitching | Pitch A-frame and lean-to in under 15 minutes | Tarp setups, Tarp Planner |
| 4 | Fire preparation | Carve 3 feather sticks, collect 3 natural tinders, light with ferro rod | Feather sticks, Tinder |
| 5 | Fire lays & safety | Build teepee and log cabin, extinguish until cold to the touch | Fire lays, Fire safety |
| 6 | Water | Filter and boil 2 l, time your fuel use | Filtering, Boiling, Boil calculator |
| 7 | Map & compass | Take and follow 3 bearings, measure your pace count | Navigation, Pace calculator |
| 8 | Campfire cooking | Cook a one-pot meal and bannock over coals | Campfire cooking, Bannock |
| 9 | Saw, sharpening, batoning | Process an armful of firewood safely, restore an edge | Saws, Sharpening, Batoning |
| 10 | Sleep system test | Sleep one night in the garden under the tarp | Sleeping gear, Sleep calculator |
| 11 | Day trip: site & camp | Choose a site, set up and strike a full camp in daylight | Site selection, Camp setup |
| 12 | First overnight | One night out close to home, leave no trace | Kit list, Daylight calculator |
After the first 12 weeks
Once you are comfortable with a summer overnight, deepen one area at a time: friction fire with the bow drill, natural navigation, tracking, cordage, spoon carving with carving tools, or colder-season trips. Keep a simple logbook: date, weather, what worked, what failed. Patterns show up quickly and tell you what to practise next.
Your first bushcraft overnight, step by step
Your first night out should be easy: close to home or the car, in settled weather, on a site where you are allowed to camp, with a way to bail out if something goes wrong. The goal is not to prove anything — it is to sleep reasonably well and learn what to change next time.
First overnight checklist in order
- Choose a legal site. A designated trekking or primitive campsite, a campground with a quiet corner, or private land with permission. See wild camping rules for how strict it can be.
- Check weather and daylight. Pick a dry, mild night. Use the daylight calculator and plan to arrive at least three hours before sunset; check fire danger levels.
- Tell someone. Leave your location, planned return time and what to do if you do not check in.
- Pack and weigh. Use the kit list or the Kit Builder. Test the stove, headlamp and filter at home.
- Walk in and assess the site. Look up for dead branches, down for water runoff and roots, around for wind. How to choose a site.
- Pitch the shelter first. Ridgeline, tarp, stakes, then lay out pad and sleeping bag while everything is dry. Use a trucker's hitch for a tight ridgeline.
- Sort water. Fill and treat enough for the evening and morning — around 3 litres for one person, more if you cook a lot. Purification methods.
- Gather firewood before dusk. Three piles — tinder, kindling, fuel — more than you think. The firewood calculator helps. Only light a fire where it is permitted; otherwise use a stove.
- Cook and relax. A simple one-pot meal and a hot drink. Hang or store food away from your sleeping spot — food storage.
- Prepare for the night. Headlamp, water and warm hat next to your bed; dry clothes for sleeping; fire out cold before you sleep.
- Break camp and leave no trace. Scatter cold ashes, return stones, pack out every scrap. Check the site from the path: it should look untouched.
On site: the evening in six pictures
 1Shelter first
Ridgeline tight between two healthy trees, tarp over it, corners staked. Aim to have it up within about 45 minutes of arriving — before you touch the firewood. Tarp setups.
 2Bed out while it is dry
Pad and sleeping bag go under the tarp straight away, head at the higher and more sheltered end. Check: lie down once — no roots in your back, no drips from the ridgeline.
 3Water for evening and morning
Around 3 litres per person, more if you cook a lot. Filter into a clean bottle or bring it to a rolling boil; keep raw and treated water in clearly different containers. How to filter.
 4Three piles before dusk
Tinder, kindling and fuel, each sorted and kept dry under the tarp edge or a jacket. If you think it is enough, gather the same again — firewood calculator.
 5Cook over coals
Light the fire early and let it burn down; a pot on steady coals cooks evenly and does not soot up as badly. Store food away from the bed afterwards.
 6Out cold before sleep
Drown, stir, drown again, then hold the back of your hand just above the ashes. If you feel any warmth, repeat. A fire left glowing overnight is how forest fires start.
Checkpoint at sunset
When the sun touches the horizon, you should be able to tick off: shelter pitched and tight, bed laid out, treated water for the night and morning, three piles of wood, food ready, headlamp in your pocket. If one item is missing, fix it now — every job takes twice as long in the dark.
| Symptom | Likely cause | Fix |
|---|---|---|
| Cold from below despite a warm bag | Pad insulates too little | Add a second pad, a spare jacket or a thick layer of dry leaves under the pad; check the R-value with the sleep calculator |
| Tarp flaps and wakes you | Slack ridgeline or guylines | Re-tension with a trucker's hitch and taut-line hitches; lower the windward edge |
| Bag wet on the outside in the morning | Condensation under the tarp, or dew | Pitch higher and more open for airflow, dry the bag in the sun before packing |
| Water pooling next to the bed | Pitched in a hollow | Move to raised ground — digging trenches damages the site |
| Can't sleep for noises | Normal on the first night | Earplugs, a warm drink, and remind yourself that most sounds are small animals and wind |
Safety and the law: fire, knives and wild camping
Bushcraft is a safe hobby when you respect a few rules. Most accidents are small — cuts, burns, blisters — and most legal trouble comes from not knowing local rules. Laws differ widely between countries and even regions, so treat the following as an overview and always check the current rules where you go. This is not legal advice.
Knife safety and knife laws
Cut away from your body, keep the "blood circle" clear, sheathe the knife whenever you are not using it and never walk around with an open blade. Most beginners' cuts happen on the hand holding the wood, so position it behind or beside the blade, never in its path. Our knife guide and carving guide explain the safe grips in detail.
Carrying knives in public is regulated in many countries. In the UK, carrying any fixed blade or locking knife in public without a good reason is an offence; small non-locking folders with blades under 3 inches are generally allowed. In Germany, § 42a of the Weapons Act restricts carrying fixed blades over 12 cm and one-hand-opening locking knives in public without a legitimate reason, and rules have been tightened in recent years. In the US and Canada, rules vary by state, province and city. Carry your knife in your pack on the way to the woods, not on your belt in town.
Fire rules
Many regions ban open fires in forests, especially in dry seasons. In Germany, open fires in and near forests generally require landowner permission and are banned during high fire danger; in the UK most land needs the landowner's consent; in the US and Canada, fire restrictions change with fire danger levels and are published by land managers. Use designated fire pits where they exist, keep fires small, never leave them unattended and extinguish them until cold. Our full guide to campfire safety covers siting, extinguishing and fireless alternatives.
Wild camping
Access rights range from generous (Scandinavian "right of public access", Scotland's access code for responsible wild camping, dispersed camping on many US public lands) to strict (most of Germany, England and Wales, where you need permission or a designated site). Our article on wild camping in Germany explains a strict example in detail, including legal alternatives such as trekking sites.
| Region | Wild camping | Open fire | Knife carry |
|---|---|---|---|
| Germany | Generally not allowed in forests; trekking sites and permission are the legal routes | Generally only with permission, often banned within about 100 m of forests | Restrictions under § 42a WaffG; weapon-free zones |
| England & Wales | Landowner permission needed (some local exceptions) | Landowner permission needed | Fixed or locking blades need a good reason |
| Scotland | Responsible wild camping widely allowed under the access code; local bylaws apply | Allowed with care; avoid in dry periods and sensitive ground | Similar to England |
| Scandinavia | Right of public access, with rules on distance and duration | Often allowed with care; seasonal bans are common | Generally tolerated for outdoor use |
| USA & Canada | Dispersed camping allowed on many public lands; rules per agency | Depends on current fire restrictions | Varies by state, province and city |
Simplified overview for orientation only. Rules change; check official sources for your exact location before every trip.
Leave No Trace: bushcraft that respects the forest
Traditional bushcraft books show large lean-tos of freshly cut saplings and bed mats of spruce boughs. In today's crowded, managed forests, that approach is neither legal nor sustainable in most places. Modern bushcraft follows the Leave No Trace principles developed by outdoor organisations: enjoy the skills, but leave no sign that you were there.
The seven Leave No Trace principles, bushcraft edition
- Plan ahead and prepare: know the rules, weather and your route
- Travel and camp on durable surfaces; use established sites where they exist
- Dispose of waste properly: pack it in, pack it out; bury human waste 15–20 cm deep, 60 m from water
- Leave what you find: no cutting of living trees, no digging trenches around shelters
- Minimise campfire impact: use existing fire rings, small fires, dead and down wood only — how
- Respect wildlife: observe from a distance, store food securely — food storage
- Be considerate of others: keep noise low, camp out of sight of paths
For bushcraft specifically: practise traditional skills on material you are allowed to use — deadfall, prunings, wood you have bought or permission from a landowner. Collect bark and roots for cordage only with permission and in small amounts. Carve with dead or fallen wood, or with green wood from a legitimate source. And scatter your feather-stick shavings — they are the bushcraft equivalent of litter when left in a pile.
Bushcraft through the seasons
Every season teaches different skills. Beginners should start in late spring or summer when nights are mild and days are long, then extend into autumn and, with the right gear and experience, winter.
| Season | Opportunities | Challenges | Skills to focus on |
|---|---|---|---|
| Spring | Sap is rising: bark peels easily; green wood carves well; birds and tracks everywhere | Cold nights, wet ground, nesting season (be quiet, avoid disturbing wildlife) | Carving, cordage, tracking, tarp pitches |
| Summer | Long days, mild nights, dry tinder, easy first overnights | Fire bans and forest fire danger, ticks, mosquitoes, heat and water needs | Finding water, water planning, hammock camping, fire safety |
| Autumn | Cool, bug-free nights, great tinder (dry grasses, seed fluff), colours, fewer people | Rain, shorter days, falling branches in storms | Wet-weather fire, fatwood, campfire cooking, daylight planning |
| Winter | Tracks in snow, no insects, quiet forests, snow for shelter and water | Hypothermia, frostbite, long nights, heavy sleep systems, fuel needs | Snow shelters, water from snow, axe work, wind chill, sleep system |
Winter bushcraft deserves special respect. Nights of 14–16 hours mean long hours in camp; your sleep system and clothing must handle temperatures well below freezing, and you burn far more firewood and calories. Build up gradually: a cold night in the garden, then a night near the car, before a remote winter trip.
Bushcraft planning tools and calculators
Planning is half the skill. The free interactive tools on this site turn rules of thumb into numbers for your exact trip. They are planning aids, not guarantees — always add a safety margin and use your judgement on the ground.
| Tool | What it answers | Use it with |
|---|---|---|
| Kit Builder | What exactly should I pack, and how much does it weigh? | Kit list |
| Water Needs Calculator | How much water do I need to drink, cook with and carry? | Water containers |
| Boiling Point & Fuel Calculator | At what temperature does water boil here, and how much fuel do I need? | Boiling water |
| Firewood Calculator | How much wood for cooking, warmth or a full night? | Fire lays |
| Fire Lay Picker | Which fire should I build for this purpose and weather? | Fire starting |
| Trail Food & Calorie Planner | How many calories and how much food weight per day? | Recipes |
| Tarp Pitch & Cordage Planner | Which pitch, how much cord and how many stakes? | Tarps |
| Knot Finder | Which knot for this job? | Knots |
| Sleeping Bag & Pad Calculator | Which comfort rating and R-value for tonight? | Sleeping gear |
| Wind Chill Calculator | How cold does it really feel, and is frostbite a risk? | Clothing |
| Hiking Time Calculator | When will I actually arrive with this pack and terrain? | Backpacks |
| Pace Count Calculator | How many paces is that distance on the map? | Navigation |
| Sunset & Daylight Calculator | When is sunset, and when should I start building camp? | Camp setup |
Bushcraft glossary: terms every beginner should know
| Term | Meaning |
|---|---|
| Baton / batoning | Driving a knife through wood with a wooden club to split it — guide |
| Bearing | The direction to a target in degrees from north, taken with a compass — navigation |
| Blood circle | The zone within arm-plus-blade reach that must be clear of people while you cut |
| Bow drill | Friction fire set of bow, spindle, hearth board and bearing block — guide |
| Char cloth | Cotton charred without oxygen; catches sparks from flint and steel — guide |
| Cordage | Any rope or string; in bushcraft often twisted from plant fibres — guide |
| Dead and down | Fallen dead wood — the preferred, usually permitted firewood |
| Debris hut | Small shelter insulated with a thick layer of leaves — guide |
| Fatwood | Resin-saturated pine wood from stumps and branch joints — guide |
| Feather stick | A stick with thin attached curls for easy lighting — guide |
| Ferro rod | Ferrocerium rod that throws hot sparks when scraped — guide |
| Fire lay | The arrangement of tinder, kindling and fuel — guide |
| Kindling | Small sticks from match to thumb thickness between tinder and fuel |
| Lashing | Binding poles together with cord, e.g. square or tripod lashing — knots |
| Leave No Trace | Principles for minimal impact outdoors |
| Pace count | Number of double steps per 100 m, used to measure distance — calculator |
| Ridgeline | Tensioned line between two trees supporting a tarp — tarp setups |
| R-value | Thermal resistance of a sleeping pad; higher is warmer — calculator |
| Scandi grind | Single wide bevel knife grind, easy to sharpen and great for carving — knives |
| Tinder | Fine, dry material that catches a spark or flame — guide |
| Widowmaker | A dead branch or tree that could fall on your camp — site selection |
| Wind chill | How cold air feels on skin due to wind — calculator |
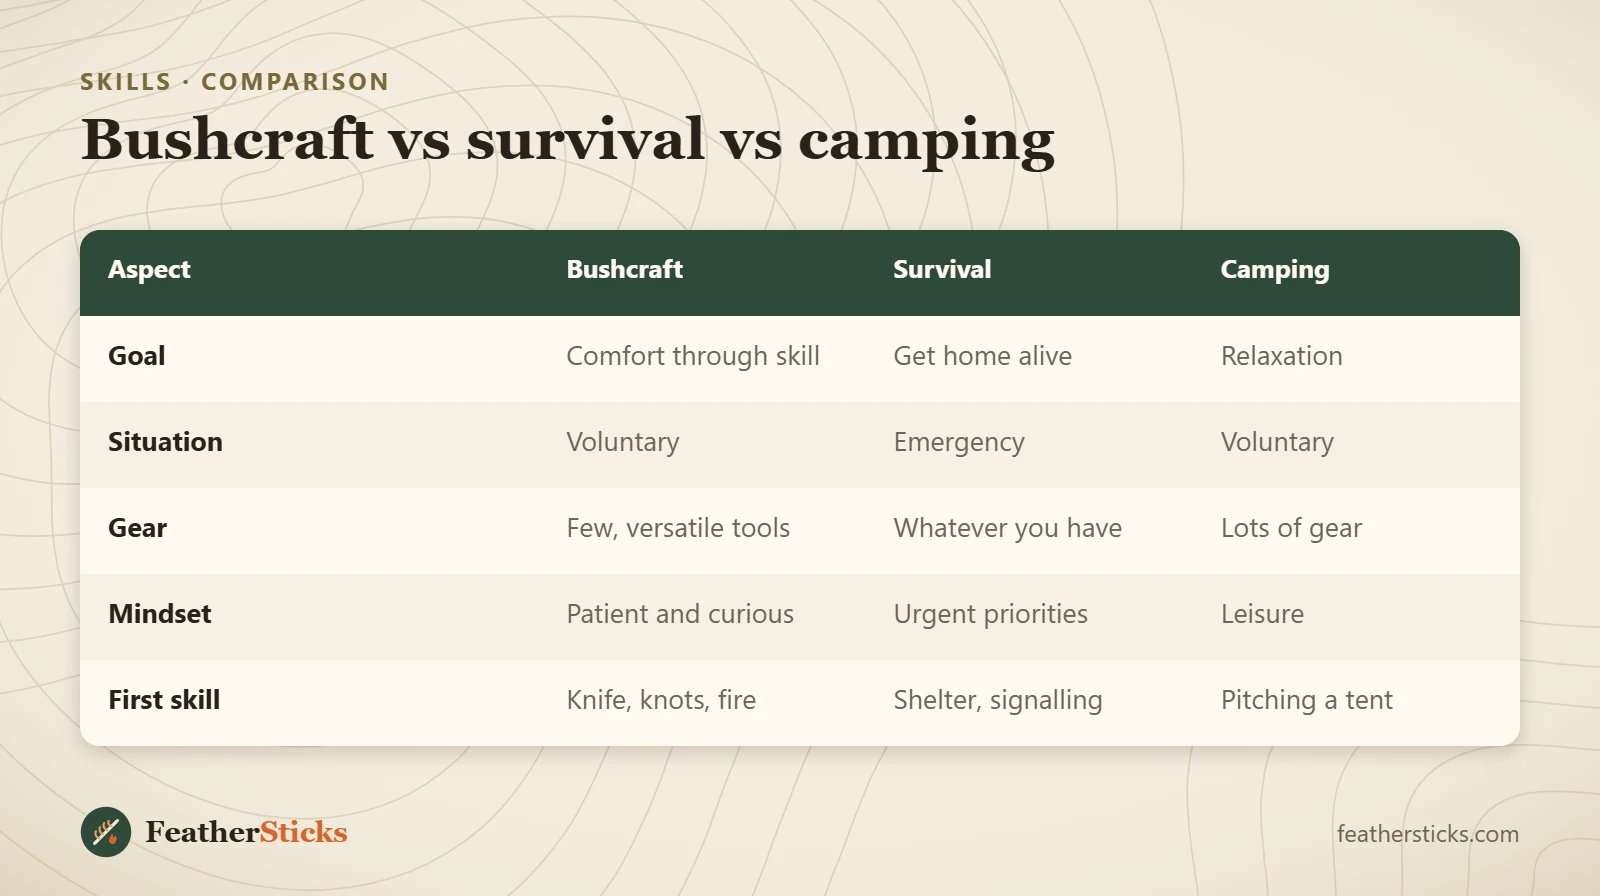
| Aspect | Bushcraft | Survival | Camping |
|---|---|---|---|
| Goal | Comfort through skill | Get home alive | Relaxation |
| Situation | Voluntary | Emergency | Voluntary |
| Gear | Few, versatile tools | Whatever you have | Lots of gear |
| Mindset | Patient and curious | Urgent priorities | Leisure |
| First skill | Knife, knots, fire | Shelter, signalling | Pitching a tent |
Common mistakes
- Buying expensive gear before learning the basic skills — a sharp, simple knife and a tarp beat a gadget-filled kit.
- Lighting the fire first and pitching the shelter in the dark and rain.
- Underestimating the cold: a thin sleeping pad and a summer bag cause more miserable nights than anything else.
- Gathering too little tinder and kindling, then using up the best material on failed attempts.
- Ignoring local rules on fire, wild camping and knife carrying.
- Cutting towards the body or with the free hand in the blade's path.
- Going too far, too early: the first overnights belong close to home, in settled weather.
What you need
- Fixed-blade bushcraft knife (9–11 cm)
- Ferro rod and a lighter
- Tarp (about 3 × 3 m) with cord and stakes
- Sleeping bag and insulated pad
- Metal pot or single-wall bottle
- Water filter or purification tablets
- Folding saw
- First aid kit, headlamp, map and compass