Fire
How to Make a Feather Stick: The Complete Bushcraft Guide
To make a feather stick, split a dry piece of softwood to the thickness of your thumb, then push a sharp knife down one edge at a shallow angle so it lifts thin wood curls that stay attached at the bottom. Twenty to forty fine curls on one stick give a flame or ferro rod spark enough surface to catch, and the stick itself becomes the first kindling.
This guide covers everything that makes the difference between a pile of chips and a stick that lights first time: which wood to choose, how to hold the knife and your body, three curl techniques, fatwood sticks, fixing common problems and carving in steady rain. It is the skill this site is named after, and a core part of bushcraft for beginners and of reliable fire starting in any weather.
Step by step
-
1
Pick dead, dry, straight wood
Choose a dead standing branch or a split log with straight grain and no knots. Softwood such as pine or spruce is easiest.
-
2
Split it to thumb thickness
Baton the piece into a blank about 2–3 cm thick and 25–30 cm long. The split faces give you sharp edges and dry wood.
-
3
Lock your wrist, set the angle
Rest the blade flat on an edge, then tilt it to about 15–25°. Keep the wrist locked and move with the shoulder, not the hand.
-
4
Push long, thin curls
Slide the full edge down the stick with steady pressure and stop before the end so each curl stays attached. Work around the edges.
-
5
Make three sticks and light
Carve 20–40 curls per stick and prepare two or three sticks. Rest them on a dry base and aim your spark into the finest curls.
What is a feather stick and why does it work?
A feather stick (also called a fuzz stick) is a piece of dry wood with a cluster of very thin shavings still attached at the base. It looks a little like a feather or a bottle brush. The idea is old: people have made fuzz sticks as long as they have carried knives, because a feather stick turns ordinary dead wood into tinder and kindling at the same time.
Wood does not burn directly. It first has to be heated until it releases flammable gases, which happens at roughly 250–300 °C. A thick stick soaks up the heat of a match or spark and spreads it into its mass, so it never reaches that temperature. A shaving thinner than paper has almost no mass and a huge surface, so it heats up and ignites in a second or two. As the curls burn, they heat the slightly thicker curls behind them, and then the stick itself. The feather stick is a built-in bridge from spark to fuel.
Its second advantage is moisture. After days of rain every twig on the forest floor is soaked, but the core of a dead, split branch is usually dry. A feather stick lets you bring that dry core to the surface in a form that burns. That is why it is the first answer to the question of how to make fire in wet weather.
How a feather stick carries the flame
- Spark or flameA ferro rod spark (around 3,000 °C) or a match lands in the finest curls.
- Finest curlsPaper-thin curls reach ignition temperature in seconds and flare up.
- Thicker curlsThe flame climbs to the heavier curls near the base.
- The stick itselfThe heated core catches and burns like thumb-thick kindling.
- Kindling and fuelPencil-thin sticks, then thumb and wrist thickness, laid in a fire lay.

What a good feather stick looks like: checkpoints
Before you reach for the ferro rod, hold the stick up and check it against the points below. A stick that passes all of them lights on the first or second strike; a stick that fails two or more is usually quicker to fix now than to nurse later.
Feather stick checkpoints
- Curls are attached at the bottom and form one dense bundle, not a scattered row
- The lowest 3–5 cm are a cluster of the finest, almost see-through curls
- At least 20 curls in dry weather, 30–40 in rain or cold
- Curls roll into loops; flat strips and chips are the exception, not the rule
- The fresh wood is pale and dry to the touch, with no dark wet patches
- The upper third is uncarved: a clean handle and later the first kindling
- No curls have touched wet ground, snow or wet hands
Compare the finished stick with the anatomy drawing above: the shape you want is a bottle brush that is widest near the base and tapers towards the handle. If your curls are spread evenly over the whole length, you have been stopping in different places. Aim for the same stop point on every stroke, and the bundle builds itself.
What is the best wood for feather sticks?
The best wood for feather sticks is dead, dry, straight-grained softwood: pine, spruce, fir, larch or cedar. Softwoods are easy to cut, form long curls and contain resin that helps them burn. Among hardwoods, dry birch, poplar, lime (basswood) and willow also carve well. Oak, beech and ash are possible but demand a razor-sharp edge and more strength, and their curls tend to be short.
Dead standing wood beats wood from the ground
Look for branches that are dead but still attached to the tree, or small dead trees that are still upright. Standing wood sheds rain and dries in the wind; wood lying on the ground wicks up moisture and starts to rot. A good test: a dry branch snaps with a crisp crack. If it bends, it is green or wet. Rotten wood crumbles, will not hold a curl and is not worth carving.
Grain, knots and size
Straight grain gives long curls that run the full length of the stick. Knots stop the blade, make it skip and cause curls to break off. Choose a section of 20–40 cm between knots. If you can only find twisted wood, carve short curls on the straightest part instead of fighting the grain.
| Wood | Carving effort | Curl quality | Wet weather | Notes |
|---|---|---|---|---|
| Pine (dead, dry) | Easy | Long, springy | Good | Resin helps; watch for knots |
| Pine fatwood | Medium–hard | Short, waxy | Excellent | Lights even when damp; scrape dust too |
| Spruce / fir | Easy | Long, fine | Good | Many small knots on branches |
| Cedar / juniper | Very easy | Very fine | Good | Burns fast; gather extra |
| Birch (dry, bark removed) | Medium | Fine, even | Medium | Rots quickly on the ground; bark is great tinder |
| Lime / poplar / willow | Easy | Soft, fluffy | Medium | Burn quickly; good for practice |
| Oak / beech / ash | Hard | Short, brittle | Poor | Only with a very sharp knife |
Always use dead wood. Green wood tears, holds water and smothers the flame.
Collect legally: cutting live trees or branches is prohibited almost everywhere without the landowner's permission. Collect only dead, fallen or dead-standing wood where it is allowed, and check local rules, which vary by country and even by forest. Our guide to campfire safety and Leave No Trace covers the basics.
Preparing the blank: splitting and batoning
A round branch can be feathered, but a split piece is almost always better. Splitting exposes the dry heartwood, removes wet bark and gives you flat faces with crisp 90° edges. Curls start more easily on an edge than on a curved surface, because the blade only needs to catch a tiny ridge of wood.
The easiest way to split a wrist-thick log is batoning: set your knife on the end of the log, strike the spine with a stout stick, and drive the blade through. An axe or hatchet works just as well and saves your knife. Cut the log to length first with a folding saw, because clean ends split more predictably.
Making a feather stick blank
 1Cut a knot-free section
Saw a piece of dead wood 25–35 cm long and 5–8 cm thick between two knots. Clean, square ends split more predictably than broken ones.
 2Split through the pith
Stand the round on a chopping block, set the knife across the centre and baton the spine near the tip. Your knife hand stays on the handle, your free hand stays clear of the blade path.
 3Split into quarters
Split each half again. Quarters have a triangular cross-section with two sharp 90° corners, the ideal starting edges for curls.
 4Check the core
Touch the fresh face to the back of your hand, lip or cheek. Warm and dry means ready; cool and clammy means damp, so split thicker wood or go deeper.
 5Square the blank
Shave off bark and soft, punky wood until you have a clean blank about 2–3 cm thick. Carve down and away, onto the block.
The ideal blank is about forearm length (25–30 cm), roughly thumb thick (2–3 cm), square or triangular in cross-section with sharp edges, dry to the touch on a fresh split and straight-grained with no knots in the carving zone. Longer blanks are awkward to brace; shorter ones bring your holding hand too close to the edge.
Which knife is best for feather sticks?
You can carve a feather stick with almost any sharp knife, but some designs make it much easier. The classic choice is a fixed-blade bushcraft knife with a Scandi grind: the single wide bevel sits flat on the wood and acts as a guide, so you can hold the same shallow angle stroke after stroke. Flat and convex grinds work well too once you have learned to feel the angle.
More important than the grind is sharpness. A dull edge skids over the surface, then suddenly bites and digs in, producing thick chips. A sharp edge slices smoothly and lets you control the curl thickness. If the knife cannot shave the hair on your forearm or slice paper cleanly, it needs sharpening before you start. A blade length of 9–11 cm is a good compromise between control and reach; the first third of the edge near the handle gives the most power.
A sharp, square 90° spine is a bonus: you can use it to scrape fatwood dust and to strike a ferro rod without damaging the edge. Folding knives work for light carving, but the lock can fail under pressure, so a fixed blade is safer for this job.
Grinds in short
- Scandi: easiest curls, the bevel guides the angle, simple to sharpen flat on a stone.
- Flat grind with secondary bevel: good once you have learned the angle by feel.
- Convex: robust and forgiving in hardwood; maintain it on a strop.
- Hollow grind: tends to dig in or skate; the thin edge is delicate.
- Serrated: tears the wood instead of slicing; avoid for feather sticks.
Knife grips and body positions
Most failed feather sticks are a posture problem, not a knife problem. When you carve with the wrist, the blade angle changes during the stroke and the curl either thickens into a chip or runs off the side. The solution is to lock the wrist and elbow and move the knife with the shoulder and upper body, so the angle stays constant from top to bottom.
The forward grip
Hold the handle in a full fist with the edge pointing down and away from you. Your thumb wraps around the fingers, not on the spine. Press your forearm against your thigh or knee if you kneel. This grip gives the most power and is the base for the push technique.
The anchored stick
Place the end of the stick on a solid, flat surface: a chopping log, a flat stone, or a piece of bark on the ground. Hold the top of the stick with your non-knife hand, well above the blade path, and lean the stick slightly away from you at about 45–70°. The curls collect on the base and do not fall into wet leaves.
| Position | How it works | Best for | Safety note |
|---|---|---|---|
| Kneeling, stick on a log | Kneel on one knee, rest stick end on a chopping block, carve down and away | Most situations, long strokes | Blade path must end on the block, not next to your leg |
| Sitting, stick on the ground | Sit with legs to the side, stick braced on bark or a board in front of you | Tired, cold hands, long sessions | Never carve between your legs toward the femoral artery |
| Standing, stick on a stump | Bend at the hips, lock arm straight, push with body weight | Hard or long blanks | Stable footing; clear the area of people |
| Chest lever (knife fixed) | Knife held still against chest/knee area, stick pulled past it | Fine control, tiny curls | Advanced; only with good blade control and sheath nearby |
Check your blood circle: before you carve, stretch out your arm with the knife in its sheath and turn a full circle. Nobody should be inside that radius. Always carve away from your body and keep your holding hand above the edge.

How to make feather stick curls: push, thumb-assisted and pull
There is no single right way to carve curls. Most people start with the push technique and later add the other two for fine work and difficult wood. All three share the same rules: shallow angle, long stroke, steady pressure, and stopping before the curl breaks off.
1. The push technique (the standard)
Set the edge near the handle on the top of an edge of the blank. Lay the blade almost flat, then raise the spine a few degrees until it bites (about 15–25°). Push the knife down the stick by moving the whole upper body forward, not by bending the wrist. The curl forms in front of the edge. About 3–5 cm above the base, stop and lift the knife out. Move a few millimetres to the side and repeat. Work from one edge until it becomes rounded, then rotate the stick to the next edge.
2. The thumb-assisted push
For thin, controlled curls, place the thumb of your holding hand on the spine of the knife and push. Your knife hand only guides the angle while the thumb supplies short, measured pressure. This works best with the stick braced against your chest or knee and short strokes of 5–10 cm, which is ideal for very fine curls on the last centimetres, fatwood, or hardwood. Keep the thumb on the spine, never in front of the edge.
3. The pull technique (knife fixed, stick moves)
Brace your knife hand firmly, for example with the forearm resting on your knee, so that the knife does not move. Then pull the stick upward along the edge with your other hand. Because the knife stays still, the angle is perfectly constant, which gives very even, long curls. Many people find it the easiest way to make ultra-thin curls. Practise slowly: the edge faces toward your leg or body area, so your body position must ensure the stick moves away from anything you care about.
Push technique vs. pull technique
Push (knife moves)
- Powerful, fast, works in hard wood
- Easy to learn; the default for beginners
- Angle drifts if the wrist bends
- Curls tend to be slightly thicker
Pull (stick moves)
- Knife angle stays constant
- Very thin, long curls
- Needs stable bracing and good body position
- Less power; best in softwood
The perfect curl, stroke by stroke
 1Find the edge
Start on a sharp corner of the blank, not on the flat face. The blade only has to catch a tiny ridge of wood there, so the curl starts with almost no force.
 2Blade flat, then tilt
Lay the blade flat on the wood, then raise the spine just until the edge bites, about 15–25°. If it skids, tilt a little more; if it digs in, lower it.
 3Use the whole edge
Start with the edge near the handle and let the blade slide slightly sideways as it travels down. A slicing cut is smoother than a straight scrape.
 4Constant pressure
Keep the same pressure from top to bottom and move from the shoulder. A sudden push or a bending wrist is what snaps curls off.
 5Stop early
End each stroke 3–5 cm above the base and lift the blade out gently. The curl stays attached, and the next ones stack on top of it.
 6Stagger and rotate
Start the next curl a few millimetres to the side. When an edge is rounded off, rotate the stick to a fresh corner.
How thin is thin enough?
Curl thickness decides how you can light the stick. Paper-thin, almost translucent curls catch a ferro rod spark. Curls like a plane shaving light reliably with a match or lighter. Curls of around 1 mm need a steady flame, and thick chips will not ignite from a spark at all. Aim for a mix: a cluster of ultra-fine curls at the bottom, thicker ones above that burn longer.


What your curls tell you
Every curl is feedback. Look at it before you carve the next one and change only one thing at a time:
- Translucent, springy, rolled into a loop: perfect. Keep the angle and pressure exactly as they are.
- Straight, stiff strip that does not roll: slightly too thick. Lower the spine a degree or two.
- Short curl that breaks off halfway: pressure changed during the stroke, or you hit a knot. Lock the wrist and check the grain.
- Dust and tiny flakes: the angle is too flat and the edge is scraping. Raise the spine until it bites.
- Curl wanders off the corner: the blade is not parallel to the edge of the blank. Turn your body, not your wrist, to line it up.
How many curls and how many sticks do you need?
In dry summer weather one feather stick with 20 good curls, lit with a match or lighter, is often enough to start a small cooking fire. The harder the conditions, the more material you need. As a rule of thumb, prepare three sticks in rain or cold, each with 30–40 curls, including a tight cluster of very fine curls at the bottom. Break or shave the finest curls from one stick into a small nest as a spark catcher.
Beyond the curls, the kindling decides success. Before you strike anything, have a double handful of matchstick and pencil-thin sticks, a bundle of thumb-thick sticks and some wrist-thick fuel ready. The firewood calculator shows how much wood a cooking fire or a full evening really needs.
| Conditions | Sticks | Curls per stick | Ignition |
|---|---|---|---|
| Dry summer, calm | 1 | 15–20 | Match, lighter or ferro rod |
| Damp forest, overcast | 2 | 25–30 | Ferro rod into a nest of fine curls |
| Steady rain | 3 | 30–40 + shavings | Ferro rod or lighter, under cover |
| Frost, snow | 2–3 | 30–40 | Ferro rod; warm fingers and dry kindling first |
| Practice with flint and steel | 1 + char cloth | 30+ | Glowing char in curl nest, then blow |
Fatwood feather sticks
Fatwood is pine wood saturated with resin, typically found in old stumps and at the base of dead branches. Its resin is flammable and water-repellent, so fatwood curls light even when they are damp and burn for a long time with a hot, smoky flame. A fatwood feather stick is the most reliable tinder you can make from nature.
Fatwood behaves differently under the knife. It is dense and sticky, so long curls are rare. Expect short, stiff, slightly translucent curls. Use short strokes, a very sharp edge and more pressure. The thumb-assisted push is especially useful here. Add a small pile of fatwood scrapings: scrape the square spine of your knife down the fatwood to produce a fine, dusty powder that catches a ferro rod spark almost instantly.
A wet-weather tinder stack with fatwood (top = last added)
- Laid over the stack as soon as the curls flare up.
- Two sticks leaning over the nest, curls down.
- Short resinous curls that burn several minutes.
- A thumbnail-sized pile of powder as the spark catcher.
- Split sticks or bark keep everything off wet ground.
Tip: clean your blade. Resin builds up on the blade and makes it drag. Wipe it off with a little oil, hand sanitiser or by rubbing with dry ash and a cloth. A dab of fat or oil on the bevel before carving also reduces sticking.
Fixing common feather stick problems
Every beginner goes through the same problems: curls breaking off, chips instead of curls, curls that are too short. Almost all of them have one of four causes: the angle is too steep, the knife is not sharp enough, the wood is wrong, or the wrist moves. The table below lists the symptoms and fixes.
| Problem | Likely cause | Fix |
|---|---|---|
| Curls break off | Sudden extra pressure at the end; angle rising at the end of the stroke | Keep pressure even; stop earlier; lock the wrist |
| Thick chips instead of curls | Angle too steep; dull edge | Lower the spine; sharpen or strop the knife |
| Blade skids and does not bite | Angle too flat; rounded edge on the stick; hard or glazed surface | Raise the spine slightly; carve on a fresh sharp edge |
| Very short curls | Knots, twisted grain or wet wood | Choose straight-grained dry wood; split further |
| Curls run off the side | Blade not parallel to the edge; wrist rotating | Align the edge with the grain; turn with the body |
| Curls are thick at the base only | Stopping abruptly and levering | Lift the blade out gently at the end of the stroke |
| Curls crumble | Rotten or punky wood | Discard; find dead standing wood |
| Curls do not light | Too thick, damp or too few | Carve finer curls; add fatwood or natural tinder |
Quick diagnosis
Does your knife shave arm hair cleanly?
Yes → Good. Look at angle and posture next.No → Sharpen or strop first. No technique beats a dull edge.Does the fresh split feel dry and snap crisply?
Yes → The wood is fine.No → Find dead standing wood and split deeper to the core.Do the curls form but break at the end?
Yes → Stop 3–5 cm earlier and keep pressure even.No → If you get chips, lower the angle and lock your wrist.
How to make feather sticks in the rain
Feather sticks shine in wet weather, but only if you protect the dry wood you create. The outside of a log can be soaked while the core is perfectly usable. Your job is to reach that core, carve it under cover and keep it dry until it catches.
- Work under shelter. Carve under a tarp, a dense spruce canopy or even hunched over your stick with your hat and jacket forming a roof.
- Split thicker wood. Wrist- to calf-thick dead standing wood has a dry heart. Twigs are wet all the way through.
- Carve onto something dry. Let curls fall onto a piece of bark, your pack lid or a split board, never onto wet ground.
- Dry your hands. Wet hands transfer water into the curls. Wipe them on the inside of your jacket or a spare cloth.
- Prepare everything first. Kindling, fuel and the fire lay should be ready before the stick meets a spark.
Build the fire on a platform of split sticks, place the feather sticks with the curls down and toward the wind side, and light them low. Feed only split, dry kindling until the fire has a bed of coals. For more strategies, see our full guide to starting a fire in the rain.
Rainy-day feather stick checklist
- Dead standing softwood, wrist thick or thicker
- Saw and baton or axe to reach the dry core
- Tarp or natural cover to work under
- Dry surface to catch the curls (bark, board, pack lid)
- Fatwood piece or fire extender as backup
- Ferro rod and a lighter in a dry pocket
- Split kindling sorted by thickness before lighting
How to light a feather stick
With a lighter or match, hold the flame under the finest curls: flames climb upward, so fire from below. With a ferro rod, rest the tip of the rod directly in the curls and pull the rod back while holding the striker still. This keeps the stick from being knocked over and puts the sparks exactly where you want them. For spark-based methods like the ferro rod a nest of shavings on the ground in front of the stick doubles your chance of success.
As soon as the curls flame, tilt the stick so the flame runs up along it, or lay it in the centre of your fire lay with the curls down. Then add kindling from thin to thick without smothering the flame. A teepee or a lean-to structure over the burning sticks works well because it lets heat rise into the next layer.
The sequence from stick to cooking fire is always the same: prepare (three sticks, kindling in three sizes, fuel, water to extinguish), place (curls down on a dry platform, sheltered from wind), ignite (spark or flame into the finest curls, from below), feed (matchstick and pencil sticks, then thumb thick) and finally let it burn down to coals for campfire cooking.
From feather stick to cooking fire
 1Prepare
Three finished sticks, kindling sorted into matchstick, pencil and thumb thickness, fuel wood and water to put the fire out, all within reach before the first spark.
 2Place
Lay the sticks curls-down on a dry platform of split sticks, the handle ends raised on a small log. Put the curls on the side the wind comes from, so it pushes the flame into the wood.
 3Ignite
Rest the rod tip in the finest curls and pull the rod back while the striker stays still. Aim low: flames climb upward.
 4Feed
4FeedAs soon as the curls burn, lean matchstick-thin twigs over the flame, then pencil-thin ones. Add the next size only when the last one burns strongly.
 5Burn down to coals
Build up to thumb- and wrist-thick fuel and let it collapse into an even bed of glowing coals: steady heat for a pot or pan.
Troubleshooting at the moment of lighting
- Sparks land but nothing catches: the curls under the rod tip are too thick. Shave a pinch of the finest curls into a small nest right under the tip, or add fatwood scrapings.
- Curls flare and die in seconds: too few curls, or no kindling above them. Lay the first matchstick twigs over the curls before you strike.
- The stick falls over when you strike: you are pushing the striker. Plant the rod tip and pull the rod back instead.
- Lots of white smoke: the kindling is damp. Split it further and shave a few curls on the thicker sticks too.
Feather stick safety: protecting hands, legs and forest
Carving feather sticks involves long, powerful strokes with a sharp blade, which means cuts happen when you get tired or careless. Most injuries hit the hand holding the stick, the thigh and the knee. They are almost always avoidable.
- Carve down and away from your body; the blade path ends on the block, not your leg.
- Keep your holding hand above the blade, never below it.
- Never carve between your legs: the inner thigh has major blood vessels.
- Use a fixed blade or a locking folder; sheath the knife whenever you put it down.
- Take breaks. Cold, tired hands lose grip and control.
- Carry a first aid kit that can deal with deep cuts (pressure bandage).
- Keep children at a distance, and teach them on softwood with close supervision.
Safety also includes the fire itself. Check the fire danger level and local rules, use an existing fire ring or a fire pan and put the fire out completely: drown, stir and feel. Our campfire safety guide explains site choice and extinguishing, and a proper first aid kit belongs in every pack. General knife handling is covered in carving basics.
How to practise and get better quickly
Feather sticks reward practice more than almost any other bushcraft skill. Start with ideal material, then make it harder. Split pine or spruce kindling from a hardware store or firewood bundle is a perfect training material at home, as long as you practise outdoors and safely.
- Week 1: curls on ideal wood. Dry, knot-free softwood. Goal: 20 curls that stay attached.
- Week 2: finer curls. Same wood, but aim for translucent curls. Test each stick with a ferro rod.
- Week 3: forest wood. Dead standing branches that you split yourself.
- Week 4: difficult conditions. Hardwood, fatwood, cold hands, damp weather.
- Challenge: one stick, one strike, one fire. Then do it in rain.
Three ten-minute drills
- The stop-line drill: draw a pencil line 4 cm above the base of a blank and carve 20 curls that all end exactly on the line. It trains the steady stop that builds a dense bundle.
- The one-edge drill: carve only on one corner until it is rounded, counting the curls. Beginners get 5–8; with a locked wrist and thin curls you will get 12 or more from the same edge.
- The spark test: after every stick, strike a ferro rod into the lowest curls. Note how many strikes it takes. When it lights on the first or second strike three times in a row, move on to harder wood.
Treat the feather stick as part of a system. It fits alongside other tinder like birch bark and the right kit: see the bushcraft kit list or plan yours with the Kit Builder. Browse all fire skills to go deeper.
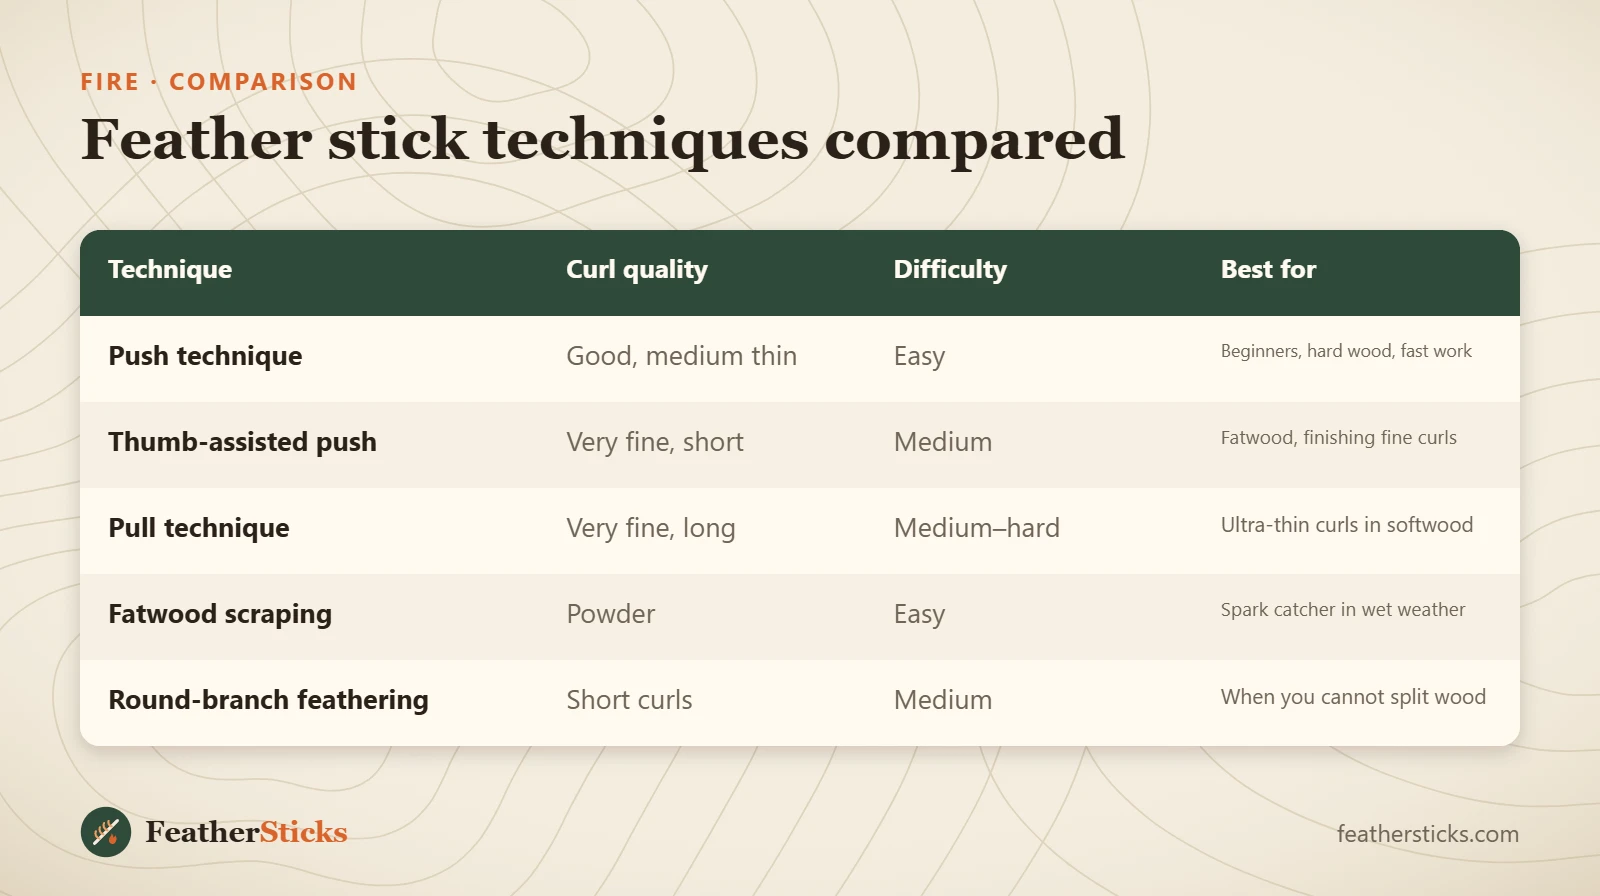
| Technique | Curl quality | Difficulty | Best for |
|---|---|---|---|
| Push technique | Good, medium thin | Easy | Beginners, hard wood, fast work |
| Thumb-assisted push | Very fine, short | Medium | Fatwood, finishing fine curls |
| Pull technique | Very fine, long | Medium–hard | Ultra-thin curls in softwood |
| Fatwood scraping | Powder | Easy | Spark catcher in wet weather |
| Round-branch feathering | Short curls | Medium | When you cannot split wood |
Common mistakes
- Carving green, wet or rotten wood instead of the dry, split core of dead standing wood.
- Holding the blade too steeply, which produces chips instead of curls.
- Carving with the wrist: the angle changes and curls break or run off.
- Cutting the curls off. Keep them attached so they form a bundle on the stick.
- Starting with a dull knife and then pressing harder, which is when cuts happen.
- Preparing too little kindling: the feather stick burns out before the fire is established.
- Letting finished curls touch wet ground or wet hands.
What you need
- Fixed-blade bushcraft knife, ideally Scandi grind, with a 90° spine
- Baton or small axe for splitting blanks
- Folding saw for clean lengths of dead wood
- Ferro rod plus lighter as backup
- A piece of fatwood in a dry bag
- Sharpening stone or strop
- Small tarp to work under in rain