Cooking
Campfire Cooking: Heat Zones, Methods & Fire Setups
Campfire cooking works best when you cook over glowing coals, not tall flames. Burn hardwood for 30–45 minutes, rake the embers into a hot, a medium and a warm zone, and match each dish to the right zone. That single habit fixes most burnt-outside, raw-inside meals.
This guide explains how to cook over a campfire step by step: how to build a cooking fire lay, how to judge heat with the hand test, which wood gives the best coals, and when to use a pot, pan, grill grate, foil packet or hot stone. You will also find cooking times, food hygiene rules and the safety points that matter most. For the wider picture, start at the outdoor cooking hub or the bushcraft basics guide.
Step by step
-
1
Check rules and pick a safe site
Confirm there is no fire ban, then use an existing fire ring or bare mineral soil away from roots, dry grass and overhanging branches.
-
2
Build a hardwood fire
Light a compact log cabin fire and feed it wrist-thick, dry hardwood such as oak, beech or birch. Keep water and a shovel within reach.
-
3
Wait 30–45 minutes for coals
Let the flames die down until the wood turns into glowing embers with a thin layer of grey ash. Boil water on the flames meanwhile.
-
4
Rake the coals into heat zones
Pile coals deep on one side for high heat, spread a thinner layer in the middle and leave one side almost empty as a warm zone.
-
5
Test the heat, then cook
Hold your hand at grate height and count seconds. Sear in the hot zone, finish in the medium zone and use a thermometer for meat.
-
6
Clean up and drown the fire
Wash dishes well away from water, pack out food scraps, then drown, stir and drown the fire until the ashes are cold to the touch.
Why cook over coals instead of flames?
Cook over coals because they give steady, predictable heat. Flames are hot but unstable: they lick up and down with every gust, blacken pots with soot and scorch the outside of food long before the inside is done. A bed of glowing embers radiates heat evenly for 30–60 minutes and more, which is exactly what grilling, frying and simmering need.
Flames still have a job. A lively fire is the fastest way to bring water to a rolling boil, and a hanging pot above a flickering fire is perfect for soups and stews that just need to bubble. The skill of campfire cooking is using both: flames for boiling, coals for everything that needs control.
How do you set up heat zones for cooking over coals?
Set up heat zones by raking coals unevenly: a deep pile on one side, a single layer in the middle and almost nothing on the far side. This is the campfire version of the two-zone fire used on charcoal grills, and it is the single most useful technique in campfire cooking.
The hot zone (coals 8–10 cm deep, packed together) sears meat, fries fast and boils water. The medium zone (one even layer of coals with small gaps) cooks food through without burning it. The warm zone (scattered coals or bare ground beside the bed) keeps finished food warm, rests meat and slowly cooks foil packets or bread.
The simple two-zone fire
If you only want two zones, pile all coals under one half of the grate and leave the other half empty. Sear over the coals, then move the food to the empty side, where it cooks gently from rising heat. Two zones are enough for sausages, burgers, chicken and vegetables.
Keeping the zones alive
Coals fade. Keep a small feeder fire burning at the back or to one side, and every 15–20 minutes rake fresh coals from it into the cooking area. This is exactly what a keyhole fire is designed for (see below). Add new wood only to the feeder fire, never under the food, or you are back to cooking in smoky flames.
Setting up heat zones in four moves
 1Rake the coals to one side
Once the flames have died down, push the coal bed towards one side with a green stick or a small shovel. Break up big glowing chunks so the bed is even.
 2Build the hot zone
Pile the coals 8–10 cm deep and packed together. This is where you sear, fry fast and bring a pot to the boil.
 3Spread the medium zone
Next to the pile, leave one single layer of coals with small gaps. Food that is seared in the hot zone moves here to cook through without burning.
 4Keep a warm zone and a feeder fire
Leave the far side almost bare for resting meat and slow foil packets. Keep a small fire burning to one side and rake fresh coals across every 15–20 minutes.
What a ready coal bed looks like
- Colour: the wood has broken into glowing chunks covered with a thin, even layer of grey-white ash. Black patches mean the wood is still burning off.
- Flames: only short, occasional blue or yellow flickers, no tall yellow flames and no thick smoke.
- Sound: the crackle has turned into a quiet hiss. Crackling and popping mean moisture and resin are still cooking out.
Three heat zones, hottest first
- Coals 8–10 cm deep. Searing, fast frying, boiling. Roughly 200 °C and above at grate height.
- One even layer of coals. Cooking through: chicken, burgers, fish, pancakes. Roughly 150–200 °C.
- Scattered coals or the edge of the bed. Resting meat, keeping warm, slow foil packets. Below about 150 °C.
How hot is the fire? The hand test explained
Without a thermometer, use the hand test: hold your open palm flat at the height where the food will sit, roughly 10–15 cm above the coals, and count how many seconds you can keep it there comfortably. Fewer seconds means more heat. It is an old grilling rule of thumb, not a precise measurement, but it is surprisingly consistent once you have tried it a few times.
Pull your hand away the moment it feels uncomfortable. Remove rings and watches, keep sleeves away from the coals, and never do this over open flames. Results vary with hand sensitivity, wind and how high you hold your palm, so treat the table below as a rough guide and confirm meat doneness with a thermometer.

| Seconds you can hold | Heat level | Approx. temperature | Use it for |
|---|---|---|---|
| 1–2 s | Very hot | about 260 °C+ (500 °F+) | Quick searing, thin steaks, flatbread on a stone |
| 3–4 s | Medium-high | about 200–260 °C (400–500 °F) | Burgers, sausages, frying, bringing a pot to the boil |
| 5–7 s | Medium | about 175–200 °C (350–400 °F) | Chicken pieces, fish, pancakes, vegetables |
| 8–10 s | Low | about 120–175 °C (250–350 °F) | Thick cuts, bannock, simmering, foil packets |
| over 10 s | Warm | below about 120 °C (250 °F) | Resting meat, keeping food warm, drying |
Temperatures are approximate and vary with wind, coal depth and hand sensitivity. Always check meat with a thermometer.
To adjust the heat, you have three levers: move the food (up, down or sideways), change the coal depth (rake coals in or out) or change the airflow (a windbreak calms the fire, a gentle blow on the coals livens it up). Moving food is fastest; raking coals is the most precise.
Practice drill: the first few times, do the hand test and then check the same spot with a probe or oven thermometer laid on the grate for a minute. After two or three comparisons you know what "four seconds" means for your own hand, and you can leave the thermometer for the meat.
Which wood gives the best cooking coals?
Dense, well-seasoned hardwood gives the best cooking coals. Oak, beech, ash, maple, hornbeam and fruit woods such as apple or cherry burn down to thick, long-lasting embers with little smoke. Birch lights more easily and burns hotter and faster; its coals do not last as long, but it is a great all-rounder, and its bark is excellent tinder.
Avoid resinous softwoods like pine, spruce and fir for direct grilling. They burn fast, spit sparks and give off sooty, resin-laden smoke that coats food with a bitter, tarry taste. Softwood is still perfectly good for starting the fire, for a quick boil in a lidded pot, and for making fatwood kindling. Just let it burn off completely before food goes over the coals.
Why dry wood matters so much
Wet or green wood wastes much of its energy boiling off water, smokes heavily and rarely forms a proper coal bed. Look for wood that is grey, cracked at the ends, light for its size and that sounds hollow when two pieces are knocked together. Split larger rounds: dry wood burns from the inside faces first. Use the firewood calculator to estimate how much you need for an evening of cooking and warmth.
Never burn painted, varnished or pressure-treated timber, plywood, chipboard, pallets of unknown origin or rubbish. They can release toxic fumes, and residues end up on your food.
Coal quality for cooking (relative, dry wood)
Which fire setup is best for campfire cooking?
The best cooking fire is small, compact and shaped so you can manage coals. A fire the size of a dinner plate to a small tray (40–60 cm across) is plenty for a pot and a pan; a bonfire just roasts the cook. Start with a log cabin or teepee lay and a reliable fire-starting method, then shape it into one of the setups below. The fire lay picker helps you choose a structure for your conditions.
Keyhole fire
The keyhole fire is the classic cooking setup. Build a round fire ring about 60–90 cm across with a narrow rectangular extension, roughly 30 cm wide and 45–60 cm long, like the outline of an old keyhole. The main fire burns in the round part; you rake coals into the slot, where a grate or pan sits across stones or green logs. You get a constant supply of fresh coals without adding wood under the food.

Trench fire
A trench fire is a narrow pit, about 30 cm wide, 15–20 cm deep and 60–90 cm long, dug in line with the wind so air feeds it from one end. Pots and pans rest across the edges, and the trench shelters the fire from wind and concentrates heat. Only dig where it is permitted, avoid peaty or root-filled ground (fire can creep underground), and refill and restore the ground afterwards.
Tripod
Three poles of 1.5–1.8 m, lashed together near the top, stand over the fire with a chain, cord or wire and hook hanging down. Raise or lower the pot by shortening the hanger. A tripod suits open ground and heavy pots, and it keeps the fire area free for a grate or pan at the same time. Use metal chain or wire for the last 50 cm above the fire; natural cord will burn through.

Crane and pot hanger
The crane, or gallows, is a bushcraft favourite: two forked sticks (Y-sticks) driven into the ground on either side of the fire with a green crossbar resting in the forks. Pots hang from the crossbar on adjustable pot hooks. Cut the crossbar from green, living wood about 3–4 cm thick so it does not burn through, and keep it at least 60 cm above the fire. A sharp bushcraft knife and a small hatchet or folding saw are all you need.
Build a crane with an adjustable pot hook
 1Cut two Y-sticks
Choose sturdy forked sticks about 80–100 cm long and 3–4 cm thick. Sharpen the lower ends so they can be driven into the ground.
 2Drive them in
Set them on opposite sides of the fire, 1–1.2 m apart and at least 30 cm from the flames, forks at the same height. Tap them in with a baton, not the back of a knife.
 3Add the crossbar
Lay a straight, green pole 3–4 cm thick in both forks, at least 60 cm above the fire. Green wood resists burning; check it now and then anyway.
 4Carve a pot hook
Take a branch with a side stub that hooks over the crossbar and cut 2–4 notches down its length, carving away from your body. Each notch is a height setting.
 5Hang and adjust
Hang the hook over the crossbar and the pot bail in a notch. A lower position brings the pot closer to the fire and gives more heat; a higher one gives less.
Stones around the fire: a warning
Stones make good pot supports and windbreaks, but choose them carefully. Stones taken from rivers, streams, lake shores or wet ground can hold water in pores and cracks. When heated, that water turns to steam and can make the stone crack or burst violently, throwing hot fragments. Use dry stones from well above the waterline, avoid layered or crumbly rock, and never sit or lean close to stones that are heating up.

Where a fire ring or grill site already exists, use it rather than building a new one. It limits damage, and in many places it is the only place fires are allowed. The campfire safety and Leave No Trace guide covers site selection in detail.
Campfire cooking methods: which one should you use?
Choose the method by the food and the gear you carry. A hanging pot is unbeatable for liquids, a pan or grate for quick meals, foil for no-dishes cooking, and the embers themselves for potatoes and vegetables. Most camp meals combine two methods, for example boiling water on the flames while vegetables roast in the ashes.
| Method | Heat source | Best for | Gear | Difficulty |
|---|---|---|---|---|
| Hanging pot | Flames or coals | Water, soups, stews, porridge | Pot with bail, tripod or crane | Easy |
| Pan / skillet | Medium coals | Eggs, pancakes, fish, frying | Cast iron or steel pan | Easy |
| Grill grate | Hot and medium coals | Meat, sausages, vegetables, bread | Grate, long tongs, gloves | Easy |
| Foil packets | Medium coals or embers | Vegetables, fish, potatoes, one-pot meals | Heavy-duty foil | Easy |
| Hot stone | Coals under a flat stone | Flatbread, thin meat, eggs | Dry, flat, non-layered stone | Moderate |
| In the embers | Ash and glowing coals | Potatoes, onions, corn, root veg | Tongs, shovel or stick | Easy |
| Plank / spit | Radiant heat beside the fire | Fish fillets, whole birds, joints | Split plank, pegs, spit | Moderate |
Pot hanging
A pot on a crane or tripod is the most versatile way to cook over a campfire. Hang it 10–20 cm above coals for simmering or directly in the flames for a fast boil. Use a lid: it cuts boiling time noticeably and keeps ash out. Pots with a wire bail are easiest; use a stick or gloves to lift them, because the bail gets very hot. The boil time calculator estimates how long water and fuel will take.
Pan and skillet
A pan needs a flat, stable surface: a grate, two parallel green logs or flat stones over medium coals. Cast iron spreads heat evenly and tolerates high temperatures; thin aluminium creates hot spots and can warp. Keep the handle away from the hottest coals or wrap it with a damp cloth. More on materials in the bushcraft cookware guide.
Grill grate
A grate turns any fire into a barbecue. Set it 10–15 cm above the coals, let it heat for five minutes, then scrape it clean and oil it lightly so food does not stick. Sear in the hot zone, then move thicker items to the medium zone to cook through. Fat dripping on coals causes flare-ups; move food away rather than spraying water.
Foil packets
Wrap chopped vegetables, fish or thinly sliced meat with a little oil and seasoning in two layers of heavy-duty foil, shiny side in, sealed with a double fold. Leave some air space so steam can circulate. Place packets on medium coals or at the edge of the ember bed and turn them once. Foil must always be packed out; it does not burn away.
Foil packets step by step
 1Two layers, shiny side in
Lay two sheets of heavy-duty foil on top of each other and put the food in the middle with a little oil and seasoning. Cut everything to a similar size so it cooks evenly.
 2Seal with a double fold
Bring the long edges together and fold them over twice, then fold the ends the same way. Leave some air above the food so steam can circulate.
 3Onto medium coals
Place the packet on medium coals or at the edge of the ember bed. Turn it once halfway through; most vegetable packets need 15–25 minutes.
 4Open carefully and check
Lift it off with tongs and open one corner away from your face – the steam scalds. Vegetables are done when a knife slides in easily; fish flakes and meat reaches its safe core temperature.
Hot stones
A flat, dry stone about 2–4 cm thick, propped over coals or with coals raked around it, becomes a griddle after 30–45 minutes. Test with a drop of water: it should sizzle and skitter. Slate-like or layered stones can split, and river stones can burst, so pick carefully and heat slowly. Thin flatbread, eggs and thin meat work best.
In the ashes and embers
Whole potatoes, onions, beetroot and corn in their husks can go straight into the ember bed. Bury them in a mix of warm ash and a few coals, not in the hottest glowing core, and turn them every 10–15 minutes. Wrapping in foil keeps them clean; unwrapped, the charred skin is simply peeled off.
Plank and spit cooking
Planking uses radiant heat from the side: fish fillets are pegged to a split, water-soaked plank of non-resinous hardwood and propped facing the coals. For whole birds or larger joints, a rotating spit is the classic solution, covered in detail in the spit cooking guide. For baking, stews and bread, a Dutch oven with coals on the lid works like a real oven.
How long does campfire cooking take?
Plan on about an hour from lighting the fire to eating a simple meal. Coals take 30–45 minutes to form from a good hardwood fire, and most campfire dishes need 10–40 minutes of cooking. Boil water on the young fire while you wait, so the time is not wasted.
From match to meal: a typical timeline
- 0–10 minLight tinder and kindling, build up a small log cabin with hardwood.
- 10–30 minBoil water in a hanging pot over the flames; prepare food on a clean board.
- 30–45 minFlames settle into glowing coals with grey ash. Rake into heat zones.
- 45–90 minCook in the right zone, feed the side fire and rake in fresh coals every 15–20 min.
- After the mealWash up, pack out scraps, drown and stir the fire until it is cold.
| Food | Zone / method | Approx. time | Done when |
|---|---|---|---|
| 1 L water | Hanging pot, flames | 8–15 min | Rolling boil (boiling water guide) |
| Sausages | Medium coals, grate | 10–15 min, turning | No pink inside, juices run clear |
| Burger, 2 cm | Hot then medium | 8–12 min | Core 71 °C (160 °F) |
| Chicken thighs, bone-in | Sear, then medium | 25–40 min | Core 74 °C (165 °F) |
| Fish fillet | Pan, plank or foil | 10–20 min | Flakes easily, 63 °C (145 °F) |
| Potatoes, whole | In the embers | 45–60 min | A knife slides in without resistance |
| Vegetable foil packet | Medium coals | 15–25 min | Tender when pierced |
| Bannock on a stick | Low heat, beside coals | 10–15 min | Sounds hollow, no raw dough inside |
Times are rough estimates; coal heat, wind, altitude and food thickness change them a lot. Use a food thermometer for meat and poultry.
How do you keep campfire food safe and hygienic?
Food poisoning ruins more trips than bad weather. Outdoors you have no fridge, no hot tap and dirty hands from wood and ash, so the basic rules matter even more than at home. Wash hands, keep raw meat separate, keep perishables cold, cook meat to a safe core temperature and clean up properly.
Hand washing without a sink
Health agencies such as the CDC recommend washing hands with soap and water for at least 20 seconds. At camp, hang a water bottle or a small bag with a tap from a branch, or have someone pour for you. Hand sanitiser helps but works poorly on hands greasy with soot, soil or resin, so wash first whenever you can.
Raw meat and cross-contamination
Use one board and one knife for raw meat and a separate set, or a thoroughly washed one, for everything else. Never put cooked food back on the plate that held raw meat, and use separate tongs for raw and cooked items. Marinades that touched raw meat must be boiled before they are used as a sauce.
Safe core temperatures
USDA/FSIS guidance gives these minimum internal temperatures: poultry 74 °C (165 °F), minced meat 71 °C (160 °F), and whole cuts of beef, pork and lamb as well as fish 63 °C (145 °F), with a three-minute rest for meat. A small probe thermometer weighs only a few grams and removes the guesswork, especially with thick pieces over uneven coals.
Keeping food cold
Bacteria multiply fastest between roughly 4 °C and 60 °C (40–140 °F). Keep raw meat in a cool box at 4 °C or below, and do not leave perishables out for more than two hours, or one hour when air temperature is above about 32 °C (90 °F). On multi-day trips, bring dry, shelf-stable food and plan fresh items for the first day; see storing food at camp for keeping food cool and away from animals.
Campfire kitchen hygiene checklist
- Wash hands with soap for 20 seconds before cooking and after handling raw meat
- Separate board, knife and tongs for raw meat
- Raw meat stays in the cool box until it goes on the grate
- Check core temperature of meat and poultry with a thermometer
- Eat hot food hot, and cool leftovers quickly or throw them away
- Use treated or boiled water for washing up and rinsing produce
- Wash dishes at least 70 m (200 ft) from lakes and streams
- Strain food scraps from dishwater and pack them out
Washing up the Leave No Trace way
Carry dishwater at least 70 m (about 200 ft) away from lakes, rivers and streams, which is the common Leave No Trace guideline. Scrape and wipe pots first, use hot water and only a drop of biodegradable soap, strain out food particles and pack them out, then scatter the greywater widely. Even biodegradable soap harms aquatic life if it goes directly into water. Burning food scraps in the fire rarely burns them completely and attracts animals.
Campfire cooking safety: bans, burns, children and carbon monoxide
Safety at a cooking fire comes down to four things: only light fires where and when they are allowed, protect yourself from burns, keep children at a safe distance and never bring fire or coals into an enclosed space.
Fire bans and local rules
Rules vary a lot by country and region. In the UK, open fires usually need the landowner's permission. In the US and Canada, land managers announce fire restrictions and burn bans that can prohibit wood fires entirely during dry periods, sometimes allowing only gas stoves. Scandinavian countries have generous access rights, but fire bans in dry summers are common and strictly enforced. Always check current fire danger, park rules and signs before lighting anything. When fires are banned, cook on a stove or eat cold food. It is that simple.
Burns and scalds
Most campfire injuries are burns from hot pot handles, spilled boiling water or sparks. Wear leather gloves, use long tongs, and lift pots with a stick through the bail. Natural fibres such as wool and cotton are safer near a fire than synthetic fleece, which melts onto skin. Cool any burn under cool running water for 20 minutes, as first aid bodies such as the NHS and Red Cross advise, and keep a first aid kit with burn dressings at hand.
Children at the fire
Mark a clear no-play zone of at least a metre around the fire and cooking area, and agree on a rule that children walk, never run, near it. Let older children help with supervised tasks such as stick bread or foil packets, which teaches respect for fire far better than a ban. Hot coals stay dangerous for hours after the flames are gone.
Putting the fire out
Stop adding wood 45–60 minutes before you want to leave, so the fire can burn down to ash. Then drown it with plenty of water, stir the ashes and coals with a stick, and drown it again. Hold the back of your hand close to the ashes: if you feel any heat, repeat. Where water is scarce, mix in mineral soil or sand and stir, but water is far more reliable. Never bury a fire with coals still glowing; it can smoulder and spread underground.
Troubleshooting: wind, rain, winter and common problems
Cooking in wind
Wind makes coals flare, scatters sparks and steals heat from pots. Build a windbreak of logs or stones on the windward side, use a trench or keyhole fire, and turn the fire so the pot sits on the sheltered side. In strong, gusty wind, especially in dry conditions, do not light a fire at all.
Cooking in rain
Rain kills coals from the top. Rig a tarp high above the cooking area, at least 2 m above the fire and never directly over tall flames, and shelter the wood pile. Split wood to reach the dry core and bring extra kindling. The wet weather fire guide explains how to get a fire going when everything is damp.
Cooking in winter
In snow, build the fire on a platform of green logs so it does not sink and drown itself. Everything takes longer: water starts near 0 °C, pots lose heat quickly, and you burn more wood. Plan warm, calorie-dense meals and check your energy needs with the food and calorie planner.
Common problems and fixes
- Food burns outside, raw inside: heat is too high. Move to the medium zone, spread the coals thinner or raise the grate.
- Coals die before the food is done: not enough hardwood or too little time. Keep a feeder fire and rake in fresh coals.
- Everything tastes of smoke: you are cooking over flames or softwood. Wait for coals and switch to hardwood.
- Pot will not boil: add a lid, shield the wind, and put the pot into the flames rather than above them.
- Food sticks to the grate: heat, scrape and oil the grate first, and let meat release naturally before turning.
What should you cook first? Planning simple campfire meals
Start with forgiving dishes: one-pot stews, sausages, foil-packet vegetables, pancakes and stick bread. They teach heat control without much risk. Move on to thick cuts, whole fish, planked salmon or baking only once you can read the coals reliably.
Plan meals by cooking method, not just by ingredients. One hanging pot for water and soup plus one pan or grate covers almost everything. Chop and portion food at home to reduce packaging, cutting and cross-contamination at camp. Our bushcraft recipes collection has tested ideas for one-pot meals and grilling, and the bannock and campfire bread guide shows how to bake with nothing but flour, water and a stick.
How much food and fuel to bring
Active days outdoors can need considerably more energy than office days. The calorie planner estimates your daily needs and the food weight to carry. For fuel, count on burning several armfuls of hardwood for an evening of cooking; the firewood calculator gives a better estimate for your plans.
The minimal campfire kitchen
A good fire kitchen kit is small: a pot with a bail and lid, a small pan or grate, leather gloves, long tongs, a knife, a spoon, a small board, foil and a water container. See the bushcraft kit list for the complete setup and camp setup for placing the kitchen, sleeping area and fire safely in relation to each other.
Which method fits your meal?
Is the food mostly liquid (water, soup, stew, porridge)?
Yes → Hang a pot from a crane or tripod over flames or coals.No → Go to the next question.Is it quick-cooking meat, fish or vegetables in pieces?
Yes → Use a grate or pan over hot and medium coals.No → Go to the next question.Do you want no dishes at all?
Yes → Use foil packets on medium coals, or cook potatoes and veg in the embers.No → Go to the next question.Is it bread, a bake or a whole joint?
Yes → Use a Dutch oven, a stick for bannock or a spit.No → A hot stone or plank is a fun alternative for flatbread and fish.
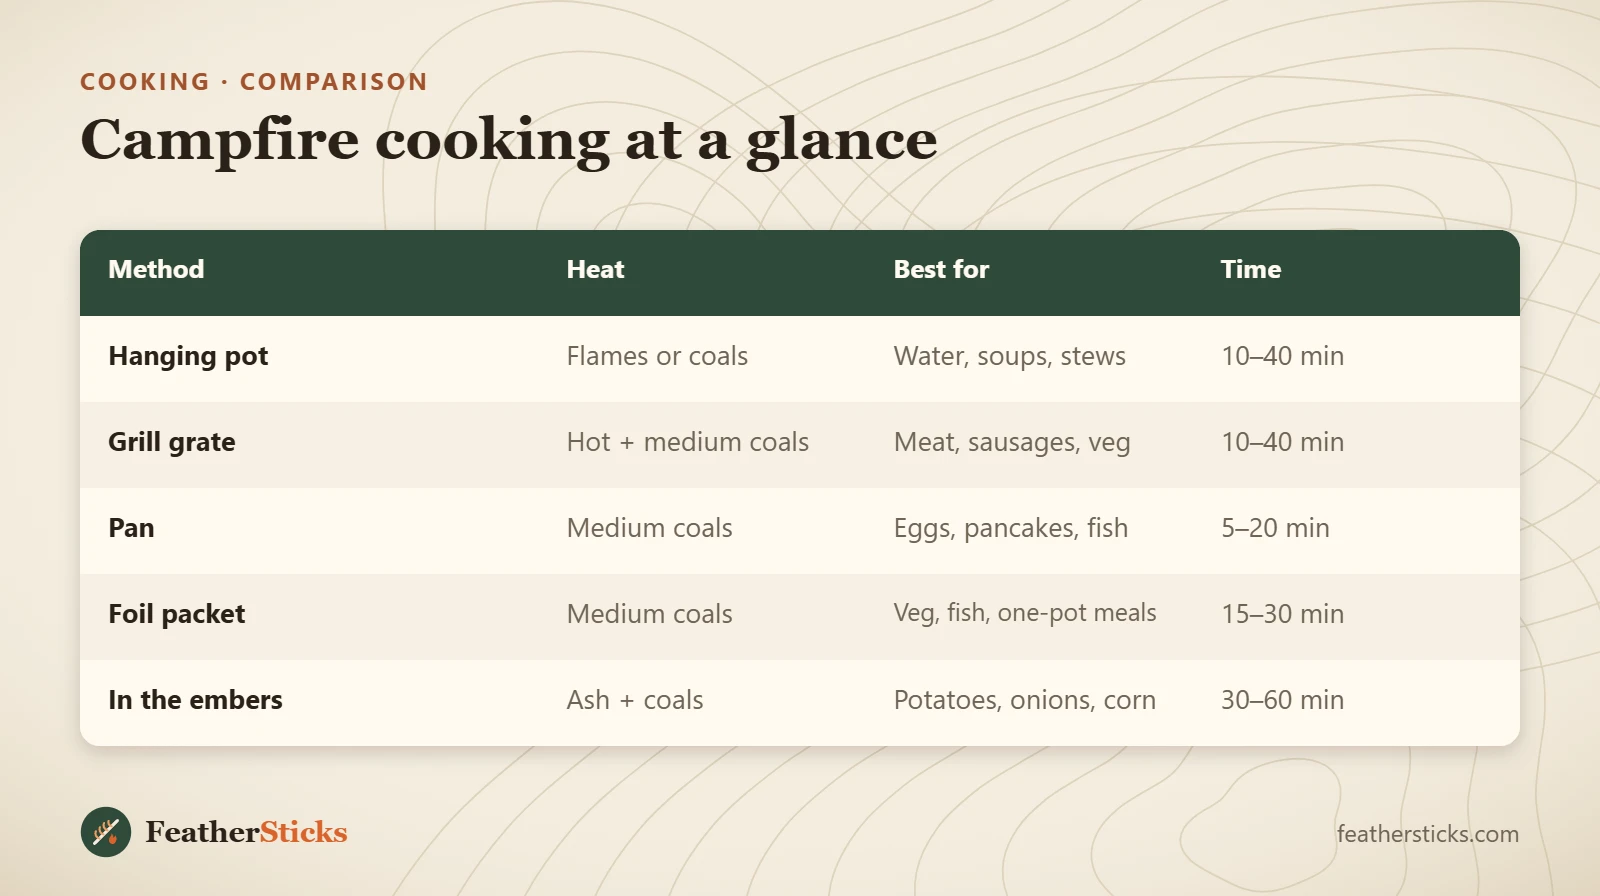
| Method | Heat | Best for | Time |
|---|---|---|---|
| Hanging pot | Flames or coals | Water, soups, stews | 10–40 min |
| Grill grate | Hot + medium coals | Meat, sausages, veg | 10–40 min |
| Pan | Medium coals | Eggs, pancakes, fish | 5–20 min |
| Foil packet | Medium coals | Veg, fish, one-pot meals | 15–30 min |
| In the embers | Ash + coals | Potatoes, onions, corn | 30–60 min |
Common mistakes
- Cooking over tall flames instead of waiting 30–45 minutes for coals.
- Building one big, even fire with no cooler zone to move food to.
- Grilling over pine or spruce, which coats food with soot and resin.
- Using wet river stones around the fire, which can crack or burst when heated.
- Mixing raw and cooked meat on the same board, plate or tongs.
- Guessing doneness of chicken and minced meat instead of using a thermometer.
- Leaving the site with warm ashes instead of drowning, stirring and drowning again.
What you need
- Pot with wire bail and lid
- Small cast iron or steel pan, or a folding grill grate
- Leather fire gloves
- Long tongs and a sturdy spoon
- Probe thermometer for meat
- Heavy-duty aluminium foil
- Water container for washing up and extinguishing
- Small cutting board and knife