Cooking
Food Storage Camping: Keep Food Safe, Cool and Away from Animals
Good food storage while camping comes down to three jobs: keep perishable food out of the bacterial "danger zone", keep animals from getting a free meal, and leave nothing behind. The fastest win is choosing food that does not need cooling, repacking it at home and storing it away from your shelter at night.
This guide covers cooling without a fridge, packaging, bear hangs and canisters, smaller camp raiders and waste. It fits into the wider bushcraft cooking hub and pairs with campfire cooking and our trail-friendly recipes. Plan quantities first with the trail food calorie planner so you carry exactly what you eat.
Step by step
-
1
Choose food that keeps
Build meals around dry, cured and shelf-stable foods. Limit fresh meat, fish and dairy to the first evening.
-
2
Repack at home
Remove cardboard and excess packaging, portion meals into labelled zip bags per day and put everything into one odour-resistant bag.
-
3
Keep perishables cold
Freeze the first dinner as an ice block, carry it in an insulated pouch and eat it within about 24 hours.
-
4
Store food away from camp
At night hang the food bag or use a canister or locker, well away from your sleeping spot. Never keep food in the tent.
-
5
Pack out every scrap
Collect leftovers, packaging and foil in a dedicated trash bag. Do not bury or burn food waste.
Why food storage while camping matters
Food outdoors faces two threats. The first is invisible: bacteria multiply fastest between roughly 5 °C and 60 °C (40–140 °F), the range food-safety agencies such as the USDA call the danger zone. A summer day in a rucksack sits right in the middle of it. The second threat is visible and hungry: rodents, birds, foxes, raccoons and, in parts of North America, bears.
Poor storage costs you more than a lost dinner. Food poisoning in the backcountry means dehydration far from help, and wildlife that learns to associate people with food becomes bolder, gets into conflict with campers and in the case of bears is often destroyed by wildlife managers. Good storage protects you, the next camper and the animal.

Food safety at a glance
- Danger zone
- approx. 5–60 °C / 40–140 °F
- Perishables out of the cold
- max. 2 h (1 h above 32 °C / 90 °F), USDA guidance
- Fridge target at home
- ≤ 4 °C / 40 °F (≤ 7 °C often cited in Europe)
- Hot food
- keep above 60 °C or eat promptly
- Leftovers outdoors
- eat now or discard, do not keep overnight
Which foods keep without a fridge?
The easiest way to solve cooling is to not need it. Dry, cured, fatty and low-moisture foods resist bacteria because microbes need water to grow. Build your menu around them and treat fresh ingredients as a first-day luxury. Our bushcraft recipes are written with this in mind.
The times below are rough guides for moderate temperatures (10–25 °C) in a shaded pack. Heat, humidity and opened packaging shorten them. When in doubt, throw it out.
| Food | Keeps roughly | Notes |
|---|---|---|
| Oats, pasta, rice, couscous | Weeks to months | Keep dry; ideal base for one-pot meals |
| Nuts, trail mix, dried fruit | Weeks | High calorie density; oils can go rancid in heat |
| Hard cheese (aged, waxed) | 3–7 days | Wrap in paper or cloth, keep shaded; sweats but stays safe |
| Dry-cured salami, jerky | 1–2 weeks | Whole sticks keep better than sliced |
| Tortillas, flatbread, crispbread | 5–10 days | Flatter and sturdier than a loaf |
| Eggs (unwashed, EU style) | Several days if cool | Washed US eggs should stay chilled; protect from breaking |
| Butter, ghee, oil | Butter days, ghee/oil weeks | Carry in leak-proof bottles or tubs |
| Fresh meat, fish, poultry | Hours; ~24 h only if frozen and insulated | First-evening only, cook thoroughly |
| Soft cheese, milk, mayonnaise | Hours | Avoid in warm weather; use powder instead |
Plan quantities with the calorie planner: shelf-stable foods also give the best kcal per gram.
How to keep food cold while camping without a fridge
If you do bring fresh food, the goal is simple: start cold, stay insulated, eat early. Every trick below slows warming; none of them turns a forest into a refrigerator. A cool box is worth it at a car camp, but on foot you rely on these low-tech methods.
Freeze it at home
Freeze the first night's meat, a marinated stew or a water bottle solid before you leave. Wrapped in a jacket or an insulated pouch in the centre of your pack, a frozen block can stay cold for most of a day in mild weather. It doubles as an ice pack for cheese and butter, and a frozen water bottle becomes drinking water later.
Use evaporative cooling
Water absorbs heat when it evaporates. Wrap a pot or a cotton bag with a wet cloth, place it in shade and breeze, and keep the cloth damp. The effect is strongest in dry, windy weather and weak in humid conditions. A clay or unglazed container works on the same principle.
Cool water and cool ground
A stream or lake is often 8–15 °C even in summer. Put food into a fully sealed bag, then into a second bag, and weigh or tie it in shaded, flowing water. Secure it so it cannot drift away and never let food packaging touch drinking water intakes. Alternatively, dig a small hole on the north side of a rock or tree: soil 30 cm down stays noticeably cooler than air. Refill the hole when you leave.
Keeping fresh food cold, step by step
 1Freeze it solid at home
Freeze the first dinner flat in its bag, plus a full water bottle. Flat packs thaw more slowly in the pack and double as ice packs.
 2Pack it in the middle
Put the frozen food in an insulated pouch in the centre of the pack, with clothing all around it. Never strap it to the outside in the sun.
 3Use a cold stream
At camp, seal the food in two bags and tie it into shaded, flowing water. Streams are often 8–15 °C even in summer; secure the bag so it cannot drift.
 4Or a wet cloth in the breeze
Wrap a lidded pot in a damp cloth and place it in shade and wind. Keep the cloth wet – it only cools while water evaporates.
Checkpoint: when the frozen block has turned soft all the way through and feels cool rather than cold, the clock is running – cook that food at the next meal.
Cooling methods: how much they help (relative)
Packaging: how to pack food for camping
Good packaging reduces weight, rubbish and smell. Do the work at home, where you have a bin and a kitchen scale. The result is a food bag you can count at a glance: if you have four day-bags left, you have four days of food.
Repack your food at home
 1Strip packaging
Remove cardboard boxes and outer wrappers; cut out the cooking instructions and put them in the bag with the food.
 2Portion per meal
Weigh breakfast, lunch, dinner and snacks per person into zip bags. Mix dry ingredients like bannock premix in advance (see bannock and twist bread).
 3Label and group
Write day, meal and the water needed on each bag with a permanent marker, then group the bags by day.
 4Double-bag liquids
Oil, honey and sauces go into leak-proof bottles, and each bottle goes inside a zip bag. One leak otherwise soaks everything.
 5Use one food sack
All food, trash and scented items go into one odour-resistant liner inside a dry bag or a canister, so there is only one thing to store at night.
Scented items that belong in the food bag
- All food, snacks and drinks other than water
- Cooking pot and utensils if not washed perfectly clean
- Trash bag with packaging and leftovers
- Toothpaste, sunscreen, lip balm, insect repellent
- Wet wipes and soap
- Empty food wrappers from your pockets
Bear country: bear hangs, canisters and lockers
In large parts of North America, black bears and grizzlies are the main reason for strict food rules. Many parks and forests require an approved bear-resistant canister or the use of provided food lockers, and some no longer accept hanging at all. Always check the current regulations of the managing agency before your trip; they override any general advice.
The bear triangle
Separate sleeping, cooking and food storage. Pitch your tent, then cook and store food roughly 60 m (200 ft) downwind of it, with cooking area and storage spot also apart from each other. Change out of clothes that smell strongly of cooking before you sleep. Good camp site selection makes this layout easy.

How to hang a bear bag
Where hanging is allowed, a common guideline is to get the bag about 4–5 m (12–15 ft) above the ground, around 2–3 m (6–10 ft) from the trunk and well below the branch, so neither a climbing bear nor a cub on the branch can reach it. Two methods are widespread: the counterbalance method with two bags over one branch, and the PCT method, which uses a small stick clipped into the line to lock the bag in place. You need about 15 m of cord and a reliable knot; see essential knots or the knot finder.

PCT-style bear hang
- Find a branchLive, 5+ m high, thick enough to hold the bag, clear of the trunk.
- Throw the lineTie a rock bag to the cord and throw it over the branch.
- Clip and hoistClip the food bag to the line and pull it up to the branch.
- Lock with a stickClip a small stick into the line as high as you reach, then let the bag drop until the stick jams at the carabiner.
| Method | Protection | Weight | Best for |
|---|---|---|---|
| Bear-resistant canister | High, also vs rodents | 0.8–1.3 kg | Mandatory bear areas, treeless terrain |
| Food locker / bear box | High | None | Established campsites |
| Bear hang (PCT/counterbalance) | Medium, depends on skill and tree | ~150 g cord + bag | Forests where hanging is allowed |
| Hard-sided rodent-proof box | Good vs small animals | 0.3–1 kg | Europe, UK, fixed camps |
| Hung dry bag | Good vs mice, foxes, boars | ~100 g | Most European woods |
Mice, foxes, birds and other camp raiders
Outside bear country, the thieves are smaller but just as persistent. In the UK, Scandinavia and much of Europe you are more likely to lose food to mice, foxes, badgers, crows, ravens, gulls, jays, wild boar or, increasingly, raccoons. Ants and wasps join in during warm months.
- Mice and voles chew through fabric and zip bags in minutes. A hanging bag or a hard container stops them.
- Foxes and badgers dig and drag bags away. Do not leave food at ground level or in an unzipped vestibule.
- Corvids and gulls open bags in daylight while you gather firewood. Keep food packed whenever you leave camp.
- Wild boar are strong and not shy near food; hang food and keep leftovers packed.
- Ants and wasps go for sugar and meat. Seal sweet foods and clean spills right away.
A simple dry bag hung 1.5–2 m high on a thin branch, away from the trunk, solves most European cases. A small hanging line is quick to rig with the cord already in your bushcraft kit list.
Hanging a food bag against mice and foxes
 1Find a branch
A live branch about 2–3 m up and at least 1 m out from the trunk, strong enough for the bag but too thin for a climbing animal.
 2Throw the line
Put a stone in a small stuff sack, tie it to the cord and throw it over the branch. Throw underarm and step back from where it lands.
 3Clip and hoist
Clip the food bag to the line with a carabiner or a slip knot and pull it up until it hangs 1.5–2 m above the ground.
 4Tie off the free end
Tie the free end to another tree or a branch, out of reach of animals. Check in the morning: an untouched bag and an intact line mean the setup works.

Evening routine before you sleep
- All bags, snacks and rubbish into the food sack – including wrappers from jacket and trouser pockets
- Toothpaste, sunscreen and soap go in too
- Pot scraped and rinsed, kitchen area checked for crumbs
- Food sack hung or in its container, well away from the tent
- Nothing edible in the tent, vestibule or the pack at your sleeping spot
Which storage do I need tonight?
Are bears present or does the area require canisters?
Yes → Use a canister or food locker, or a hang only where permitted.No → Go to the next question.Is there a suitable tree or branch?
Yes → Hang a dry bag 1.5–2 m high, away from the trunk.No → Use a hard, sealed container placed away from the tent.Are you leaving camp during the day?
Yes → Pack all food away first, birds and foxes raid in daylight.No → Keep food packed except when cooking.
Hygiene in the camp kitchen
Storage and hygiene go together. Wash or sanitise hands before handling food, especially after toilet trips and gathering firewood. Keep raw meat separate from ready-to-eat food, use a separate board or the lid of the pot, and cook meat through as described in spit cooking and Dutch oven cooking.
Cook only what you will eat. Leftovers cool slowly into the danger zone overnight and they smell. If something is left, eat it at the next meal only if it stayed cold, otherwise pack it out. A pot that has been scraped clean and rinsed smells far less than one with burnt porridge; see bushcraft cookware for cleaning tips.
Is it still safe to eat? Checks before cooking
| Check | Still fine | Throw it out |
|---|---|---|
| Fresh meat or fish | Still cold to the touch, no smell | Warm for more than 2 hours, sour or off smell, slimy surface |
| Packs and tins | Flat, sealed, intact | Bulging, leaking or hissing when opened |
| Hard cheese, cured sausage | Sweaty but firm, normal smell | Soft, sticky, fuzzy mould spreading through |
| Leftovers | Eaten at the same meal | Kept overnight without cooling |
| Dry goods | Dry, free-flowing | Damp, clumped, chewed bags or droppings |
Smell and look can miss dangerous bacteria. If food spent too long in the danger zone, discard it even if it seems fine.
Waste and Leave No Trace
"Pack it in, pack it out" applies to every crumb. Food scraps are not natural in the forest: they change animal behaviour, attract wasps and rodents to future campers, and orange peel or nutshells can take months or years to break down.
- Do not burn packaging. Plastic and aluminium foil do not burn cleanly, release toxic fumes and leave residue in the fire pit. See campfire safety and Leave No Trace.
- Do not bury food waste. Animals dig it up within a night.
- Strain greywater. Pour dishwater through a small sieve or cloth, pack out the solids and scatter the water widely at least 60 m (200 ft) from lakes and streams.
- Use soap sparingly. Even biodegradable soap should never go directly into water.
- Check before you leave. Walk the site and pick up every twist tie and crumb.
Food storage by season and trip length
In summer, heat is the enemy: go almost entirely shelf-stable, pack chocolate and butter in the middle of the pack, and eat fresh food on day one. In spring and autumn, nights are cool enough to keep cheese and cured meat for several days and a frozen dinner lasts well. In winter, cold keeps food safe but freezes it: carry tomorrow's lunch in an inner pocket, and keep oil and water from freezing solid. Animals are hungrier in late autumn and early spring, so storage discipline matters most then.
For a single overnight trip you can carry almost anything. From three days onwards, weight and spoilage dominate, which is why calorie density matters. The food planner estimates grams per day for fresh, standard and ultralight styles, and the Kit Builder adds the right containers to your list.
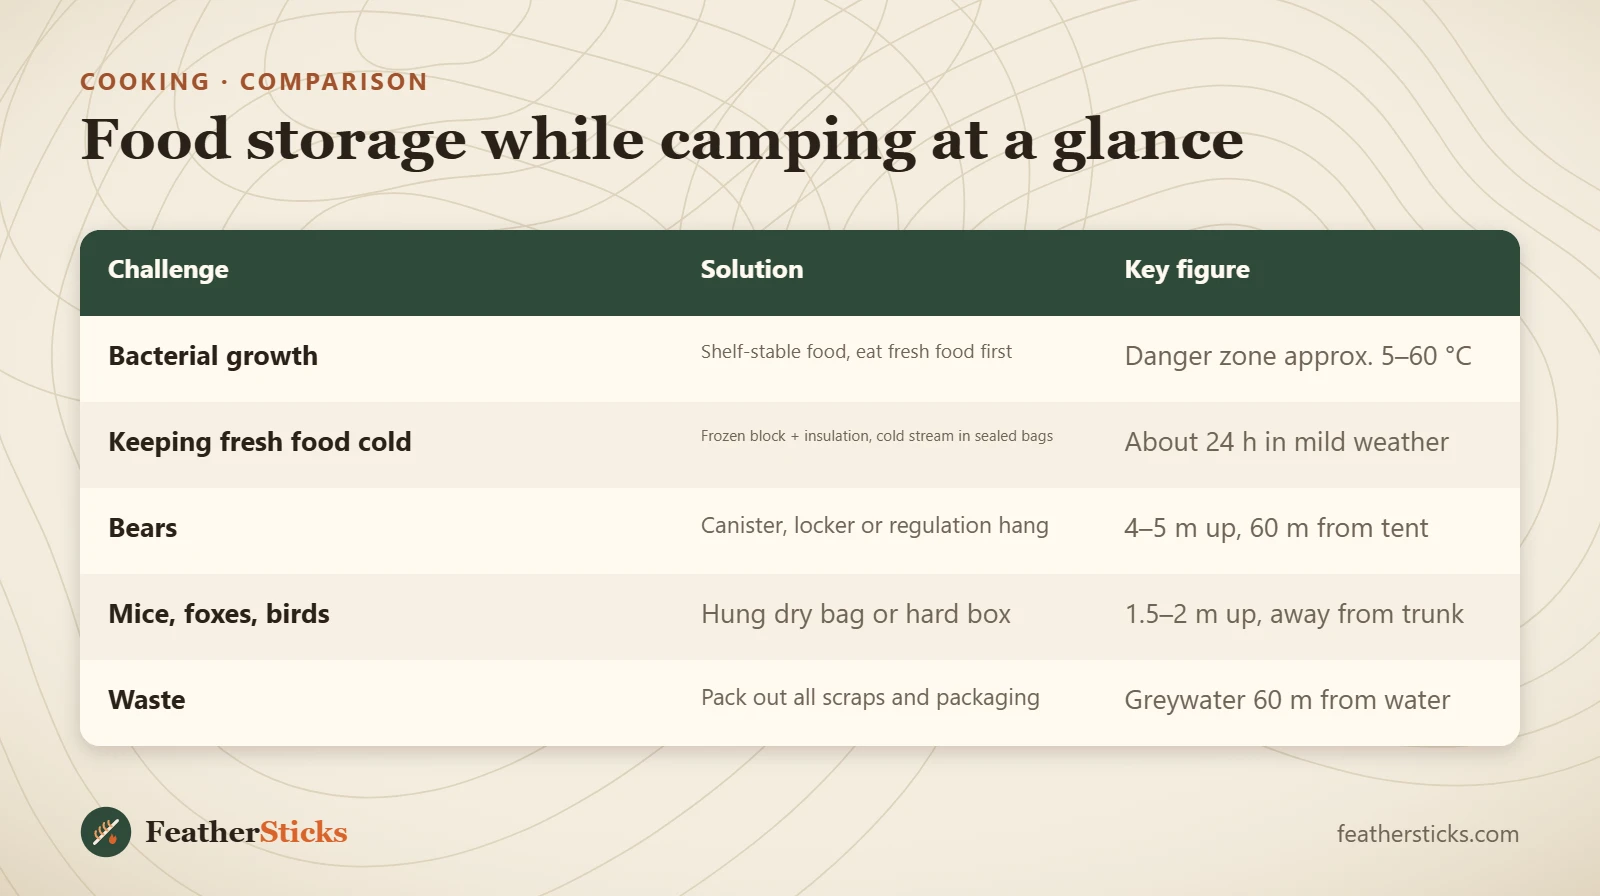
| Challenge | Solution | Key figure |
|---|---|---|
| Bacterial growth | Shelf-stable food, eat fresh food first | Danger zone approx. 5–60 °C |
| Keeping fresh food cold | Frozen block + insulation, cold stream in sealed bags | About 24 h in mild weather |
| Bears | Canister, locker or regulation hang | 4–5 m up, 60 m from tent |
| Mice, foxes, birds | Hung dry bag or hard box | 1.5–2 m up, away from trunk |
| Waste | Pack out all scraps and packaging | Greywater 60 m from water |
Common mistakes
- Keeping food, trash or toothpaste in the tent or vestibule overnight.
- Leaving the food bag open while fetching water or firewood; birds and foxes act fast.
- Bringing soft cheese, mayonnaise or fresh chicken for day three of a summer trip.
- Burning or burying leftovers and foil instead of packing them out.
- Hanging the bag close to the trunk or too low, where animals can reach it.
- Assuming a hang is allowed in bear country without checking current park rules.
What you need
- Zip bags for daily portions
- Odour-resistant liner bag
- Dry bag or bear-resistant canister where required
- 15 m of 3–4 mm cord and a small carabiner
- Insulated pouch for frozen food
- Dedicated trash bag
- Small sieve or cloth for greywater