Cooking
Spit Cooking Over a Campfire: Build a Spit, Roast Safely, Time It Right
Spit cooking means roasting food on a green-wood pole held over or beside a bed of embers and turning it slowly until it is cooked through. All you need for a basic campfire spit is two forked uprights, a straight green hardwood spit, some wire or cotton string and a steady bed of coals – not flames.
This guide shows you how to build a campfire spit and a hanging "string roast" rig, what cooks well on a spit, how to manage heat and distance, and how long things take. It also covers the safe core temperatures that matter most. It builds on campfire cooking basics and the core bushcraft skills every beginner should learn first.
Step by step
-
1
Build an ember bed first
Light a hardwood fire 45–60 minutes ahead and let it burn down to a deep, glowing bed of coals.
-
2
Cut two forked uprights
Cut two Y-shaped sticks about 3–4 cm thick and 60–80 cm long, and sharpen the bottom ends.
-
3
Carve a green-wood spit
Choose a straight green hardwood pole about 2–3 cm thick, peel the bark and point one end.
-
4
Load and tie the food
Skewer the food through its centre of mass and tie it firmly with wire or cotton string so it cannot slip.
-
5
Roast beside the coals
Set the spit beside the embers, not over flames, and turn a quarter turn every few minutes.
-
6
Check the core temperature
Probe the thickest part. Poultry needs 74 °C (165 °F); whole cuts 63 °C (145 °F) plus a rest.
What is spit cooking – and why it works
A spit roast cooks with radiant heat from glowing coals rather than with direct contact or flame. Turning the food exposes every side in turn, so the surface browns evenly while the heat slowly works its way to the centre. Fat that melts out bastes the surface as it rolls around the meat instead of dripping straight into the fire.
That is also why the most common mistake is cooking too hot and too close. Flames blacken the outside in minutes while the middle stays raw, and dripping fat causes flare-ups that coat food in soot. A campfire spit rewards patience: moderate heat, steady turning, and a thermometer at the end.
Unlike slow pot cooking in a Dutch oven, spit cooking needs no cookware at all – just a good fire, some carving and a bit of rigging.
How to build a campfire spit
The classic rotisserie over fire is built from three pieces of wood: two forked uprights and one spit. You can make all of them with a bushcraft knife and a small folding saw. Only cut living wood where you have the landowner's permission – rules vary by country and land type.
Spit parts and typical sizes
- Forked uprights
- 2 × Y-sticks, 3–4 cm thick, 60–80 cm long, forks at similar height
- Spit
- Straight green hardwood, 2–3 cm thick, 30–40 cm longer than the fire is wide
- Crank
- Side branch left on the spit, or a short stick lashed across one end
- Fastening
- Soft iron wire or 100% cotton string (no synthetics – they melt)
- Drip pan
- Foil tray, lid or flat stone below the food, beside the coals
- Fire
- Ember bed about as long as the food, stoked from the side
Why the spit must be green wood
Dry sticks burn through right where the heat is highest – usually just as the food is almost done. Freshly cut green hardwood holds a lot of water and chars only slowly. Straight shoots of hazel, maple, ash or birch are traditional choices. Avoid resinous conifers, which taste of pitch, and never use yew (all parts are toxic), unidentified species, or painted, treated or pressure-impregnated timber. If in doubt about a species, use a metal skewer instead.
The crank and the anti-slip trick
A spit only works if the food turns with it. Carve the spit slightly flat or square where the food sits, or push two small green pegs through the spit on either side of the load. Leave a side branch at one end as a crank handle, or lash on a short cross-stick with a clove hitch.

Building the forked-stick spit
 1Mark the fire
Decide where the ember bed will be and where the food should hang – usually just to one side of the hottest coals. The line between the two uprights runs along that edge, not across the middle of the fire.
 2Set the uprights
Sharpen the uprights and drive them in 15–20 cm deep on either side of the fire, about 10–15 cm wider than the spit load, with the forks at the same height. Tap them in with a baton; in hard ground, pile stones around the base.
 3Check height
The forks should sit so the food is 20–40 cm above the level of the embers. Adjust by driving the stakes deeper or moving them further out from the coals.
 4Prepare the spit
Peel the bark from the section that touches food, carve that section slightly flat, point one end, and leave a side branch or lash a cross-stick at the other as a crank.
 5Test run
Lay the empty spit in the forks and turn it a full circle. It should rotate without jamming, and neither upright should wobble or lean. Fix it now – not with a hot chicken on top.
What a good spit set-up looks like
- Both forks at the same height, so the spit lies level and the food does not slide towards one end.
- The uprights stand firm when you push the spit sideways – they are well outside the ember bed, where they will not char.
- The spit is at least as long as the fire is wide plus 30–40 cm, so the crank end stays cool enough to hold with a glove.
- There is room under the food for a drip pan, and space beside the ember bed for a small feeder fire.
Hanging alternative: crane, tripod and string roasting
Heavier loads – a whole chicken, a leg of lamb, a large fish – are often easier to cook hanging than on a horizontal spit. This is the old "string roast".
Build a crane (a pole angled over the fire's edge, its butt weighted with stones or pegged down, resting on a forked stick) or a simple tripod. Tie the food to a length of cotton string or wire so it hangs vertically beside the embers, at roughly the same height as the coals and 20–30 cm to the side. Twist the food a few dozen turns and let go: the string winds and unwinds on its own for several minutes. Every time it slows, give it another twist.
A drip pan directly underneath catches the fat for basting. Use a stout, non-synthetic cord – see natural cordage if you want to make your own – and keep the string well away from flames. Soft wire is safer for anything over about 1 kg.

Horizontal spit vs. hanging string roast
Horizontal spit
- Good for kebabs, sausages, several items at once
- Easy to control height
- Needs regular manual turning
- Load must be balanced or it flops round
Hanging string roast
- Ideal for whole birds, joints and big fish
- Turns itself with a twisted cord
- Fat drips neatly into a pan
- Needs a crane or tripod and stronger rigging
What can you cook on a spit?
Almost anything firm enough to hold on a skewer works. The smaller and thinner the piece, the easier it is to cook through before the outside burns.
- Sausages – the easiest start. Pre-cooked varieties only need heating through; raw ones must be cooked to the ground-meat temperature.
- Kebabs – cubes of 2–3 cm cook evenly. Alternate meat with onion and pepper. Soak thin wooden skewers or use green-wood skewers.
- Chicken – a whole bird takes long and cooks unevenly. Halving or spatchcocking it (cutting out the backbone and pressing it flat) roughly halves the time. Clamp a flattened bird between two green sticks or split the spit.
- Fish – small whole fish on a skewer through the backbone, or larger fish split and pinned to a plank (see below).
- Vegetables – corn cobs, whole peppers, courgette chunks, mushrooms, halved onions and apples.
- Bread on a stick – twist dough around a peeled stick for classic twist bread. The full recipe is in our bannock and campfire bread guide.
Bring meat into camp cold and keep it cold until cooking. How to do that without a fridge is covered in storing food at camp. For marinades, rubs and side dishes, browse our bushcraft recipes.
Heat management: beside the coals, not above the flames
The fire for spit cooking is a cooking fire, not a campfire for warmth. Burn hardwood such as beech, oak, ash or birch down to embers for 45–60 minutes before you start. Keep a small feeder fire burning to one side and rake fresh coals under or beside the food as needed. The fire lay picker helps you choose a suitable layout, and fire lays explains keyhole and long fires in detail – the long, narrow "trench" or keyhole shape is ideal for spits. Use the firewood calculator to estimate how much fuel a long roast needs; it is usually more than people expect.
The hand test is a useful rough guide: hold your palm at food height. If you have to pull it back after 2–3 seconds, the heat is high; 5–7 seconds is medium, ideal for most spit roasting; 8–10 seconds is low, good for large joints.
Spit roast set-up (top to bottom)
- 20–40 cm above ember level, offset a little to the side of the hottest coals
- Directly below the food, catching fat so it does not flare in the fire
- Glowing hardwood coals, no tall flames; replenished from the feeder fire
- Bare mineral soil or an existing ring, cleared 1–2 m around

Managing the heat during the roast (view along the spit)
 1Embers beside, pan below
Rake the ember bed so it lies just to one side of the food and set the drip pan directly underneath. Fat then drips into the pan instead of onto the coals, and flare-ups stay rare.
 2Hand test at food height
Hold your palm where the food is. 5–7 seconds before you have to pull it away means medium heat, right for most spit roasting; if it is only 2–3 seconds, move the embers away or raise the spit.
 3A quarter turn at a time
Turn a quarter every 3–5 minutes for small items and every 5–10 minutes for big pieces. If one side is browning faster, let it face away from the embers for longer.
 4Top up from the feeder fire
The ember bed shrinks as it burns. Rake fresh coals from the feeder fire into the bed in small amounts, roughly whenever the hand test drifts towards 8–10 seconds, instead of throwing new logs on the cooking coals.
Checkpoints during the roast
Every 15–20 minutes, take a quick look at three things. The surface should be turning evenly from pale to golden, with no black patches. The drip pan should be catching fat, not smoking – if it smokes, it is too close to the embers. The spit should be darkening slightly but not glowing or cracking; if it starts to char through near the fire, support the load with a second green stick alongside and finish the roast quickly.
Turning, balancing and tying the load
Turn the spit a quarter turn every 3–5 minutes for small items and every 5–10 minutes for large ones. If one side browns faster, leave it facing away from the heat for longer.
Balance matters: push the spit through the food's centre of mass, not just through the middle of its shape. An unbalanced chicken rolls to its heavy side and stays there, burning one flank. Tie wings and legs close to the body with wire or cotton string, and use a counterweight (a potato, a stone wired on) if needed.
Never use nylon or polypropylene cord near the fire – it melts into the food.
Skewering and balancing the load
 1Find the centre of mass
The balance point is rarely the middle of the shape: a chicken is heavier at the breast and thighs. Hold the bird loosely on two fingers or a stick and see where it stays level.
 2Push the spit through
Push the pointed spit through that balance point along the length of the food, twisting gently rather than forcing it. If it comes out off-line, pull it back and try again – do not just carry on.
 3Pin it against slipping
Push two small green pegs through the spit, one on each side of the load, or sit the food on the section you carved flat. Otherwise the spit turns and the food stays still.
 4Tie legs and wings
Tie the legs together and bind the wings close to the body with 100% cotton string or soft wire. Loose limbs burn first and shift the balance. No nylon or paracord.
 5Roll test in the forks
Lay the loaded spit in the forks and turn it to a few positions. It should stay where you leave it. If it keeps rolling to one side, re-skewer or wire a counterweight, such as a potato, to the light side.

Spit roast troubleshooting: what went wrong?
Most spit roast problems show up as a symptom you can see or smell long before the meal is ruined. Match the symptom, fix the cause, and keep turning.
| Symptom | Likely cause | What to do |
|---|---|---|
| Outside black, inside raw | Too close, or cooking over flames | Move the food away, let flames die to embers, finish more slowly |
| Load always ends up the same way round | Skewered off-centre | Re-skewer through the centre of mass or add a counterweight |
| Spit turns, food does not | Round spit, no pegs | Add green pegs or carve the spit flat under the food |
| Sudden flare-ups and black smoke | Fat dripping onto coals | Put a drip pan under the food, rake coals to the side |
| Spit charring or sagging | Dry or too thin wood, too close | Use a thicker green spit, raise it, support heavy loads with wire |
| Hours pass, still pale | Ember bed too small or too far away | Top up from the feeder fire, check with the hand test |
| String burnt through | Cord too close to embers or synthetic | Use soft wire for heavy loads, keep cord away from heat |
Safe core temperatures for spit roasting
A browned surface tells you nothing about the centre. The only reliable check is a probe thermometer pushed into the thickest part, away from bone. The table below follows the general minimum internal temperatures published by the US Department of Agriculture's Food Safety and Inspection Service (USDA FSIS). Other national food agencies publish similar figures; check the guidance in your country.
| Food | Core temperature | Notes |
|---|---|---|
| Poultry (whole, pieces, minced) | 74 °C / 165 °F | Check thigh and breast; juices should run clear |
| Minced/ground meat, raw sausages | 71 °C / 160 °F | Bacteria are mixed through, so cook through |
| Whole cuts of pork, beef, lamb | 63 °C / 145 °F | Plus 3 minutes resting time before cutting |
| Fish | 63 °C / 145 °F | Flesh opaque and flakes easily |
| Leftovers, pre-cooked sausages | 74 °C / 165 °F | Reheat until hot throughout |
Measure in the thickest part, not touching bone or the spit.
Checking doneness step by step
 1Probe the thickest part
Push the probe into the thickest part of the thigh or joint, aimed at the centre. The tip must not touch bone or the spit – both conduct heat and give a false high reading. Check more than one spot on large pieces.
 2Cut test as a backup
Without a thermometer, cut into the thickest part next to the bone. Juices should run clear, there should be no pink, and the meat should be steaming hot all the way through. If in doubt, keep roasting.
 3Clean board for cooked food
Lift the finished food onto a clean board or plate – never back onto the one that held raw meat. Let whole joints rest before carving, then serve promptly.
How long does a spit roast over a campfire take?
Campfire heat varies with wood, wind, air temperature and distance, so all times are rough. Use them to plan the fire and the meal, then trust the thermometer.
| Food | Size | Approx. time | Turn every |
|---|---|---|---|
| Sausages (raw) | 2–3 cm thick | 15–25 min | 2–3 min |
| Kebabs | 2–3 cm cubes | 15–25 min | 3 min |
| Small whole fish | 250–400 g | 15–25 min | 3–5 min |
| Chicken, spatchcocked or halved | 1.2–1.5 kg | 45–75 min | 5 min |
| Whole chicken | 1.2–1.5 kg | 1.5–2 h | 5–10 min |
| Pork or lamb joint | 1.5–2 kg | 2–3 h | 10 min |
| Corn, peppers, onions | whole | 15–30 min | 5 min |
Wind and cold can easily add 30–50 %.
Plank fish: roasting fish beside the fire
A traditional way to cook larger fish without a spit is to pin it to a board and lean it towards the embers. Split the gutted fish along the back or belly and open it flat like a book. Pin it skin-side down to a plank of non-resinous hardwood – split beech, oak, alder or birch – using small wooden pegs or thin green strips woven across it.
Stand the plank upright, angled towards the coals at 20–40 cm distance, propped with stones or a stake. Turn the plank end over end once halfway through so the thicker end gets its share of heat. A 1 kg fish usually takes 20–40 minutes, until the flesh is opaque and reaches 63 °C (145 °F). Avoid pine and spruce planks, which add a strong resin taste.
Catching your own fish almost always requires a licence or permit, with seasons and size limits; laws vary by country.
Plank fish in four steps
- SplitGut, scale if needed, open the fish flat
- PinPeg it skin-down onto a hardwood plank
- LeanAngle the plank toward the embers
- CheckFlip once, cook to 63 °C / 145 °F
Camp kitchen hygiene with raw meat
Undercooking is only half the risk. The other half is cross-contamination: raw chicken juice on a knife that later cuts bread.
Raw meat hygiene checklist
- Keep raw meat cold (below about 5 °C / 40 °F) and sealed until cooking
- Use a separate board or clean plate for raw meat and for cooked food
- Wash hands with soap and treated water after handling raw meat
- Clean the knife before using it for anything else – or carry two
- Never put cooked food back on the plate that held raw meat
- Eat hot food promptly and do not keep leftovers without cooling
- Pack out grease, packaging and bones – do not bury them near camp
A light board, a lidded tin and biodegradable soap from your camp cookware kit solve most problems.
Fire safety and rules for spit cooking
A long roast means a fire that burns for hours, often with people moving around it. Before you start, check whether fires are allowed at all: many countries, parks and private forests ban open fires, especially in dry periods, and some only allow fires in designated pits. Rules vary widely by country, so check local regulations and fire danger warnings.
- Use an existing fire ring or bare mineral soil, well away from overhanging branches, roots, peat and dry grass.
- Keep at least 5 litres of water or a shovel with soil next to the fire.
- Never leave a spit fire unattended – dripping fat can flare up suddenly.
- Wear sturdy gloves or use a cloth to handle a hot spit; green wood gets very hot near the fire.
- Drown, stir and feel the ashes cold before leaving.
Our campfire safety guide covers fire bans, Leave No Trace and full extinguishing. For more cooking methods, return to the cooking hub.
Should you spit roast today?
Are open fires permitted here and now?
Yes → Continue.No → Use a stove and pan instead.Is there time for 45–60 minutes of ember build-up plus cooking?
Yes → Continue.No → Cook skewers or sausages over a small fire.Do you have a thermometer for poultry or large joints?
Yes → Go ahead with a whole bird or joint.No → Cut the meat small or choose pre-cooked foods.
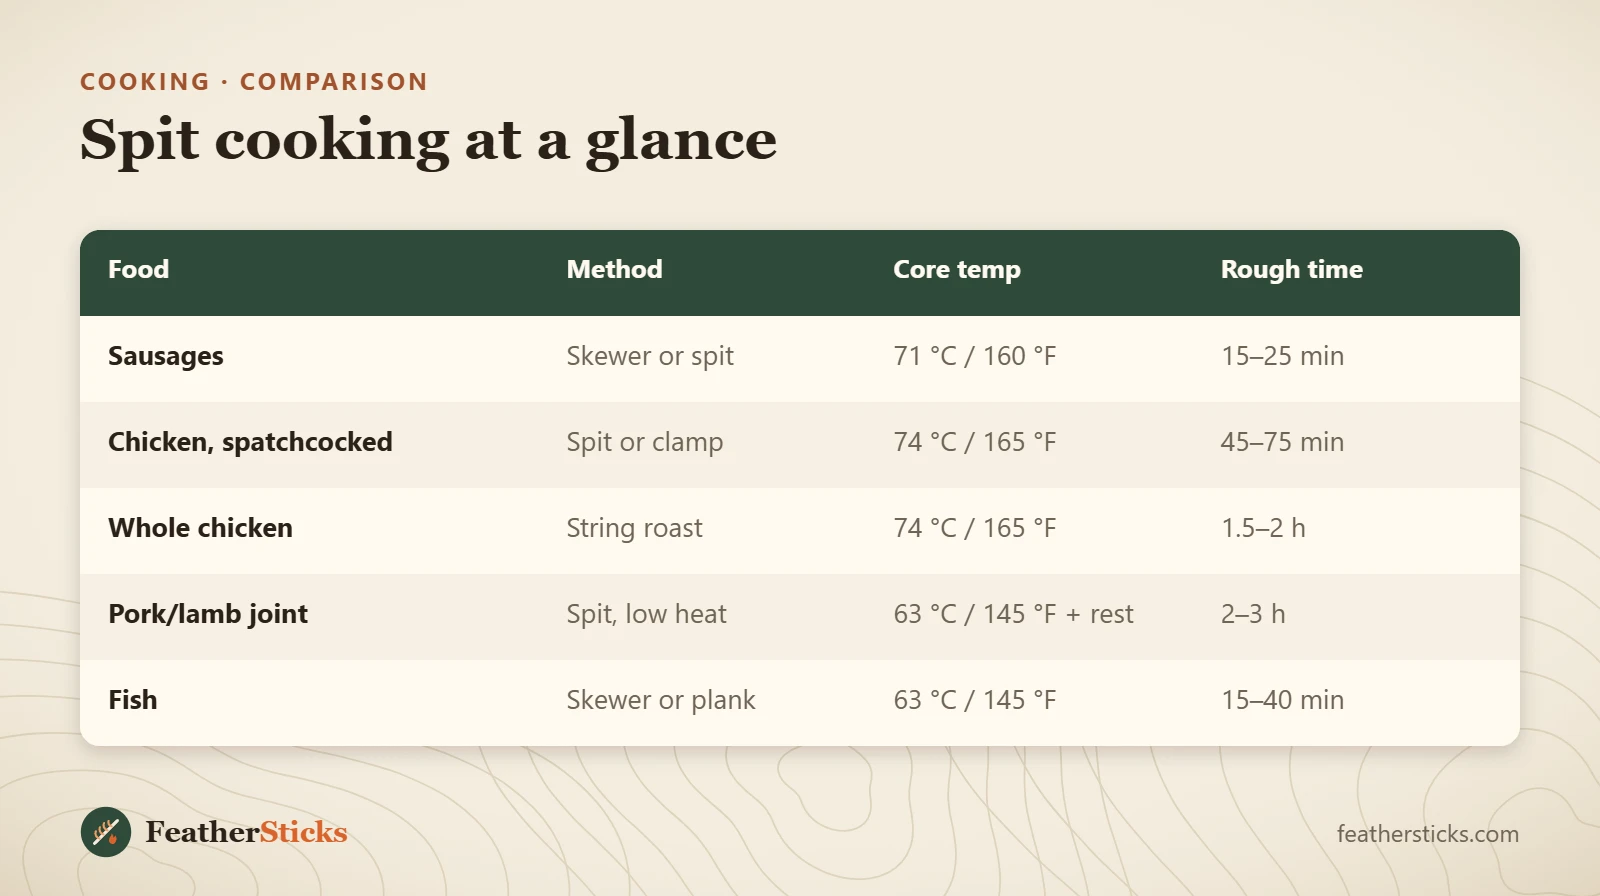
| Food | Method | Core temp | Rough time |
|---|---|---|---|
| Sausages | Skewer or spit | 71 °C / 160 °F | 15–25 min |
| Chicken, spatchcocked | Spit or clamp | 74 °C / 165 °F | 45–75 min |
| Whole chicken | String roast | 74 °C / 165 °F | 1.5–2 h |
| Pork/lamb joint | Spit, low heat | 63 °C / 145 °F + rest | 2–3 h |
| Fish | Skewer or plank | 63 °C / 145 °F | 15–40 min |
Common mistakes
- Roasting over tall flames instead of beside a mature ember bed.
- Using a dry stick as a spit, which burns through just before the food is done.
- Skewering off-centre so the load flops round and burns on one side.
- Tying food with synthetic cord that melts into the meat.
- Judging doneness by colour instead of with a probe thermometer.
- Cutting cooked meat on the same board used for raw chicken.
- Leaving a long-burning cooking fire unattended.
What you need
- Fixed-blade bushcraft knife
- Folding saw
- Probe thermometer
- Soft iron wire or cotton butcher's twine
- Foil tray or lid as drip pan
- Heat-resistant gloves
- Separate cutting board for raw meat
- Water container for fire safety