Fire
Fire Lays: 10 Campfire Types and When to Use Each
A fire lay is the way you arrange tinder, kindling and fuel before lighting a fire, and the type of fire lay you choose decides how fast the fire catches, how much wood it eats and what it is good for. A teepee flares up quickly to boil water, a log cabin collapses into an even bed of coals for cooking, a star fire sips wood all night, and a Dakota fire hole hides the flame from wind.
This guide compares the ten most useful types of campfire, with a purpose table, build steps, pros and cons and a decision tree. If you want a quick answer, the Fire Lay Picker suggests the right lay for your purpose, weather and ground. For the basics of lighting, see fire starting and our cornerstone guide to bushcraft for beginners.
Step by step
-
1
Choose a safe fire site
Use an existing fire ring or bare mineral soil, clear of roots, dry grass and overhanging branches. Check fire bans and local rules first.
-
2
Sort wood by thickness
Collect tinder, matchstick and pencil kindling, thumb-thick sticks and wrist-thick fuel. Gather twice as much kindling as you think you need.
-
3
Pick the lay for the job
Teepee for quick heat, log cabin for cooking coals, star or long fire for a long night, lean-to or Dakota hole for wind.
-
4
Build around the tinder
Place tinder in the centre, build the lay with gaps for air and leave a lighting door on the windward side.
-
5
Light low, feed gradually
Ignite the tinder from below on the windward side and add wood thin to thick without smothering the flame.
-
6
Put it out completely
Drown with water, stir the ashes, drown again and feel for heat with the back of your hand. Leave no trace.
What is a fire lay and why does the structure matter?
Every fire needs three things: heat, fuel and oxygen. The fire lay controls the last two. Stack wood too tightly and the flame suffocates; spread it too loosely and the pieces cannot heat each other. A good fire lay keeps small fuel close to the flame, leaves channels for air to flow in from below, and lets rising heat pre-warm the next, thicker layer of wood.
Every lay, however exotic, is built from the same three layers of material. The skill lies in how you arrange them. That is why understanding the layers is more important than memorising shapes: once you know why a teepee works, you can improvise a lay from whatever wood the forest gives you.
The three layers of every fire lay (top = added last)
- Provides heat and coals for cooking or warmth. Added only once kindling burns strongly.
- Bridges the gap between tinder and fuel. Most fires fail here: gather plenty.
- Catches the spark or flame. Natural tinder, feather sticks or fatwood.
Two further factors shape every choice: wind and ground. Wind feeds a fire with oxygen but also blows it out, scatters sparks and drives heat away from your pot. Wet, snowy or peaty ground drains heat and moisture from the base of the fire. Some lays, like the lean-to and Dakota hole, exist mainly to solve wind problems; the platform fire solves ground problems.
Types of fire lays at a glance
The table below compares the ten fire lays covered in this guide by what they are best for, how fast they light, how much wood they use and how they handle wind. Use it as a quick reference; the sections below explain how to build each one.
| Fire lay | Best for | Lights | Wood use | Wind | Heat type |
|---|---|---|---|---|---|
| Teepee | Starting, boiling water fast | Very fast | High | Poor | Tall, concentrated flame |
| Lean-to | Windy conditions, starting | Fast | Medium | Good | Directed flame, later reflector |
| Log cabin | Cooking over coals, stable fire | Medium | Medium–high | Medium | Even flame, then flat coal bed |
| Upside-down (top-down) | Long evening fire, little attention | Slow start | Low–medium | Medium | Steady, long burn |
| Star fire | All-night fire, saving wood | Medium | Very low | Medium | Small, controllable |
| Long fire / hunter's fire | Warmth along a sleeping spot, cooking with several pots | Medium | High | Medium | Wide, low heat |
| Keyhole fire | Cooking and campfire at the same time | Medium | Medium | Medium | Flames plus separate coal zone |
| Dakota fire hole | Wind, low visibility, efficient cooking | Medium | Low | Excellent | Hot, concentrated upward |
| Platform fire | Snow, wet or boggy ground | Medium | Medium | Medium | Depends on lay on top |
| Swedish torch | Single-pot cooking, light, compact fire | Slow start | Low | Good | Flat top, upward flame |
Not sure? The Fire Lay Picker suggests a lay for your purpose, weather and ground.


Teepee fire and lean-to fire: the fast starters
Teepee fire (cone fire)
The teepee is the most common starting lay and the easiest for beginners. Kindling leans against itself in a cone around the tinder. Heat and flame rise through the centre, preheating every stick on the way up, so the fire grows very quickly. That makes the teepee ideal for lighting a fire and for boiling water fast.
How to build a teepee fire: place a tinder bundle or two feather sticks in the centre. Lean matchstick-thin kindling around it in a small cone, leaving a door on the windward side. Add a second ring of pencil-thin sticks, then a third of thumb-thick sticks, always keeping gaps between them. Light through the door, low down. As the teepee burns it collapses inward; then add fuel or convert it into a log cabin or star fire.
Limits: the teepee burns hot but fast, uses a lot of wood and falls over as it burns, so pots cannot sit directly on it. In strong wind the tall flame leans and burns unevenly.
Lean-to fire
The lean-to is a wind specialist. Push a green stick into the ground at about 30° over the tinder, pointing into the wind, or lay a thick log on the windward side. Lean kindling against the stick or log over the tinder on the downwind side. The log shelters the flame while it is small, and the wind blows through the gap and fans the fire. Later, the log becomes a heat reflector and a support for a pan.
The lean-to is a good choice on exposed shorelines and ridges and when your tinder is marginal. It is also the basis for the reflector fire: a wall of logs behind the fire that throws heat toward a lean-to shelter or tarp.
Teepee fire: pros and cons
Pros
- Lights very fast and forgives small mistakes
- Concentrated heat for boiling water
- Works with small, mixed kindling
- Easy to convert into other lays
Cons
- Burns wood quickly
- Collapses as it burns, unstable for pots
- Tall flames: more spark risk in wind
- Needs constant feeding
Building a teepee, ring by ring
 1Tinder in the centre
A loose tinder bundle or two feather sticks go in the middle, on a dry base. Everything else is built around this point.
 2Matchstick-thin cone
Lean the thinnest twigs against each other over the tinder, tips touching. Leave a hand-wide door on the side the wind comes from.
 3Pencil-thin ring
Add a second ring of pencil-thin sticks outside the first, keeping gaps of about a finger between sticks so air can flow in from below.
 4Thumb-thick, then light
Finish with a loose ring of thumb-thick sticks, then light the tinder through the door, low down. The flame climbs the inner cone first.
Log cabin fire and upside-down fire: stable, even heat
Log cabin fire
The log cabin stacks pairs of sticks in alternating layers around a small teepee, like the walls of a cabin. It is stable, lets air in from all sides and burns evenly. When the walls burn through, they collapse into a flat, even bed of coals, which is exactly what you want for campfire cooking with a pan, grill or Dutch oven.
How to build a log cabin fire
 1Lay a base
Put two thumb- to wrist-thick sticks parallel, about 20–25 cm apart. On wet ground, build a platform first.
 2Build a small teepee
Place tinder and a small kindling teepee between the base sticks. It should be about as tall as the finished walls.
 3Stack the walls
Lay two sticks across the ends of the base, then two more across those. Build 4–6 layers, slightly smaller toward the top, with gaps between the sticks.
 4Optional roof
Cover the top with a layer of pencil-thin sticks: heat rising from the teepee lights it, and it drops embers down.
 5Light and wait
Light the teepee through a gap on the windward side. After 20–30 minutes the cabin collapses into cooking coals.
Upside-down fire (top-down or pyramid fire)
The upside-down fire turns the usual order around: the thickest logs go at the bottom, followed by progressively thinner layers crossed at right angles, with tinder and kindling on top. You light it from the top. The fire burns downward layer by layer, with each layer igniting the one below as embers fall.
A top-down fire takes longer to get going and needs dry fuel, but once burning it runs for hours with almost no attention, produces little smoke and gives a steady, compact flame. The bottom layers also keep the tinder off wet ground. It is a good evening fire and a sensible choice when you want to relax rather than feed a fire every five minutes. A typical build: 3–5 layers of 4–5 logs each, from wrist to thumb thickness, and a small teepee on top.

Star fire and long fire: burning through the night
Star fire (Indian or spoke fire)
Five or six long logs point toward the centre like the spokes of a wheel, with only their tips in the fire. As the tips burn away, you push the logs further in. To turn up the heat, push them together; to slow it down, pull them apart. The star fire uses very little wood, needs no saw to cut logs into short lengths and is easy to control. It is the classic long-burning fire for a quiet night or a small cooking fire that needs to simmer.
Start it with a teepee in the centre. Once there are coals, lay the logs in with their tips just touching the embers. Logs of 5–10 cm thickness and 1–1.5 m length are ideal. Dead wood that is too long to break works perfectly here.

Long fire (hunter's fire and long log fire)
The long fire is built along the length of a sleeping area to warm your whole body in cold conditions. Two long logs of 15–25 cm diameter are laid parallel, 15–30 cm apart, and a fire of kindling and smaller fuel burns in the channel between them. The logs slowly catch and burn for hours. Combined with a reflector wall and a lean-to shelter, this is the traditional northern way of spending a cold night outdoors.
A variation is the hunter's fire: the two logs are laid in a narrow V pointing into the wind. Pots sit across the logs at different points; the narrow end is hotter, the wide end cooler. It is excellent for cooking several dishes at once.
A long fire uses a lot of wood and needs a keeper: someone has to wake and tend it. Never sleep close to a fire without a safe distance, a clear space and a plan. On cold nights, check the wind chill calculator to judge how much heat you really need, and compare with the insulation of your sleeping gear.
Relative wood use per hour (typical, same fire size)
These values are rough comparisons, not measurements: wood type, dryness and how you feed the fire matter more than the shape. The firewood calculator helps you estimate how much wood you actually need for cooking, an evening or a full night.
Keyhole fire: a campfire and a kitchen in one
The keyhole fire is shaped like an old-fashioned keyhole: a round fire area with a narrow rectangular slot attached. The main fire burns in the round part, usually as a teepee or log cabin, and provides light and warmth. As coals form, you rake them into the slot, where a grill, pot or pan sits across stones or green logs. You get steady cooking heat without waiting for the main fire to die down.
How to build it: on bare mineral soil or in a large fire ring, outline a circle of about 60–80 cm with stones, then add a slot about 30 cm wide and 40–50 cm long, open toward the downwind side. Build the main fire in the circle. Keep a stick or small shovel handy to move coals. Only use dry stones from above water level: stones from rivers or lakes can crack or burst when heated because of trapped moisture.
The keyhole is the best fire for a group camp and for cooking dishes that need controllable heat, such as bannock or stews. It uses a moderate amount of wood and keeps the cooking area tidy.
Dakota fire hole: wind-proof and efficient
The Dakota fire hole is an underground fire with a draught. You dig a fire pit and a second, smaller air tunnel that connects to its bottom from the windward side. Wind blows into the air hole and feeds the fire from below like a chimney, so it burns hot and efficiently with little smoke. The flame stays below ground level, which makes it almost invisible and very resistant to wind.
How to dig a Dakota fire hole
 1Check the ground
You need firm mineral soil without roots, peat or thick humus. If the spade hits roots or dark, spongy soil, stop and choose another lay.
 2Cut and keep the sod
Lift the top turf in one piece and set it aside, grass up and in the shade, so you can replace it later.
 3Dig the fire pit
About 25–30 cm wide and 30 cm deep, slightly wider at the bottom. Keep the soil in a neat pile for refilling.
 4Dig the air hole
About 20–30 cm upwind, a smaller hole of 10–15 cm diameter, angled so it meets the bottom of the fire pit.
 5Build and light
Lay tinder and a small teepee at the bottom, light it and feed short sticks. Air is drawn in through the tunnel. Rest a pot on two green sticks across the pit.
 6Restore
Drown the fire completely, fill the holes, check with your hand for heat and replace the sod.
Platform fire and Swedish torch: special situations
Platform fire (fire base for snow and wet ground)
A platform is not a fire lay by itself but the foundation for one. On snow, bog, soaked moss or cold wet soil, the ground draws heat and water out of your fire, and in snow the fire melts itself into a hole and drowns. A platform of wrist-thick dead sticks laid tightly side by side (one or two layers, crossing each other) lifts the fire above the moisture. In deep snow, use thicker green logs as the bottom layer, or stamp the snow firm first.
Build any lay on top: usually a teepee to start, then a log cabin or star fire. A layer of flat stones on the platform can be used where available but avoid wet river stones. For more on fires in rain and snow, see our guide to fire in wet weather.
Swedish torch (Swedish fire log)
A Swedish torch is a vertical log, cut or split so that the fire burns inside it. The flat top becomes a small stove for a single pot or pan. The classic version is a round of dry wood 20–30 cm thick and 30–50 cm long, cut from the top with a saw into four or six segments to about three quarters of its height. Tinder and small kindling go into the centre, and the fire burns downward inside the cuts with a strong draught.
Without a chainsaw, make a bushcraft Swedish torch: split a log into quarters with an axe or by batoning, carve a few feather curls on the inner edges, then stand the pieces back together with a small gap in the centre and bind them near the bottom with wire or wet cordage. It burns for roughly 1–2 hours depending on size and wood. Place it on bare mineral soil or a fire pan, because the base burns through at the end.
| Fire lay | Main advantage | Main drawback |
|---|---|---|
| Teepee | Fastest to light | Burns wood fast, collapses |
| Lean-to | Shelters flame from wind | Needs a log or stake and correct wind direction |
| Log cabin | Stable, perfect cooking coals | Takes more kindling and time to build |
| Upside-down | Burns for hours unattended | Slow to start, needs dry fuel |
| Star fire | Minimal wood, easy heat control | Small heat output |
| Long fire | Warms a whole sleeping area | Huge wood demand, needs a fire watch |
| Keyhole | Fire and cooking coals at once | Needs space and stones |
| Dakota hole | Wind-proof, efficient, discreet | Digging; risk of underground fire in wrong soil |
| Platform | Works on snow and wet ground | Extra wood and time for the base |
| Swedish torch | Compact stove for one pot | Needs a big dry log and a saw or axe |
Combining fire lays and adding a reflector wall
In practice, experienced fire builders rarely stick to one textbook shape. They combine lays as the fire's purpose changes through the evening. Understanding these transitions saves wood and effort.
Common combinations
- Teepee inside a log cabin: the teepee lights quickly, the cabin walls catch from it and provide stability and coals. This is the most reliable all-round fire for beginners.
- Lean-to into log cabin: start behind a windbreak log, then build cabin walls on the other three sides once the flame is established.
- Log cabin into star fire: cook on the coals, then push long logs into the embers for a low, economical fire for the rest of the night.
- Teepee on a platform: the standard answer for snow and waterlogged ground.
- Long fire with reflector: the classic cold-weather setup for sleeping next to a fire under an open shelter.
How to build a reflector wall
A reflector wall throws radiant heat back toward you instead of letting it escape into the forest. Drive two pairs of stout stakes into the ground about 1 m apart, on the far side of the fire from where you sit or sleep, and stack green or thick dead logs between each pair to a height of 50–80 cm. Leave 50–100 cm between the wall and the fire. A rock face or large boulder works too, as long as the rock is dry. A reflector noticeably improves the warmth you feel from a small fire, so you can burn less wood for the same comfort.
Reflectors also shield the fire from wind and reduce the spread of sparks toward the forest. Combined with a tarp pitched as an open lean-to, they create a warm pocket where you can dry clothes and rest. Keep the tarp at a safe distance: synthetic fabrics melt from radiant heat and sparks long before they catch fire.
Is your fire lay ready? Checkpoints, troubleshooting and drills
Before you strike anything, kneel beside the finished lay and check it. Thirty seconds here saves ten minutes of blowing into smoke later.
Ready-to-light checkpoints
- You can see daylight through the lay from the side: there are gaps for air
- The tinder sits low, in the centre, and can be reached through a door on the windward side
- The thinnest kindling touches or leans over the tinder, not 5 cm above it
- Every size from matchstick to wrist is within reach, sorted in separate piles
- Nothing in the lay is thicker than a thumb yet, except base logs and cabin walls
- Water or soil for extinguishing is next to you, not back at the tent
| What you see | Likely cause | Fix |
|---|---|---|
| Tinder burns, kindling does not catch | Kindling too high above the flame or too thick | Push matchstick twigs into the flame; add a second tinder bundle |
| Teepee collapses onto the flame | Sticks too steep or too few in the inner cone | Rebuild a wider base; lean more thin sticks against each other |
| Thick white smoke, little flame | Damp wood or lay packed too tight | Open gaps, add split dry kindling, blow gently at the base |
| Flame leans flat and dies | Strong wind through the door | Turn to a lean-to or add a windbreak log; narrow the door |
| Log cabin burns only in the middle | Walls too far from the teepee | Build the walls closer or add a roof of pencil sticks |
| Fire sinks into snow or wet ground | No platform underneath | Rebuild on a platform of wrist-thick dead sticks |
Practice drills
- Same wood, three lays: collect one pile of wood and build a teepee, a log cabin and a lean-to from it in turn. Time how long each takes to reach a steady flame.
- One-match teepee: build the lay so completely that a single match or one ferro rod strike is enough. If it fails, look for the missing rung of kindling.
- Convert on the fly: start a teepee, turn it into a log cabin once it burns, and finish as a star fire. This is how real evening fires run.
Which fire lay should I use? A decision tree
Start with your purpose, then check the conditions. Most real fires are combinations: a teepee to get going, converted into a log cabin for cooking, then left as a star fire overnight. The decision path below covers the common cases; the Fire Lay Picker goes into more detail.
Choosing a fire lay
Is it windy or is the site exposed?
Yes → Lean-to fire, or a Dakota fire hole where digging is safe and allowed.No → Go to the next question.Is the ground wet, boggy or covered in snow?
Yes → Build a platform first, then your chosen lay on top.No → Build directly on bare mineral soil or in a fire ring.Do you mainly want to cook?
Yes → Log cabin for coals, keyhole for a group, hunter's fire for several pots, Swedish torch for one pot.No → Go to the next question.Do you need the fire for many hours?
Yes → Star fire to save wood, upside-down fire for low attention, long fire for warmth along a sleeping spot.No → Teepee: fast heat, quick boil, then let it burn down.
Preparing wood for any fire lay
The most common reason a fire lay fails is not the shape but the wood: too little kindling, too wet, or too big a jump in thickness. Before you build any lay, sort your wood into piles by thickness. Dead standing wood is best; split larger pieces to reach the dry core, using a folding saw for length and an axe, knife and baton for splitting.
| Category | Thickness | Examples | Amount for a cooking fire |
|---|---|---|---|
| Tinder | Fibres, curls < 1 mm | Birch bark, dry grass, feather stick curls, fatwood scrapings | Two good handfuls |
| Fine kindling | Matchstick to pencil (2–6 mm) | Dead spruce twigs, split slivers | A thick bundle, forearm diameter |
| Kindling | Pencil to thumb (6–20 mm) | Dead branches, split sticks | Two bundles |
| Small fuel | Thumb to wrist (2–5 cm) | Dead branches, split logs | An armful |
| Fuel | Wrist and thicker (5 cm+) | Split logs, long dead poles for a star fire | An armful or more per hour |
Wood that snaps cleanly is dry enough. Wood that bends is green or wet.
Softwoods like pine and spruce light easily and burn hot and fast, making them ideal for kindling and quick lays. Dense hardwoods like oak and beech burn longer and make better coals for cooking and long fires. For the best results, start with softwood and move to hardwood fuel once the fire is established.
Fire lay safety and putting the fire out
Whatever lay you choose, the rules stay the same. Check the local fire danger level and any fire bans; rules vary by country, region and season. Use an existing fire ring or a fire pan where possible. Otherwise choose bare mineral soil, clear a radius of about 3 m of dry leaves and grass, and keep the fire away from overhanging branches, roots, tents and tarps. Pick a sheltered spot as part of good camp site selection and build the fire no bigger than you need.
Keep water or sand within reach before you light. To extinguish, drown, stir and feel: pour water over all embers, stir the ashes and half-burnt wood, pour again, and hold the back of your hand over the ash. When nothing feels warm, the fire is out. Scatter cold ashes, replace sod and leave the site as you found it. The full rules are in our campfire safety guide, and more fire skills are gathered on the fire hub.
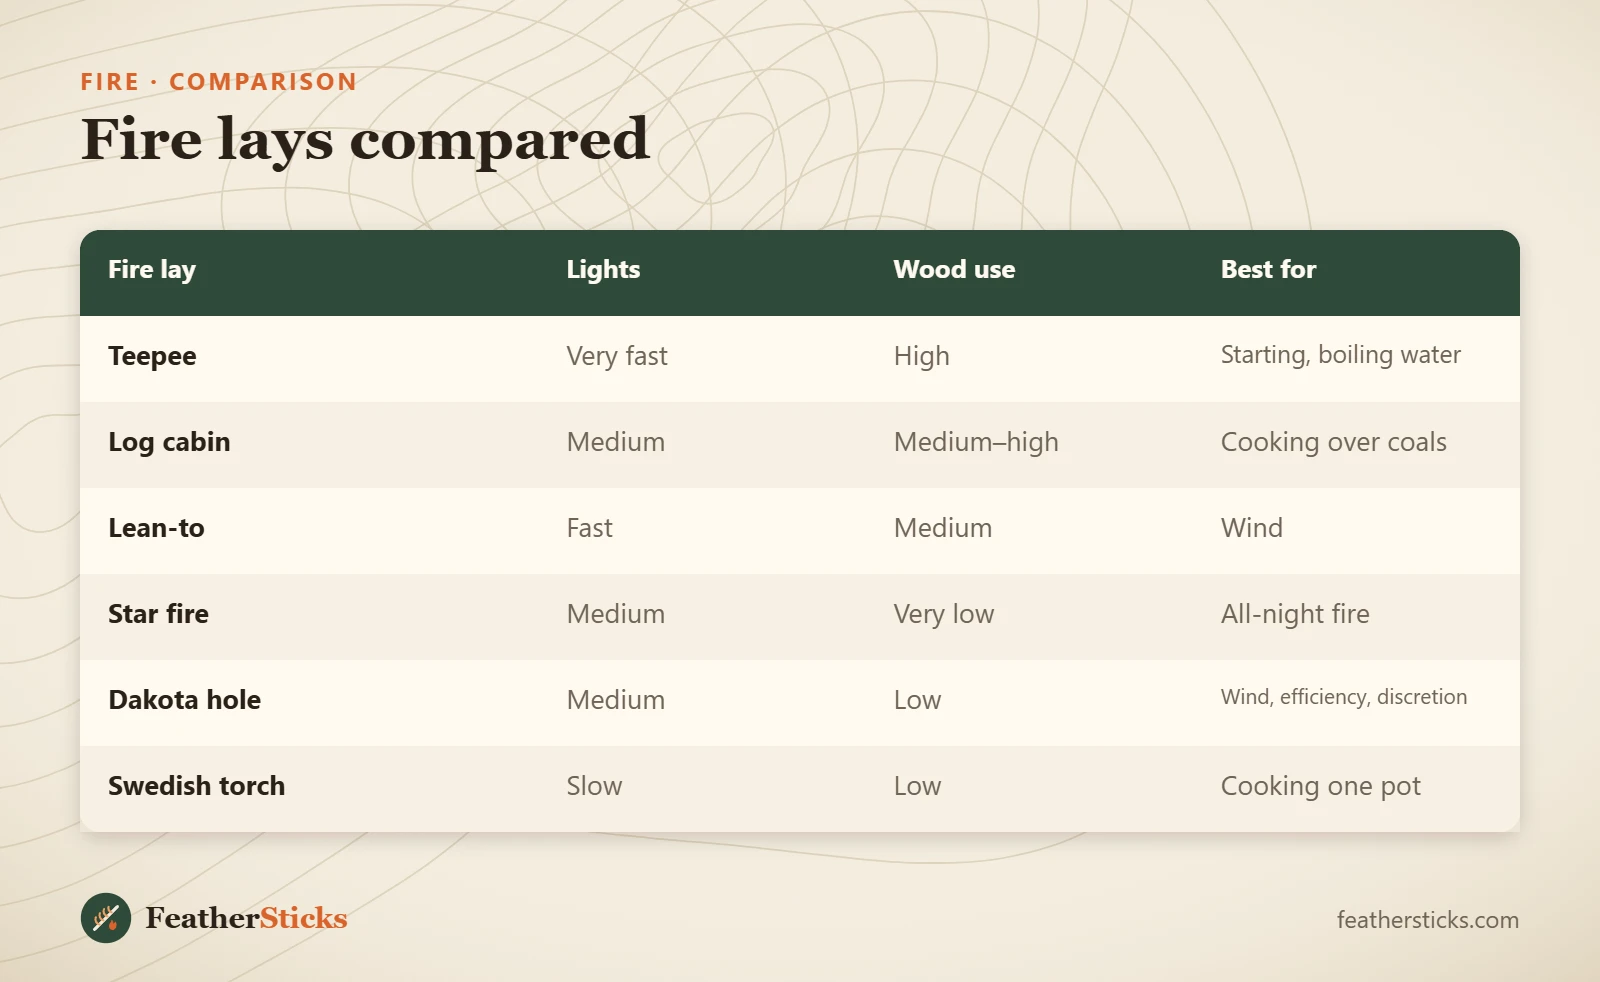
| Fire lay | Lights | Wood use | Best for |
|---|---|---|---|
| Teepee | Very fast | High | Starting, boiling water |
| Log cabin | Medium | Medium–high | Cooking over coals |
| Lean-to | Fast | Medium | Wind |
| Star fire | Medium | Very low | All-night fire |
| Dakota hole | Medium | Low | Wind, efficiency, discretion |
| Swedish torch | Slow | Low | Cooking one pot |
Common mistakes
- Packing the lay too tightly: fire needs gaps for air to flow.
- Jumping from tinder straight to thick logs without enough kindling.
- Building on wet ground or snow without a platform.
- Choosing a tall teepee in strong wind instead of a lean-to or Dakota hole.
- Digging a Dakota fire hole in peat or root-rich forest soil.
- Making the fire bigger than needed: it wastes wood and is harder to control.
- Leaving the site with warm ashes. Drown, stir and feel until cold.
What you need
- Ferro rod and lighter
- Knife for feather sticks and kindling
- Folding saw and small axe for fuel wood
- Water container or collapsible bucket to extinguish
- Leather gloves for handling hot wood
- Fire pan where ground fires are not allowed
- Small trowel or shovel for Dakota holes and moving coals