Gear
Sleeping Gear for Bushcraft: Bag Temperature Ratings, Pads & R-Values
A sleeping bag temperature rating tells you how cold it can get before you start to feel chilly – but only if you read the right number and pair the bag with a pad that stops the ground from draining your heat. Buy by the comfort rating (EN ISO 23537), not the limit, and choose a pad whose R-value matches the night low: about R 2 in summer, R 4 in autumn and R 5–7 in winter.
This guide explains ratings, down vs synthetic, pad types, bivvy bags, quilts and hammock insulation, with seasonal setups that match our Kit Builder. For your exact night, use the sleeping bag & pad calculator. It is part of our bushcraft gear guides.
Step by step
-
1
Find the night low
Check the forecast for the coldest hour – usually just before dawn – and subtract a few degrees in valleys and hollows.
-
2
Pick the comfort rating
Adjust for shelter, wind, how warm you sleep and what you wear, then choose a bag whose comfort rating meets that number.
-
3
Match the pad R-value
R 2 above 10 °C, R 4 around 0–5 °C, R 5 below freezing. Stack a foam pad under an air pad for more.
-
4
Add shelter and bivvy
A tent adds roughly 3 °C, a tarp or bivvy bag about 1 °C, and blocks the wind that strips heat from your bag.
-
5
Test close to home
Sleep one cold night in the garden or near the car before you rely on the system far from help.
The bushcraft sleep system: more than a sleeping bag
Staying warm at night is a system, not a single product. Your body is the only heat source; everything else slows down how fast that heat escapes. It leaves in four ways: conduction into the cold ground, convection when wind or draughts move air through your insulation, radiation to the open night sky and evaporation of moisture. A good sleep system addresses each one.

Sleep system from top to bottom
- Blocks rain, dew and radiant heat loss to the sky – see choosing a tarp
- Wind and splash protection, adds a few degrees
- Traps warm air around you – rated by EN ISO 23537
- Dry base layer, hat, socks; a fleece or puffy adds warmth
- Stops conduction into the ground – rated by R-value (ASTM F3340)
- Protects pad and bag from moisture and sharp debris
The most common beginner mistake is spending all the money on a warm sleeping bag and then lying on a thin summer mat. The insulation underneath you is crushed by your body weight, so it barely works – the pad does that job. In winter the ground can pull heat out of you far faster than the air above, which is why the Kit Builder packs two pads for winter trips.
Setting up your sleep system, layer by layer
 1Clear the ground, lay a groundsheet
Sweep away twigs, cones and stones by hand and lay the groundsheet on the flattest spot. Lie down briefly to feel for roots and slopes – head uphill if there is a slope.
 2Foam pad first
The closed-cell foam pad goes directly on the groundsheet. It cannot puncture, adds R-value and protects the air pad above it from thorns and cold.
 3Air pad on top
Inflate the air pad on top of the foam – in cold weather with a pump sack, because breath carries moisture into the pad. Firm enough that your hip does not touch the ground when you lie on your side.
 4Shake out the bag
Take the bag out of its sack as soon as camp is set, shake it and let it loft while you set up the rest of camp. Only lofted insulation traps warm air.
 5Dry sleep clothes
Change into the dry base layer, dry socks and a warm hat kept only for sleeping. Tomorrow's clothes and the water bottle go into the foot of the bag.
 6Bivvy vented, face out
Close the hood around your face, keep the bivvy opening vented and breathe out into the air, not into the bag – breath moisture ends up in the insulation.
Sleeping bag temperature ratings explained (EN ISO 23537)
Since 2016 most sleeping bags sold in Europe are tested to EN ISO 23537, which replaced the older EN 13537 with the same basic method. A heated thermal manikin wearing a base layer lies in the bag on a standardised mat in a climate chamber. From its heat loss, the lab calculates three temperatures. Because every bag goes through the same test, the numbers are comparable between manufacturers – which is not true of vague "season" labels or untested claims.
| Rating | What it means | Use it for |
|---|---|---|
| Comfort (T-comf) | A standard adult sleeping relaxed on their back feels comfortable. Based on a "standard woman" profile, who on average sleeps colder. | Buying decisions – this is the number to plan with |
| Limit (T-lim) | A standard adult curled up in a ball sleeps about 8 hours without waking from cold. Based on a "standard man" profile. | The edge of the bag's range – a cold night, not a good one |
| Extreme (T-ext) | Survival rating: a standard woman can survive about 6 hours, with a real risk of hypothermia. | Never plan with it – emergency only |
Typical gap: limit ≈ comfort − 5 °C; extreme lies well below the limit. Newer versions of the standard may show only comfort and limit.
The comfort rating assumes a sleeper who has eaten, is not exhausted, wears a base layer and lies on an insulating mat. On a real bushcraft trip you may be tired, damp and under an open tarp in a breeze – so experienced people add a margin rather than trusting the number to the degree.
Why buy by the comfort rating, not the limit?
Many shops and product pages headline the limit rating because it looks more impressive. A bag with "limit −5 °C" typically has a comfort rating around 0 °C. If you plan a night at −5 °C with it, you will spend the night curled up and awake. Plan with the comfort figure and treat the limit as your safety reserve for an unexpectedly cold night.
Women, men and cold sleepers
The comfort figure uses a profile that sleeps colder, the limit a profile that sleeps warmer. In practice, individual differences are larger than gender differences: body size, metabolism, fatigue, hydration and what you ate all matter. If you know you are always cold at night, choose a bag rated 5 °C warmer than the calculation suggests – the sleep calculator does exactly that with its "cold sleeper" option.
How warm does my sleeping bag need to be?
Start with the expected night low – the forecast minimum, usually just before sunrise. Cold air drains downhill, so valleys, hollows and stream sides can be several degrees colder than the forecast; see choosing a camp site. Then adjust for your conditions. Our calculator uses these rules:
Calculating the comfort rating you need – worked example
 1Night low
Start with the coldest expected temperature – in this example 2 °C. In a valley or hollow, subtract a few degrees first.
 2Shelter
A tent keeps you about 3 °C warmer, a tarp or bivvy bag about 1 °C; a hammock adds nothing. Here: tarp, +1 °C → 3 °C.
 3Sleep type
Warm sleepers add 3 °C, cold sleepers subtract 5 °C. Here: average sleeper, ±0 → 3 °C.
 4Wind
4WindA breezy camp subtracts 2 °C, an exposed one 4 °C. Here: sheltered by trees, ±0 → 3 °C.
 5Clothing and liner
Sleeping in a fleece or puffy adds about 3 °C, a liner about 2 °C. Here: fleece, +3 °C → 6 °C.
 6Result
The sum is the comfort rating your bag should meet or beat: 6 °C or lower. The limit rating is roughly 5 °C lower – your reserve for a colder night.
Worked example: night low 2 °C, average sleeper, tarp, sheltered spot, sleeping in a fleece: 2 + 1 + 0 + 0 + 3 = comfort rating 6 °C or lower. That is a three-season bag. The same night for a cold sleeper in a breezy spot without a fleece: 2 + 1 − 5 − 2 = −4 °C – a clearly warmer three-season-plus bag. The sleeping bag & pad calculator runs these numbers for you and also shows the pad R-value you need.
As a rough classification, a bag with a comfort rating above about 7 °C is a summer bag or quilt, 0–7 °C a three-season bag, around 0 to −10 °C a three-season-plus bag, and anything with comfort −10 °C or colder a winter bag, ideally filled with high-quality down (700 cuin or more) to keep weight and bulk manageable.
Down vs synthetic sleeping bags
Both fills trap still air; they differ in weight, packed size, behaviour when wet and price. Neither is "better" – it depends on your climate, budget and how carefully you manage moisture.
Down
Down clusters from ducks or geese give the highest warmth for the weight and compress very small. Quality is measured as fill power (cubic inches per ounce, "cuin"): 550–650 is good mid-range, 700–800+ is high quality and 850+ is premium. Higher fill power means more loft from less down, so a lighter bag for the same rating. Down can last many years if stored loosely. Its weakness is moisture: wet down clumps and loses much of its insulation, and it dries slowly in the field. Hydrophobic treatments help a bit but do not make it waterproof. Look for certification that the down was sourced responsibly (no live plucking).
Synthetic
Synthetic fibres (continuous filament or short staple) are cheaper, keep a useful part of their warmth when damp and dry faster. They are the robust choice for wet climates, long humid spells under a tarp and beginners. The trade-off: at the same comfort rating a synthetic bag is typically heavier and packs bigger, and repeated compression slowly reduces loft over the years.
Down vs synthetic at a glance
Down
- Best warmth-to-weight ratio
- Packs very small
- Long life if stored loosely
- Loses loft when wet, dries slowly
- More expensive; look for responsible sourcing
Synthetic
- Keeps some warmth when damp
- Dries faster, easier to wash
- Lower price
- Heavier and bulkier for the same rating
- Loses loft gradually with compression
Rule of thumb for bushcraft: synthetic for damp autumn trips, open tarps and tight budgets; down for cold, dry winter conditions and when pack size matters – protected by a bivvy bag or breathable shell against condensation. Packed size matters too: a bulky synthetic winter bag can fill half of a 50-litre pack, so check the volume against our backpack guide. Many experienced bushcrafters combine both: a down bag inside a synthetic over-quilt in deep winter, so moisture freezes in the cheaper outer layer rather than in the down.
Near the fire
Sleeping bag shells are thin nylon or polyester. A single spark from spruce or larch can burn a hole, and down will then leak out. Keep a safe distance from the fire, let it burn down before sleeping, and never dry a bag close to the flames. Read campfire safety before you plan a "long fire" next to your bed.
Mummy bag, rectangular bag or quilt?
Mummy bags taper at the feet and have a hood. Less air to heat and less weight make them the warmest shape for a given weight; features like a draught collar, a zip baffle and a well-fitting hood are important below about 5 °C. The downside is less room to move – side sleepers may prefer a wider cut.
Rectangular bags are roomy and can often be unzipped into a blanket, which is pleasant on warm summer nights. They are heavier and let more warm air escape at the shoulders, so they suit summer car-camping more than cold bushcraft nights.
Quilts have no insulation underneath (it would be crushed anyway) and no hood; you wear a warm hat instead. They save weight and are comfortable for restless sleepers. They rely completely on your pad and on straps that keep draughts out, so they work best from late spring to early autumn and in hammocks as a top quilt. Below freezing a well-fitting mummy bag is more forgiving.
Liners
A liner keeps the bag cleaner (less washing, longer life) and adds warmth: the calculator counts about 2 °C for a typical liner. Silk and thin synthetic liners add least, fleece liners most. In summer a liner alone can be enough on a warm night.

Sleeping pad R-value explained (ASTM F3340)
The R-value measures a pad's thermal resistance – how well it stops heat flowing from your body into the ground. Since 2020 most manufacturers test to the ASTM F3340 standard, which made R-values comparable across brands. Higher is warmer, and R-values add up: a foam pad with R 2 under an air pad with R 4.5 gives about R 6.5.
| Night low | Minimum R-value | Typical solution |
|---|---|---|
| Above 10 °C | R 2 | Closed-cell foam pad |
| 5 to 10 °C | R 3 | Self-inflating pad (≈ R 3.5) |
| 0 to 5 °C | R 4 | Insulated air pad (≈ R 4.5) |
| −10 to 0 °C | R 5 | Foam + self-inflating or warm air pad |
| −20 to −10 °C | R 6 | Foam + insulated air pad (≈ R 6.5) |
| Below −20 °C | R 7+ | Winter air pad + foam (≈ R 8.5) |
The night low is used as a proxy for ground temperature. Frozen, wet or snowy ground needs the upper end; a thick bed of dry leaves or spruce boughs (where permitted) adds insulation.
Typical R-values of pad setups
Pads rated before the ASTM standard, or cheap pads without a test, often state optimistic values; treat untested R-values with caution. And remember that a pad only works where you lie on it: if you roll off a narrow pad in the night, your hip or shoulder is suddenly on bare ground. Wider pads (around 64 cm instead of 51 cm) help restless sleepers, and a groundsheet keeps the pad from sliding.
Sleeping pad types: foam, self-inflating or air?
| Type | Typical R | Weight | Pros | Cons |
|---|---|---|---|---|
| Closed-cell foam | 1.5–2.5 | 250–450 g | Cannot puncture, cheap, doubles as sit mat and fire-side pad | Bulky, firm, low R alone |
| Self-inflating | 2.5–4.5 | 600–1,200 g | Comfortable, robust, some insulation even if punctured | Heavier, packs larger |
| Air pad, uninsulated | ≈ 1–1.5 | 350–550 g | Very comfortable, small pack size | Cold – summer only, puncture risk |
| Air pad, insulated | 3–5+ | 400–700 g | Warm for its weight, packs small | Puncture risk from thorns and sparks, can be noisy |
| Winter air pad | 6+ | 500–800 g | Very warm | Expensive; still best combined with foam as backup |
For bushcraft, closed-cell foam has a special role: it survives thorns, sparks and rough ground, works as a seat by the fire and as a backup if your air pad fails. That is why the Kit Builder packs a foam pad in summer (on its own) and in winter (under the air pad). In autumn it suggests an insulated air pad with R 4 or more, which is warm enough for most nights around freezing.
Protecting an air pad
Always use a groundsheet, clear the ground of sharp twigs and cones, and carry a repair kit (patches and adhesive). Inflate with a pump sack instead of your breath in cold weather – breath adds moisture that can freeze inside the pad and slowly damage insulation. Keep inflated pads away from the fire: embers melt holes instantly.
Bivvy bags: when you need one
A bivvy bag (bivouac sack) is a waterproof or water-resistant cover for your sleeping bag. Under a tarp it keeps off splash, blown-in rain and heavy dew, stops draughts and adds about as much warmth as the tarp itself – the calculator counts a bivvy or tarp as roughly +1 °C. The Kit Builder adds a 400 g bivvy for tarp and natural-shelter trips in autumn and winter.
Breathable bivvies use a waterproof-breathable membrane on top; they let some of the water vapour you release overnight escape. Non-breathable emergency bivvies (foil or plastic) are light and cheap, but condensation builds up inside quickly and wets the bag – fine for an emergency, poor for regular use. Even breathable bivvies can collect frost and condensation on the inside in freezing, humid weather; leave the opening vented and never breathe into the bag.
A bivvy on its own, without a tarp, is a minimalist option for dry nights. In steady rain it becomes uncomfortable quickly: getting in and out and cooking without a roof is hard. Combine it with a small tarp for the best of both – see tarp shelter setups.
Hammock insulation: underquilt and top quilt
Hammocks are comfortable and keep you off wet ground, but they are cold. Air moves freely underneath you, and any insulation you lie on – including the bottom of your sleeping bag – is compressed and almost useless. That is why the calculator gives a hammock no shelter bonus and recommends an underquilt.
An underquilt hangs outside and below the hammock, lofted but not compressed, and seals against the fabric from beneath. Inside, a top quilt or an unzipped sleeping bag covers you. A pad inside the hammock works as a cheap alternative, but it slides around and creates cold spots at the shoulders; a wider or segmented pad helps. Add a tarp with enough coverage to block wind – and see hammock camping for hanging angles and tree protection.
Hammock sleepers joke about "cold butt syndrome": a warm top and a cold underside. It almost always means missing or compressed bottom insulation – adjust or add the underquilt before buying a warmer top bag.

Sleep systems by season
These setups match the items the Kit Builder suggests for a tarp trip. Weights are typical mid-range values; high-quality down can save several hundred grams.
| Season | Sleeping bag (comfort) | Pad | Extras | Weight approx. |
|---|---|---|---|---|
| Summer | +10 °C, 800 g (or quilt) | Foam pad, R ≈ 2, 350 g | Optional mosquito net 150 g | ≈ 1.2 kg |
| Autumn | 0 °C, 1,300 g | Insulated air pad R 4+, 550 g | Bivvy bag 400 g | ≈ 2.3 kg |
| Winter | −10 °C, 2,000 g | Foam + insulated air pad, R ≈ 6.5, 900 g | Bivvy bag 400 g | ≈ 3.3 kg |
For deep frost below about −10 °C, a warmer bag (or bag plus over-quilt), R 6–7+ and a sheltered site are needed. Check your own night with the calculator.
In a tent you gain around 3 °C and do not need the bivvy; in a snow shelter the air stays near 0 °C while it is much colder outside, but you need very good ground insulation. Wind is the other big factor: a site sheltered by trees or terrain is worth more than an extra 200 g of down. The wind chill calculator shows how much wind cools exposed skin, and our clothing guide covers what to wear in camp.
How to sleep warm outdoors: practical tips
Good gear only works if you use it well – a theme that runs through our bushcraft for beginners guide. These habits can add several degrees of comfort at no weight cost:
Sleep-warm checklist
- Go to bed warm: walk around or do a few squats, but do not sweat
- Eat a snack with fat and carbohydrates before sleeping – digestion produces heat
- Drink enough during the evening, and pee before bed so your body does not heat extra liquid
- Change into a dry base layer, dry socks and a warm hat – never sleep in damp clothes
- Shake the bag to restore loft before getting in; close the hood and draught collar
- Breathe out of the bag, not into it – breath moisture wets the insulation
- Keep tomorrow's clothes and your water bottle in the bag's foot section so they don't freeze
- Put the pad on a groundsheet and a bed of dry leaves where allowed
- Air the bag in the morning or at midday so moisture can escape
Cold at night? Troubleshooting by symptom
| Symptom | Likely cause | Fix tonight | Fix next time |
|---|---|---|---|
| Cold from below, hips and shoulders | Pad R-value too low or you rolled off | Put the foam pad, pack or dry leaves under you | Higher R-value, wider pad, foam under the air pad |
| Cold spots along the top | Bag not lofted, compressed by clothing or damp | Shake the bag, loosen layers that press on it | Warmer bag or a quilt over it; keep it dry |
| Draught at the neck | Hood and draught collar open | Close collar and hood around your face | Mummy bag with draught collar |
| Cold feet | Damp socks, little blood flow | Dry socks, hot water bottle between the thighs | Warm booties; eat before sleeping |
| Damp bag in the morning | Breath, condensation in the bivvy, humid air | Air the bag in the sun or wind at midday | Vent the bivvy, breathe out of the bag, consider synthetic |
| Shivering that will not stop | Early hypothermia | Act now – see hypothermia first aid, get help if needed | A warmer system and a test night close to home |
The hot water bottle trick
A single-wall steel bottle (see water containers) filled with hot (not boiling) water makes a superb bed warmer. Close it tightly, check the seal, and put it in a sock or wrap it in clothing to prevent burns – never place a hot bottle directly against your skin for long, especially with children or if you are very tired. Held between your thighs, it warms blood flowing to the rest of your body. By morning you have liquid water instead of ice. Plastic bottles can deform or leak with hot water; use only bottles designed for it.
Caring for your sleeping bag and pad
Store sleeping bags loose – in a large cotton or mesh storage sack or hanging in a cupboard – never compressed in their stuff sack for months. Long compression slowly destroys loft, especially in synthetic fills. Air the bag after every trip until it is completely dry.
Looking after bag and pad
 1Air it every morning
Turn the bag inside out and hang it over a line or branch in the sun or breeze for as long as breakfast takes. Moisture from the night escapes before you pack.
 2Stuff it into a waterproof sack
Stuff the bag into its waterproof sack rather than rolling it – stuffing spreads the stress over the fill instead of creasing it in the same places every time.
 3Store it loose at home
At home the bag lives in a large cotton or mesh storage sack or hangs in a cupboard. Months in the compression sack slowly destroy loft.
 4Test the air pad
Before a trip, inflate the air pad at home and leave it overnight. If it is still firm in the morning, it is ready; if not, find and patch the leak in the bathtub.
Wash only when needed, following the manufacturer's label: down with a special down wash on a gentle cycle, then long tumble drying on low heat with a few clean tennis or dryer balls to break up clumps; synthetics with a mild detergent, air-dried or tumble-dried on low. Never dry-clean with solvents unless the label allows it. A liner reduces how often you need to wash.
Store self-inflating pads unrolled with the valve open so the foam stays springy. Check air pads for slow leaks by inflating them overnight at home before a trip. Small repairs in the field need a clean, dry surface; carry the kit in your repair pouch alongside the needle and tape from the bushcraft kit list.
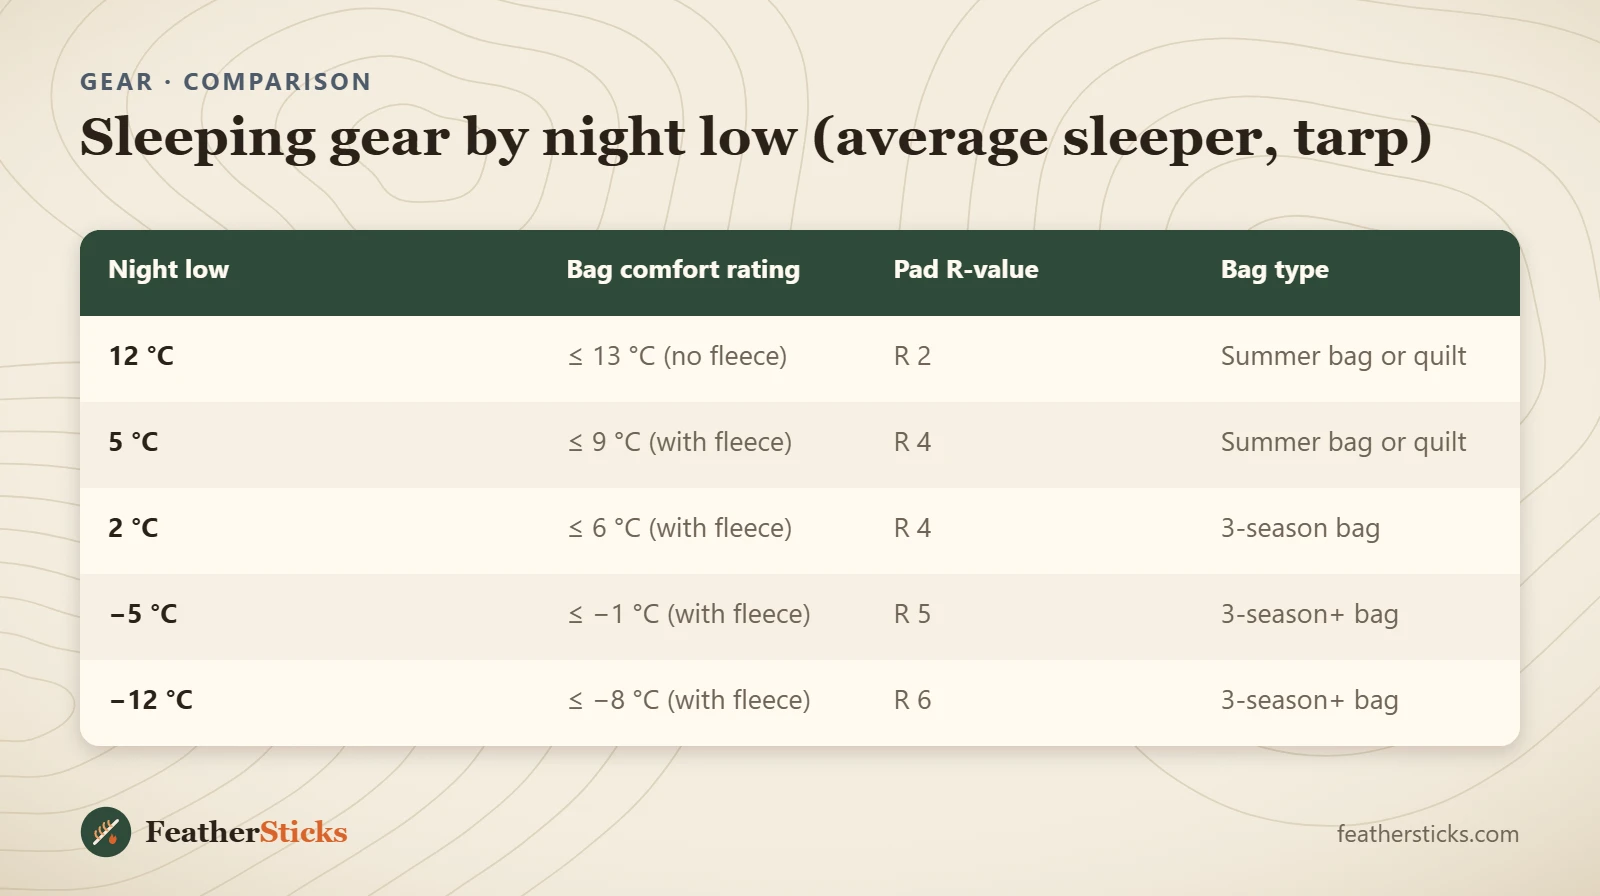
| Night low | Bag comfort rating | Pad R-value | Bag type |
|---|---|---|---|
| 12 °C | ≤ 13 °C (no fleece) | R 2 | Summer bag or quilt |
| 5 °C | ≤ 9 °C (with fleece) | R 4 | Summer bag or quilt |
| 2 °C | ≤ 6 °C (with fleece) | R 4 | 3-season bag |
| −5 °C | ≤ −1 °C (with fleece) | R 5 | 3-season+ bag |
| −12 °C | ≤ −8 °C (with fleece) | R 6 | 3-season+ bag |
Common mistakes
- Buying a bag by its limit or extreme rating instead of the comfort rating.
- Spending on a warm sleeping bag but sleeping on a thin summer mat or bare ground.
- Using a pad or sleeping bag inside a hammock without bottom insulation.
- Sleeping in damp clothes or breathing into the sleeping bag.
- Pitching in a hollow or on a stream bank where cold air collects.
- Storing the bag compressed for months, so it loses loft.
- Drying a bag or placing an air pad too close to the fire.
What you need
- Sleeping bag with suitable EN ISO 23537 comfort rating
- Closed-cell foam pad (R ≈ 2)
- Insulated air pad (R 4+) with repair kit
- Breathable bivvy bag
- Liner (silk, synthetic or fleece)
- Dry sleeping clothes: base layer, socks, hat
- Single-wall steel bottle for hot water
- Underquilt and top quilt (hammock users)