Shelter
Snow Shelters: How to Build a Quinzhee, Snow Trench & Snow Cave
A snow shelter uses snow as insulation: a hollowed-out quinzhee mound, a snow trench, a tree-well shelter or a snow cave dug into a deep drift. Because snow traps air, a well-built snow shelter typically stays around freezing inside, often between −5 and 0 °C, while the air outside may be −20 °C and windy.
This guide explains the main types, how to build a quinzhee step by step, and — most importantly — the ventilation, carbon monoxide and collapse rules that keep you alive, plus clear advice on when not to build one. Snow shelters are serious winter skills; practise them close to a car or cabin before you ever rely on one. For all other shelter types, see the shelter hub.
Step by step
-
1
Check terrain and snow
Stay out of avalanche terrain and away from snow-loaded trees. Check the snow is deep, cold and not slushy, and that you have time and energy.
-
2
Pile or find the snow
Heap a mound 2–2.5 m high for a quinzhee, or find a stable drift at least 2 m deep for a snow cave. Let piled snow settle 1–2 hours.
-
3
Push in thickness sticks
Insert 30-cm sticks all over the mound. When you hit their ends while digging, stop: the wall is thick enough there.
-
4
Dig in low, sleep high
Dig the entrance low and hollow a dome with a raised sleeping platform, so cold air sinks out of the living space.
-
5
Ventilate and mark it
Poke a 5–10 cm vent hole through the roof, keep a shovel inside, and mark the shelter so nobody walks on the roof.
How does a snow shelter keep you warm?
Fresh snow is mostly air — often 80–90 % by volume — and still air is an excellent insulator. A snow wall 30–60 cm thick blocks wind completely and slows heat loss so much that your body heat, and the ground below the snowpack, keep the inside close to freezing. That sounds cold, but it is a world away from −20 °C with a 30 km/h wind outside, which can feel like −30 °C or colder: check it with the wind chill calculator.
Two design rules make the difference. First, warm air rises and cold air sinks, so the sleeping platform must be higher than the entrance; the entrance then acts as a cold sink that drains the coldest air away. Second, the interior must be small, a dome only large enough to sit up and lie down in, so your body can warm it.
How cold it gets: outside vs inside a snow shelter (longer bar = colder)
These are typical ranges, not guarantees: they depend on wall thickness, the number of people, ventilation and how well the entrance is blocked. Inside temperatures above 0 °C are actually a warning sign — the ceiling starts to drip and weaken. You still need a winter sleep system: two insulating pads (a combined R-value of 5 or more), a winter sleeping bag rated for the conditions and dry clothes. Size your bag with the sleeping bag calculator and read our sleeping gear guide.
When NOT to build a snow shelter
A snow shelter takes hours of heavy digging. Done in the wrong place or state, it can kill you through avalanche, collapse, carbon monoxide or hypothermia from sweat-soaked clothing. Before you dig, run through these questions honestly.
Should you build a snow shelter here?
Is the site on or below a slope steeper than about 30°, under a cornice or in an avalanche runout?
Yes → Do not build here. Move to safe, low-angle terrain away from slopes above.No → Continue to the next question.Is the snow wet, slushy, or is a thaw or rain forecast?
Yes → Do not build a quinzhee or cave: collapse risk and soaking. Use a tent, tarp or a covered trench.No → Continue to the next question.Is there enough snow: 60 cm+ for a trench, a 2 m+ drift for a cave, or enough to pile a 2 m mound?
Yes → Continue to the next question.No → Choose a trench, a tarp shelter or a natural shelter in the forest.Do you have 3–4 hours of daylight, a shovel and the energy to dig without soaking yourself?
Yes → Build — but dig slowly, vent it and keep the shovel inside.No → Build a quick trench or use your tent; a half-finished quinzhee helps nobody.

Also avoid building directly under snow-loaded trees, which can drop heavy "snow bombs", over frozen streams or lakes, and alone without anyone knowing your plan. And if you already carry a four-season tent, it is usually the faster, lower-risk option — the snow shelter is a skill for extreme cold, strong wind, emergencies and practice.
Types of snow shelter compared
Which snow shelter you build depends mostly on how much snow there is, what kind, and how much time and energy you have.
| Type | Snow needed | Build time | People | Warmth | Main risks |
|---|---|---|---|---|---|
| Snow trench | 60 cm+ of firm snow | 45–90 min | 1 | Moderate | Roof sag, drifting snow closing the entrance |
| Quinzhee | Any snow that can be piled 2–2.5 m | 3–4 h incl. settling | 1–3 | High | Collapse if walls thin or snow wet; CO |
| Snow cave | Deep, stable drift 2 m+ | 2–4 h | 1–4 | Very high | Avalanche, collapse, CO, soaking while digging |
| Tree-well shelter | Deep snow around a conifer | 30–60 min | 1 | Low to moderate | Snow falling from branches; deep wells can trap people |
| Igloo (snow blocks) | Wind-packed snow that cuts into blocks | 3–5 h, needs skill | 1–4 | High | Requires practice and a snow saw |
Build times for two fit adults with a proper snow shovel; alone and with a small shovel they can double.
Snow trench
The fastest snow shelter. Dig a trench as long as your body plus 30 cm, 60–90 cm wide and about 1 m deep in firm snow. Cover it with a tarp weighted with snow, skis and poles laid across with a tarp on top, or snow blocks leaned together into an A-shape. Keep the entrance at one end, lower than your sleeping level if you can. A trench is cooler than a quinzhee but can be built even by a tired person, and it is a good emergency option. A tarp is ideal as the roof.
Tree-well shelter
Around the trunks of large conifers, branches shed snow and leave a hollow "tree well". You can enlarge it, line the floor with dead boughs and roof it with a tarp or branches. It is fast, but be careful: snow can fall from the branches, and deep tree wells are a known hazard for skiers and snowboarders, who can fall in head first. Only use shallow, stable wells and never enter a deep one alone.
Snow cave
Dug horizontally into a deep, stable drift — often on the lee side of a ridge or bank — a snow cave is the warmest snow shelter. Dig a low entrance tunnel, then turn upwards and hollow a dome with the sleeping platform above the entrance level. It demands deep, consolidated snow and safe, non-avalanche terrain, and the digging is wet work: wear waterproof outer layers and remove insulation while you dig.
Building a snow trench
 1Dig the trench
In firm snow, dig a trench as long as your body plus 30 cm and about 1 m deep. Cut the walls straight down so the roof has a firm edge to rest on.
 2Keep it narrow
60–90 cm is enough — narrower is warmer and easier to roof. Lay your pads and bag in as soon as the floor is level, so you can test the length.
 3Span the roof
Lay skis, poles or dead branches across the top, with at least 20 cm of support on each side.
 4Tarp and snow on top
Spread a tarp over the span and shovel a thin layer of snow on it to hold it down and insulate. Keep the entrance end lower than your sleeping level if you can.
How to build a quinzhee step by step
The quinzhee (also spelled quinzee) is the most practical snow shelter where snow is not deep enough for a cave. You pile loose snow into a mound, let it settle and bond (sinter), and hollow it out. Mixing snow layers of different temperatures while piling speeds up the bonding.
Quinzhee build sequence
 1Mark a circle
For one or two people, stamp out a circle 2.5–3 m across on safe, flat ground. Plan the entrance on the downwind side.
 2Pile the snow and let it settle
Shovel snow into a dome 2–2.5 m high, mixing snow from different depths; do not pack it. Then wait 1–2 hours (longer in very cold, dry snow) and use the time to drink, eat and change into dry layers.
 3Insert thickness sticks
Push 30-cm sticks into the mound all over, pointing towards the centre — sides, shoulders and top. They are your guide for an even wall of 30–45 cm.
 4Dig the entrance low
Dig a small tunnel low on the downwind side, then hollow upwards. Wear shell clothing and take off insulation: this is wet work. One person digs, the other clears snow outside.
 5Shape the interior
Hollow a smooth dome and stop wherever you reach the end of a stick. Leave a sleeping platform 30–50 cm above the entrance floor, so cold air drains out below you.
 6Vent and finish
Poke a 5–10 cm vent through the roof at an angle, lay two pads on the platform and partly block the entrance with a pack. Never seal it airtight.
| Element | Target | Why |
|---|---|---|
| Mound height (quinzhee) | 2–2.5 m before hollowing | Leaves room for a dome and 30–45 cm walls |
| Wall and roof thickness | 30–45 cm, even all round | Strength and insulation; thin spots collapse |
| Interior height | 90–110 cm | Enough to sit up; smaller is warmer |
| Sleeping platform | 30–50 cm above entrance floor | Cold air drains out below |
| Vent hole | 5–10 cm diameter, at the roof | Fresh air and CO escape |
| Entrance | 60 cm wide, as low as possible | Crawl-through, acts as cold sink |
Ventilation and carbon monoxide: the rules that save lives
Snow walls are nearly airtight once their inner surface glazes over with ice. Every breath you exhale adds carbon dioxide and moisture, and any flame — candle, stove, lantern — adds carbon monoxide (CO), an odourless, colourless gas that can kill. Deaths in snow shelters and tents from CO are well documented by mountain rescue and health authorities.
Before you sleep in a snow shelter
- Vent hole open and clear; a ski pole or stick left in it to clear it at night
- No stove, candle or lantern burning while you sleep
- Entrance only partly blocked — never sealed airtight
- Shovel inside the shelter, next to you
- Shelter marked outside with poles or skis so no one walks on the roof
- Walls and roof even, no sagging or thin spots showing light
- Someone outside the group knows your location and plan
Air in, CO out: three rules in pictures
 1Vent open all night
Leave a ski pole or stick in the 5–10 cm vent and give it a twist whenever you wake up. Drifting snow and frost can close it within hours.
 2No flame inside
No stove, candle or lantern burning in a closed snow shelter — carbon monoxide is odourless and builds up quickly behind glazed walls.
 3Cook outside
Melt snow and cook outside or in a well-ventilated entrance with the vent open. Headache, dizziness or drowsiness mean: everyone out into fresh air.
A candle can help you judge air quality — if it burns weakly, improve ventilation — but it also produces CO itself, so never rely on it and never leave one burning while you sleep. Melting snow for drinking water is best done outside; our guide to water from snow and ice explains how to do it efficiently, and the boiling point calculator helps you plan fuel.
Collapse safety and the structure of a good snow shelter
A well-built dome of settled snow is strong, but thin spots, wet snow and a flat ceiling can fail. Build to an even wall thickness of 30–45 cm using the thickness sticks, keep the roof arched, never build with slushy snow, and never sleep in a shelter that sags. If temperatures rise above freezing or rain starts, get out.
Cross-section of a snow cave or quinzhee (top first)
- 5–10 cm, angled through the roof; kept clear all night.
- Smooth and arched so meltwater runs down the walls.
- Small: sit-up height only. Warmest air collects here.
- 30–50 cm above the entrance, with two pads (R 5+) and a winter bag.
- Lowest point; cold air drains out here. Partly block with a pack.

What a sound snow shelter looks like
- Smooth, round ceiling without flat spots or bulges — meltwater runs down the walls instead of dripping.
- Even glow: in daylight the walls let through a soft, even blue light. A brighter patch means a thin spot; pack snow on from outside.
- Stick ends just visible all round the inside, none missing and none buried deep.
- Dry floor at the platform, with the lowest point at the entrance.
| Symptom | Likely cause | Fix |
|---|---|---|
| Ceiling drips | Flat spot, too warm inside (above 0 °C) or candle | Smooth the ceiling round, enlarge the vent, no flame |
| Headache, drowsiness | Poor ventilation, possible CO | Everyone out into fresh air immediately; clear the vent |
| Cold on the platform | Platform not higher than the entrance, too few pads | Raise the platform or deepen the entrance; two pads R 5+ |
| Roof sags or cracks | Walls too thin, wet snow, thaw | Get out and stay out — rebuild only with cold, settled snow |
| Soaked clothes after digging | Digging in insulation layers | Dig in shell layers only, take turns, change before settling in |
Wet clothing is the other hidden danger. Digging is hot, heavy work; if you sweat into your insulation, it will freeze later. Dig in waterproof shell layers with minimal insulation underneath, take turns, and change into dry layers before you settle in for the night. See our clothing guide for winter layering, and treat shivering, clumsiness or confusion as early hypothermia: warm up, eat, drink something warm and get help if symptoms continue.
Practise first, plan your time and know the rules
Practice drill: on your first snowy weekend, build a snow trench for one in under 90 minutes next to your car or cabin and lie in it for an hour with a thermometer at your chest. Compare the reading with the outside air. Only then plan a quinzhee night — with a partner, a shovel inside and the car as your backup.
Build your first snow shelter near a car, cabin or home, with a partner, in daylight. In winter the days are short: a quinzhee needs 3–4 hours including settling time, so check sunset with the daylight calculator and start early. Carry the basics — a proper metal snow shovel, a head torch, a winter sleep system and warm food — and tell someone your plan.
Snow shelters are also subject to local rules. National parks and nature reserves may prohibit overnight stays or restrict access to protect wildlife in winter; in Germany the rules for overnight stays depend on the federal state and protected-area regulations — see wild camping in Germany. In the Alps, check the avalanche bulletin before every trip. For more winter craft, see our bushcraft basics guide, and for choosing a spot, how to choose a camp site.
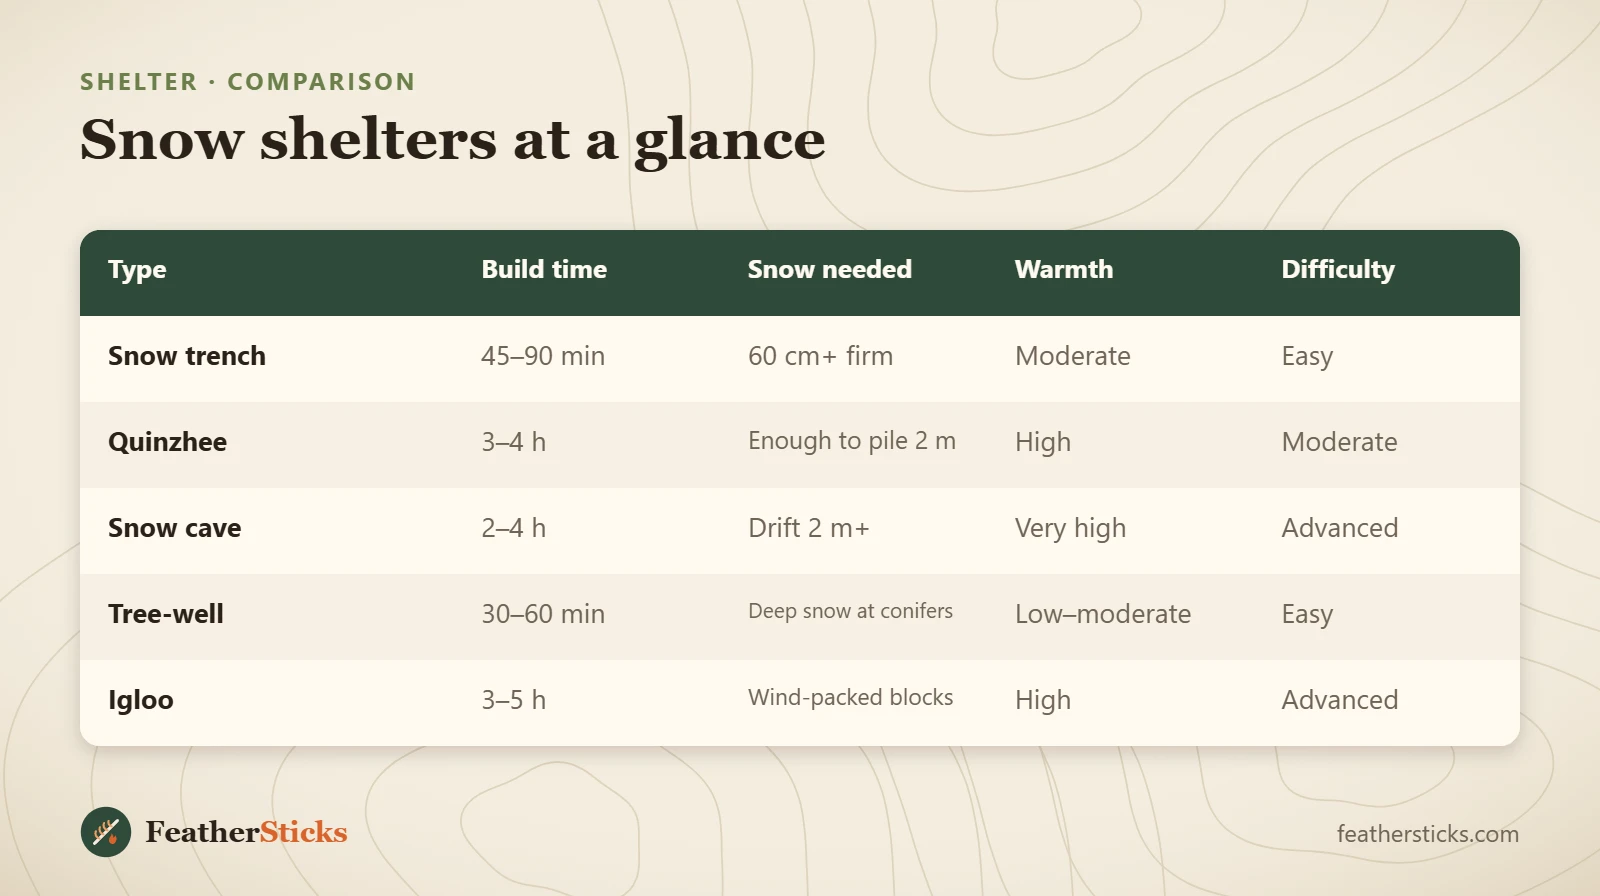
| Type | Build time | Snow needed | Warmth | Difficulty |
|---|---|---|---|---|
| Snow trench | 45–90 min | 60 cm+ firm | Moderate | Easy |
| Quinzhee | 3–4 h | Enough to pile 2 m | High | Moderate |
| Snow cave | 2–4 h | Drift 2 m+ | Very high | Advanced |
| Tree-well | 30–60 min | Deep snow at conifers | Low–moderate | Easy |
| Igloo | 3–5 h | Wind-packed blocks | High | Advanced |
Common mistakes
- Building in or below avalanche terrain or under snow-loaded trees.
- No vent hole, or letting it ice over — risking carbon monoxide build-up.
- Running a stove or candle in a sealed shelter while sleeping.
- Walls too thin or uneven; not using thickness sticks.
- Sleeping level lower than the entrance, so cold air pools around you.
- Sweating into insulation while digging, then freezing at night.
- Leaving the shovel outside, where it can be buried.
What you need
- Metal snow shovel (avalanche shovel)
- Snow saw (for blocks and trimming)
- Two sleeping pads, combined R 5+
- Winter sleeping bag and bivvy bag
- Waterproof shell jacket, trousers and gloves for digging
- Dry spare base and mid layers
- Head torch, whistle and marker wands or poles
- Avalanche transceiver and probe in mountain terrain