Shelter
Tarp Shelter Setups: 12 Pitches, Ridgelines, Knots & Geometry
A tarp shelter is a single sheet of waterproof fabric pitched over a tight ridgeline or between stakes, and it is the most versatile shelter you can carry. The same 3 × 3 m tarp becomes an open lean-to for a warm evening by the fire, a steep A-frame for a night of rain or a low, closed storm pitch when the wind swings round at 2 a.m.
This guide shows you how to set up a tarp step by step: the ridgeline systems, twelve proven pitches compared in one big table, the knot for every attachment point, the simple geometry behind ridge height and covered floor, and how to manage wind and drip water. Use the tarp pitch planner to calculate your own numbers, and see the shelter hub for all other shelter types.
Step by step
-
1
Pick a safe, sheltered spot
Choose level, slightly raised ground between two trees 4–6 m apart. Look up for dead branches and avoid hollows where water and cold air collect.
-
2
Rig a tight ridgeline
Anchor one end with a bowline or round turn and two half hitches, then tension the other end with a slipped trucker’s hitch.
-
3
Hang and centre the tarp
Clip the tarp to the ridgeline with two prusik loops or drape it over. Slide it until both halves and both ends hang evenly.
-
4
Angle the tarp to the weather
Turn the low or closed end into the wind. Use 45–60° walls for rain and pitch lower as wind rises.
-
5
Stake, tension and add drip lines
Stake the corners first, then side tie-outs. Tighten guylines until the fabric is drum-tight and tie drip lines on the ridgeline.
Why a tarp shelter? Tarp vs tent in a nutshell
A tent is a finished product with one shape. A tarp is a kit of parts: fabric, cord, stakes and knots that you assemble into whatever the site and weather demand. That flexibility is the reason bushcrafters love tarps. You can sit up underneath one, cook in its shelter, face it towards a fire, see the forest around you and adapt it in seconds when conditions change.
The trade-offs are honest ones. A tarp has no floor and no bug netting, so you add a groundsheet, a bivvy bag or a bug net when needed. It demands skill: a badly pitched tarp flaps, pools water and lets rain blow in, while a well pitched one is quieter and drier than many cheap tents. If you are new to outdoor living, pair this guide with our bushcraft for beginners guide and practise your first pitches in the garden or a local wood before you rely on them.
Tarp vs tent at a glance
Tarp
- 300–900 g for a 3 × 3 m tarp
- Dozens of pitches from one sheet
- Open to the fire and the view
- Room to sit, cook and store gear
- Works with ground sleeping and hammocks
- Needs knots, practice and good site choice
Tent
- 1–3 kg for a solo or duo tent
- One shape, fast and predictable
- Floor and bug mesh included
- Warmer: traps more air, blocks draughts
- Less adaptable to trees, rocks and slopes
- Keep sparks away from its thin fabrics as well
Most experienced campers do not see it as either/or. A tarp is the best choice for mild to cool conditions, wooded terrain and fire-based camps. A tent (or a closed storm pitch) wins in exposed, windy country and during heavy midge or mosquito seasons. Our guide to choosing a tarp explains fabrics, sizes and tie-out layouts in detail.
Ridgeline systems: the backbone of every tarp pitch
Most tarp pitches hang from a ridgeline: a cord stretched tight between two trees. The ridgeline carries the tarp, defines the height of the shelter and holds the fabric taut so rain runs off instead of pooling. A slack ridgeline is the number one reason tarps sag and drip.
Which cord for the ridgeline?
Use a low-stretch cord of 3–5 mm diameter and 10–15 m length. Polyester or Dyneema-core cords stretch very little; standard nylon paracord stretches noticeably when wet and cold, so you will need to retension it at night. Carry it on a winder or in a stuff sack so it deploys without tangles.
Three common ridgeline methods
- Over-the-top ridgeline: the tarp is draped over the cord. Quick and simple, but the tarp cannot be tensioned along its length, and water running along the cord reaches the fabric at the ridge.
- Under-slung ridgeline with prusiks: the tarp hangs below the line on two prusik loops clipped to its ridge tie-outs. You can slide and tension it without touching the main knots. This is the standard bushcraft method.
- Tarp-integrated ridgeline: the cord runs through the tarp’s own ridge loops or a sleeve. Very clean and wind-stable, but less flexible for asymmetrical pitches such as the plow point.
Rigging a tensioned ridgeline in five moves
 1Anchor tree 1
Tie off at 1.1–1.3 m for a ground A-frame with a bowline or a round turn and two half hitches. Check the height against your hip before you commit — re-tying later means loosening everything.
 2Prusiks on first
Slide two prusik loops onto the free end before you touch tree 2. The most common mistake at this moment: tying off both ends and then realising the prusiks are still in the bag.
 3Wrap tree 2
Pass the running end once or twice round the second trunk. The turns add friction, so the line holds while you build the tensioning knot. Use a tree strap on soft bark.
 4Tension 3:1
Tie a trucker’s hitch, pull down on the tail and lock it with a slipped half hitch. A good line twangs when plucked and sags no more than a hand’s width under the tarp’s weight.
 5Hang and slide out
Clip the tarp’s ridge tie-outs to the prusiks and push the prusiks outwards until the ridge seam is straight. If the seam still droops, the ridgeline itself is too slack — retension it, do not overload the prusiks.
How high should the ridgeline be? For an A-frame on the ground, about hip height (1.1–1.3 m) with a 3 m wide tarp gives sitting room and walls steep enough for rain. For a lean-to by the fire, go higher (1.5–1.8 m). Over a hammock, the ridgeline sits about 30 cm above the point where your hammock suspension meets the trees. Protect bark with wide tree straps when you use the same trees for weeks, and never cut live branches to make room — see the camp setup guide for low-impact habits.
What a good ridgeline looks like
- Level or slightly lower at the foot end — never lower at the head end, or water runs towards your face.
- Straight between the prusiks: sight along it from one tree; any visible belly will become a puddle in rain.
- Knots at the trees, not in the middle: the section over your shelter should be clean cord so the prusiks can slide.
- Tails tidy: coil the trucker’s tail and hang it on the tree, so you can find and re-tension it in the dark.
No trees? Use poles. Two trekking poles or two straight dead sticks of about 1.2 m replace the trees. Run a guyline from each pole top to a stake at roughly 45° outwards along the ridge axis; the tension on the tarp holds the poles upright.
Tarp setups compared: 12 pitches for every weather
You do not need to master all twelve pitches. Learn the A-frame, the lean-to and one storm pitch first; they cover 90 % of real nights. Then add the others as your tarp and your terrain invite them. The table compares each pitch by weather suitability, number of people, minimum tarp size and stakes needed.
| Pitch | Best weather | People | Min. tarp size | Stakes | Setup |
|---|---|---|---|---|---|
| A-frame | Rain, light wind | 1–2 | 3 × 3 m (2 × 3 m solo) | 6–8 | Easy |
| A-frame with raised walls | Mild rain, warm nights | 1–2 | 3 × 3 m | 6–8 + 2 poles | Easy |
| Low storm A-frame | Driving rain, strong wind | 1–2 | 3 × 3 m | 8–10 | Medium |
| Closed-end A-frame | Wind from one end | 1 | 3 × 3 m | 7–9 | Medium |
| Lean-to | Fair, light wind from behind | 1–3 | 2 × 3 m | 4–6 | Very easy |
| Lean-to facing a fire | Cold, dry, calm | 1–3 | 3 × 3 m | 4–6 | Easy |
| C-fly | Showers, variable wind | 1–2 | 3 × 3 m | 6 | Medium |
| Adirondack | Cold, fire camp, showers | 1–2 | 3 × 3 m | 6–8 | Medium |
| Plow point | Wind from one side, rain | 1 | 3 × 3 m | 4–5 | Easy |
| Holden tent (wedge) | Rain, cold, wind from behind | 1–2 | 3 × 3 m | 5–7 + 1 pole | Medium |
| Diamond / flying diamond | Fair to light rain, hammock | 1 | 3 × 3 m | 2–4 | Very easy |
| Envelope / tube pitch | Storm, exposed site, bivvy | 1 | 3 × 3 m | 6–8 | Medium |
Stake counts include corners and side tie-outs; add 2 spares. Covered space and ridge height for your tarp: tarp pitch planner.
The five core pitches at a glance (3 × 3 m tarp)
 1A-frame
Ridge through the centre, both halves at about 50°, ridge 1.15 m. Check: both walls the same angle, ridge seam straight, all six edge stakes leaning away from the tarp.
 2Lean-to
One edge high on the ridgeline, the other staked behind you. At 45° the high edge sits about 2.1 m up — room to sit, cook and face a fire. Back to the wind, always.
 3Low storm A-frame
Ridge down to 70–90 cm, edges flush on the ground, any surplus width folded under as a floor lip. Narrow end into the wind; you crawl in, the rain does not.
 4Plow point
One corner staked into the wind, the opposite corner raised 1.2–1.5 m on a tree or pole, side corners out. Few stakes, very wind-stable, solo only.
 5Diamond
Corner to corner along the ridgeline: the 4.2 m diagonal covers a hammock. Side corners staked low. Fast and airy, but the open sides let driving rain in.
1. A-frame: the all-rounder
The ridgeline runs through the centre of the tarp and both halves slope down to the ground like a roof. With a 3 × 3 m tarp at 50°, the ridge sits about 1.15 m high and covers a floor almost 2 m wide — enough for one person with gear or two people shoulder to shoulder. The A-frame sheds rain on both sides and handles wind from either end if you pitch it along the wind. It is the default pitch the calculator suggests for rain.
2. A-frame with raised walls
Instead of staking the edges to the ground, you raise them on short guylines or sticks 30–50 cm high. You gain headroom, airflow and a view while keeping the roof over you. Ideal for warm, humid nights when condensation is the bigger problem than rain.
3. Low storm A-frame
Drop the ridgeline to 70–90 cm and stake the edges flush to the ground, with the narrow end straight into the wind. The steep, low profile gives the wind little to push against and leaves rain no gap to blow in. It is cramped — you will crawl in — but it is the pitch that keeps you dry when the forecast gets it wrong.
4. Closed-end A-frame
Pitch an A-frame with the tarp shifted along the ridgeline, then fold the excess at the windward end inwards and stake it as a triangular door. The result is an A-frame with one closed wall, excellent where the wind is steady from one direction, for example on a forest edge or a lakeshore.
5. Lean-to
One edge of the tarp is tied high along the ridgeline, the opposite edge is staked to the ground behind you. The lean-to is the fastest pitch, offers the most view and airflow, and needs a tarp of only 2 × 3 m. Its weakness is exposure: wind from the open side turns it into a sail. Read the dedicated lean-to shelter guide for natural and tarp versions.
6. Lean-to facing a fire
The winter classic of bushcraft: a steep lean-to with its open side facing a long, low fire 1.5–2 m away. The sloping roof catches the radiant heat and reflects it down onto you, and a log or rock reflector wall behind the fire doubles the effect. Only pitch this with a fire-tolerant tarp (cotton canvas or poly-cotton) or at a safe distance, and see our fire lays guide for the long log fire that suits it.
7. C-fly
Picture the tarp in profile as the letter C. The ridgeline runs about one third in from the front edge; the front third is guyed out and up as an awning, the back two thirds slope steeply to the ground, and the last 50–60 cm are folded forward underneath you as a floor. You get a sheltered back wall, a porch and an integrated groundsheet from one sheet of fabric.
8. Adirondack
Named after the three-sided log shelters of the Adirondack mountains, this pitch is a lean-to with a short front awning and its back corners pulled forward and staked as partial side wings. It blocks side draughts better than a plain lean-to while keeping the open face towards the fire. A comfortable base camp pitch for one or two.
9. Plow point
Stake one corner of the tarp firmly into the wind, raise the opposite corner 1.2–1.5 m on a tree, pole or short ridgeline, and stake the two side corners out. The shelter forms a sloping triangle with a pointed, aerodynamic back. It is quick, uses few stakes and shrugs off wind from one direction, but offers space for only one person.
10. Holden tent (wedge)
Stake the whole back edge of the tarp to the ground, raise the middle of the front edge on a pole or a line to a tree about 1.2–1.4 m high, and stake the two front corners out forwards. The result is a wedge with sloping triangular sides and a tall, open front — well protected from behind and the sides, with good sitting room at the entrance.
11. Diamond and flying diamond
Hang the tarp corner to corner along the ridgeline so it forms a diamond. Over a hammock, the two side corners are staked out low; a 3 × 3 m tarp gives a 4.2 m diagonal, which covers most hammocks in fair to showery weather. On the ground, the flying diamond stakes one corner to the earth and raises the other on the ridge, giving a fast, airy solo shelter.
12. Envelope or tube pitch
Fold the tarp so that one side lies flat as the floor and the other rises over a low ridgeline and comes back down, with the ends closed or partly closed. It is essentially a tarp bivvy: low, tight and very weatherproof, but condensation builds quickly and there is no room to sit. Keep it for exposed sites and emergencies.
Which tarp pitch should I use tonight?
Is strong wind or driving rain forecast?
Yes → Low storm A-frame, closed-end A-frame or plow point, narrow end into the wind.No → Continue to the next question.Is it cold and are fires allowed?
Yes → Lean-to or Adirondack facing a long fire, with a reflector wall.No → Continue to the next question.Are you sleeping in a hammock?
Yes → A-frame for rain, diamond for fair weather, storm mode with doors for wind.No → Continue to the next question.Is rain likely but wind light?
Yes → Classic A-frame at 45–55°, or a C-fly for a porch.No → Lean-to or A-frame with raised walls for view and airflow.
Tarp geometry: ridge height, angle and covered floor
A little trigonometry answers the question every beginner asks: how high do I set the ridgeline? For a ridge pitch such as the A-frame, each half of the tarp (width ÷ 2) slopes down from the ridge to the ground at an angle α. That gives two simple formulas:
- Ridge height = (width ÷ 2) × sin α
- Covered floor width = width × cos α
For a lean-to, the whole width forms one slope, so height = width × sin α and floor depth = width × cos α. Steeper walls shed rain better and catch less wind from the side, but they cost floor space. Around 45–55° is the sweet spot for rain; 30–40° gives a roomy fair-weather shelter.

Field check without a calculator: at 45° the ridge height equals the horizontal distance from the point under the ridge to the edge of the tarp. Measure both with a trekking pole or a stick: equal lengths mean 45°; a ridge higher than that distance means a steeper wall, which is better for rain.
| Tarp width across ridge | At 35° | At 45° | At 50° | At 60° |
|---|---|---|---|---|
| 2 m | 0.57 m high · 1.64 m floor | 0.71 m · 1.41 m | 0.77 m · 1.29 m | 0.87 m · 1.00 m |
| 3 m | 0.86 m · 2.46 m | 1.06 m · 2.12 m | 1.15 m · 1.93 m | 1.30 m · 1.50 m |
| 4 m | 1.15 m · 3.28 m | 1.41 m · 2.83 m | 1.53 m · 2.57 m | 1.73 m · 2.00 m |
If the edges are raised on guylines, add the edge height to the ridge height. The tarp’s length along the ridge stays the length of your shelter.
Worked example: a 3 × 3 m tarp pitched as an A-frame at 50° needs a ridge height of 1.5 × sin 50° ≈ 1.15 m and covers 3 × cos 50° ≈ 1.93 m of floor, 3 m long. A solo sleeper needs about 0.8 × 2.2 m; two people need about 1.5 × 2.2 m. So a 3 × 3 m A-frame fits two in calm rain, while a steeper 60° storm version (1.5 m floor) is really a one-person shelter with gear.
For a lean-to, the same 3 m width at 35° rises to 3 × sin 35° ≈ 1.72 m and covers 2.46 m of floor — plenty of room to sit up facing a fire. The tarp pitch planner runs these numbers for your tarp size, weather and tree spacing, including cord length and stake count.
How much cord do you need?
- Ridgeline: tree distance + 3 m for wraps and knots (5 m spacing → 8 m).
- Guylines: 2 m each; 6 for ridge pitches, 4 for a lean-to.
- Reserve: +10 % and one spare 3 m line.
- Typical total: 20–25 m of 2–4 mm cord for a 3 × 3 m tarp.
- Stakes: 6–8 plus 2 spares; longer V- or Y-stakes in soft forest soil.
Which knots for a tarp? One knot per attachment point
Four or five knots are enough for every pitch in this guide. The key is using the right knot at the right point: a fixed anchor where the load never changes, a tensioning hitch where you need pull, a friction hitch where you want to slide, and an adjustable hitch on guylines that you will retighten after dark. Our essential knots guide shows each one step by step, and the knot finder suggests a knot for any job.
| Attachment point | Recommended knot | Alternative | Why |
|---|---|---|---|
| Ridgeline anchor (tree 1) | Bowline or round turn & two half hitches | Timber hitch, Siberian hitch | Secure, easy to untie after load |
| Ridgeline tension (tree 2) | Trucker’s hitch, slipped | Toggle-locked slipped hitch | 3:1 pull for a drum-tight line |
| Tarp to ridgeline | Prusik loop + carabiner or toggle | Klemheist, tarp clips | Slides when loose, grips under load |
| Guylines to tie-outs | Bowline or larks head | Figure-eight loop | Fixed loop that will not slip |
| Guyline tension | Taut-line hitch | Adjustable grip hitch, midshipman’s hitch | Retension in seconds without untying |
| Guyline to stake | Loop over stake or clove hitch | Slipped half hitch | Quick release in the morning |
| Drip line | Prusik or short cord with overhand | Strip of cloth tied on | Diverts water running along cords |
Slip every knot you can. Finish tension knots with a slipped (quick-release) half hitch. Cold, wet fingers can untie a slipped knot in one pull; a jammed hitch in frozen cord can cost you twenty minutes and a knife cut.
Site and wind: where and how to pitch your tarp
The best pitch fails on the wrong site. Before you unroll the tarp, spend five minutes reading the ground and the sky — the dedicated guide to choosing a camp site goes deeper. Look for level, slightly raised ground with good drainage, shelter from the prevailing wind by trees or terrain, and trees healthy and far enough apart for your ridgeline.
Look up first. Dead branches and dead standing trees ("widowmakers") are the most serious hazard in woodland camping, especially in wind or after heavy snow. Never pitch under them. Avoid hollows and valley bottoms where cold air pools on clear nights and where rainwater collects. Keep at least 60 m (about 200 ft) from lakes and streams where possible; this protects the bank and keeps you out of damp air and flash-flood paths.
Tarp site checklist
- No dead branches or leaning dead trees within reach of a fall
- Two healthy trees 4–6 m apart (or poles and stakes ready)
- Level, raised ground; no water channels or hollows
- Wind direction checked — and the likely night shift
- Soil deep enough for stakes, or rocks and logs as anchors
- Safe distance to your fire, downwind of the tarp
- Camping and fires permitted here (wild camping rules)
How to orient a tarp to the wind
The golden rule is simple: the low, narrow or closed end faces the wind. An A-frame pitched along the wind lets gusts slide over the roof; turned broadside, it catches every gust like a sail. A plow point or closed-end A-frame points its closed tip into the weather. Wind often shifts at dusk and again around dawn, and in valleys cold air drains downhill at night, so pitch for the worst direction you expect, not the breeze you feel at 4 p.m.

Reading the wind on site: watch the tops of young trees and loose leaves for a few minutes, not the air at ground level, which is often calm in the forest. If the wind comes at an angle, turn the pitch so the ridge points into it, even if that means using a different pair of trees.
Wind also cools you faster than air temperature suggests. At 0 °C with a 30 km/h breeze, the felt temperature drops well below freezing — check it with the wind chill calculator before choosing an open pitch. And plan your time: in autumn and winter, the light fades early under trees. The daylight calculator tells you when to stop walking so you pitch in daylight.
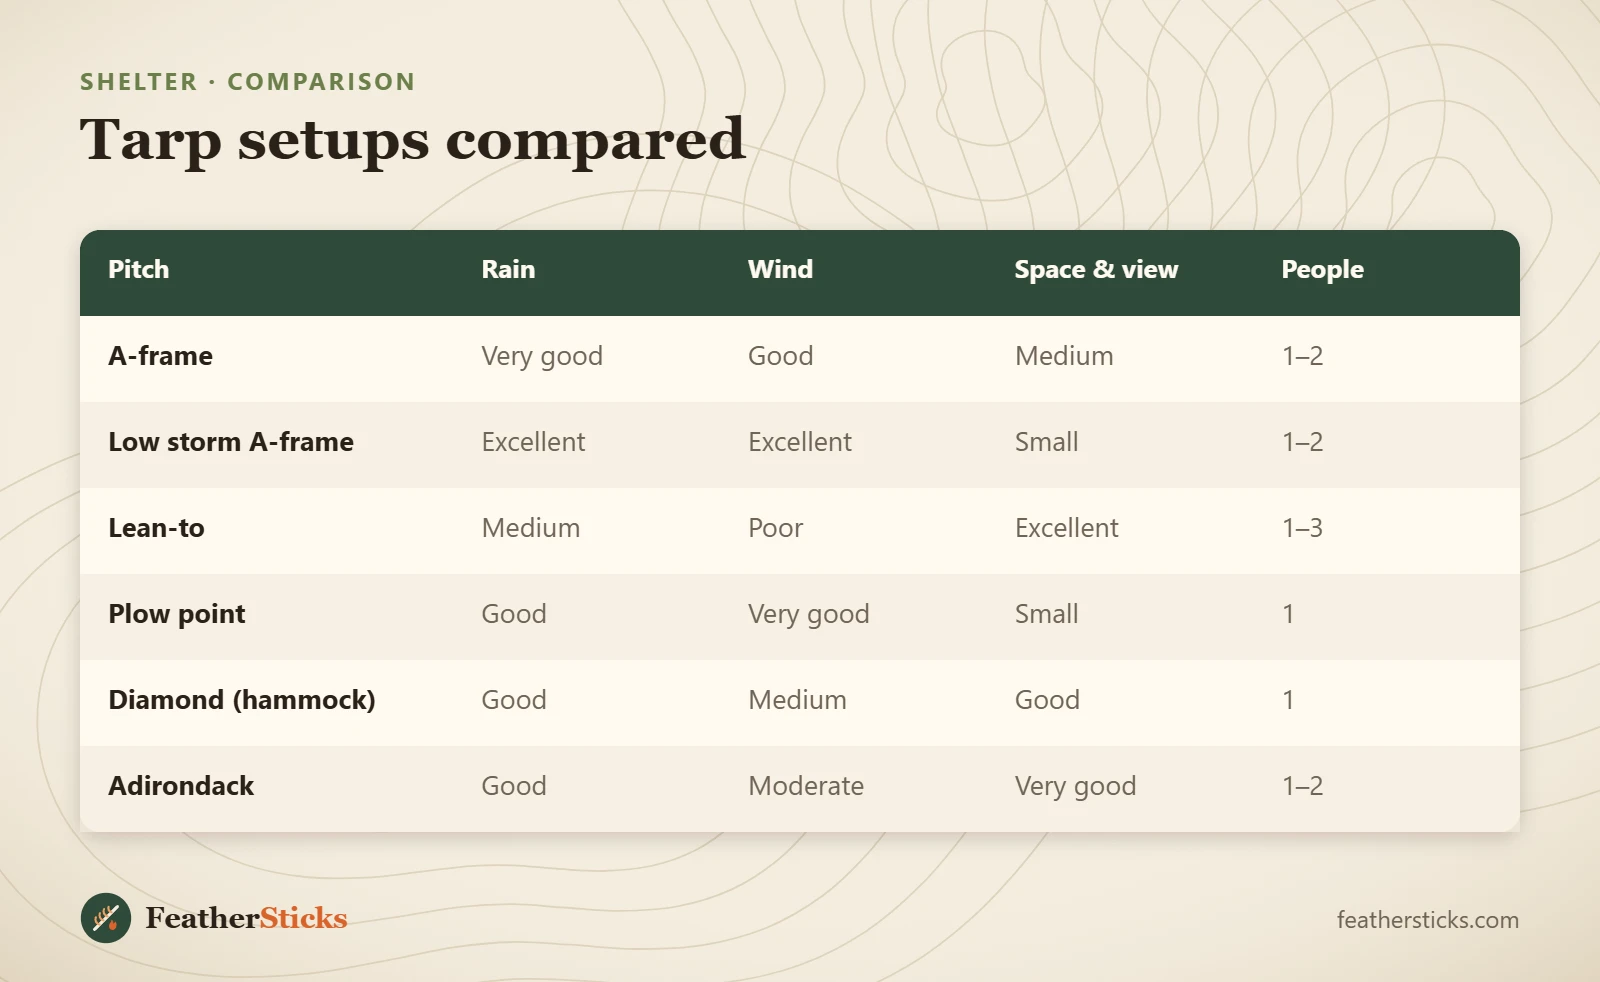
Wind resistance, from best to worst: envelope pitch and low storm A-frame (excellent), plow point and closed-end A-frame (very good), standard A-frame (good), C-fly and Adirondack (moderate), and the lean-to (poor when the wind hits the open side).
Rain management: drip lines, tension and staying dry
Most people who get wet under a tarp are not rained on — they are dripped on. Water runs along the ridgeline and guylines, pools in slack fabric, splashes up from hard ground or flows in across the floor. Each has a simple fix.
How a drip line works
 1The problem
Rain hitting the ridgeline outside the tarp runs along the cord like a gutter and drips off at the ridge seam — right above your head.
 2The fix
Tie a 20–30 cm piece of cord (or a prusik) onto the ridgeline 20–30 cm outside each tarp end and let the tail hang down. Tie it tight enough that it does not slide.
 3The result
Water follows the hanging tail and drips to the ground outside the shelter. Check it in the first rain: drops should fall from the tail, not from the tarp seam.

Five habits that keep a tarp dry
- Drip lines on every cord that enters the shelter. Tie a 20–30 cm piece of cord or a prusik onto the ridgeline just outside each end of the tarp and let its tail hang down. Water running along the line follows the drip line to the ground instead of reaching your sleeping bag. Do the same on hammock straps.
- Keep the fabric drum-tight. Sagging panels collect pools of water that stretch the fabric further and eventually spill inwards. Tension corners first, then side tie-outs, and retension nylon tarps after dark and after rain.
- Pitch steep enough. Walls of 45–60° shed water quickly; flat roofs under 30° hold puddles. If you need more height, raise the ridge rather than flattening the tarp.
- Keep your groundsheet inside the drip line. A groundsheet that sticks out beyond the tarp edge catches rain and funnels it underneath you. Fold it back so it stays at least 20 cm inside the edge.
- Choose ground that drains. Pitch on slightly raised, porous forest floor. Do not dig trenches around your tarp: they damage the soil and are rarely needed on a well-chosen site.
Condensation is not a leak. On still, humid nights, moisture from your breath condenses on the underside of the tarp. Raise one edge or an end for airflow, avoid pitching in damp hollows and keep wet clothes outside the sleeping area. A good sleep system — see sleeping gear — copes with some dampness; a down bag with no cover does not.
Pitch check: what a good tarp setup looks like (and how to fix a bad one)
Before you unpack your sleeping bag, step back three paces and look at the pitch from each end and each side. A good tarp shelter has a shape you can read at a glance: a straight ridge, flat panels without wrinkles running across them, symmetrical walls and stakes that all lean away from the load at roughly 45°. Most problems announce themselves in daylight — fix them now, not at 2 a.m.
Five-point pitch check
- Ridge seam straight from end to end, no belly between the prusiks
- Wrinkles run diagonally towards the corners, not across the panel
- Both walls at the same angle (45–60° for rain), edges clear of the groundsheet by 20 cm
- Every stake angled away from the tarp and pushed in to the head
- Drip lines hanging outside both ends; guyline tails coiled and findable
| Symptom | Likely cause | Fix |
|---|---|---|
| Water drips from the ridge seam | No drip lines, or water running along the ridgeline | Tie drip lines 20–30 cm outside each end |
| Puddle on a panel | Slack fabric or a wall flatter than 30° | Re-tension corners, then side tie-outs; raise the ridge |
| Tarp flaps and roars in gusts | Broadside to the wind or loose guylines | Turn the ridge into the wind, lower the pitch, tighten taut-line hitches |
| Stakes pull out overnight | Soft soil or stakes driven vertically | Angle stakes at 45° away from the load, use longer stakes or buried sticks as deadman anchors |
| Wet sleeping bag, no leak visible | Condensation or splash-back | Raise one end for airflow, keep the groundsheet inside the drip line |
| Ridgeline sagged by morning | Nylon cord stretched in wet and cold | Pull the trucker’s tail again; switch to low-stretch polyester or Dyneema-core cord |
Three practice drills
- The ten-minute A-frame. In the garden or a local wood, pitch an A-frame from a packed bag to fully staked. Time yourself; repeat until you are under ten minutes without looking anything up. This is what you will need when the first drops fall.
- The storm switch. From a standard A-frame, convert to a low storm pitch without taking the tarp down: lower the ridgeline at the trucker’s hitch, re-stake the edges flush and fold the surplus under. Then switch back. You learn which knots release easily and which jam.
- The dark pitch. Once the daylight version is automatic, pitch by head torch only. You will discover whether your guylines are pre-tied, your stakes are in one bag and your ridgeline is wound without tangles — lessons far better learned at home than on a wet hillside.
Record your numbers after each practice: tree spacing, ridge height and how much cord you used. Within a few weekends you will know your own tarp so well that the tarp pitch planner only confirms what your eyes already tell you.
What size tarp do you need?
Tarp size decides which pitches you can use. A 3 × 3 m square is the bushcraft favourite because it folds into every pitch in this guide and covers two people in an A-frame. Smaller tarps save weight but limit you to a few pitches; larger ones make superb group and base-camp shelters. Hammock campers often prefer rectangular or hexagonal tarps cut for length.
| Size | Typical weight | Good pitches | Best for |
|---|---|---|---|
| 1.5 × 2 m (poncho tarp) | 250–450 g | Lean-to, plow point, low A-frame | Emergency, day hikes, minimalist solo |
| 2 × 3 m | 300–600 g | A-frame solo, lean-to, plow point | Light solo trips in mild weather |
| 3 × 3 m | 450–900 g | All 12 pitches in this guide | Solo all-round, duo in A-frame, hammock |
| 3 × 4 m | 600–1,100 g | A-frame for two, large lean-to, hammock storm | Two people, long hammocks, base camp |
| 4 × 4 m and larger | 0.9–2 kg | Group lean-to, kitchen fly, Adirondack | Groups, family camps, winter fire camps |
| Hex / cat-cut hammock tarp, 3.3–3.6 m ridge | 300–800 g | A-frame over hammock, storm mode | Hammock campers wanting low weight |
Weights vary with fabric: silnylon and silpoly are light; PU-coated polyester is heavier; cotton canvas is heaviest but fire-tolerant.
Fabric matters as much as size. Silicone-coated nylon is light and strong but stretches when wet; silicone- or PU-coated polyester stretches far less; cotton or poly-cotton canvas is heavy and bulky but tolerates sparks and breathes, which is why it remains popular for fire-facing lean-tos. Tie-out points matter too: look for at least 16 tie-outs on a 3 × 3 m tarp (corners, edges and a line down the middle) so that every pitch in this guide is possible.
For complete kit weights, including tarp, cord and stakes, build a list with the kit builder or see the bushcraft kit list.
Staying warm under a tarp: sleep system, fire and clothing
A tarp keeps rain and wind off but traps little warm air. Your warmth comes from your sleep system, your clothing and — where allowed — a fire. Treat the ground as the biggest heat thief: conduction into cold soil drains more warmth than the air around you, so a good insulating pad matters more under a tarp than in a tent.
Layered sleep system under a tarp (top = outside)
- Rain, wind and dew protection; pitch lower in cold weather.
- Blocks draughts and splash, adds a few degrees of warmth.
- Rated to the expected low; size it with the sleeping bag calculator.
- R-value 2–3 in summer, 4+ in winter; add a foam pad on frozen ground.
- Keeps pad and bag clean and dry; stays inside the drip line.
Fire and tarps: nylon and polyester melt from a single ember. Keep a fire at least 3 m downwind of synthetic tarps, and more when the wind is gusting. Only cotton canvas or specially treated fabrics tolerate a fire close by, and even those need watching. Check fire rules and the forest fire danger index before lighting anything, and follow our campfire safety guide. The firewood calculator tells you how much wood a fire-facing lean-to needs for an evening or a whole night.
Clothing is the other half: a dry base layer for sleeping, an insulated jacket for camp and a hat make a big difference under an open pitch. See our bushcraft clothing guide for layering.
Is tarp camping allowed? Rules vary by country
Where you may pitch a tarp overnight depends entirely on local law. Scandinavian countries have broad public access rights for low-impact camping; Scotland allows responsible wild camping under its access code, while most of England and Wales require landowner permission; in the USA and Canada, rules differ between national forests, parks and private land. In Germany, overnight camping and shelter building in the forest are regulated by each federal state, and many states only allow it on designated trekking sites — see wild camping in Germany. Always check locally, leave no trace, never cut live wood and keep fires only where they are explicitly allowed.
| Pitch | Rain | Wind | Space & view | People |
|---|---|---|---|---|
| A-frame | Very good | Good | Medium | 1–2 |
| Low storm A-frame | Excellent | Excellent | Small | 1–2 |
| Lean-to | Medium | Poor | Excellent | 1–3 |
| Plow point | Good | Very good | Small | 1 |
| Diamond (hammock) | Good | Medium | Good | 1 |
| Adirondack | Good | Moderate | Very good | 1–2 |
Common mistakes
- Pitching under dead branches or dead trees that can fall in wind or under snow load.
- A slack ridgeline or saggy fabric — water pools, the tarp flaps and drips inside.
- Broadside to the wind or open side facing the weather, turning the tarp into a sail.
- No drip lines, so water runs along the ridgeline and guylines straight into the shelter.
- Groundsheet sticking out past the tarp edge and funnelling rain underneath you.
- A synthetic tarp too close to the fire or upwind of it — one ember burns a hole.
- Leaving the pitch until dusk; practise in daylight and at home first.
What you need
- Tarp 3 × 3 m (3 × 4 m for two or long hammocks) with 16+ tie-outs
- Ridgeline cord, 10–15 m, 3–5 mm low-stretch
- 6 guylines of 2–3 m, 2–3 mm, pre-tied with loops
- 8–10 stakes (V or Y profile for forest soil)
- 2 prusik loops and 1–2 small carabiners or toggles
- Groundsheet or bivvy bag
- Two tree straps (bark protection) or trekking poles