Skills
Camp Setup: How to Lay Out a Bushcraft Camp in the Right Order
Good camp setup means two things: putting each part of camp in the right place, and doing the jobs in the right order. Divide your camp into zones – sleep, fire, kitchen, water and latrine – arranged by wind direction and distance, and work through a fixed sequence: shelter first, then water and firewood, then fire and food, all finished before dark.
It sounds simple, but most bad nights in the woods come from a camp set up in the wrong order: a tarp pitched by headlamp, firewood gathered in the dark, a fire placed upwind of the sleeping bag. This guide gives you a layout you can adapt to any site, a timeline counted back from sunset and a checklist for breaking camp without a trace. It builds on choosing a camp site and is part of our bushcraft for beginners series.
Step by step
-
1
Arrive 2–3 hours before sunset
Check today's sunset and stop early enough to choose a site and finish all jobs in daylight.
-
2
Mark out the zones
Decide where sleep, fire, kitchen, water and latrine go, based on wind direction and slope.
-
3
Pitch the shelter first
Shelter and sleep system come first – if the weather turns, you are already protected.
-
4
Fetch water and firewood
Collect water for the evening and morning, then gather more wood than you think you need.
-
5
Light the fire and cook
Only now build the fire or set up the stove and cook dinner – at least 30 minutes before sunset.
-
6
Break camp without a trace
Drown the fire, pack out all waste, restore the ground and do a final sweep before you leave.
The five camp zones: sleep, fire, kitchen, water, latrine
Every efficient camp, from a solo bivouac to a group base camp, is organised in zones. Separating functions keeps sparks away from your sleeping bag, food smells away from your bed, and waste away from your water. The layout adapts to the site, but the logic stays the same.

| Zone | Where | Distance | Why |
|---|---|---|---|
| Sleep | Best, flattest, safest ground, upwind of the fire | Centre of camp | Safety from sparks and smoke; the most important spot |
| Fire | Downwind of the shelter, on mineral soil or existing ring | 2–3 m from a synthetic tarp, more in wind | Smoke and sparks blow away from camp |
| Kitchen | Next to the fire, on the side away from the shelter | 1–2 m from the fire | Short trips, spills away from the bed |
| Water | Storage in the kitchen; source away from camp | Camp 50–60 m from the source | Less damp, flood and wildlife disturbance |
| Latrine | Downhill and downwind, away from paths | 60 m+ from water and camp | Hygiene and water protection |
The sleep zone
This is the heart of camp and gets the best spot: level, drained, no widowmakers overhead, sheltered from the wind. Everything else is arranged around it. Keep this area clean – no food, no cooking, no boots full of mud – so it stays dry and does not attract animals. Your sleeping gear goes in last, just before you go to bed, so it doesn't collect dew.
The fire zone
If fire is permitted, place it downwind of the shelter so smoke and sparks blow away from you. Keep at least 2–3 m between the fire and any nylon or polyester tarp – synthetic fabric melts from a single spark – and more on windy nights. Build on mineral soil, sand or an existing fire ring, clear flammable litter in a radius of about 1.5 m and never under low branches. For details, read the campfire safety guide, and use the fire lay picker to choose the right fire for cooking or warmth.
The kitchen zone
The kitchen sits beside the fire (or stove), on the opposite side from the shelter. Keep pots, water, food and utensils together, off the ground if possible – a log, a sit mat or a small tarp works. Spills and crumbs stay away from your bed. In areas with bears, the kitchen and food storage move at least 60–100 m downwind of the sleeping area; in Central Europe, keeping food sealed and hung or packed away is enough against foxes, mice and wild boar – see storing food at camp.
The water zone
You camp 50–60 m from the water source, but you need a "water station" in camp: a collapsible container for raw water, a clearly separate bottle for treated water and your filter or pot for boiling. Label or colour-code dirty and clean containers so you never mix them up. See finding water and boiling water.
The latrine zone
Choose a spot at least 60 m from water, camp and paths, downhill and downwind. Dig a cat hole 15–20 cm deep with a small trowel, cover it afterwards and pack out toilet paper in a sealed bag where required. For groups over several days, a single shared latrine area is better than many scattered spots. Wash hands or use sanitiser – most camp stomach bugs come from poor hand hygiene, not bad water.

Camp layout diagram: how the zones fit together
Think of camp as a line along the wind. Upwind: the sleeping area. Downwind of it: the fire, with the kitchen beside it. Further off, the latrine, downhill and downwind. Water comes from a source 50–60 m away. The diagram below shows this from upwind (top) to downwind (bottom).
Camp layout along the wind (wind blows from top to bottom)
- Shelter on the best ground, entrance facing away from the wind or towards the fire at a safe distance.
- Pack under cover, sit mat, tools hung on a line – between shelter and fire.
- 2–3 m+ downwind of the shelter, cleared ground, water bottle ready to extinguish.
- Beside the fire, away from the shelter; raw and treated water separated.
- 60 m+ from camp, water and paths.
Building the camp layout, zone by zone (plan view, not to scale)
 1Read the site first
Before you unpack anything, find the wind direction and scan for hazards. A dead tree or hanging dead branches rule out the ground around them – treat it as a no-go zone, not as a spot "just for one night".
 2Place the sleep zone
The shelter gets the best, flattest, best-drained ground, upwind of everything else. Every other zone is placed relative to this spot, so fix it first.
 3Fire downwind
Put the fire downwind of the shelter, at least 2–3 m from a synthetic tarp and more in wind. Clear flammable litter in a radius of about 1.5 m – only where fire is allowed at all.
 4Kitchen and firewood
The kitchen sits 1–2 m beside the fire, on the side away from the shelter. Stack sorted firewood near the tarp edge, where it stays dry but out of the spark path.
 5Water and latrine
The camp is 50–60 m from the water source. The latrine goes 60 m or more from water, camp and paths, downhill and downwind. Walk the distances once so you know them in the dark.
What it should look like: standing at your shelter, you should feel the wind on your back or side and see the fire in front of you, downwind. Smoke drifts away from the bed, the kitchen is a few steps from the fire, and you cannot see the latrine from camp. If smoke blows into your face at the shelter, the layout is wrong – move the fire, not the shelter.
On sites without a clear wind, use slope instead: sleep at the top, fire and kitchen in the middle, latrine at the bottom and well away. With a group, arrange several shelters in an arc around a shared fire, each at a safe distance, with the kitchen on the open side of the arc. Keep a clear "walkway" between zones so nobody trips over guylines or into the fire in the dark – mark guylines with reflective cord or tie a strip of light-coloured cloth to them.
Special cases
- No fire allowed: the kitchen becomes a stove spot on bare ground or a flat stone, still downwind of the shelter.
- Hammock camp: the sleep zone is defined by two healthy trees; the fire goes downwind and far enough from the underquilt – see hammock camping.
- Legal trekking sites: the pitch, fire pit and toilet are fixed; you only arrange your own sleep and kitchen corner. See wild camping in Germany.
- Winter: the fire moves closer for warmth, with a heat reflector behind it; keep extra distance from snow-loaded branches.
Checking and pitching the sleep spot, step by step
The sleep zone decides how the night goes, so it deserves two careful minutes before the pack comes off. Check the spot in four directions – up, down, where the water goes and where the wind comes from – and only then pitch. The full site checklist is in choosing a camp site; here is the quick version you do on every pitch.
Checking the pitch: up, down, water, wind
 1Look up
Stand where you want to sleep and look straight up. Dead branches, broken tops and leaning dead trees (widowmakers) can fall even without wind – if you see one, move on instead of negotiating with it.
 2Check the ground
Crouch and clear stones, cones and sticks. The spot should be level and firm, with no roots under your hips; if in doubt, lie down on it for a moment.
 3Think like rain
Imagine heavy rain: where would the water run and collect? Avoid hollows, dry channels and the foot of slopes – a slightly raised, well-drained spot stays dry.
 4Read the wind
Watch the treetops for a minute. The wind direction decides where the closed side of the shelter and the fire go.
Once the spot passes all four checks, pitch the shelter. The sequence below shows a simple A-frame tarp between two trees – the most common bushcraft pitch; other pitches are in the tarp setup guide, and the tarp pitch planner helps you choose one for the forecast.
Pitching an A-frame tarp
 1Ridgeline first
Tie the ridgeline between two healthy trees and pull it taut, for example with a trucker's hitch from our essential knots. A sagging ridgeline means a sagging tarp.
 2Centre the tarp
Drape the tarp over the line so both sides hang equally and the centre seam sits on the ridgeline. Attach the corners to the line with prusik loops or toggles so you can slide them later.
 3Peg the corners
Drive the pegs leaning about 45° away from the tarp, so the line pulls against the whole length of the peg. In soft ground use longer pegs or a stick buried crosswise.
 4Tension evenly
Work around the tarp and tighten every point a little at a time until the fabric is smooth. Wrinkles show which line is too loose or too tight.
 5Add drip lines
Tie a short cord to the ridgeline just outside each end of the tarp and let it hang down. Rain running along the line drips off there instead of running under your roof.
What a good pitch looks like
- No dead wood overhead, no hollow or channel underfoot
- Ridgeline taut, tarp centred, both sides equal
- Pegs leaning away from the tarp, lines in line with the seams
- Fabric smooth without wrinkles, closed side into the wind
- Drip lines at both ends, groundsheet fully under the roof
- Fire spot at least 2–3 m downwind, firewood dry under the tarp edge
| Symptom | Likely cause | Fix |
|---|---|---|
| Tarp sags after dark or in rain | Nylon stretches when wet; ridgeline knot slipped | Re-tension ridgeline and corners before bed and again after rain starts |
| Water runs along the line into the shelter | No drip lines | Tie short drip cords just outside both tarp ends |
| Puddle on the groundsheet | Pitched in a hollow, or groundsheet sticks out beyond the roof | Fold the groundsheet edges under; next time pitch on raised ground |
| Smoke in the shelter | Fire upwind, or the wind turned | Move the fire downwind or let it die and use a stove |
| Pegs pull out | Soft ground, pegs driven upright | Lean pegs about 45° away, use longer pegs or a buried stick |
| Tarp flaps loudly | Uneven tension, pitch too high for the wind | Tension evenly, lower the windward side |
Order of work: what to do first when setting up camp
Priorities in the outdoors follow the survival logic of shelter, water, fire, food – adjusted to the situation. On a normal evening, the order below is the most robust: every step makes the next one easier, and if something goes wrong (rain, injury, darkness), the most important things are already done.
The camp setup sequence
- AssessCheck the site with the 5 W's and mark the zones.
- ShelterPitch tarp, tent or hammock; lay out ground sheet.
- WaterFetch and start treating water for evening and morning.
- WoodGather tinder, kindling and fuel – then gather more.
- Fire & foodLight the fire or stove, cook, eat before dark.
Why the shelter comes first
If a shower arrives while you are gathering wood, your bag and dry clothes are already protected. A tarp also gives you a dry workspace for preparing tinder and food. And pitching needs good light: finding a good anchor, checking trees overhead and tensioning lines is much harder by headlamp. The tarp setup guide and essential knots help you pitch quickly.
Water before wood
Water needs time to treat – boiling, cooling or waiting for tablets to work – so start it early. Walk to the source once with enough capacity for dinner, drinks, breakfast and a fire bucket. The water calculator tells you how much you actually need.
Firewood: gather twice as much
The classic bushcraft rule: when you think you have enough firewood, gather the same amount again. Sort it by thickness into tinder, kindling (pencil to thumb thickness) and fuel (wrist thickness and up), and keep it dry under the tarp edge. Collect only dead, fallen wood, and only where you are allowed to. The firewood calculator estimates the amount for cooking or a full night.
Fire and dinner before sunset
Light the fire at least 30 minutes before sunset so you can cook and eat while you can still see. Place your headlamp, knife, water bottle and fire-extinguishing water within reach. After dinner, prepare tomorrow morning: tinder in a dry bag, water filled, breakfast within reach.

Checkpoint: anyone in camp should be able to tell raw and treated water apart in the dark, by colour or by feel (for example a bag versus a hard bottle). If you are ever unsure which container you drank from, treat the next refill again and swap the markings for something clearer.
Camp timeline: working back from sunset
The biggest mistake is simply stopping too late. Use sunset as the fixed point and count backwards. In the forest it gets dark 20–30 minutes before the official sunset, and after sunset you only have civil twilight – about 30–40 minutes in Central Europe, longer in the far north in summer – before you need a headlamp. The sunset and daylight calculator generates this timeline for your location and date.
| Time | Job | Notes |
|---|---|---|
| Sunset − 3 h | Start looking for a camp site | Enough time to reject poor spots |
| Sunset − 2 h | Pitch shelter | Best light for checking trees and anchors |
| Sunset − 75 min | Gather firewood and water | Start treating water |
| Sunset − 30 min | Fire lit, dinner cooking | Eat while you can still see |
| Sunset | Camp ready, relax | Headlamp, water, knife within reach |
| End of civil twilight | Headlamp time | About 30–40 min after sunset in Central Europe |
Timeline based on the logic of the daylight calculator. Add time in bad weather, with groups or with children.

To know how much walking time you have left before that first stop, combine the timeline with the hiking time calculator. Without a watch, use the hand method: hold your outstretched hand at arm's length with fingers horizontal, bottom finger on the horizon; each finger between horizon and sun is roughly 15 minutes until sunset. It works best at mid-latitudes. More sun-based tricks are in navigation without a compass.
Adapting camp setup to weather
Rain camp vs. fair-weather camp
Rain or wind forecast
- Low, steep tarp pitch, closed side into the wind
- Drip lines on the ridgeline and guylines
- Firewood under cover immediately
- Stove instead of fire, cook under the tarp edge (never inside a tent)
- Gear in dry bags, boots under cover
Stable, dry weather
- High, open pitch or lean-to for view and airflow
- More distance to water because of insects
- Check fire danger index – dry weather can mean a fire ban
- Keep water for extinguishing ready
- Shade in the afternoon for the kitchen
Wind decides the orientation of everything: shelter opening, fire position, even the latrine. Check the forecast and watch the treetops when you arrive. On a cold night, the wind chill calculator shows why a few metres of shelter behind a thicket matter, and the tarp pitch planner suggests the right pitch for the conditions.
Keeping camp organised: small habits, big difference
An organised camp is a safe camp. The most common "lost" items in the woods are knives, headlamps and lighters – usually a few metres from where they were last used, hidden in leaf litter. A few habits prevent this:
- A home for everything: tools always go back to the same place – a pocket, a hanging line, a specific corner of the tarp.
- Nothing on the ground: hang gear on a line under the tarp or on a short stick hammered into a tree fork (not into living bark).
- Bright markings: orange cord on knife sheaths, lighter and trowel makes them easy to find.
- Headlamp in the same pocket from the moment you arrive.
- Knife safety: sheath the knife after every use and set up a clear working area with a chopping block – see bushcraft knives.
Your pack is part of the system too. Unpack in the order you need things – shelter first, sleep system last – and the kit list or the Kit Builder help you pack in a way that makes setup quick.
Setting up camp with a group or children
With several people, camp goes up much faster – if the jobs are clearly shared. A simple division on arrival works well: two people pitch shelters, one fetches water, two gather wood, one sets up the kitchen and fire area. After 45 minutes, meet at the fire spot and check what is still missing. Nobody stands around, and nobody walks to the stream alone in the dark.
With children, add a few rules: agree on a clearly visible boundary around the fire (for example a ring of sticks about two paces from it) that only adults cross. Every child gets a headlamp and a whistle and knows where the latrine and water station are. Children love fixed jobs – gathering tinder, sorting wood by thickness, counting pegs – and learn the basics along the way. Add a third to every time estimate.
Breaking camp: leave no trace
Breaking camp is the reverse of setting up, with one extra priority: the site should look as if you had never been there. Start early enough – packing a wet tarp and dousing a fire properly takes longer than you think, often 45–60 minutes.
Breaking camp step by step
- Breakfast and water first. Eat, drink and fill bottles while the camp is still set up.
- Put out the fire completely. Drown it with water, stir the ashes, drown again until everything is cold to the touch of the back of your hand. Scatter cold ashes if appropriate and restore the ground.
- Pack the sleep system. Air the sleeping bag briefly if the weather allows, then stuff it into a dry bag.
- Strike the shelter last. It protects your gear from rain until the end. Shake off water and dirt; dry it at home.
- Pack out all waste. Including food scraps, micro-trash and used toilet paper where required.
- Restore the site. Scatter leaves back over bare patches, return stones and logs you moved, fill any holes.
- Final sweep. Walk the whole camp in a grid, looking for pegs, cord ends, lighter, knife. Look back once more from the path.
Putting the fire out and the final sweep
 1Drown it
Pour water over the whole fire bed, including the edges, until the hissing stops. Use plenty – one bottle is rarely enough, so keep the fire bucket from the evening.
 2Stir and drown again
Stir ash and embers with a stick so the water reaches the embers underneath, then pour again. Repeat until nothing steams any more.
 3Back-of-hand test
Hold the back of your hand close to the ash, then touch it. Only when everything is cold to the touch is the fire out – "mostly out" is not out.
 4Sweep in lanes
Walk the site in parallel lanes, eyes on the ground, and look for pegs, cord ends, lighter and knife. Then look back once more from the path.
Troubleshooting the fire: if the ash still steams or hisses after stirring, there are embers underneath – add more water and stir deeper, including the ground under the edge stones. If you run short of water, fetch more rather than covering the fire with soil: a buried ember can keep smouldering in roots and humus. Details are in the campfire safety guide.
Last check before you leave
- Fire cold to the touch, ashes wet
- All pegs, guylines and cord ends collected
- No food scraps, wrappers or micro-trash
- Latrine holes covered
- Ground restored, leaf litter spread
- Knife, lighter, headlamp, phone accounted for
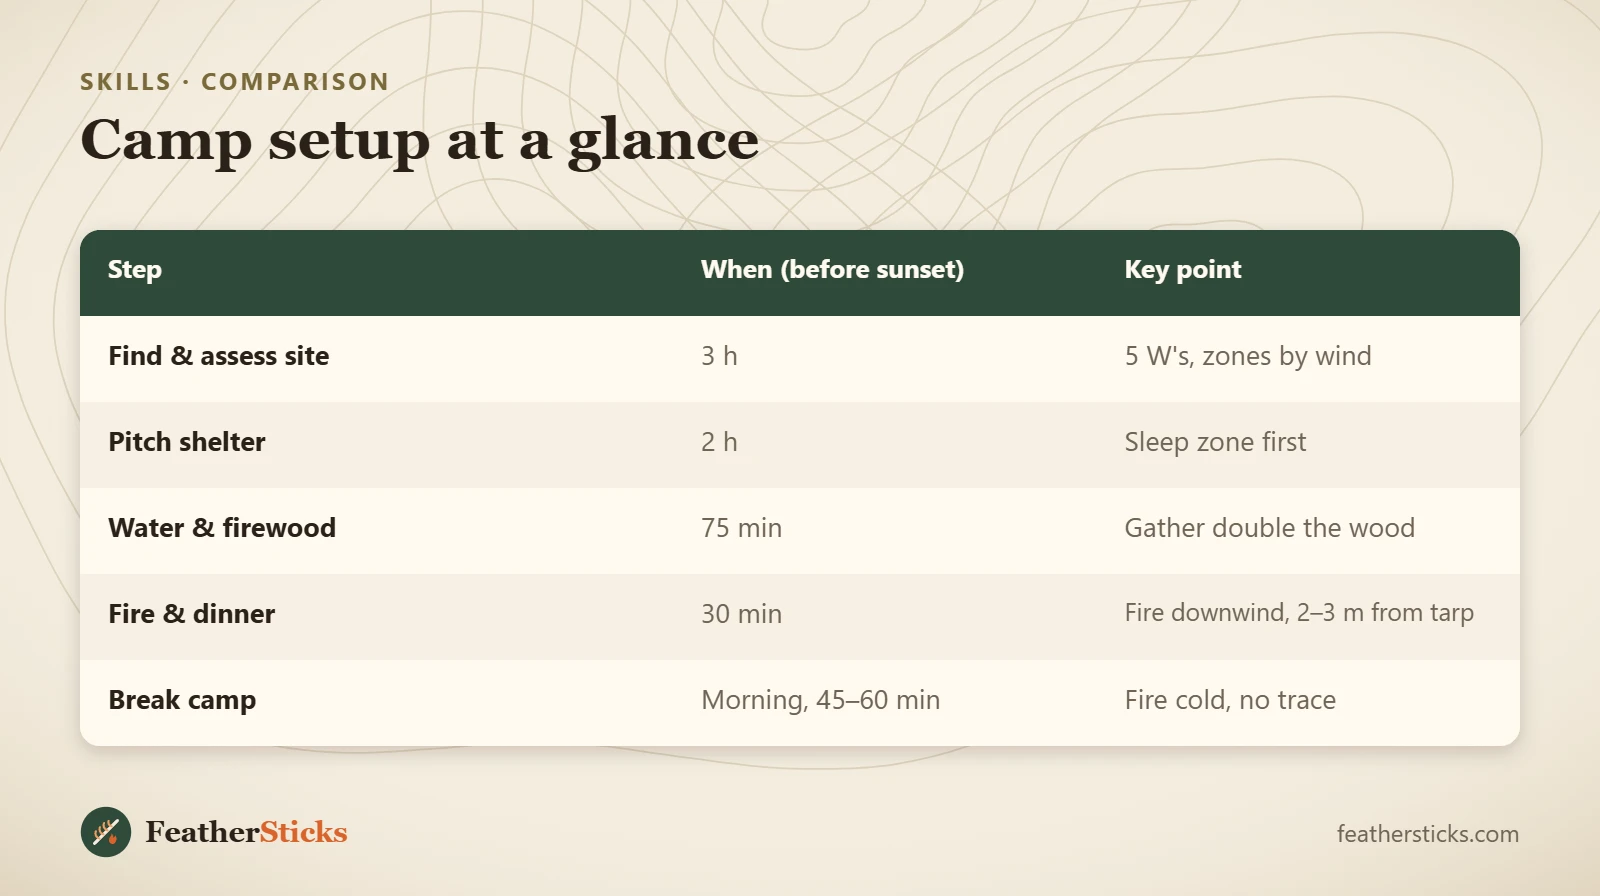
| Step | When (before sunset) | Key point |
|---|---|---|
| Find & assess site | 3 h | 5 W's, zones by wind |
| Pitch shelter | 2 h | Sleep zone first |
| Water & firewood | 75 min | Gather double the wood |
| Fire & dinner | 30 min | Fire downwind, 2–3 m from tarp |
| Break camp | Morning, 45–60 min | Fire cold, no trace |
Common mistakes
- Stopping too late and pitching the shelter in the dark.
- Placing the fire upwind of the shelter so smoke and sparks drift onto the tarp.
- Gathering just enough firewood – and running out at 10 p.m.
- Mixing raw and treated water containers.
- Latrine too close to camp or water.
- Leaving tools on the ground where they vanish in the leaf litter.
- Leaving the fire "mostly out" when breaking camp.
What you need
- Tarp or tent with guylines and pegs
- Folding saw and knife
- Collapsible water container and filter
- Small trowel
- Headlamp with spare batteries
- Dry bags for tinder and sleeping bag
- Waste bags