Skills
Navigation Without a Compass: Sun, Stars, Moon and Nature Signs
To navigate without a compass, use the sky first: the sun rises roughly in the east, is due south at solar noon (in the northern hemisphere) and sets roughly in the west; a shadow stick turns this into a usable east–west line in 15–20 minutes. At night, Polaris marks north within about a degree, and the Southern Cross points south below the equator. Nature signs such as wind-bent trees or snow melt can support these methods – but many popular "rules", like moss growing on the north side, are unreliable.
This guide explains each method step by step, how accurate it really is and when it fails, with an honest reliability table. Natural navigation is a backup and an observation skill, not a replacement for map and compass navigation – but it makes you far harder to get lost, and it is one of the most rewarding parts of bushcraft.
Step by step
-
1
Note where the sun is
Remember: east in the morning, south at solar noon (northern hemisphere), west in the evening – shifted by season.
-
2
Set up a shadow stick
Push a straight stick upright into flat ground and mark the tip of its shadow with a pebble.
-
3
Wait 15–20 minutes
Mark the new shadow tip. The line from the first to the second mark runs roughly west to east.
-
4
Use the stars at night
Follow the pointer stars of the Plough to Polaris for north, or use the Southern Cross for south.
-
5
Cross-check with nature
Use several nature signs together – never a single one – and treat them as supporting evidence only.
Using the sun for direction
The sun is the most useful natural compass, but the familiar phrase "the sun rises in the east and sets in the west" is only exactly true around the spring and autumn equinoxes (around 20 March and 22–23 September). In summer, the sun rises and sets far to the north of east and west; in winter, far to the south. The further you are from the equator, the larger this shift.
| Date | Sunrise direction | Sunset direction | At solar noon |
|---|---|---|---|
| Around 21 June | North-east (≈ 50°) | North-west (≈ 310°) | Due south, high |
| Around 20 March / 23 September | East (≈ 90°) | West (≈ 270°) | Due south, medium |
| Around 21 December | South-east (≈ 128°) | South-west (≈ 232°) | Due south, low |
Approximate values; they change with latitude. In the southern hemisphere the sun is due north at solar noon.

What to look for: in summer the arc is high and wide, and the sun spends a long time in the northern half of the sky early and late in the day; in winter it is low and short and stays in the south. So "sun on the horizon at breakfast" means north-east in June but south-east in December – exactly the kind of difference that sends people 40° off course if they assume "east".
Solar noon: the sun's most useful moment
At solar noon the sun is at its highest point and exactly due south (seen from the northern hemisphere, north of the tropics) – shadows point due north. Solar noon is not 12:00 on your watch: it depends on your longitude within the time zone, on summer time, and on a seasonal wobble (the "equation of time") of up to about a quarter of an hour. In Germany it usually falls somewhere between about 11:50 and 12:50 in winter time, depending on place and date, and an hour later under summer time. The sunset and daylight calculator shows the exact solar noon for your location and date.
Around solar noon the sun moves quickly across the south but changes height slowly, which makes it hard to pinpoint by eye. In the morning and evening it is easier to use the sun together with the season table above. And even without precise numbers, simply keeping the sun on a constant side – "sun on my left cheek in the morning" – prevents the classic mistake of walking in circles. Experiments have shown that people without a visible reference such as the sun tend to wander in circles, however straight they think they walk.
The shadow stick method: finding east–west
The shadow stick (or shadow tip) method is the most reliable way to find direction from the sun without a watch. It works in both hemispheres and at any time of day when the sun casts a clear shadow.
Shadow stick step by step
 1Stick upright
Push a straight stick about 1 m long vertically into flat, clear ground. Sight it from two sides to check it really is vertical – a leaning stick shifts the shadow tip. A longer stick gives a longer shadow and more accuracy.
 2First mark
Place a pebble or peg exactly at the very tip of the shadow, not beside its fuzzy edge. This first mark is roughly west.
 3Wait
3WaitWait 15–20 minutes without touching the stick. Longer gives better accuracy, especially near midday.
 4Second mark
Mark the new position of the shadow tip with a second pebble. This is roughly east. If the two marks are barely a finger-width apart, wait longer.
 5Draw the line
Scratch a straight line from the first to the second mark and extend it beyond both. It runs approximately west to east.
 6Find north
Stand on the line with the first mark on your left and the second on your right: you are facing roughly north (in both hemispheres), and south is behind you.
How accurate is it? Around midday and near the equinoxes, the result is usually within about 10°. In the early morning or late afternoon, especially in summer at high latitudes, the error can be considerably larger. A more precise variant is the equal shadow method: mark the shadow tip in the morning, draw a circle around the stick with that radius, and mark where the shadow tip touches the circle again in the afternoon. The line between the two marks runs very accurately east–west – but it takes several hours.
What it should look like: quick checkpoints
- A sharp tip: the shadow ends in a clear point on bare, level ground. A thin stick with a pointed top, or a small twig lashed across the top, makes the tip easier to see.
- Marks a hand-width apart or more: if they are closer, any small placing error becomes a large direction error.
- A plausibility check with the sun: facing north along your result in the northern hemisphere, the sun should be behind you – behind your right shoulder in the morning, behind your left in the afternoon. If it is in front of you, the marks are swapped.
| Symptom | Likely cause | Fix |
|---|---|---|
| Shadow tip blurred or fading | Thin cloud or haze | Use a thinner, pointed stick and mark in the brightest moment; wait for a gap in the cloud |
| Marks almost on top of each other | Waited too short, stick too short | Wait longer and use a longer stick |
| Line clearly off when checked with a compass | Stick leaning, ground sloping, marks set beside the tip | Reset the stick vertically on level ground and mark the very tip |
| Large error early or late in the day | Low sun, especially in summer at high latitudes | Repeat closer to midday or use the equal shadow method |
| No usable shadow at all | Overcast sky | Switch to the brightest patch of cloud, slopes and several nature signs; try again later |
Practice drill: calibrate against a compass
On a sunny day, set up three shadow sticks – mid-morning, around solar noon and mid-afternoon – each with 15–20 minutes between the marks. Lay a compass along each finished line and write the difference in degrees in your notebook. Repeat the drill in another season. Remember that a compass points to magnetic north: the difference to true north is small in Central Europe but large in some other regions, so check the value printed on your map. After a few sessions you know how far to trust the method at different times of day.
The watch method: quick but rough
An analogue watch – or a watch face drawn on paper with the correct time – can give a quick direction. It is popular because it is fast, but it is also one of the least accurate methods, so use it for a rough idea only.
Watch method by hemisphere
Northern hemisphere
- Hold the watch flat
- Point the hour hand at the sun
- Bisect the angle between the hour hand and 12 o'clock
- Under summer time, use 1 o'clock instead of 12
- The bisecting line points roughly south
Southern hemisphere
- Hold the watch flat
- Point 12 o'clock at the sun
- Bisect the angle between 12 and the hour hand
- Under summer time, use 1 o'clock instead of 12
- The bisecting line points roughly north
Watch method step by step (northern hemisphere, 10:00)
 1Hour hand at the sun
Hold the watch flat and level, then turn it until the hour hand points at the sun. The example shows 10:00 winter time. Tilting the watch distorts every angle that follows.
 2Halve the angle
Find the point halfway between the hour hand and 12 o'clock – at 10:00 that is the 11. Always use the smaller of the two angles.
 3Summer time: use the 1
Under summer time your clock runs an hour ahead of the sun, so halve the angle between the hour hand and 1 o'clock instead. Forgetting this is one of the most common mistakes.
 4Read south, then north
The bisecting line points roughly south; north is directly opposite. Expect errors of 15–30° and confirm with a shadow stick when you have time.
Why is it inaccurate? The method assumes the sun moves evenly around the horizon at 15° per hour, but the sun actually moves across a tilted arc. The error grows the higher the sun stands, the further you are from solar noon, the closer you are to the tropics – and when your clock time differs from solar time. Errors of 20° or more are common in summer. Treat the result as a first guess and confirm with a shadow stick.
Navigating by the stars: Polaris and the Southern Cross
Finding Polaris (northern hemisphere)
Polaris, the North Star, sits less than a degree from the celestial north pole, so it marks true north all night, all year – the most accurate natural direction there is. It is not particularly bright, so find it via two constellations:
- The Plough (Big Dipper): follow the two "pointer" stars at the end of the pan (away from the handle) in the direction the pan opens, about five times the distance between them, to reach Polaris.
- Cassiopeia: the W-shaped constellation lies on the opposite side of Polaris from the Plough. When the Plough is low or hidden, Cassiopeia is high, and vice versa.
Once you have Polaris, drop an imaginary vertical line from it to the horizon – that point is north. Bonus: the height of Polaris above the horizon roughly equals your latitude (about 50° in central Germany).
Finding Polaris with the pointer stars
 1Find the Plough
Face roughly north and look for the seven bright stars of the Plough (Big Dipper): four form the pan, three the curved handle. Depending on season and hour it stands high, low or on its side.
 2Pick the pointers
The two stars at the end of the pan, away from the handle, are the pointers: Merak at the bottom of the pan and Dubhe at its rim.
 3Go five times the gap
Follow the line from Merak through Dubhe in the direction the pan opens, about five times their distance. The first moderately bright star standing on its own is Polaris.
 4Drop a line to the horizon
Drop an imaginary vertical line from Polaris to the horizon – that point is north. Line it up with a tree or a notch in the skyline so you can still use the direction when you walk on.

Have you got the right star? Polaris is only moderately bright, so a brilliant "star" low in the south, east or west is far more likely a planet. Three quick checks: the pointer line and Cassiopeia's W, on the far side, both lead to the same star; over 15 minutes Polaris stays put against a tree top while other stars drift; and its height above the horizon matches your latitude. For practice, find Polaris at home, then check the direction against a compass by day from the same spot.
The Southern Cross (southern hemisphere)
There is no bright "South Star". Instead, use the Southern Cross (Crux): extend its long axis about four and a half times its length towards the horizon to reach the approximate position of the south celestial pole. Two bright "pointer" stars next to the Cross (Alpha and Beta Centauri) help confirm: the perpendicular bisector of the line between them crosses the extended Cross axis near the pole. Drop a vertical line to the horizon for south.
Orion and moving stars
Orion, visible in winter from both hemispheres, has a useful property: the star at the western end of its belt rises almost due east and sets almost due west. And any star can give direction if you watch it for 15 minutes against a fixed point, like a tree top: in the northern hemisphere, if it rises you are facing roughly east; if it sinks, west; if it moves to the right, south; if it moves to the left, north. In the southern hemisphere, left and right are reversed.
Using the moon
The moon is less straightforward than the sun because its position depends on its phase, but it can still help.
- Crescent method: draw an imaginary line through the two horns of a crescent moon and extend it to the horizon. In the northern hemisphere this points roughly south; in the southern hemisphere, roughly north. It is a rough guide only.
- Full moon is opposite the sun: it rises around sunset in the east, is roughly due south around the middle of the night (northern hemisphere) and sets around sunrise in the west.
- Lit side: the lit side of the moon always faces the sun. After sunset, the lit side points towards where the sun went down – roughly west.
| Phase | Rises | Highest (roughly south) | Sets |
|---|---|---|---|
| New moon | With the sun | Around midday (not visible) | With the sun |
| First quarter (right half lit) | Around midday | Around sunset / early evening | Around midnight |
| Full moon | Around sunset | Around midnight | Around sunrise |
| Last quarter (left half lit) | Around midnight | Around sunrise | Around midday |
Times refer to local solar time and are approximate. In the southern hemisphere the moon is roughly north when highest, and the lit sides appear reversed.
Nature signs: what works and what is a myth
Nature signs are where most bushcraft books exaggerate. Plants, snow and wind do react to sun and weather, but local conditions – shade, moisture, slope, nearby buildings – often override the general pattern. Use them only in combination and to confirm a direction you already suspect.
The moss myth
"Moss grows on the north side of trees" is the best-known and one of the least reliable rules. Moss needs moisture and shade, and in a dense, damp forest it grows on all sides of trunks. On a single, exposed tree in the open, it may indeed prefer the shadier north side – or the side facing the prevailing rain. Using moss to navigate in a forest can easily send you in the wrong direction.

| Sign | Claim | Reliability | Why / conditions |
|---|---|---|---|
| Moss on trees | Grows on the north side | Poor – myth in forests | Follows moisture and shade, not direction |
| Tree rings | Wider on the south side | Poor | Ring width depends on slope, stress and neighbours |
| Lone tree crowns | Fuller, denser branches on the sunny south side | Moderate | Only on open-grown trees; check several |
| Wind-bent trees ("flagging") | Lean away from the prevailing wind | Moderate–good | If you know the local prevailing wind (Central Europe: mostly west to south-west) |
| Snow melt | Melts first on south-facing slopes and sides | Good | Clear pattern in spring; shade can mask it |
| Ant hills | On the south side of trees | Poor–moderate | Wood ants like sunny spots, but location varies widely |
| Old churches | Altar end faces east | Moderate | Common tradition in Europe, many exceptions |
| Satellite dishes (Europe) | Face roughly south to south-east | Good | Most point at satellites over the equator |
Ratings are general guidance for Central Europe. Always combine several signs.
Signs that genuinely help
In the northern hemisphere, south-facing slopes are warmer and drier: snow melts first, spring flowers appear earlier, and plants that like warmth and dryness are more common, while north-facing slopes stay damper, mossier and snowy for longer. On an open-grown tree, the south side often has more and longer branches reaching horizontally towards the light, while branches on the north side grow more steeply upwards. These patterns are real but subtle; look for them on several trees and slopes before trusting them.
Wind patterns: a useful but fickle guide
In Central Europe the prevailing wind blows mostly from the west to south-west, carrying rain from the Atlantic. Over years, this shapes the landscape: exposed trees lean and "flag" towards the east, snow builds up in drifts on the lee (east) side of obstacles, and sand dunes and snow ridges line up with the wind. In the Alps and other mountains, local valley and slope winds can override the general pattern completely.
The wind on any given day is a different matter: it shifts with weather fronts and can turn within hours. Still, it can help you keep a straight line over a short time. Note which cheek feels the wind when you set off on a known bearing, and check it against the sun or a compass regularly. The same awareness helps you pitch your tarp and choose a sheltered camp site – and the wind chill calculator shows why exposure matters.
Typical accuracy of natural navigation methods (smaller error = longer bar)
Putting it together: choosing the right method

Which method should I use?
Is it night with a clear sky?
Yes → Use Polaris (north) or the Southern Cross (south).No → Continue.Is the sun casting a shadow and do you have 15–20 minutes?
Yes → Use the shadow stick method.No → Continue.Do you need a quick rough direction and have a watch?
Yes → Use the watch method, then confirm later.No → Continue.Is it overcast?
Yes → Look for the brightest patch of cloud, then use snow melt, slopes and several nature signs together.No → Combine the sun's position with the time of day and season.
In practice, you rarely rely on one method. You notice the sun's position when you set off, keep it on a constant side while walking, confirm with a shadow stick at a break, and check against slopes and wind-bent trees. Combined with rough distance estimates from pace counting (pace count calculator) and time (hiking time calculator), this "dead reckoning" can get you to a large catching feature – a road, a river, a forest edge – even without a compass.
Walking a straight line without a compass
Finding north is only half the job; the other half is holding the direction while you walk. Four habits keep you on line:
Holding a straight line
 1Pick a landmark
Once you know your direction, choose a distinctive object on that line – a dead tree, a boulder, a gap in the ridge – and walk to it instead of looking at the sky all the time.
 2Keep the sun on one side
Between landmarks, keep the sun or your shadow at the same angle to your body. The sun moves across the sky, so re-check your direction every half hour or so.
 3Look back
Now and then turn round: your last landmark or a marker you left, such as a stick with a strip of cloth, should be directly behind you. If it is off to one side, you have drifted – correct before going on.
 4Aim off
When heading for a point on a long catching feature such as a river, track or forest edge, aim deliberately to one side of it. When you reach the feature you know which way to turn.
Natural navigation practice list
- Note sunrise and sunset directions at home for one week
- Do a shadow stick and compare with a compass
- Try the watch method at 10:00, 13:00 and 16:00 and record the error
- Find Polaris via the Plough and Cassiopeia
- Check moss on 10 trees in a forest – and see how random it is
- Look for flagged trees and snow melt patterns on a winter walk
These exercises also sharpen the observation skills you need for animal tracking and for reading the landscape when you are looking for water. Keep a compass in your kit anyway – natural navigation is best as a second system. For more skills, browse all bushcraft skills or plan an evening camp with camp setup.
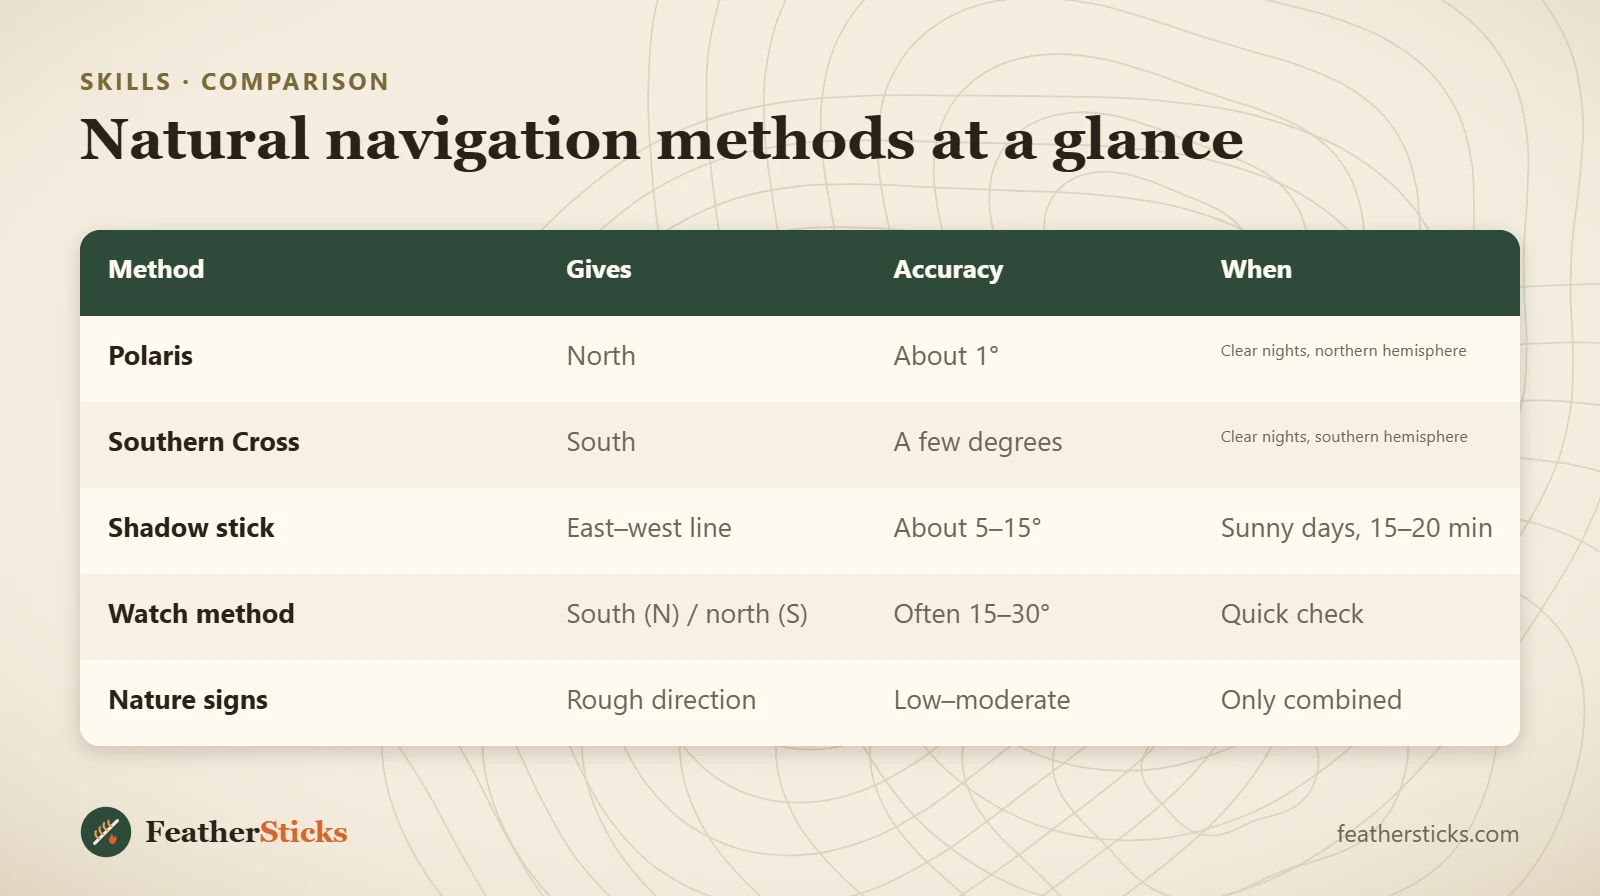
| Method | Gives | Accuracy | When |
|---|---|---|---|
| Polaris | North | About 1° | Clear nights, northern hemisphere |
| Southern Cross | South | A few degrees | Clear nights, southern hemisphere |
| Shadow stick | East–west line | About 5–15° | Sunny days, 15–20 min |
| Watch method | South (N) / north (S) | Often 15–30° | Quick check |
| Nature signs | Rough direction | Low–moderate | Only combined |
Common mistakes
- Trusting moss on trees to show north in a forest.
- Assuming the sun always rises due east and sets due west.
- Using the watch method without allowing for summer time.
- Mistaking a bright star or planet for Polaris instead of using the Plough's pointers.
- Relying on a single nature sign instead of combining several.
- Forgetting that everything reverses in the southern hemisphere.
What you need
- Analogue watch (or knowing the time)
- A straight stick and two pebbles
- Small notebook for observations
- Headlamp with red light for star-gazing
- Compass for checking your results