Gear
Bushcraft Kit List: The Complete Checklist for Every Trip
A good bushcraft kit list starts with ten core items – the "10 C's": cutting tool, combustion, cover, container, cordage, cotton bandana, candle (light), compass, cargo tape and canvas needle. Add a sleep system and clothing matched to the season, water treatment, food and a first aid kit, and you have everything for a safe night out. For a two-day autumn trip under a tarp that comes to roughly 7.5 kg base weight plus food and water.
This guide gives you the complete checklist by category, trip length and season, realistic weight targets and three budget tiers for beginners. If you want a personalised list, the Bushcraft Kit Builder creates one in seconds. New to the woods? Start with our bushcraft for beginners guide.
Step by step
-
1
Start with the 10 C's
Pack knife, fire starters, tarp, steel bottle, cord, bandana, headlamp, compass, tape and a sturdy needle. These ten items solve most problems in the woods.
-
2
Match sleep kit to the night low
Choose a sleeping bag by its comfort rating and a pad with enough R-value for the coldest expected night.
-
3
Dress in layers for the season
Base layer, warm mid layer, insulated jacket in autumn and winter, and a rain jacket on every trip.
-
4
Plan water, food and first aid
Carry a filter plus tablets, about 700 g of food per day (900 g in winter) and a compact first aid kit.
-
5
Weigh, trim and pack
Weigh everything, cut duplicates, pack heavy items close to your back and check the list before you leave.
What do you need for bushcraft? The short answer
Bushcraft is about doing more with less: you carry a few robust tools and use your skills to make the rest from the forest. That does not mean carrying nothing. A realistic bushcraft kit list has three layers:
- The core (10 C's): ten small, multi-purpose items that cover cutting, fire, shelter, water, repairs and navigation. They weigh around 2–2.5 kg together and go on every trip, even a day walk.
- The overnight system: sleeping bag, sleeping pad, groundsheet or bivvy bag, pot, food and extra clothing. This is where most of the weight – and most of the comfort – comes from.
- Safety and seasonal extras: first aid kit, spare batteries or a power bank, a whistle, winter insulation, a saw or hatchet for longer stays, and more water capacity where sources are scarce.
The biggest mistake beginners make is buying tools first and sleep gear last. A great knife does not keep you warm at 2 °C; a sleeping bag with the wrong rating ruins the night. That is why this list is ordered by importance for safety and comfort, not by what is most fun to buy. For the "why" behind each piece, the gear hub bushcraft gear overview links to our in-depth guides on packs, tarps, sleep systems, clothing and first aid.
Let the planner do the maths: choose trip length (1–3 days), season, shelter type and water availability in the Bushcraft Kit Builder and you get the complete list with item weights, base weight, consumables and a suggested pack volume. The tables in this guide use the same data.
The 10 C's: the core of every bushcraft kit list
The "10 C's of survival" are a memory aid popularised by bushcraft and survival instructors. The first five are the hard-to-improvise essentials; the second five make life much easier and weigh very little. Together they form the part of your kit list that you never leave at home.
| C | Typical item | Why it matters | Approx. weight |
|---|---|---|---|
| 1. Cutting tool | Fixed-blade knife, 9–11 cm, full tang | Carving, feather sticks, food prep, shelter work – see bushcraft knives | 150–250 g |
| 2. Combustion | Ferro rod + lighter + tinder | Warmth, boiling water, cooking, morale – see fire starting | ≈ 110 g |
| 3. Cover | Tarp 3 × 3 m (or tent) + groundsheet | Protection from rain, wind and heat loss | 700–1,800 g |
| 4. Container | Single-wall steel bottle 1 L | Carry water and boil it directly in the fire | ≈ 250 g |
| 5. Cordage | 15–30 m of 3–4 mm cord | Ridgelines, guylines, repairs, lashings | ≈ 150 g |
| 6. Cotton bandana | Large cotton scarf | Pre-filter, bandage, sun protection, char cloth | ≈ 40 g |
| 7. Candle / light | Headlamp (+ spare batteries) | Camp work and walking after dark, signalling | ≈ 90 g |
| 8. Compass | Baseplate compass + map | Navigation when phone batteries die | ≈ 100 g |
| 9. Cargo tape | Duct tape wrapped around bottle or lighter | Repairs, blister care, sealing | ≈ 30 g |
| 10. Canvas needle | Sail or leather needle + strong thread | Repairing packs, tarps, clothing, boots | ≈ 10 g |
Weights are typical mid-range values, not ultralight. Tarp and tent weights match the Kit Builder data.
1. Cutting tool: one good fixed blade
A fixed-blade knife with a 9–11 cm blade, a comfortable handle and a Scandi or flat grind handles most everyday bushcraft tasks: carving pot hooks, making feather sticks, preparing food and cutting cord. Full tang construction survives occasional batoning. Add a folding saw for trips of two days or more – it processes firewood far more safely and efficiently than a knife. A hatchet is optional and mainly worth its 700 g in winter. Keep your blade keen with a small pocket stone; our field sharpening guide shows how.
2. Combustion: three ways to make fire
Carry at least two independent ignition sources: a ferro rod (works wet, thousands of strikes) and a simple lighter (fast, convenient). Add a waterproof tin of prepared tinder such as cotton pads with petroleum jelly. In autumn and winter pack a handful of fatwood sticks – resin-rich pine that lights even when everything around you is damp. Learn to use them before you rely on them: our guides on the ferro rod and fire in wet weather cover the technique.
3. Cover: tarp, tent or natural shelter
For most bushcrafters the default roof is a 3 × 3 m tarp: light (around 700 g), flexible and good for sitting by the fire. A 1–2 person tent (around 1.8 kg) makes sense in midge season, exposed terrain or for beginners who want a closed space. A natural shelter such as a debris hut takes hours to build and depends on local rules – always carry a backup poncho or small tarp. Our guide choosing a tarp compares sizes and materials.
4. Container: a steel bottle you can boil in
A single-wall stainless steel bottle is the bushcraft classic because you can put it straight into the embers to boil water. Avoid double-walled (vacuum) bottles for this – they can burst when heated. Combine it with a nested steel cup or a 0.9 L pot and you can boil, cook and drink with one small set. See water containers for options.
5. Cordage: more than you think
Fifteen metres of 3–4 mm cord covers a tarp ridgeline and guylines; many bushcrafters carry 30 m, because cord also serves for bear-bag hanging, repairs, a clothesline and lashings. Paracord-style cord can be gutted for thinner inner strands. Knowing a handful of knots matters more than the cord itself – the essential knots guide and the Knot Finder help.
6. Cotton bandana
A large cotton bandana weighs almost nothing and serves as a sweat rag, sun protection, sling or bandage, pot holder and pre-filter for muddy water (it removes sediment, not germs). Burnt in a closed tin it becomes char cloth for flint and steel.
7. Candle or light
Today "candle" means a headlamp. Choose one with a red-light mode (keeps your night vision), 200–400 lumens and a battery type you can replace or recharge. In autumn and winter you may spend 14 hours in the dark, so carry spare batteries or a small power bank.
8. Compass
A baseplate compass and a paper map of the area do not run out of battery. Phone apps are useful, but cold, rain and a flat battery end them quickly. Learn the basics with our map and compass guide.
9. Cargo tape
Wrap a few metres of strong fabric tape around your bottle or a lighter. It patches a torn tarp, secures a splint, protects a hot spot before it becomes a blister and seals a leaking bag.
10. Canvas needle
A heavy sail or leather needle with waxed thread lets you repair a torn pack strap, a boot seam or a tarp tie-out in the field. It weighs grams and can save a trip.
The full bushcraft checklist by category
Beyond the 10 C's, a complete overnight kit is best organised in eight categories – the same ones the Kit Builder uses. Weights in brackets are typical for mid-range gear.
Shelter
- Tarp 3 × 3 m (700 g) or 1–2 person tent (1,800 g)
- Ridgeline + guylines, 15 m cord (150 g) – for tarp and natural shelters
- 8 tent stakes (120 g) – for a tarp
- Groundsheet (200 g) – under a tarp or natural shelter
- Emergency poncho or small backup tarp (300 g) – essential if you plan a natural shelter
Sleep system
- Sleeping bag rated for the season: comfort +10 °C in summer (800 g), 0 °C in autumn (1,300 g), −10 °C in winter (2,000 g)
- Sleeping pad: foam pad (350 g) in summer, insulated air pad R 4+ (550 g) in autumn, both combined in winter
- Bivvy bag (400 g) under a tarp in autumn and winter – adds warmth and splash protection
- Optional: mosquito net (150 g) in summer, liner, small pillow
Use the sleeping bag & pad calculator to check what comfort rating and R-value you really need for your night low; our sleeping gear guide explains ratings in detail.
Fire
- Ferro rod + striker (60 g)
- Backup lighter (20 g)
- Tinder kit, e.g. cotton + petroleum jelly in a tin (30 g)
- Fatwood sticks (150 g) in autumn and winter
Water
- Steel bottle 1 L, boil-safe (250 g)
- Water filter (90 g) and purification tablets (20 g) as backup
- Collapsible 2 L bladder (60 g) where water is scarce
- Carried water: 1 L when you can refill often, about 3 L when sources are scarce
How much you drink depends on heat, effort and body weight – the water needs calculator gives a personal figure. Treat all wild water: see filtering water and boiling water.
Cooking & food
- Pot 0.9 L with lid (250 g) and a long spoon (20 g)
- Food: about 2,500 kcal per day (≈ 700 g) in summer and autumn, about 3,500 kcal (≈ 900 g) in winter
- Optional in winter: small gas stove + canister (350 g) for fast hot drinks
Plan meals and calories with the trail food planner and find ideas in campfire cooking.
Tools
- Fixed-blade bushcraft knife (200 g)
- Folding saw (300 g) – for trips of two days or more, or for natural shelters
- Pocket sharpening stone (60 g) – for trips of two days or more
- Optional: hatchet (700 g) in winter
Clothing (carried, in addition to what you wear)
- Rain jacket (350 g) – every trip, every season
- Merino base layer (200 g)
- Fleece mid layer (350 g) in summer and autumn
- Synthetic insulated jacket (450 g) in autumn, down or synthetic parka (700 g) in winter
- Thermal leggings (250 g), warm hat and gloves (150 g) in autumn and winter
- One pair of spare wool socks per day (70 g each)
Our bushcraft clothing guide explains the layering system and why wool and cotton blends behave better near a fire than pure synthetics.
Navigation & safety
- Map + compass (100 g)
- Headlamp (90 g)
- First aid kit (250 g) – see what goes in a first aid kit
- Power bank (200 g) for trips of two days or more
- Whistle (10 g)
- Trowel + toilet kit (100 g)
- Charged phone, ID, emergency contact and a trip plan left with someone at home
Kit list by trip length: day trip, overnight and 3 days
The core stays the same; what changes with trip length is the sleep system, food, tools and spare clothing. A day trip needs no sleeping bag but still needs fire, water, a warm layer and first aid – conditions can change and you may be out longer than planned. From the first night onwards, the sleep system becomes the heaviest part of your pack.
| Item group | Day trip / 1 day | Overnight / 2 days | 3 days |
|---|---|---|---|
| Shelter | Tarp, cord, stakes, groundsheet (1 night) – or just an emergency poncho on a pure day walk | Tarp, cord, 8 stakes, groundsheet | Same as 2 days |
| Sleep | Pad, bag 0 °C, bivvy (if you stay the night) | Pad, bag 0 °C, bivvy | Same |
| Tools | Knife | Knife, folding saw, pocket stone | Same |
| Food | ≈ 700 g | ≈ 1.4 kg | ≈ 2.1 kg |
| Spare socks | 1 pair | 2 pairs | 3 pairs |
| Electronics | Headlamp | Headlamp + power bank | Headlamp + power bank |
| Base weight* | ≈ 6.9 kg | ≈ 7.5 kg | ≈ 7.6 kg |
| Food + water | ≈ 1.7 kg | ≈ 2.4 kg | ≈ 3.1 kg |
| Suggested pack | 40 L | 50 L | 55 L |
*Base weight from the Kit Builder for an autumn tarp trip, including carried clothing, excluding the pack itself (add 1.2–2.5 kg) and optional items. A pure day walk without overnight gear weighs around 2.5–4 kg.

Notice how little the base weight grows from two to three days: the extra is mainly one more pair of socks. What grows is food. That is why experienced bushcrafters say the difference between one night and a week is mostly food and fuel – and why the pack volume rule of thumb in the Kit Builder is 30 L + 8 L per day, plus 15 L in winter and 5 L with a tent. Our backpack guide explains frame types and fit.
Day trip essentials
For a day in the woods practising skills, carry the 10 C's, a warm layer, a rain jacket, food and water for the day, a sit mat, the first aid kit and a charged phone. It is also worth carrying a lightweight emergency bivvy or poncho: if you twist an ankle in November, you may wait hours for help.
Longer trips: what to add after day three
Beyond three days, food weight dominates. Add a small repair kit (spare buckle, cord locks, seam sealer), more batteries, a second pair of camp socks kept dry for sleeping, and consider a bigger pot if you cook with others. Resupply points change everything – plan your route with the hiking time calculator so you know how far you can walk each day with a loaded pack.
Seasonal bushcraft packing list: summer, autumn, winter
Season changes three things: the sleep system, insulation layers and fire kit. Summer is lightest, but brings insects, fire bans and heat; autumn adds damp and long nights; winter roughly doubles the weight of your sleep system and demands more food.
The same trip in three seasons (2 days, tarp)
 1Summer
A +10 °C bag or quilt on a foam pad (R ≈ 2) and a fleece for the evening. Base weight around 5.4 kg – the lightest season, but check fire bans and pack insect protection.
 2Autumn
A 0 °C bag, an insulated air pad with R 4 or more and a bivvy bag under the tarp, plus a synthetic jacket, hat and gloves. Base weight around 7.5 kg.
 3Winter
A −10 °C bag, a foam pad under an insulated air pad (R ≈ 6.5), a bivvy and a parka for camp. Base weight around 8.5 kg and a 65-litre pack.
| Summer | Autumn | Winter | |
|---|---|---|---|
| Sleeping bag (comfort) | +10 °C (800 g) | 0 °C (1,300 g) | −10 °C (2,000 g) |
| Pad | Foam pad (R ≈ 2) | Insulated air pad R 4+ | Foam + insulated air pad (R ≈ 6.5) |
| Bivvy bag | – (mosquito net optional) | Yes | Yes |
| Insulation | Fleece | Fleece + synthetic jacket, leggings, hat, gloves | Parka, leggings, hat, gloves |
| Fire extras | Check fire bans | Fatwood | Fatwood, optional stove |
| Food per day | ≈ 2,500 kcal / 700 g | ≈ 2,500 kcal / 700 g | ≈ 3,500 kcal / 900 g |
| Base weight | ≈ 5.4 kg | ≈ 7.5 kg | ≈ 8.5 kg |
| Pack volume | 50 L | 50 L | 65 L |
Values from the Kit Builder; the winter hatchet and stove are optional and not included in base weight.
Summer
Short nights and warm temperatures let you carry a light bag or quilt and a simple foam pad. The challenges are different: ticks and mosquitoes (long sleeves, a head net, a tick card), dehydration and fire danger. In many regions open fires are banned in summer, so check local rules and forest fire danger levels before you go, and read campfire safety. Carry more water in hot weather.
Autumn
Autumn is the classic bushcraft season – and the most underestimated. Nights around 0–5 °C with high humidity feel colder than dry frost. A 0 °C comfort bag, an insulated pad with R 4 or more and a bivvy bag under the tarp make the difference. Dry tinder becomes rare, so carry fatwood and collect dry material during the day. Darkness falls early: check sunset with the daylight calculator and have camp set up before it.
Winter
Winter bushcraft is rewarding but unforgiving. Ground insulation matters more than the sleeping bag: stack a foam pad under an air pad. Carry a parka to wear in camp, spare gloves, and plan on 3,500 kcal a day. A small stove produces a hot drink in minutes when fire lighting is slow with cold hands. Wind makes everything worse – the wind chill calculator shows how cold it really feels. For snow country, see snow shelters and water from snow.
How heavy should a bushcraft pack be? Weight targets
Weight is a trade-off between comfort in camp and comfort on the trail. Bushcraft kits are usually heavier than ultralight hiking kits because they include steel tools, a cook pot for the fire and more robust fabrics. That is fine – as long as the load suits your fitness and the distance you walk.
The key number is base weight: everything except food, water and fuel. The Kit Builder counts carried clothing but not the pack itself. Realistic targets for a two-day trip:
Typical base weight, 2 days (without pack)
Add the pack (1.2–2.5 kg), food and water, and a two-day autumn trip lands at around 11–12 kg total. A common rough guide is to keep the total load at or below about 20–25 % of your body weight for multi-day walking; for short walks to a camp spot you can carry more. If your pack is heavier, look at the "big three" first:
- Sleep system: a down bag saves 300–600 g compared with synthetic at the same rating; a quilt saves more.
- Shelter: a tarp saves about 1 kg compared with a typical tent.
- Pack: a heavy canvas rucksack can weigh twice as much as a synthetic one of the same volume.

Then cut duplicates: one knife instead of three, one pot instead of pot plus pan, a small tube of sunscreen instead of a full bottle. Never cut the safety items: first aid, headlamp, fire starters, water treatment, rain jacket and a warm layer.
Beginner bushcraft kit on a budget: three tiers
You do not need expensive gear to start. The table below shows three budget tiers for a complete three-season overnight kit. Prices are rough ranges for new, generic mid-market products and vary by country; buying used or borrowing cuts them substantially.
| Item | Starter (≈ €300–450) | Solid (≈ €700–1,000) | Long-term (≈ €1,500+) |
|---|---|---|---|
| Knife | Carbon steel Scandi knife, simple sheath | Full-tang knife, leather sheath | Premium full-tang knife |
| Shelter | Polyester tarp 3 × 3 m | Lighter polyester or silnylon tarp | Silpoly or poly-cotton tarp for fire |
| Sleeping bag | Synthetic, comfort ≈ 5 °C | Synthetic or down, comfort 0 °C | Down, comfort 0 °C + summer quilt |
| Pad | Closed-cell foam | Self-inflating R 3–4 | Insulated air pad R 4+ plus foam |
| Pack | Used 45–55 L trekking pack | New 50–60 L framed pack | Canvas or technical pack to fit |
| Fire & water | Ferro rod, lighter, steel bottle, tablets | + water filter, steel pot | + nesting cook set |
| Clothing | What you own: wool/synthetic layers, rain jacket | Merino base, fleece, synthetic jacket | Wool or poly-cotton outer, down parka |
Always buy the sleep system for your coldest planned night first. First aid kit, headlamp and map are mandatory in every tier.
Where to save: pots, bottles, cord, bandanas, tarps and knives are available in good quality at modest prices. Where not to save: the sleeping bag and pad (a cold night is dangerous), boots that fit, and the rain jacket. A cheap knife with good steel works; a cheap sleeping bag with an optimistic rating does not.
What to buy first
 1Sleep system
Bag and pad for your coldest planned night come first – check the numbers with the sleep calculator. A cold night is the one thing skill cannot fix on the spot.
 2Rain jacket and boots
Staying dry and blister-free beats everything else. Boots must fit; try them on in the afternoon with your own socks.
 3Shelter
A 3 × 3 m polyester tarp covers most situations and costs little. Add cord and stakes and practise pitching it at home.
 4Knife and fire kit
One good fixed-blade knife, a ferro rod and a lighter. Learn to use them well before buying more tools.
 5Pack last
Buy the pack when everything else is at home – then you know how many litres your kit needs and can try packs with your own gear inside.
How to pack your bushcraft kit
A good list is only half the job; how you pack it decides how the load carries and how fast you can set up camp in rain. The principle: heavy and dense items close to your spine at shoulder-blade height, light and bulky items at the bottom, and things you need during the day on top or in outer pockets.

Line the pack with a waterproof liner or use separate dry bags – rain covers alone let water in through the back panel. Carry the sleeping pad inside or strapped under the lid, and never strap an unsheathed blade or saw to the outside. Water bottles should be reachable without taking the pack off. More on this in how to choose and pack a bushcraft backpack.
What a well-packed kit looks like: the closed pack stands upright on its own, nothing rattles when you twist your upper body, the tarp and rain jacket come out without unpacking anything else, and you can reach water, map, headlamp and first aid kit with the pack on your back.
Printable bushcraft packing checklist
Copy or print these two lists and tick them off before every trip. For a version tailored to your trip, generate one in the Kit Builder – it has a print and share function.
The pre-trip routine: lay out, weigh, trim, pack, check
 1Lay it all out
Spread every item on the floor, grouped by the categories of this list: shelter, sleep, fire, water, cooking, tools, clothing, safety. Gaps become obvious at a glance.
 2Weigh and write it down
Weigh each item once on a kitchen scale and note it – or enter it in the Kit Builder. You only have to do this once per item.
 3Cut duplicates
One knife, one pot, one light. Put everything you packed "just in case" but never used on the last three trips into a separate pile and leave most of it at home – but never the safety items.
 4Pack by zones
Sleeping bag at the bottom, heavy items close to your back, tarp and rain gear on top, essentials in the lid – as shown above.
 5Tick off and leave a plan
Go through the checklist below one last time and leave your route, camp spot and return time with someone at home.
| Item | When you notice it is missing | Quick check at home |
|---|---|---|
| Spare batteries / charged power bank | The first long evening in the dark | Switch the headlamp on for a minute; check the power bank indicator |
| Lighter or dry tinder | When the ferro rod meets damp material | Strike the lighter; open the tinder tin |
| Water treatment | At the first stream | Filter and tablets in the same bag as the bottle |
| Personal medication | Often too late | Put it in the first aid kit, not in the bathroom |
| Dry sleeping socks | At night in a cold bag | Pack them in the sleeping bag's stuff sack |
| Trip plan left at home | Only in an emergency | Send the message before you drive off |
Core kit – every trip
- Fixed-blade knife in a secure sheath
- Ferro rod, lighter and tinder in a waterproof tin
- Tarp or emergency poncho, 15–30 m cord
- Steel bottle (1 L) + water filter or tablets
- Cotton bandana, duct tape, needle and thread
- Headlamp with charged or spare batteries
- Map, compass, whistle, charged phone
- First aid kit and personal medication
- Rain jacket and a warm layer
- Food and water for the day, trowel and toilet kit
Overnight additions
- Sleeping bag with the right comfort rating
- Sleeping pad with enough R-value (stack two in winter)
- Groundsheet and/or bivvy bag
- Pot with lid and long spoon
- Food for every day + one spare snack
- Folding saw and pocket stone (2+ days)
- Insulated jacket, hat, gloves (autumn/winter)
- One pair of spare wool socks per day
- Power bank (2+ days)
- Trip plan left with a contact at home
Knives, fire and camping: check the rules before you pack
Your kit list also has a legal side. Rules on carrying knives, lighting fires and sleeping outdoors differ widely between countries – and often between regions within a country. In the UK, for example, carrying a fixed blade in public requires a good reason; in Germany, § 42a of the Weapons Act restricts carrying certain knives in public; Scandinavian right-of-access traditions are more permissive about camping but still restrict fires in dry periods. In many parts of North America, fire restrictions change with the season and fire danger.
Practical rules that keep you on the safe side almost everywhere: transport knives and saws in a closed pack rather than on your belt when you walk through towns or use public transport; use existing fire pits or a fire bowl where fires are allowed; never light a fire during a fire ban; and ask the landowner for permission to camp. For Germany in particular, see wild camping rules in Germany.
Skills replace weight: when you can leave items at home
The more you practise, the shorter your kit list becomes. Someone who can reliably make fire from natural tinder needs fewer prepared fire starters; someone who can carve pot hangers and tent pegs does not need to carry them; someone who knows natural cordage can improvise lashings. But skills replace convenience items, not safety items. Even the most experienced bushcrafters carry a good sleep system, a first aid kit, a way to treat water and a reliable way to make fire.
A good progression is to start with a slightly heavier, forgiving kit close to home – a garden, a local forest, a campsite – and to remove items only after you have proven you can do without them in bad weather. Keep notes after each trip: what did you never use, what did you miss? After three or four nights out, your personal kit list will be far better than any generic one.
When you are ready to deepen specific skills, work through tarp shelter setups, fire lays and camp setup – each turns part of this kit list from "carried" into "understood".
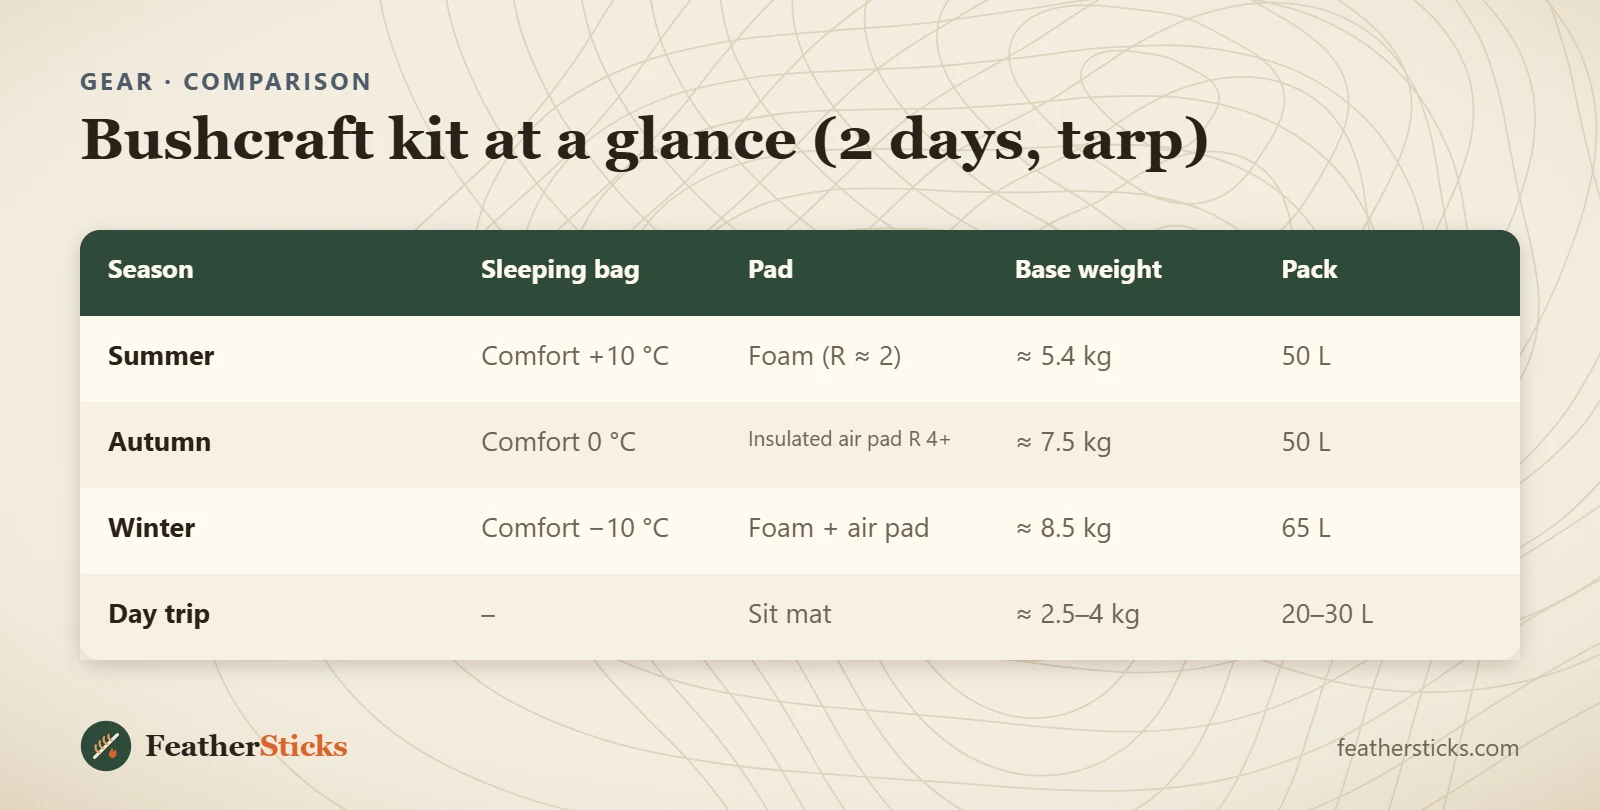
| Season | Sleeping bag | Pad | Base weight | Pack |
|---|---|---|---|---|
| Summer | Comfort +10 °C | Foam (R ≈ 2) | ≈ 5.4 kg | 50 L |
| Autumn | Comfort 0 °C | Insulated air pad R 4+ | ≈ 7.5 kg | 50 L |
| Winter | Comfort −10 °C | Foam + air pad | ≈ 8.5 kg | 65 L |
| Day trip | – | Sit mat | ≈ 2.5–4 kg | 20–30 L |
Common mistakes
- Buying tools first and the sleep system last – a cold night is the most common reason beginners give up.
- Choosing a sleeping bag by its limit rating instead of its comfort rating.
- Relying on a single fire starter or on a phone for navigation.
- Packing a rain cover but no liner or dry bags – the sleeping bag gets wet anyway.
- Carrying three knives, two pots and gadgets you never use while leaving the first aid kit at home.
- Strapping blades and saws to the outside of the pack without a sheath.
- Not checking fire bans and local rules before the trip.
What you need
- Fixed-blade bushcraft knife and folding saw
- Ferro rod, lighter and tinder tin
- Tarp 3 × 3 m with 15–30 m cord and stakes
- Sleeping bag and pad rated for the season
- Single-wall steel bottle and 0.9 L pot
- Headlamp, map and compass
- First aid kit
- Rain jacket and insulated layer