Gear
Bushcraft First Aid Kit: What to Pack & How to Treat Common Injuries
A bushcraft first aid kit should handle the injuries that really happen around camp – cuts from knives and saws, burns from the fire, blisters, splinters and ticks – and help you manage a serious emergency until help arrives. A compact basic kit weighs around 250 g; an extended kit for remote trips or groups 400–700 g.
This guide lists what to pack, explains first steps for common bushcraft injuries and shows how to recognise hypothermia. It is general information, not medical training: take a first aid course before you rely on any kit. The kit is part of every bushcraft kit list and is included in our Kit Builder. More gear guides: bushcraft gear.
Step by step
-
1
Build a basic kit
Plasters, sterile dressings, a pressure bandage, tape, blister care, gloves, tweezers or tick card, antiseptic wipes and an emergency blanket.
-
2
Pack it dry and reachable
Use a waterproof, clearly marked pouch in the lid or top of the pack – not at the bottom.
-
3
Add personal items
Your own medication, allergy emergency kit if prescribed, and anything your doctor or pharmacist recommends.
-
4
Take a first aid course
Practical training – ideally outdoor or wilderness first aid – teaches what no list can.
-
5
Know how to call help
Save the emergency number, carry a charged phone and know how to share your location.
Before you read on: first aid is a skill, not a kit
In the woods, help is further away than in town. A simple cut that would be a nuisance at home can become a problem if you cannot clean it, stop the bleeding or keep the wound dry for two days. That is why bushcrafters focus on prevention first: sharp tools used with a safe technique, a well-managed fire, good footwear and dressing for the weather. Our guides on bushcraft knives, axes and campfire safety cover the techniques that prevent most injuries.
What goes in a bushcraft first aid kit?
The best kit is one you know inside out. Start with a basic kit for day trips and weekends, and extend it for remote areas, longer trips or when you are responsible for a group. Buy a ready-made kit as a base if you like, then adapt it: add more blister care and tape, remove things you do not know how to use.
| Item | Basic kit | Extended kit | Used for |
|---|---|---|---|
| Plasters in several sizes | ✓ | ✓ (more) | Small cuts and grazes |
| Sterile wound dressings / gauze pads | 2–3 | 5+ | Larger wounds, burns |
| Pressure bandage (e.g. trauma or compression bandage) | 1 | 2 | Heavy bleeding from knife or saw cuts |
| Elastic or conforming bandage | 1 | 2 | Securing dressings, sprains |
| Medical tape | ✓ | ✓ | Dressings, hot spots, splinting |
| Blister plasters / padding | ✓ | ✓ (more) | Hot spots and blisters |
| Wound closure strips | – | ✓ | Small gaping cuts (if trained) |
| Disposable gloves | 2 pairs | 4 pairs | Protecting you and the wound |
| Antiseptic wipes or wound spray | ✓ | ✓ | Cleaning around wounds |
| Fine tweezers + tick card or tick tweezers | ✓ | ✓ | Splinters and ticks |
| Small scissors or tough shears | ✓ | ✓ | Cutting tape, dressings, clothing |
| Emergency blanket (foil) | 1 | 1–2 | Shock, hypothermia prevention |
| Burn dressing (hydrogel or non-adhesive) | – | ✓ | Burns after cooling |
| Triangular bandage | – | ✓ | Sling, improvised bandaging |
| SAM-type splint | – | ✓ | Suspected fractures, sprains |
| Personal medication, pain relief as advised by pharmacist/doctor | ✓ | ✓ | Individual needs – follow the pack leaflet |
| Whistle, pencil and notepad | ✓ | ✓ | Signalling, recording times and symptoms |
A basic kit weighs around 250 g (the value in the Kit Builder). Check expiry dates and replace used items after every trip.

Packing and waterproofing
Keep the kit in a waterproof, brightly coloured or clearly marked pouch, and store it in the lid or at the top of the pack – everyone in the group should know where it is. Put sterile items in a zip bag inside the pouch, because damp dressings are not sterile any more. A small separate "blister and tick kit" in a hip-belt pocket saves you from unpacking everything for small problems. Your cotton bandana and duct tape from the 10 C's serve as backup bandage and fixation material.
Organising your first aid kit
 1Unpack and check
Before each trip, empty the pouch onto a clean surface. Check expiry dates, packaging (torn sterile packs are no longer sterile) and whether anything was used and not replaced.
 2Sterile items in a zip bag
Put dressings, gauze and the pressure bandage into a resealable bag inside the pouch. A damp dressing is no longer sterile, and pouches are rarely fully waterproof.
 3Mini-kit for small problems
A few plasters, a length of tape, tweezers and a tick card go into a hip-belt pocket. Most stops are for hot spots and splinters – you should not have to unpack the main kit for them.
 4Everyone knows where it is
Keep the kit in the lid or at the top of the pack and tell your companions where it is. In an emergency someone else may need to find it on your pack.
What to do in an emergency
In a serious incident, a clear sequence prevents panic and helps you avoid making things worse. Practise it in a course – under stress, people fall back on what they have trained.
Emergency sequence
- Secure the sceneProtect yourself first: fire, falling branches, water, sharp tools.
- Check the casualtyResponsive? Breathing normally? Heavy bleeding?
- Call for help112 in Europe, 911 in North America – say where, what, how many.
- Give first aidControl bleeding, recovery position, CPR if trained and needed.
- Keep warm and monitorInsulate from the ground, cover, reassure, note changes.
Calling for help and sharing your location
112 works across the European Union (including Germany) and in many other countries, often even without a SIM card or with no signal from your own network, as long as any network is available. In the UK use 999 or 112; in the US and Canada 911. Give your location as precisely as possible: GPS coordinates from your phone or map, a nearby landmark, the trail or road name. Many German forests have rescue points (Rettungspunkte) – signs with a code that tells the emergency service exactly where to go. If you have no signal, move to higher ground, and use a whistle: three blasts is a widely recognised distress signal. Before every trip, leave a route plan with someone at home – see map and compass navigation.
Knife and saw cuts: stopping the bleeding
Cuts are the most common bushcraft injury, usually to the hand holding the wood or the thigh when carving towards the body. Most are minor; some bleed heavily.
- Small cuts: clean with clean drinking water (boiled or treated water if needed – see water purification), clean around the wound, cover with a plaster or dressing.
- Heavier bleeding: put on gloves if you can, press firmly on the wound with a sterile dressing and keep pressing. Then apply a pressure bandage. If blood soaks through, add more dressing on top and keep up the pressure – do not remove the first layer.
- Life-threatening bleeding (spurting, pooling, not controlled by pressure): call 112 immediately and keep pressing hard. Tourniquets are for trained users only – learn them in a course.
Cleaning and covering a small cut
 1Gloves on if you can
Clean your hands if possible and put on disposable gloves. They protect the wound from dirt on your hands and you from contact with blood.
 2Rinse the wound
Rinse dirt out of the cut with plenty of clean drinking water – boiled or treated water if needed. Let the water run over the wound rather than scrubbing inside it.
 3Clean around it
Use an antiseptic wipe on the skin around the wound, wiping away from the cut edges, one stroke per clean part of the wipe. Follow the product instructions.
 4Cover and check
Cover with a plaster or a sterile dressing held by tape. Look at it every day: increasing redness, warmth, swelling, pus or red streaks mean it needs medical attention.
Controlling heavier bleeding
 1Press firmly
Put a sterile dressing (or the cleanest cloth you have) on the wound and press firmly with your hand. Keep pressing – do not keep lifting it to look.
 2Pressure bandage
Wrap a pressure bandage firmly over the dressing so it keeps up the pressure. It should be firm, but fingers beyond it must stay warm and pink.
 3Add, do not remove
If blood soaks through, put another dressing on top and bandage again. Removing the first layer can restart the bleeding.
 4Not stopping? Call for help
If the bleeding is heavy, spurting or will not stop with pressure, call 112 (Europe), 911 (US/Canada) or 999 (UK) straight away and keep pressing until help arrives.
Checking a bandage – straight away and regularly
- Fingers or toes beyond the bandage are warm and a normal colour
- No tingling, numbness or throbbing that gets worse – if there is, loosen and re-apply
- The dressing covers the whole wound with a margin of clean pad around it
- No fresh blood soaking through – if it does, add a layer on top and press again
- Note the time you applied it for the rescue service or doctor
Seek medical help for wounds that are deep, gape open, were caused by dirty objects, bleed persistently, are on the face or over joints, or if numbness or loss of movement suggests nerve or tendon damage. Make sure your tetanus vaccination is up to date – ask your doctor. Prevention beats treatment: carve away from your body, keep a "blood circle" of an arm's length plus tool around you, and use a sheath every time you put the knife down.
Burns: cool, cover, get help
Burns at camp come from embers, hot pots, boiling water and molten synthetic clothing. The first minutes matter most.
First aid for burns
- Stop the burning Move away from the heat. If clothing is on fire: stop, drop and roll, or smother the flames with a blanket.
- Cool with water Cool the burn with cool or lukewarm (not ice-cold) clean water for about 20 minutes. Do not use ice, butter, oils or creams.
- Remove jewellery and loose clothing Take off rings, watches and clothing near the burn – unless they are stuck to the skin.
- Cover loosely Use a sterile, non-adhesive dressing, burn dressing or clean cling film. Do not burst blisters.
- Keep the person warm Cooling large areas can cause hypothermia, especially in cold weather or for children – cool only the burn and keep the rest of the body warm.

Get medical help for burns larger than the casualty's palm, deep burns (white, leathery or charred skin), burns on the face, hands, feet, genitals or across joints, chemical or electrical burns, and any burn on a child or elderly person. If in doubt, call 112. Keeping a safe distance from the fire, using a pot grab and dressing in wool or poly-cotton near the flames prevents most burns – see bushcraft clothing.
Blisters and splinters
Blisters
Blisters start as a "hot spot" – a warm, rubbing area. Stop as soon as you feel one, take off the boot and cover the spot with tape or a blister plaster before a blister forms. Well-fitting, broken-in boots, wool socks and dry feet prevent most blisters. If a blister has formed, keep it intact if possible and protect it with a blister plaster or padding. Large, painful blisters are sometimes drained with a sterile needle at the edge, leaving the skin roof in place – follow what you learned in your course and keep the area clean. Watch for infection signs: increasing redness, warmth, swelling, pus or red streaks require medical attention.
Blister care, step by step
 1Stop at the hot spot
The moment you feel rubbing or warmth, stop – not at the next break. Five minutes now saves days of pain later.
 2Boot off, skin dry
Take off boot and sock, let the skin dry and wipe it clean. Tape does not stick to damp or sweaty skin.
 3Tape it smooth
Put tape or a blister plaster over the hot spot with rounded corners, smooth and without creases. Then check the sock and boot for a fold, seam or grit that caused it.
 4Blister formed? Protect it
Keep the skin roof intact where possible and protect it with a blister plaster or a ring of padding around it, so the pressure goes to the padding and not the blister.
Checkpoint: after taping, walk a few steps. If you still feel the spot, the tape is creased or the cause is still there – redo it now rather than later.
Splinters
Wood splinters are everyday bushcraft companions. Clean the area, grip the splinter with fine tweezers close to the skin and pull it out in the direction it went in. Clean again and cover. Leave deep splinters, splinters under a nail, in the eye or near joints to a doctor, and watch for signs of infection afterwards.
Ticks: removal, Lyme disease and TBE
Ticks live in grass, bracken and undergrowth and become active when temperatures rise above about 7 °C – in much of Europe and North America from early spring to late autumn, sometimes in mild winters too. They can transmit diseases, most importantly Lyme disease (borreliosis), which occurs across Europe and large parts of North America, and in some regions tick-borne encephalitis (TBE), a viral infection of the brain and meninges.
Prevention: long trousers tucked into socks or gaiters, light-coloured clothes (ticks are easier to spot), insect repellent suitable for ticks, and a thorough tick check every evening – especially the backs of knees, groin, armpits, waistband, hairline and behind the ears.
Removing a tick
- Act quickly Remove the tick as soon as you find it – the longer it feeds, the higher the risk of Lyme transmission.
- Grip close to the skin Use fine-pointed tweezers, a tick card or tick tweezers and grip the tick as close to the skin as possible, without squeezing its body.
- Pull slowly and steadily Pull straight out with steady pressure. Do not use oil, glue, nail polish, heat or alcohol on the tick.
- Disinfect and record Disinfect the bite, and note the date and place (a photo helps). If parts of the mouth stay in the skin, usually leave them to come out; see a doctor if it becomes inflamed.
- Watch for symptoms For several weeks watch for a spreading red ring or patch around the bite, or flu-like symptoms – see a doctor if they appear.

A spreading red rash (erythema migrans), often appearing days to weeks after the bite, is a typical early sign of Lyme disease and needs medical assessment; Lyme disease is treatable, especially when caught early. There is no vaccine for Lyme disease in general use. TBE can be transmitted soon after the bite, so quick removal does not protect against it – but there is a vaccine. In Germany, TBE risk areas are designated by the Robert Koch Institute (RKI) and are concentrated in Bavaria and Baden-Württemberg, with further areas in southern Hesse, south-eastern Thuringia, Saxony and individual districts in other states; the map is updated regularly. Austria, Switzerland, parts of Scandinavia, the Baltic states and Central and Eastern Europe also have TBE areas. If you spend time outdoors in such regions, ask your doctor whether vaccination is right for you.
Hypothermia: recognise it early
Hypothermia does not need arctic conditions. Wet clothing, wind and exhaustion at 5–10 °C can be enough – water conducts heat around 25 times faster than air, and wind multiplies heat loss, as the wind chill calculator shows. It creeps up slowly, and the person affected is often the last to notice.
| Stage | Typical signs | What to do |
|---|---|---|
| Mild | Shivering, cold pale skin, clumsy hands, the "umbles": stumbles, mumbles, fumbles, grumbles | Get out of wind and rain, change into dry clothes, insulate from the ground, add layers, warm sweet drinks and food, gentle movement if able |
| Moderate | Strong or decreasing shivering, confusion, slurred speech, drowsiness, poor decisions | Call 112/911. Handle gently, keep horizontal, remove wet clothing, wrap in sleeping bag and emergency blanket, insulate from ground |
| Severe | Shivering stops, very drowsy or unresponsive, weak or barely detectable breathing and pulse | Emergency – call 112/911 immediately. Handle very gently, insulate, monitor breathing, start CPR if trained and there is no normal breathing |
Give warm, sweet drinks only to a person who is fully alert and able to swallow. No alcohol, no rubbing of limbs, no hot baths.

Prevention is easier than treatment: dress in layers and avoid sweating, change out of wet clothes early, eat and drink regularly, and have a warm sleep system rated for the night – our sleeping gear guide and the sleeping bag calculator help. A hot drink made with boiled water is also good for morale. If a companion suddenly becomes quiet, clumsy or irritable in cold weather, take it seriously.
Other common problems: stings, sprains, heat and eyes
- Insect stings: remove a bee sting by scraping it out sideways, cool the area. Swelling of the face, lips or throat, difficulty breathing, dizziness or a widespread rash after a sting can mean a severe allergic reaction (anaphylaxis) – call 112/911 immediately. People with known allergies should carry their prescribed emergency kit and tell companions how to use it.
- Sprains: rest, cool (not directly with ice on the skin), compress with an elastic bandage and elevate. If you cannot bear weight, suspect a fracture and seek help.
- Heat exhaustion: headache, weakness, nausea and heavy sweating in hot weather – rest in the shade, cool down, drink. Confusion or hot, dry skin can indicate heatstroke, a medical emergency. The water calculator estimates how much you need to drink.
- Eye injuries: rinse foreign bodies such as sawdust or ash out with plenty of clean water. Do not rub. Get medical help for embedded objects, chemical splashes or persistent pain.
Should I call for help?
Is the person unresponsive, not breathing normally or bleeding heavily?
Yes → Call 112 / 911 immediately and start first aid.No → Go on to the next question.Signs of a severe allergic reaction, moderate or severe hypothermia, or a serious burn?
Yes → Call 112 / 911 now.No → Go on to the next question.Can the person walk out safely and is the injury under control?
Yes → Treat, monitor and end the trip early if in doubt; see a doctor afterwards if needed.No → Call for help – do not risk a second casualty.
Maintaining your kit and building confidence
Open your first aid kit before every trip: replace used items, check expiry dates (especially on sterile dressings, wipes and medication), and make sure everything is dry. Once a year, unpack it completely and ask yourself for each item: do I know how to use this? If not, learn it or replace it with something you can use.
Finally, the best investment is not in the pouch. A recognised first aid course – and for bushcraft ideally an outdoor or wilderness first aid course – teaches you to assess a casualty, stop bleeding, deal with cold and improvise when help is hours away. Refresh it every few years. Combined with the safe habits from our bushcraft for beginners guide, it makes every trip safer for you and the people around you.
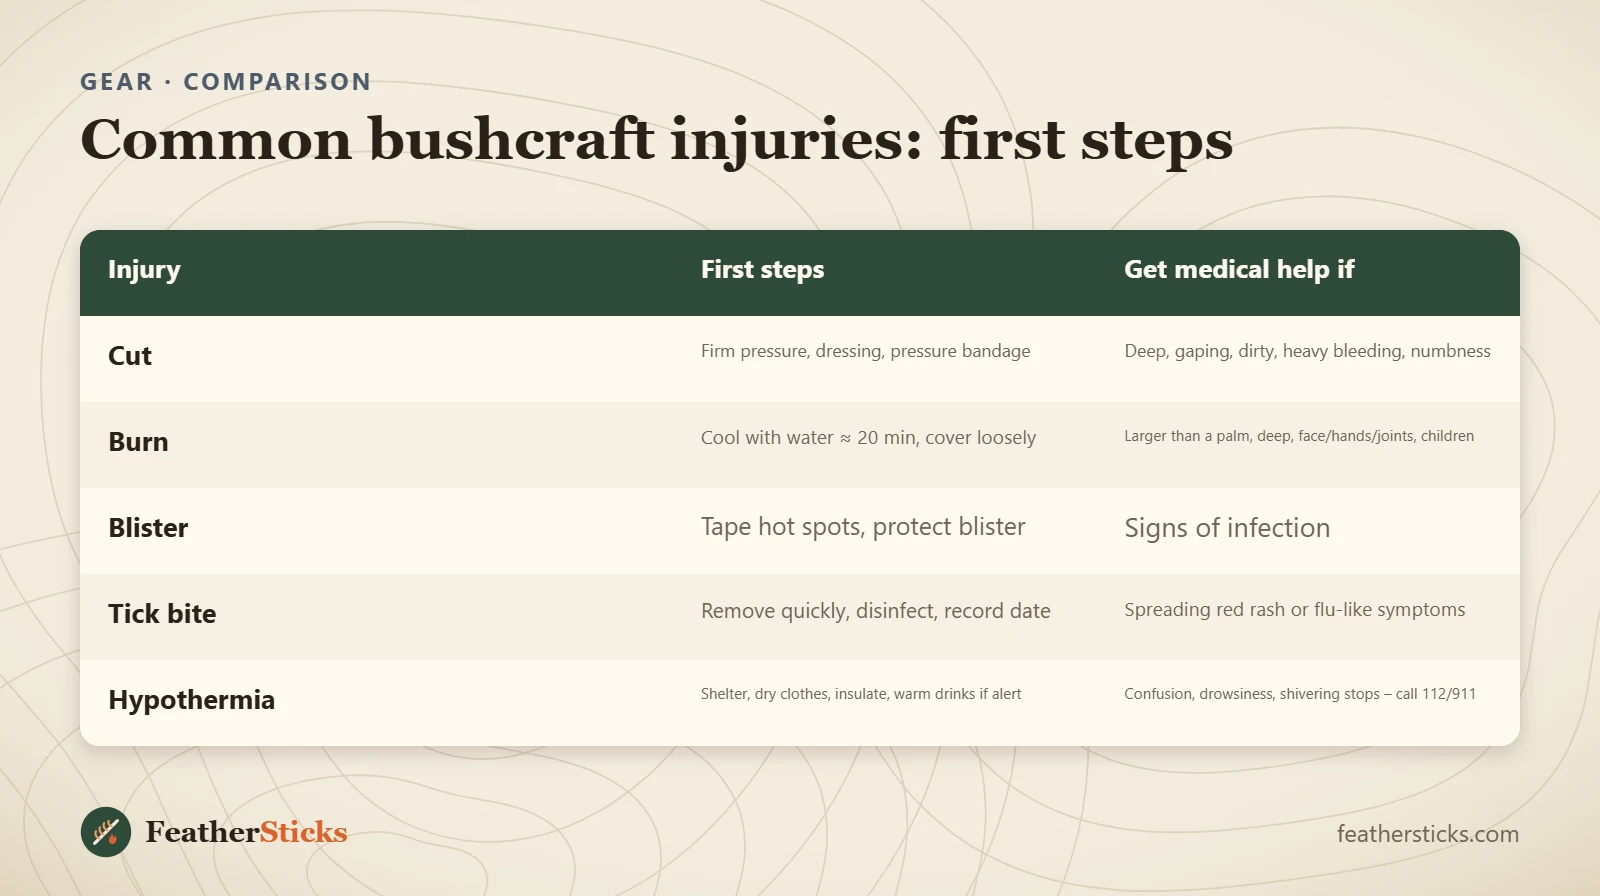
| Injury | First steps | Get medical help if |
|---|---|---|
| Cut | Firm pressure, dressing, pressure bandage | Deep, gaping, dirty, heavy bleeding, numbness |
| Burn | Cool with water ≈ 20 min, cover loosely | Larger than a palm, deep, face/hands/joints, children |
| Blister | Tape hot spots, protect blister | Signs of infection |
| Tick bite | Remove quickly, disinfect, record date | Spreading red rash or flu-like symptoms |
| Hypothermia | Shelter, dry clothes, insulate, warm drinks if alert | Confusion, drowsiness, shivering stops – call 112/911 |
Common mistakes
- Carrying a kit but never having taken a first aid course.
- Packing the first aid kit at the bottom of the pack where nobody finds it.
- Letting sterile items get damp or out of date.
- Treating burns with ice, butter or creams instead of cool water.
- Removing ticks with oil, glue or by squeezing the body.
- Ignoring early signs of hypothermia in yourself or others.
- Not telling anyone your route and return time.
What you need
- Basic first aid kit (≈ 250 g) in a waterproof pouch
- Pressure bandage and sterile dressings
- Blister plasters and medical tape
- Fine tweezers and tick card
- Emergency blanket
- Disposable gloves
- Charged phone and whistle