Tools
How to Use an Axe Safely: Hatchet vs Axe, Splitting & Care
To use an axe safely, choose the right size for the job, work on a solid chopping block, clear a swing arc of at least two axe lengths, and set up every cut so that a miss or glancing blow ends in wood or the ground – never in your legs. A hatchet is swung kneeling, a forest axe standing with feet wide apart, and a splitting axe is built to burst rounds rather than cut them.
An axe is the most efficient way to turn dead rounds into firewood and kindling, but it is also the camp tool with the highest injury potential. This guide compares hatchets, forest axes and splitting axes, explains head weight and handle length, then walks you through safe swinging, splitting, sheaths, sharpening and rehandling. It builds on the bushcraft basics and fits into our overview of bushcraft tools.
Step by step
-
1
Pick the right axe size
Hatchet (30–40 cm) for kindling, forest axe (45–60 cm) for camp chores, splitting axe (60–80 cm) or maul for big rounds.
-
2
Check the head and handle
Before every session: wedge flush, head tight, edge sharp, no cracks in the handle. The mask comes off only at the block.
-
3
Clear your safety circle
Keep two axe lengths clear all round and look up for branches. Others wait outside the circle until the axe is down.
-
4
Work on a chopping block
Set the round on a stable block, aim for the far half, so a miss lands in the block, not the ground or your shin.
-
5
Swing with control
Feet wide, knees bent, eyes on the target. Let the head weight do the work; kneel when using a hatchet.
-
6
Mask, clean and store it
Fit the mask, wipe the head dry, give steel and handle a thin coat of linseed oil and store it dry, edge away from walkways.
Hatchet vs axe: which axe do you need?
"Axe" covers a family of tools that differ mainly in head weight, handle length and head geometry. A thin, gently tapered head cuts across the grain (chopping, limbing, notching). A thick, steeply wedged head splits along the grain. Most bushcraft axes are compromises that do both reasonably well.
Parts of an axe
The edge (bit) runs from the toe at the top to the beard at the bottom. The handle sits in the eye, locked by a wedge that must sit flush. The poll is the back of the head – strike it only with wood – and the knob at the end of the handle stops it sliding out of your hand.

| Type | Head weight | Handle length | Best uses | Limits |
|---|---|---|---|---|
| Hatchet / hand axe | 0.4–0.9 kg (1–2 lb) | 30–40 cm (12–16 in) | Kindling, feather-stick blanks, tent pegs, light carving | Short handle means glancing blows come close to the body – kneel |
| Small forest axe | 0.9–1.1 kg (2–2.5 lb) | 45–60 cm (18–24 in) | Best all-rounder for camp: splitting 10–20 cm rounds, limbing, notching | Slower on big rounds than a splitter |
| Forest / felling axe | 1.1–1.6 kg (2.5–3.5 lb) | 65–80 cm (26–32 in) | Chopping through logs, heavy limbing, felling where permitted | Heavy to carry; needs real space and skill |
| Splitting axe | 1.3–2.0 kg (3–4.5 lb) | 60–80 cm (24–32 in) | Splitting seasoned rounds at a base camp or woodpile | Poor at cross-grain chopping |
| Splitting maul | 2.5–3.6 kg (6–8 lb) | 80–90 cm (32–36 in) | Large, knotty or tough rounds; can drive steel wedges if the poll is rated for it | Too heavy to carry on foot; tiring |
Figures are common market ranges, not a standard. Pair your axe with a folding or bow saw – sawing to length and splitting is safer than chopping through.
Which axe is best for bushcraft?
For most people on foot, a small forest axe with a 1 kg head and a 50–60 cm handle is the sweet spot. It is long enough for a safe two-handed miss path, light enough to carry, and splits the wood you actually burn. A hatchet is lighter but, counter-intuitively, harder to use safely, because its short arc ends near your knees. If you mostly process wood with a saw and a bushcraft knife, a hatchet or even no axe at all can make sense – see batoning for the knife-only route.
Which axe should you carry?
Are you carrying everything on your back for several days?
Yes → Go light: saw + knife, or add a hatchet or small forest axe (under 1.3 kg total).No → Car camping or base camp: a forest axe plus a splitting axe or maul is fine.Is most of your wood thinner than 15 cm?
Yes → A small forest axe or hatchet will split it easily.No → Use a saw to buck rounds, then a splitting axe or wedges.Are you new to axes, or will children help?
Yes → Start with a longer-handled small forest axe on a block, under supervision – not a hatchet.No → Choose by task and weight.
Head weight and handle length: why they matter for safety
Head weight gives the axe its energy; handle length decides where the head travels. Together they determine how forgiving the tool is when something goes wrong.
- Heavier head = more power per swing and less effort to drive through wood, but more fatigue. Tired arms cause sloppy, dangerous swings.
- Longer handle = more head speed and, crucially, a miss path that ends on the ground or block in front of your feet. With a short handle the arc ends at knee or shin height.
- Too long for your height and strength = hard to control and inaccurate. A common rule of thumb for a two-handed axe: hold the head in your hand with your arm straight down; the handle end should reach roughly to your armpit.
How to use an axe safely: stance, swing and safety circle
Most serious axe injuries follow one pattern: the edge hits wood at an angle, deflects (a glancing blow) and continues into a foot, shin, knee or the inner thigh near the femoral artery. Safe technique means the arc always ends somewhere harmless.
Before the first swing
- Safety circle: nobody within at least two axe lengths of you in any direction; tell people before you start
- Swing arc clear overhead and sideways – look up for branches and guylines of the tarp
- Solid footing: no loose leaves over roots, no ice, no stepping over logs mid-swing
- Sturdy boots, long trousers, gloves only if they grip well; no loose sleeves
- Head tight on the handle, edge sharp (a blunt axe glances more)
- First aid kit with pressure bandage within reach, and someone knows where you are
Stance and feet position
Stand square to the block, feet at least shoulder-width apart, knees slightly bent, target in line with the centre of your body. A miss then travels in front of your feet into the block or ground. Stand so your arms are comfortably extended at impact – too close and the handle hits the wood; too far and you lose accuracy.
The swing
For a two-handed swing, the lead hand starts near the head, the other at the knob. As the axe comes down, the lead hand slides down the handle to meet the other hand. Keep your eyes on the exact spot you want to hit. Use a smooth, controlled vertical arc driven by bending knees and hips – you do not need to muscle it, and never swing sideways across your body.
The safe two-handed swing, frame by frame
 1Measure your distance
Stand square to the block and stretch arms and axe out until the head just reaches the round. Too close and the handle hits the wood; too far and you lean and lose aim.
 2Lead hand near the head
Raise the axe above your head, lead hand near the head, other hand at the knob. Eyes on the exact spot you want to hit.
 3Hand slides to the knob
Bring the axe down in a vertical arc as the lead hand slides to the knob. The typical error is pulling across the body, which bends the arc toward your legs.
 4Knees bend, handle level
At impact the knees are bent, the handle is roughly level and the bit lands in the far half of the round. A miss continues into the block, not your shins.
The kneeling cut with a hatchet
A hatchet's short arc ends at thigh or knee height if you stand. So kneel: one knee on the ground, the other leg bent and placed well to the side and behind the block, the round on the block in front of you. Now a miss goes into the block or the ground ahead, not into your leg. Hold the wood by its far end, or with a stick, and keep your holding hand well away from the strike line.
Using a hatchet safely
 1Kneel behind the block
Back knee on the ground, front foot pulled back – never in front of the block. The arc must end in the block.
 2Baton on the poll
Set the edge on the end of a stick standing on the block and strike the poll with a 40–50 cm wooden baton. Your hand stays on the handle, far from the edge.
 3Wrong: standing with a hatchet
Standing, the short arc ends at knee height, so a glancing blow goes into your leg.
Never chop toward your legs
When limbing a fallen branch, stand on the opposite side of the trunk from the limb you are cutting, so the trunk sits between the axe and your legs. Cut from the underside of each branch toward its tip, following the grain. Never stand on a log and chop between your feet, and never cut toward the hand holding the wood.
Limbing a fallen trunk
 1Trunk between axe and legs
Stand on the near side and cut branches on the far side, so the trunk stops a glancing blow.
 2From underside towards tip
Strike from the underside of the branch towards its tip, along the grain. Cutting into the crotch from the tip side tears the wood and makes the axe bounce.
 3Wrong: chopping between feet
Never stand on the log and chop between your feet – one slip and the edge ends in a foot. For thick limbs, use a saw.
What a good swing looks like
- Distance
- Arms plus axe just reach the round
- Feet
- Shoulder-width or wider, square to the block
- Hands
- Lead hand slides to the knob; grip firm, not clenched
- Arc
- Vertical – never sideways across your body
- At impact
- Knees bent, handle level, bit in the far half
- After a miss
- The bit ends in the block, never near your feet
The chopping block: your most important safety device
Splitting on the ground is the classic beginner mistake: soil blunts the edge, the round rolls, and a miss ends near your feet. A block raises the work and catches misses.

A good chopping block
- Diameter
- At least 30 cm, ideally 40–50 cm, so it does not tip
- Height
- About knee height (30–50 cm) for a forest axe; lower for kneeling hatchet work
- Top
- Sawn flat and level, so rounds stand upright on their own
- Wood
- Any dead, knotty hardwood round; knots make it harder to split accidentally
- Ground
- Firm and level; dig it in slightly if needed
- Where to strike
- The far half of the round, so a miss lands in the block
In the field, a fallen log or a thick sawn round works well; never use a stone or root as an anvil. When you pause, mask the axe and put it in a known spot – an unmasked axe in leaf litter is how people step or kneel on it.
Practice drill: the charcoal mark
Draw a charcoal cross on a spare round on the block, measure your distance with arms and axe stretched out, and make ten slow, half-speed strikes at the mark. After each one, rest the axe in the wood, check where the bit landed and reset your feet. Speed up only when you hit the mark nearly every time. Then practise ten tap-and-lever splits (below) on small, dry rounds, and stop as soon as your arms tire.
How to split wood with an axe
Splitting follows the grain, so the work starts before the swing: read the round. Look at the end grain for checks – radial drying cracks that run from the bark toward the centre. They are pre-made splits; aim into them. Knots, where branches grew, disrupt the grain and resist; split either straight through the centre of a knot or well away from it, never at its edge. Shorter rounds split far more easily than long ones, so saw your wood to 25–35 cm first. The firewood calculator helps you estimate how much you need.
Splitting a round on the block
 1Stand the round upright
Set it on the block, flattest end down, so it stands on its own. A round that rocks tips away under the blow.
 2Aim at a check
Pick a drying check in the end grain; your aim line runs through the check and the centre. On large rounds, take slabs off the edge first.
 3Strike on the far half
Arms extended, handle level at impact, bit on the far half. Hitting the near half is the typical error: the handle takes the blow.
 4Work down in size
Halves, then quarters, then fuel of wrist thickness and kindling of thumb thickness. Smaller pieces need lighter blows; straight ones make good carving blanks.
 5Reset every time
The axe rests with its bit in the block first; only then does your hand pick up a split piece.
What a good split looks like
- The round stands on its own – you never hold it with your hand
- It opens in one or two blows, the halves fall to the sides
- The axe ends in the round or the block, never in the ground
The tap-and-lever method (safer and quieter)
Instead of a big swing, give the round a controlled tap to set the bit a centimetre or two into the end grain. Then lift axe and round together and bring both down onto the block: the round's own inertia drives the bit deeper. Once a split opens, twist the handle gently sideways to lever the halves apart rather than pulling it out. It suits light axes and tight camps. Never lift heavy rounds above head height on the axe.
Splitting with a hatchet and a baton
For small wood and kindling, set the hatchet's edge on the end of the stick (which stands on the block), then strike the poll with a wooden baton, a 40–50 cm length of hardwood about 5–8 cm thick. Your hands stay far from the edge and the split is precise. Only strike with wood: a steel hammer or another axe can chip the poll, deform the eye and send steel splinters flying. This is the same idea as batoning with a knife, but a hatchet's wedge shape handles it far better.
From round to fire-ready wood
Troubleshooting: when splitting goes wrong
Rest the axe in the block, then find your symptom.
| Symptom | Likely cause | Fix |
|---|---|---|
| Axe bounces or glances off | Blunt edge, angled strike, round on soft ground | Sharpen, use the block, strike square with the handle level |
| Bit sticks in the round | Round too big, green or knotty | Don't wrench: lift axe and round together onto the block, or lever gently. Take slabs off the edge |
| Round won't split | Too long, knot in the split line | Saw to 25–35 cm, split from the other end or into a check away from the knot |
| Head wobbles, handle stings | Loose head, cracked handle, handle hitting the wood | Stop; re-wedge or rehandle – never soak. Check your distance |
| Pieces fly off the block | Blows harder than needed, round not flat | Lighter blows or tap-and-lever; keep everyone two axe lengths away |
Axe sheath (mask) and carrying safely
An axe mask covers the edge whenever the axe is not in your hands at the block. It should fit snugly, close with a strap or buckle around the eye or neck of the head, and cover the full bit including the toe and heel. Leather is traditional and durable.
- Carrying by hand: masked, held just below the head, edge facing away from your body and down, arm at your side. If you trip, throw the axe clear.
- In a pack: masked, head down, strapped to the side or in a sleeve so the edge cannot work free. See backpacks for attachment ideas.
- Handing over: head down, handle toward the receiver; let go only when they say they have it.
- In public: carry axes packed and masked; carry laws vary by country.
Axe maintenance: edge, handle, rust and head tightness
A sharp edge bites instead of glancing, and a tight head stays on the handle – maintenance is safety.
Keeping the edge
Most bushcraft axes have a slightly convex edge. Sharpen with a round combination axe stone (coarse and fine side) in small circles along the bevel, following its existing shape, or touch up with a strop. Reshape a badly damaged edge with a flat mill file, pushing the file into the edge while wearing gloves and with the head clamped or braced. Typical edge geometry sits around 25–30° inclusive for general bushcraft work – thinner for chopping, blunter for splitting. For stones, files and strops in detail, see sharpening in the field.
Oiling the handle
Wooden handles (usually hickory or ash) last for decades if you keep them from drying out and cracking. Rub in a thin coat of boiled or raw linseed oil, let it soak for 20–30 minutes, wipe off all excess and let it cure. Repeat a few times a year; several thin coats beat one thick one.
Rust and storage
Wipe the head dry after use, especially after wet wood or resinous conifers. A thin film of oil prevents rust; light surface rust comes off with steel wool and oil. Store the axe masked, in a dry place with some humidity – not next to a stove or radiator, which shrinks the handle and loosens the head.
Checking head tightness
Before each session, look at the top of the eye: the wedge should be flush and the wood should fill the eye without gaps. If the head shifts even a millimetre, or the handle is cracked behind the head, stop and repair – a flying axe head is extremely dangerous.
| When | Task | Why |
|---|---|---|
| Before use | Check head tightness, handle cracks, edge condition | Prevent loose heads and glancing blows |
| After use | Wipe head dry, light oil, mask on | Prevent rust and edge damage |
| After each trip | Hone edge on stone or strop | Keeps the edge biting |
| 2–4 times per year | Linseed oil on handle, check mask | Stops handle drying and cracking |
| When damaged | File out chips, rehandle cracked handles | Safety and performance |
Hanging a new axe handle: an overview
A cracked or loose handle is not the end of a good axe head. Rehandling ("hanging") takes an afternoon and basic tools: saw, drill, rasp or carving tools, mallet and a hardwood wedge. Pick a replacement handle with straight grain running parallel to the bit – looking at the end of the handle, the growth rings should run in line with the edge, not across it.

A handle with rings across the bit tends to crack just below the head – exactly where a failure can send the head flying. Check the end of the handle before you buy; it is visible at a glance.
Rehandling in six stages
- Remove the old handle Saw the handle off just below the head. Drill a few holes into the wood left in the eye to relieve the wedge, then drive the stub out toward the wider (top) end of the eye with a hardwood drift. Avoid burning it out, which can ruin the temper.
- Test the fit Push the new handle into the eye from below. Mark where it binds (pencil or soot shows shiny pressure spots).
- Shape gradually Rasp or carve the tongue a little at a time until the head seats most of the way by hand, with the bit aligned to the handle.
- Seat the head Hold the axe head-up and strike the end of the handle on a block, or tap the handle end with a mallet, until the head is fully seated.
- Wedge it Saw a kerf about two-thirds the depth of the eye, if the handle has none. Drive in a dry hardwood wedge, often with a little glue; optionally add a steel cross-wedge.
- Trim and oil Saw off wood and wedge protruding more than a few millimetres above the eye, then oil handle and exposed end grain.
The soaking myth
A common "fix" for a loose head is to soak the axe in water overnight. The wood swells and the head feels tight – for a while. As the handle dries, the wood fibres around the eye end up crushed and shrink even further, so the head becomes looser than before, and water encourages rust and rot. The real fixes are a proper fit, a new wedge, or a new handle.
Axes, forests and the law
In many countries you may not cut living trees or branches without the landowner's permission, and even collecting deadwood can be restricted in reserves and national parks. Rules vary by country and region, so check before you go. Process dead, fallen wood, keep fires small, and follow campfire safety and Leave No Trace. If you camp in a lightweight style, a saw plus a knife may be all you need; the Kit Builder helps you weigh the options.
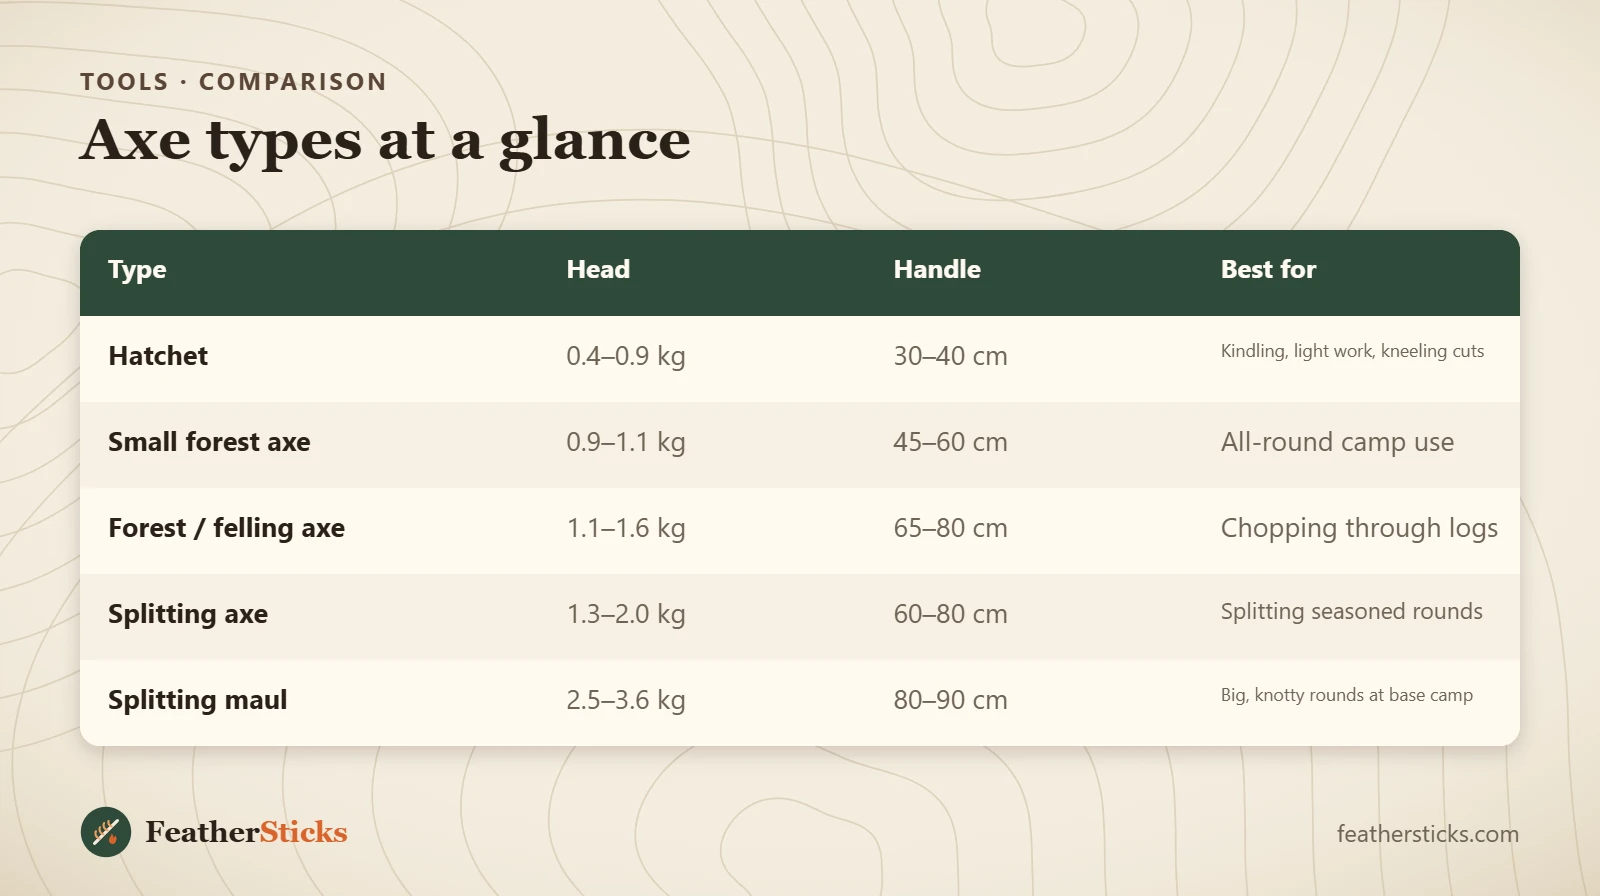
| Type | Head | Handle | Best for |
|---|---|---|---|
| Hatchet | 0.4–0.9 kg | 30–40 cm | Kindling, light work, kneeling cuts |
| Small forest axe | 0.9–1.1 kg | 45–60 cm | All-round camp use |
| Forest / felling axe | 1.1–1.6 kg | 65–80 cm | Chopping through logs |
| Splitting axe | 1.3–2.0 kg | 60–80 cm | Splitting seasoned rounds |
| Splitting maul | 2.5–3.6 kg | 80–90 cm | Big, knotty rounds at base camp |
Common mistakes
- Splitting on the ground instead of a chopping block – blunt edges and misses near the feet.
- Using a hatchet standing up, so glancing blows end at knee height.
- Chopping toward your own legs or the hand holding the wood.
- Swinging while someone is inside the safety circle, or under low branches and guylines.
- Working with a loose head, or "fixing" it by soaking it in water.
- Hitting the poll with a hammer or another axe to drive it like a wedge.
- Leaving an unmasked axe lying in the leaf litter.
What you need
- Small forest axe or hatchet with a well-fitting mask
- Folding or bow saw to cut rounds to length
- Round combination axe stone and a leather strop
- Boiled linseed oil and a lint-free rag
- Hardwood baton (40–50 cm) for hatchet splitting
- Sturdy boots and grippy work gloves
- First aid kit with a pressure bandage