Tools
How to Sharpen a Bushcraft Knife: Angles, Stones and Field Sharpening
To sharpen a bushcraft knife, hold the right knife sharpening angle for its grind, grind on a stone until a small burr forms along the whole edge, repeat on the other side, then remove the burr and strop. For a Scandi grind you simply lay the wide bevel flat on the stone (about 10–12° per side); flat grinds with a secondary bevel usually sit around 15–20° per side, and axes around 20–25° per side with a convex profile.
This guide covers why a sharp tool is safer, how edges get dull, the right angle for every tool in your kit, stones and grits, strops, a small field kit, step-by-step technique for Scandi, flat and convex edges, sharpness tests, axe sharpening and a realistic schedule. It fits alongside our guides to bushcraft knives, axes and hatchets and the wider tools overview.
Step by step
-
1
Find the bevel angle
Lay the bevel flat on the stone and rock the blade until it sits with no gap. On a Scandi grind the bevel itself is your angle guide.
-
2
Grind until a burr forms
Use even pressure and consistent strokes on one side until you feel a fine burr along the entire edge on the opposite side.
-
3
Switch sides and refine
Repeat on the other side, then alternate single strokes with lighter pressure, moving from a coarse to a finer grit.
-
4
Deburr and strop
Remove the burr with very light edge-trailing strokes, then strop 10–20 times per side on leather with compound.
-
5
Test on paper
Slice a sheet of paper and look at the edge under light. A sharp edge cuts cleanly and shows no bright reflecting spots.
Why a sharp knife is safer than a dull one
It sounds backwards, but it is the first rule every instructor teaches: a dull blade causes more injuries than a sharp one. A dull edge skids off the wood, so you push harder, and when it slips, all that force goes into the hand holding the work or into your leg.
A sharp edge goes where you aim it with light, controlled pressure. You can make short, precise cuts, stop exactly where you want and keep both hands in a safe position. Sharpening is a basic safety skill, like the blood circle and the safe grips described in bushcraft for beginners.
A sharp tool is also more efficient. A keen knife turns a dry stick into fine feather sticks in a minute, where a dull one crushes the fibres. Less force means less fatigue, and fatigue is where accidents start.
How edges get dull: rolling, chipping and wear
Knowing why an edge went dull tells you how to fix it. A sharp edge is the meeting line of two flat planes; a dull one has lost that line in one of three ways.
Rolling (bent edge)
The thin apex of the edge bends over to one side like the lip of a wave. It happens with softer steels and thin edges when you twist the blade in a cut or hit a knot. A rolled edge suddenly feels dull, but the steel is still there. It can often be straightened in a few strokes on a strop or a fine ceramic rod, without removing much metal.
Chipping (broken edge)
Harder steels tend to break rather than bend. Small pieces break out and leave visible nicks that reflect light. Typical causes are frozen wood, knots, hitting stone or soil, batoning carelessly into the ground, and an edge angle that is too acute for the job. Chips need a coarse stone: you must grind the whole edge back until it is below the deepest chip.
Wear (rounded edge)
Every cut wears off a tiny amount of steel. Sand, soil and silica in bark speed this up and round the apex. Wear is the normal, gradual dulling that regular stropping and honing on a fine stone keep in check.
A fourth enemy is corrosion: rust eats the thin apex first, so a carbon blade left in a wet sheath overnight feels dull the next morning. Dry and oil it, as described in our knife guide.

Knife sharpening angle: the right angle for every tool
The knife sharpening angle is the angle between the bevel and the centre line of the blade, measured per side. Add both sides together and you get the inclusive angle. A lower angle cuts more easily but is more fragile; a higher angle is more robust.
The most important rule is simple: follow the geometry your tool already has. Re-grinding a new angle by hand takes long and removes a lot of steel.
| Tool / grind | Per side | Inclusive | How to sharpen |
|---|---|---|---|
| Scandi bushcraft knife | about 10–12° | about 20–24° | Lay the existing wide bevel flat; the bevel is the guide. See knife grinds |
| Flat grind with secondary bevel | about 15–20° | about 30–40° | Hold the angle of the small edge bevel by hand or with a guide |
| Convex knife | about 15–20° at the apex | about 30–40° | Roll the blade on a stone or strop on a soft backing |
| Carving / sloyd knife | about 10–12° | about 20–24° | Scandi bevel, polished to a high finish for clean carving cuts |
| Hook knife | follow the factory bevel | varies | Outside bevel on a flat stone or strop, rolling along the curve; inside with a rod or wrapped dowel, see carving tools |
| Axe / hatchet | about 20–25° | about 40–50° | Convex bevel: file for repair, round puck for honing, see axes |
| Splitting axe / maul | about 25–30° | about 50–60° | Robust, blunt wedge; file and puck, no fine polish needed |
| Folding / bow saw (hardened teeth) | n/a | n/a | Impulse-hardened teeth are too hard to file: replace the blade, see saws |
Angles are typical ranges, not exact specifications. Manufacturers differ; when in doubt, match the bevel that is already there.

How to hold an angle without a guide
For flat grinds with a small secondary bevel, you have to hold the angle yourself. Useful tricks: rest the blade flat on the stone and raise the spine until the edge bevel just touches (you can feel it "catch" and see the slurry being pushed at the very edge). Colouring the bevel with a permanent marker and checking where the ink is removed after a few strokes shows immediately whether you are too steep (only the edge is cleaned) or too flat (only the shoulder is cleaned).

Consistency matters more than the exact number: every wobble in angle rounds the apex. Lock your wrist and keep the spine at the same height through the whole stroke.
Sharpening stones and grits explained
An abrasive removes steel; the grit number tells you how coarse the particles are. Lower numbers cut faster and leave a toothier edge; higher numbers polish. Grit scales differ slightly between countries and stone types, so treat numbers as orientation.
| Grit range | Job | When to use it |
|---|---|---|
| Coarse, about 200–400 | Repair | Chips, a very dull edge, a rolled edge that will not come back, changing an angle |
| Medium, about 800–1,000 | Sharpening | The main working grit: restore a dull but undamaged edge |
| Fine, about 3,000–6,000 | Honing | Refine and polish the edge after the medium stone; regular touch-ups |
| Extra fine, 8,000+ and strop compound | Polishing | Mirror finish for carving tools and a clean slicing edge |
Types of sharpening stones
- Waterstones (synthetic or natural): cut fast and produce a fine edge. They are soaked or splashed with water; softer ones dish (hollow out) and need regular flattening.
- Oil stones (natural novaculite or synthetic aluminium oxide / silicon carbide): hard, durable and slower. They use a thin honing oil to float away swarf. Oil gets messy in a pack.
- Diamond plates: diamond particles bonded to a steel plate. They cut every steel, including hard high-alloy grades, stay flat for years, work with water or even dry, and are thin and light. The best choice for the field.
- Ceramic rods and stones: very hard, fine abrasive, ideal for honing and for straightening a rolled edge. Rods reach inside curves and hook knives. They do not repair chips.
A practical combination: a medium/fine bench stone at home, a small double-sided diamond plate in the pack and a leather strop for daily maintenance. Waterstones give superb edges but are heavy, need flattening and can crack when frozen, so they stay home.
Strops and compound: the final polish
A strop is a strip of leather (or wood, felt or even cardboard) that polishes the edge and removes the last traces of the burr.
How to strop
Always strop with edge-trailing strokes: the spine leads, the edge trails behind, as if you were painting with the blade. A leading edge would cut into the leather. Lay the bevel flat, apply light pressure and pull the blade away from the edge along the full length of the strop. Do 10–20 strokes per side, alternating, then finish with a few single alternating strokes.
How to strop a knife
 1Load the strop
Rub a thin, even layer of compound into the leather, like crayon on paper, then spread it with your thumb. A thick crust clogs and rounds the edge.
 2Bevel flat, spine leads
Lay the whole bevel flat on the leather and move the blade towards the spine side. Use only light pressure: if the leather dents visibly, you are pressing hard enough to round a Scandi edge.
 3Full length, alternate sides
Pull from heel to tip over the full length of the strop, 10–20 strokes per side, then a few single alternating strokes.
 4Never edge leading
Pushing the edge forward cuts into the leather and can roll the fresh apex.
Leather, compound and backing
- Hard backing (leather glued to a wooden board) keeps a Scandi bevel flat and crisp.
- Soft backing (loose leather or leather over a mousepad) wraps slightly around the edge and is good for convex edges, but on a Scandi it rounds the apex over time.
- Compound (a fine polishing paste, usually green chromium oxide or similar) is rubbed thinly into the leather. Refresh it when the leather turns shiny black.
- Improvised strops: a leather belt, smooth dry hardwood or cardboard.
Sharpening in the field: a small kit that works
Field sharpening means maintenance, not repair. At home you have time and a big bench stone; in the woods you want something light that keeps an already good edge working. The whole kit weighs 100–250 g.
Field sharpening kit
- Small double-sided diamond plate, e.g. medium (about 400–600) and fine (about 1,000–1,200)
- Round axe puck (coarse/fine combination stone) if you carry an axe or hatchet
- Pocket strop or a strip of leather glued to a thin board, with a little compound
- Small ceramic rod or a sandpaper strip for hook knives and curves
- Rag and a few drops of oil for carbon steel
- Cut-resistant glove for axe and puck work
- Everything in a small bag that lives with the core kit
Improvising when you have nothing
If you forgot your stone, look for a fine-grained river stone: smooth, flat and hard, ideally sandstone, slate or quartzite with a uniform surface. Wet it and use it like a coarse to medium stone. Afterwards, a smooth piece of dry hardwood or a belt serves as a strop.
As a last resort, the unglazed ring on the base of a ceramic mug or plate works like a fine ceramic hone. It removes very little steel, so it only helps a slightly dull or rolled edge.
If you want to plan your field kit by weight, the Kit Builder helps you see where a diamond plate and strop fit into the total load. Remember that a sharp spine is also part of the kit: many people touch up the 90° spine of their knife so it strikes a ferro rod cleanly.
How to sharpen a bushcraft knife with a Scandi grind
The Scandi grind is the easiest edge to sharpen by hand because the wide bevel lies flat on the stone. You do not have to hold an angle in the air; the bevel does it for you. The main skill is keeping it flat, with even pressure, from heel to tip.
Scandi sharpening step by step
 1Set up safely
Wet the stone (for example a 400/1000 combination stone or a diamond plate) and fix it on a damp cloth so it cannot slide. Sit or kneel at a stable surface such as a log or flat rock, never on your knee.
 2Rock until it settles
Place the bevel on the stone and rock the blade gently until you feel it settle with no gap at shoulder or edge. Slurry pushed out at both the edge and the shoulder shows it lies flat; slurry only at the edge means the spine is too high.
 3Even pressure on the bevel
Hold the handle in your fist and put two or three fingertips of the free hand on the bevel area, not near the edge. Push along the stone, edge-leading or in small circles, pressure spread evenly over the whole bevel.
 4Heel to tip
Work in sections from heel to tip. At the curved belly, lift the handle slightly so the bevel stays flat as the edge sweeps up towards the point; forgetting this is why most tips end up dull and rounded.
 5Feel for the burr
Keep going on one side until a fine wire (burr) forms on the opposite side along the entire edge, tip included. Check by drawing your thumb gently from the spine off the edge, never along it.
 6Switch sides, then alternate
Repeat on the second side with about the same number of strokes until the burr flips back. Then alternate with falling counts: five strokes per side, three, two, one.
Refine and deburr. After the 5-3-2-1 sequence, move to the fine side of the stone and use only the weight of your fingers; the burr gets smaller with every round. Finish with a few very light edge-trailing strokes on the fine stone, then strop 10–20 times per side exactly as shown in the stropping sequence above, and test on paper.
What it should look like: checkpoints
If one fails, go back one stage instead of pressing harder.
Checkpoints for a good edge
- Even scratch pattern over the whole bevel, from shoulder to edge and from heel to tip, with no shiny untouched strip
- A burr you can feel along the entire edge, including the last centimetre at the tip, before you switch sides
- No bright line or glinting spots when you look straight down onto the edge under light
- A clean, quiet paper slice from heel to tip without snags or tearing
- The Scandi bevel still looks flat with a crisp shoulder line, not rounded or domed
Should a Scandi grind have a micro-bevel?
A micro-bevel is a tiny, slightly steeper bevel (often a few degrees steeper, less than half a millimetre wide) at the very edge of the main bevel. You create it with a few light strokes with the spine raised a little. It strengthens the edge but changes how the Scandi behaves.
Micro-bevel on a Scandi grind
Pros
- More robust apex, less chipping on knots and frozen wood
- Faster touch-ups: you only hone the tiny bevel
- Holds its edge longer during batoning and rough work
Cons
- You lose the "bevel as a guide" feeling while carving
- Slightly more effort for fine carving and feather sticks
- Grows with each touch-up; eventually you must grind the whole bevel flat again
For pure woodwork, many people keep a zero Scandi edge. For hard use, winter or softer carving ambitions, a micro-bevel is a sensible compromise. Either way, when the micro-bevel gets wider than about 1 mm, grind the main bevel back flat.
Sharpening flat and convex grinds
Flat grind with a secondary bevel
Here you sharpen only the small edge bevel. Find its angle with the marker trick, then hold that angle consistently. Edge-leading strokes, as if slicing a thin layer off the stone, are easiest. Raise a burr, switch sides and refine exactly as with the Scandi.
Over years, the secondary bevel moves up into thicker steel; thinning the blade behind the edge on a coarse stone is then a job for home.
Convex edges
A convex edge curves gently from the shoulder to the apex. It is very strong and common on axes and some knives. You can maintain it in two ways:
- On a flat stone: start with the spine slightly lower than the edge angle and raise it progressively during each stroke, rolling the blade so the curve follows the stone. Keep the rolling motion small.
- On a soft backing: wet-and-dry abrasive paper (for example 400, 800, 1,500) on a mousepad or leather strip lets the edge sink in slightly, so the convex shape forms by itself. Use edge-trailing strokes only, just like stropping.
Convex edges are forgiving: a slightly inconsistent angle simply blends into the curve.
How to test if your knife is sharp
Test sharpness with methods that keep your skin out of the way. Three simple checks cover almost everything:
- Paper slice test: hold a sheet of printer paper or newspaper by one corner and slice downward from heel to tip. A sharp edge cuts smoothly and quietly; snags, tears or a crunching sound show dull or damaged sections. This is the test we recommend.
- Light reflection: hold the blade edge-up under a lamp or in sunlight and look straight down onto the edge. A truly sharp apex is so thin that it reflects no light. Shiny spots or a bright line mean dull areas, rolled sections or chips.
- Fingernail catch: rest the edge very lightly on your thumbnail at a low angle. A sharp edge catches and bites into the nail; a dull one slides. Use almost no pressure and never push along the nail.
Shaving arm hair also works, but it puts a razor-sharp blade against your skin for no gain; the paper test is enough. The real test is the wood: a sharp knife takes a thin, continuous curl off a dry stick for tinder.

What does my edge need?
Does the edge slice paper cleanly and show no shiny spots?
Yes → It is sharp. Strop 10 strokes per side to maintain it and carry on.No → Go to the next question.Does it improve after 20 strokes on the strop or ceramic rod?
Yes → It was a rolled edge. Strop regularly and avoid twisting the blade in cuts.No → Go to the next question.Are there visible chips or a wide bright line on the edge?
Yes → Repair on a coarse stone (about 200–400) until the chips are gone, then medium, fine and strop.No → Sharpen on a medium stone (about 800–1,000), refine on fine, then strop.
Sharpening problems: troubleshooting by symptom
When a knife will not get sharp, the cause is usually technique, not the steel. Find your symptom and apply the fix before adding pressure.
| Symptom | Likely cause | Fix |
|---|---|---|
| No burr forms at all | Angle too low (only the shoulder touches), grit too fine for a dull edge, or too few strokes | Marker trick to check contact; go to the medium or coarse grit and keep going until a burr appears |
| Burr only in some sections | Uneven pressure or skipped sections; blade slightly bent; tip not reached | Mark the sections without burr and work only there; move your fingers along the bevel as you progress |
| Tip gets rounded | Handle not lifted at the belly, or the tip runs off the end of the stone | Lift the handle as the curve reaches the stone; keep the tip on the stone and slow down for the last few centimetres |
| Edge dull again after a few cuts | Burr left on, folded over in the first cut | Alternate single strokes with falling pressure, a few edge-trailing strokes on the fine stone, then strop |
| Scandi bevel rounded or convex | Rocking the wrist during strokes, too much pressure on a soft strop | Lock the wrist, lighter pressure, use a hard-backed strop; flatten the bevel again on a medium stone |
| Stone dishes or loads up | Always using the middle of the stone; no water or oil to float away swarf | Use the full surface, keep it wet, clean it; flatten a dished waterstone on a flattening plate or coarse diamond plate |
How to sharpen an axe or hatchet
An axe edge needs a different approach from a knife. It is thicker, convex and meets much harder shocks, so it is sharpened at about 20–25° per side and polished less finely. The job has two parts: a file for shaping and repair, and a round axe puck for sharpening and honing. Details on axe types and safe use are in our axe guide.
Axe sharpening sequence
 1Secure the head
Wedge the head firmly on a log with pegs (or clamp it in a vice), edge pointing up, so it cannot shift under the file.
 2File the profile
Wear a glove and use a flat file with a knuckle guard. Push into the edge on the push stroke only, following the convex shape, until chips and flat spots are gone; dragging the file back dulls its teeth.
 3Coarse side of the puck
Wet the puck and work in small circles along the whole bevel until a burr forms, then do the other side. Keep your fingers behind the edge, on the far side of the puck.
 4Fine side, light pressure
Repeat on the fine side with light pressure on both sides, alternating until the burr is gone.
 5Strop and check
Strop with edge-trailing strokes, then hold the edge up to the light. Bright spots need another round on the fine side.
Filing: shape and repair
Use a single-cut flat file of about 20–25 cm (8–10 in) with a handle and a knuckle guard or a thick glove. Files cut on the push stroke only; lift the file on the way back so you do not dull its teeth. File from the edge back towards the cheek, following the existing convex curve rather than creating a flat facet, and work evenly across the whole bit so the edge keeps its gentle arc. A sharp axe with a good profile skips the file and goes straight to the puck.
The puck: circular strokes
Brace the axe with the head on a log and the edge pointing away from you, then hold the puck in a gloved hand and move it in small circles along the bevel from heel to toe. Keep your fingers behind the edge, on the far side of the puck, never in front of it. The circles blend into the convex bevel naturally. Work until you feel a burr, switch sides, then move to the fine side and finally strop.
A sharp axe splits cleanly and is less likely to bounce off a knot. That matters when splitting firewood and kindling for fire starting. Do not let the edge touch the ground when you split; one strike into a stone undoes an hour of sharpening.
Sharpening carving tools, hook knives and saws
Carving and sloyd knives
Carving knives are sharpened exactly like a Scandi bushcraft knife, but they deserve a finer finish. A highly polished bevel glides through green wood and leaves a shiny, burnished surface. Strop after every session. A clean edge needs less force for detail cuts in spoon carving.
Hook knives
Many hook knives have a bevel on the outside only; the inside is flat and polished. Sharpen the outside bevel on a flat stone or strop, rolling the blade so the bevel stays in contact as the curve changes. Then deburr the inside with a ceramic rod or a wooden dowel wrapped in fine abrasive paper, kept flat against the inner face. Double-bevel hook knives are sharpened on both faces: inside with the rod or wrapped dowel, outside on the stone. Strop both faces, the inside on a compound-coated dowel. See carving tools for the different hook shapes.
Saws
Most modern folding and bow saw blades have impulse-hardened teeth: the tips are hardened to a level no file can cut. You recognise them by their dark tips; when they dull, you replace the blade. Carry a spare blade for a bow saw on longer trips. Only saws with non-hardened teeth, such as some traditional bow saws, can be sharpened with a special saw file and setting tool, which is a workshop job. More on this in our saw guide.
A camp kitchen knife for campfire cooking is best kept at about 15–20° per side and maintained with the same diamond plate.
Practice drills: learn to sharpen faster
Sharpening is a motor skill. Short practice on a cheap blade teaches your hands more than nervous work on your best bushcraft knife.
Marker drill (10 minutes, cheap knife)
- Colour the bevel of an inexpensive knife with a permanent marker.
- Make three light strokes on the medium stone, read the ink and correct your angle until it disappears evenly from shoulder to edge.
- Re-colour and watch the tip: untouched ink there means lift the handle more at the belly.
- When the ink comes off evenly five times in a row on both sides, your angle is consistent.
5-minute strop routine (every evening in camp)
- Look for bright spots under your head torch.
- Strop 20 strokes per side, spine leading, light pressure; then 10, 5 and 3 alternating.
- Paper test from heel to tip; give any snagging section 10 more strokes.
- Wipe, oil carbon steel and sheath the blade.
This keeps a knife ready for feather sticks and carving. Test on paper, never on skin.
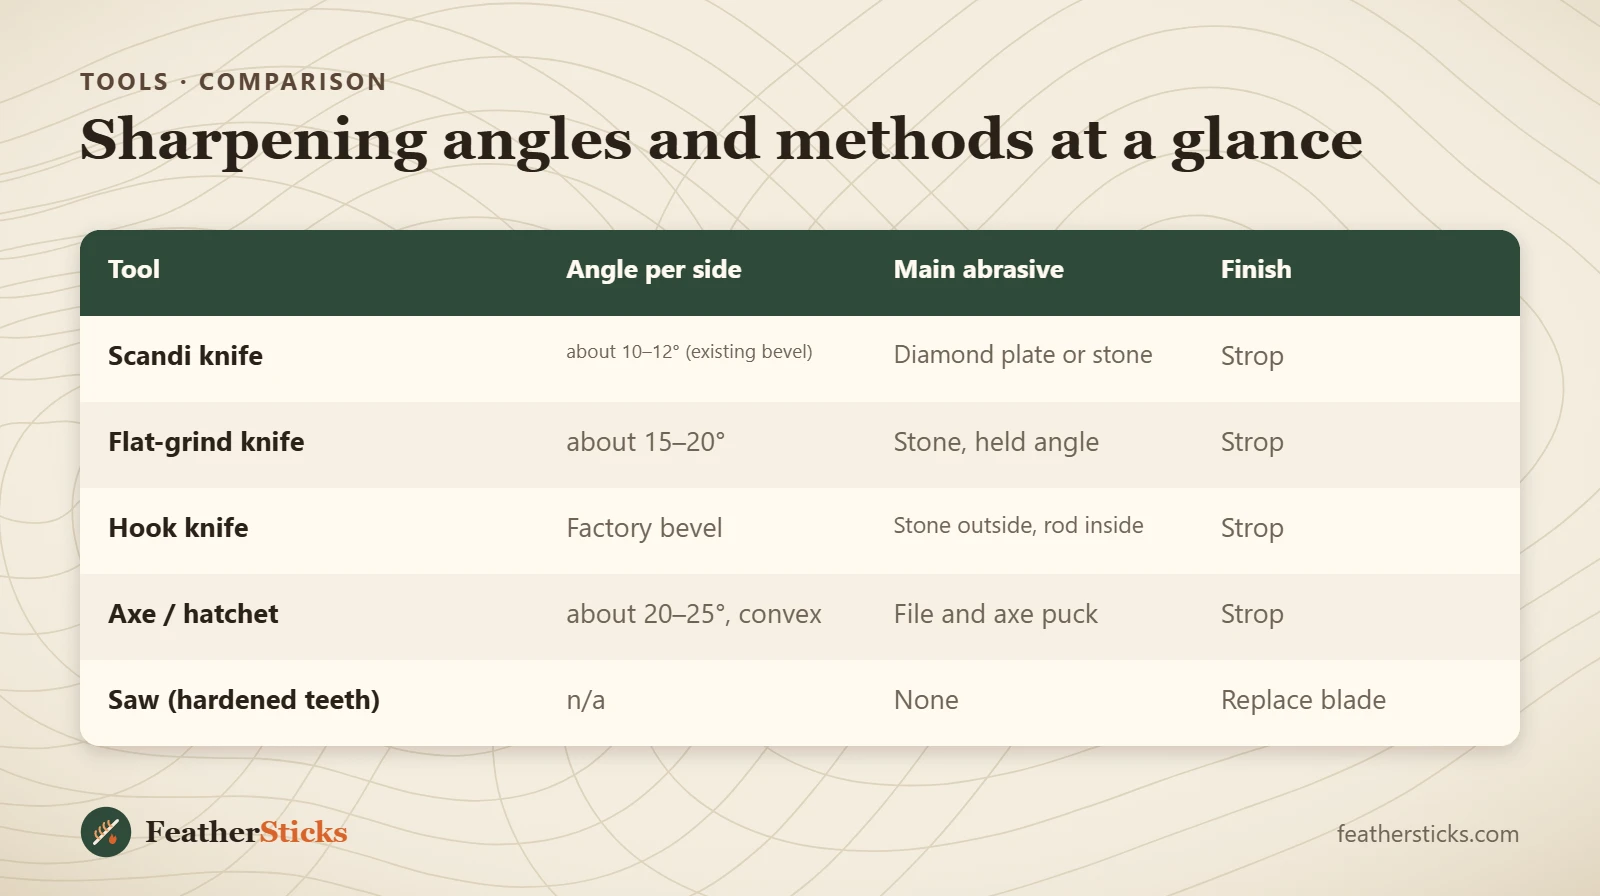
| Tool | Angle per side | Main abrasive | Finish |
|---|---|---|---|
| Scandi knife | about 10–12° (existing bevel) | Diamond plate or stone | Strop |
| Flat-grind knife | about 15–20° | Stone, held angle | Strop |
| Hook knife | Factory bevel | Stone outside, rod inside | Strop |
| Axe / hatchet | about 20–25°, convex | File and axe puck | Strop |
| Saw (hardened teeth) | n/a | None | Replace blade |
Common mistakes
- Waiting until the knife is completely dull instead of stropping and honing regularly.
- Rocking the blade and changing the angle, which rounds the edge instead of sharpening it.
- Stopping before a burr has formed along the entire edge, especially near the tip.
- Leaving the burr on: the edge feels sharp for a few cuts, then folds and goes dull.
- Stropping with the edge leading, which cuts the strop and rolls the edge.
- Sharpening on the knee or holding the stone with fingers in front of the edge.
- Trying to file impulse-hardened saw teeth instead of replacing the blade.
What you need
- Double-sided diamond plate (medium/fine) for the field
- Bench stone set (coarse, medium, fine) for home
- Leather strop with polishing compound
- Round axe puck (coarse/fine)
- Flat mill file with handle and guard
- Ceramic rod or dowel with abrasive paper for hook knives
- Cut-resistant glove
- Permanent marker for checking the bevel