Fire
How to Use a Ferro Rod: Technique, Strikers, Tinder & Care
To use a ferro rod, rest its tip in a loose bundle of fine, dry tinder, hold a sharp 90° striker against it at about 45° and pull the rod firmly back while the striker stays still. The shower of sparks lands exactly where you need it, and nothing gets knocked over. That one change, pulling instead of pushing, solves most beginner problems.
A ferrocerium rod works when wet, in frost and at altitude, with no fuel to run out. Below: how sparks form, ferro rod vs "magnesium rod", sizes, techniques, strikers, tinder, care and troubleshooting. It is one core skill in starting a fire from scratch and part of every bushcraft for beginners kit.
Step by step
-
1
Prepare tinder and kindling
Build a loose, fist-sized nest of the finest dry material you have. Lay out pencil-thin kindling and thicker sticks within reach before you strike.
-
2
Scrape off the coating
New rods often carry a dark protective coating. Scrape a few firm strokes along one side until bright grey metal shows.
-
3
Set rod and striker low
Rest the rod tip in the tinder. Hold the striker near the top of the rod at roughly 45°, with its sharp 90° edge biting into the metal.
-
4
Pull the rod back firmly
Keep the striker hand still and pull the rod towards you in one firm, full-length stroke. The sparks fall straight into the tinder.
-
5
Feed the flame gradually
When the tinder flares, shield it from wind and add the thinnest sticks first. Move to thicker wood only once the flame is steady.
What is a ferro rod and how do the sparks form?
A ferro rod is a bar of ferrocerium, a synthetic alloy developed in the early 1900s by the Austrian chemist Carl Auer von Welsbach. It consists mainly of "mischmetal", a blend of rare-earth metals led by cerium and lanthanum, plus a smaller share of iron and sometimes magnesium or other additives. The same material, in tiny form, is the "flint" inside a classic spark-wheel lighter.
The rare-earth metals react with oxygen so readily that freshly exposed particles ignite from the heat of friction alone. When a hard, sharp edge shaves tiny flakes off the rod, they burn in the air as glowing sparks, often quoted at around 3,000 °C. That is far hotter than sparks from traditional flint and steel.
What a ferro rod does not give you is a flame. Each spark lives for a fraction of a second, so your job is to put many sparks into material fine, dry and airy enough to turn that brief heat into flame. Technique and good tinder matter more than the rod itself.
Ferro rod at a glance
- Material
- Ferrocerium: rare-earth mischmetal (cerium, lanthanum) plus iron
- Spark temperature
- Often quoted as around 3,000 °C
- Works when wet
- Yes, wipe it dry and strike
- Works in frost
- Yes, no fuel or pressure involved
- Common sizes
- 4–13 mm diameter, 5–15 cm long
- Lifespan
- Thousands of strikes, more for thicker rods
- Weak point
- Needs fine, dry tinder and a sharp striker
Ferro rod vs magnesium rod, flint and steel or a lighter
The terms get mixed up constantly, so it helps to sort them out before you buy anything.
Ferro rod vs "magnesium rod"
Many products sold as "magnesium rods" are simply ferro rods. A true magnesium fire starter is a soft magnesium block with a thin ferrocerium strip on one edge. Magnesium itself does not spark: you scrape a pile of shavings with a knife, then strike the strip into it. The shavings burn very hot for a few seconds, which helps with damp tinder, but they blow away easily and take time to make.
Ferro rod vs flint and steel
With flint and steel, a sharp stone shaves glowing particles off a high-carbon steel striker. Those sparks are much cooler, so they need char cloth or tinder fungus to catch an ember, which you then blow into flame. A rewarding traditional skill, but slower and less forgiving.
Ferro rod vs lighter and matches
A lighter is the easiest option in good conditions, but butane lighters struggle near and below freezing, spark wheels fail when wet and gas runs out. Matches get damp. A ferro rod is the robust backup that keeps working. Friction methods such as the bow drill need no manufactured gear, but demand dry wood and much practice.
| Method | Ignition | Wet conditions | Cold | Skill needed |
|---|---|---|---|---|
| Ferro rod | Hot sparks, needs fine tinder | Works after wiping dry | Unaffected | Low to medium |
| Magnesium block + strip | Shavings + sparks | Shavings help with damp tinder | Unaffected | Medium, slow |
| Flint and steel | Cool sparks, needs char cloth | Char material must be dry | Unaffected | Medium to high |
| Butane lighter | Direct flame | Wheel fails when wet | Weak near and below 0 °C | Very low |
| Matches | Direct flame | Only storm or waterproofed matches | Fine | Low |
| Bow drill | Friction ember | Very difficult | Harder | High |
Ferro rod vs magnesium block
Ferro rod
- Throws hot sparks directly
- Ready in seconds, one-handed practice possible
- Compact, lasts thousands of strikes
- Needs fine, fluffy tinder to catch
Magnesium block
- Shavings burn very hot for a few seconds
- Helpful as a booster for damp tinder
- Shavings blow away in wind
- Slow: needs a knife and a minute of scraping
Which ferro rod is best? Diameter, mix and handle
For most people the best ferro rod is a plain one of about 8–10 mm diameter and 10–13 cm length, with a handle you can grip with cold or gloved hands. It throws a generous spark shower, gives you room for a full stroke and lasts for years of regular use.
Diameter and length
Thicker rods produce more sparks per stroke and wear down more slowly; longer rods allow a longer stroke. Keychain rods of 4–6 mm are fine as a pocket backup but need more strokes and precise technique. Rods of 12 mm and more are almost indestructible, but heavier than most solo users need.
Soft vs hard mixes
Manufacturers vary the alloy. As a rule, softer rods throw big, slow-burning sparks that are easy for beginners, but wear faster. Harder rods give a finer, denser spray, need a sharper striker and more pressure, and last longer. For learning, soft is more rewarding; for a long-term kit rod, a harder mix makes sense.
Handles and lanyards
A handle protects your knuckles and improves grip in the cold. A lanyard linking rod and striker stops you losing either in leaf litter. Rods built into knife sheaths are convenient if you can remove them easily with cold hands.
| Diameter | Typical use | Sparks per stroke | Relative lifespan | Notes |
|---|---|---|---|---|
| 4–6 mm | Keychain, emergency backup | Small | Short | Needs precise technique, easy to carry always |
| 8 mm | Everyday bushcraft kit | Good | Medium | Best balance of weight and spark volume |
| 10 mm | Main rod for regular use | Generous | Long | Easy for beginners and cold hands |
| 12–13 mm | Shared camp kit, vehicle, long trips | Very large | Very long | Heavy, but lasts for many years |
Length matters too: 10–13 cm gives room for a full, controlled stroke. Add a rod to your list in the Kit Builder.

Removing the coating from a new ferro rod
Many new rods are coated with a thin black or dark grey layer of paint or lacquer. It protects the metal from corrosion in storage, but it blocks sparks. If a new rod only scratches and does not spark, the coating is almost always the reason.
Scrape along one side with the striker, using short, firm strokes at a steep angle, until bright, silvery-grey metal and the first sparks appear. You only need to clean the face you strike; use does the rest. Never use your knife edge for this.
How to use a ferro rod: striking techniques that work
Every good ferro rod technique follows the same principles: the striker edge bites into the rod, pressure is firm, the stroke is long and controlled, and sparks are produced within a few centimetres of the tinder. Sparks falling from 30 cm cool and scatter.
The pull-back technique (recommended)
This is the ferro rod technique most instructors teach first. The striker hand stays still and acts as a fixed blade; the rod moves.
Pull-back strike, step by step
 1Kneel beside the tinder
Get low and stable, with your back to the wind so your body shelters the nest. Kindling lies within reach, so you never have to stand up once it catches.
 2Plant the rod tip
Rest the tip of the rod in or right at the edge of the tinder bundle, angled at about 45° to the ground. The tip stays there for the whole stroke.
 3Lock the striker
Place the striker edge near the top of the rod, angled about 45°. Brace the striker hand against your knee or thigh so it cannot shoot forward into the nest.
 4Pull the rod back
Press the striker firmly into the rod and pull the rod up and back towards you in one smooth, full-length stroke. The sparks run down the rod and drop into the tinder.
 5Repeat and adjust
If sparks land beside the tinder, change the angle of the rod rather than the force. Two to five good strokes usually light well-prepared tinder.

The push or scrape technique
Here the rod stays still and you push the striker down it, away from your body. It is intuitive and throws many sparks, but the striker hand often follows through and smashes the tinder bundle. If you prefer pushing, hold the rod tip a few centimetres above the tinder and stop the striker before the end of the rod.
The thumb-push or thumb-lever technique
The most precise method, ideal with a knife spine. Hold the knife with the spine against the rod, put the thumb of your rod hand on the back of the spine and push it down the rod like a lever while both hands stay close together. The stroke is short, but sparks go exactly where you point, and the edge faces away from you. Perfect for small targets such as a cotton ball or fatwood dust.
The thumb-lever strike with a knife spine
 1Spine on the rod, edge away
Plant the rod tip on the target. Lay the square spine of the knife across the rod near the top, with the cutting edge facing up and away from both hands.
 2Thumb pushes the spine
The thumb of the rod hand presses on the spine and pushes it down the rod in a short, firm stroke. The knife hand only holds the angle.
 3Sparks straight into the target
Because the stroke is short and both hands stay together, the sparks land exactly on the cotton ball or dust pile. Stop before the spine reaches the tinder.
Knee-braced variation
If your hands shake from cold or effort, brace the rod hand against your knee and strike with small, controlled movements. Whatever the method: angle beats force. A steep edge, firm pressure and a long, smooth stroke outperform fast, jerky strikes.

What a good strike looks like
Watch the spark shower, not your hands. A good strike has a recognisable look and sound, and every deviation points to a cause:
- A thick, orange-white shower that runs all the way down the rod and lands in a spot the size of a coin: angle, pressure and striker are right.
- A crisp, scraping sound and a visible fresh groove on the rod: the striker bites. A squeaky, gliding sound means it is sliding over the surface.
- Short, dull red sparks that die in the air: too little pressure or a rounded striker edge.
- A few big sparks followed by nothing: the striker lifted off halfway. Keep it pressed to the end of the stroke.
- Sparks bounce off the tinder: the surface is too smooth or compressed. Fluff it up so the sparks fall into the fibres.
Practice drills
- Coin target: put a coin on a fireproof surface and strike so that most sparks land on it. Ten strokes with each technique.
- Cotton in five: light a pulled-open cotton pad in five strikes or fewer, ten times in a row. Then do it with gloves on.
- Natural only: light a nest of scraped birch bark or fatwood dust without any prepared tinder.
- Weak hand: swap hands. In an emergency an injured hand may leave you no choice.
The best ferro rod striker: scraper, knife spine or hacksaw blade
The best ferro rod striker is simply a hard edge with a crisp, sharp 90° corner. The corner must be hard enough to cut into the ferrocerium instead of sliding over it. Rounded, coated or soft edges produce few or no sparks.
- Included scraper: convenient, stays attached by the lanyard and saves your knife. Quality varies; if yours feels slippery, sharpen its corner square on a stone or file.
- Knife spine: works very well if the spine is ground to a sharp 90° edge. Many bushcraft knives have a spine prepared for this. Rounded, bevelled or coated spines often do not work. You can square a spine with a file or on a stone; see sharpening in the field for technique.
- Hacksaw blade: a short piece of metal-cutting hacksaw blade, teeth taped or ground off, is a cheap, light and excellent striker with a hard, square back.
Never strike with the knife edge
The cutting edge bites deep into the rod, but it rolls and chips within a few strokes, just when you need it sharp for feather sticks and kindling. Keep the edge for cutting and the spine for sparks, and always hold the edge facing away from your hands.

Tinder that catches ferro rod sparks
Sparks from a ferro rod are hot but brief, so tinder must have three properties: it must be fine (thin fibres or shavings with lots of edges), dry and airy (loosely packed so oxygen can reach the glow). Anything as thick as a matchstick is kindling, not tinder.
Prepared tinder
Cotton pads rubbed with petroleum jelly are the classic kit tinder. Pulled apart to expose dry fibres, they catch a single good spark and burn for several minutes. Jute twine, unravelled into a fine nest, catches sparks well and packs small.
Natural tinder
Birch bark contains oily compounds that burn even when damp; scrape it into fluffy shavings with your knife spine. Fatwood, resin-saturated pine heartwood, scrapes into dust and curls that flare up and burn long. The thinnest curls of a feather stick catch sparks too. Cattail fluff catches instantly but burns out in a flash. Collect natural materials only where allowed; see our guide to natural tinder.
| Tinder | Catches sparks | Burn time | Damp conditions | Tip |
|---|---|---|---|---|
| Cotton + petroleum jelly | Very easy | Long (minutes) | Excellent | Pull apart to expose dry fibres |
| Birch bark shavings | Easy | Medium | Good | Scrape fine with the knife spine |
| Fatwood dust and curls | Easy when fine | Long | Excellent | Scrape a pile the size of a coin |
| Feather stick curls | Medium | Medium | Good | Only the thinnest curls catch |
| Cattail fluff | Very easy | Very short | Poor | Mix with a slower tinder |
| Jute twine, fluffed | Easy | Short to medium | Fair | Unravel into a loose nest |
A reliable trick is to stack tinders: a pinch of something that catches very easily (cattail fluff, fluffed jute or the finest birch shavings) on top of something that burns long (fatwood scrapings or a jelly-soaked cotton ball). The first catches the spark, the second holds the flame long enough to ignite your kindling. How you build the fire around it is covered in fire lays; the Fire Lay Picker helps you choose one for your conditions.
Stacking tinder for a first-strike fire
 1Open the cotton
Pull a jelly-soaked cotton pad apart until dry white fibres stick out. A compressed pad only smoulders; an opened one catches a single spark.
 2Scrape a fatwood base
Scrape the square spine of the knife along a fatwood stick until you have a coin-sized pile of fine dust and tiny curls.
 3Stack catcher on burner
Long burner at the bottom (fatwood dust, cotton), the finest spark-catcher on top (fluff, fluffed jute, birch bark dust). Keep the whole stack loose.
 4Strike and feed at once
Plant the rod tip next to the stack and strike. The moment it flames, lay matchstick-thin kindling over it: even long-burning tinder only gives you a minute or two.
Using a ferro rod in wet and cold conditions
Water does not stop a ferro rod. If it has been dropped in a stream or soaked by rain, wipe it on your clothing and strike as usual; the first stroke or two may clear the moisture. The real challenge in rain is dry tinder and kindling.
- Carry prepared tinder, such as jelly-soaked cotton, in a small waterproof container.
- Look for dry material under dense conifers, on standing dead wood and inside split sticks.
- Build a platform of sticks so tinder does not sit on wet ground, and shield it while you strike.
- Prepare far more kindling than you think you need.
In the cold, the rod works just as well, but numb fingers lose grip and precision. Use a lanyard, a handle you can hold in gloves and a bigger rod for winter. Fire can matter for warmth and boiling water, so practise in easy conditions first. Our guide to fire in wet weather goes deeper.
How long does a ferro rod last, and how do you care for it?
Manufacturers usually rate rods in the thousands of strikes, but real lifespan depends on diameter, hardness and technique. A thick rod used with controlled strokes can last many years of weekend use; a thin keychain rod struck aggressively wears much faster. Once you light tinder reliably, use only as much pressure as you need.
Corrosion and storage
Ferrocerium can corrode when stored damp, especially near salt water. Corrosion shows as a whitish or grey powdery layer, usually only on the surface: scrape it off and the rod sparks again. Store the rod dry, wipe it after rain, and for long-term storage rub on a thin layer of candle wax, beeswax or oil. The first stroke removes it.
When to replace it
Replace the rod when it is too short to hold safely or you strike close to your fingers. A snapped rod still works as an emergency backup. Keep a spare on your bushcraft kit list.
Troubleshooting: why is my ferro rod not sparking or not lighting?
Almost every problem falls into one of two groups: the rod does not produce good sparks, or the sparks do not light the tinder. Work through the questions below in order.
Ferro rod troubleshooting
Is the rod new or still dark and shiny?
Yes → Scrape off the protective coating until bright metal shows.No → Check the striker next.Is the striker edge crisp and square?
Yes → Check your angle and pressure.No → Sharpen it to 90° or switch to a hacksaw blade or the included scraper.Are you striking at about 45° with firm pressure?
Yes → Sparks are fine, so look at your tinder.No → Steepen the angle and press harder; use long, smooth strokes.Do sparks land on the tinder but do not catch?
Yes → Make the tinder finer, drier and fluffier, or add jelly cotton or fatwood dust.No → Strike closer: plant the rod tip in the tinder and use the pull-back technique.Does the tinder flare and then die?
Yes → Add a longer-burning tinder and have thin kindling ready before you strike.No → You have a fire. Feed it gradually.
If the tinder catches but the fire does not grow, the kindling is usually too thick, wet or not ready. Sort sticks from matchstick-thin to thumb-thick before you strike. The Firewood Calculator estimates how much tinder, kindling and fuel wood to gather for cooking, warmth or a full evening.
Ferro rod safety and fire rules
Sparks this hot can burn skin, melt synthetic clothing, damage eyes and land in dry leaves well away from your fire. Strike downwards and away from people, keep your face out of the spark path and supervise children closely.
Rules for open fires vary by country, region and landowner, and fire bans are common in dry periods. Check local rules and the current fire danger rating before lighting anything. A ferro rod is also a handy way to light a gas or alcohol stove when campfire cooking is not allowed. See campfire safety and Leave No Trace for the full routine, and all fire skills for related guides.
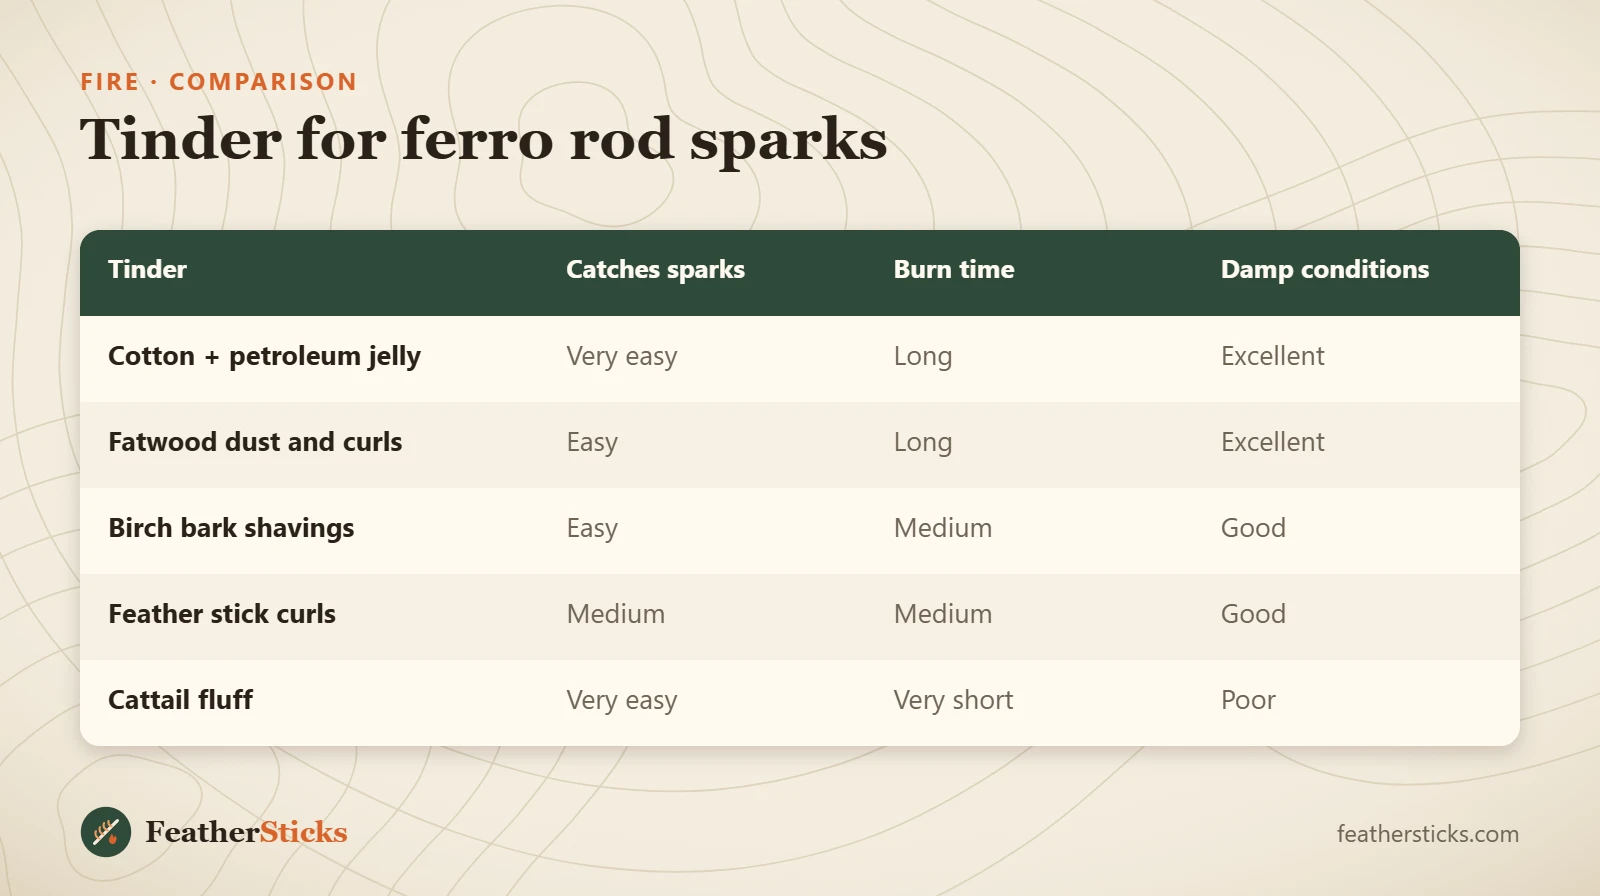
| Tinder | Catches sparks | Burn time | Damp conditions |
|---|---|---|---|
| Cotton + petroleum jelly | Very easy | Long | Excellent |
| Fatwood dust and curls | Easy | Long | Excellent |
| Birch bark shavings | Easy | Medium | Good |
| Feather stick curls | Medium | Medium | Good |
| Cattail fluff | Very easy | Very short | Poor |
Common mistakes
- Pushing the striker forward and smashing the tinder bundle apart.
- Striking from too high up, so sparks cool and scatter before they land.
- Trying to strike through the factory coating on a new rod.
- Using a rounded or coated knife spine, or ruining the knife edge as a striker.
- Tinder that is too coarse, damp or tightly packed for brief sparks to catch.
- Striking before kindling is sorted and within reach, so the tinder burns out.
What you need
- Ferro rod, 8–10 mm diameter, 10–13 cm long, with a handle
- Striker with a sharp 90° edge (scraper, hacksaw blade piece or knife spine)
- Lanyard linking rod and striker
- Cotton pads with petroleum jelly in a small waterproof container
- Fatwood stick or birch bark for scraping natural tinder
- Lighter or storm matches as a second ignition source