Fire
Bow Drill Fire: How to Make and Use a Bow Drill, Step by Step
A bow drill fire is made by spinning a wooden spindle against a wooden board with a bow until the friction grinds out hot, dark wood dust that collects in a notch and glows as an ember. That ember is placed in a tinder bundle and blown into flame. No matches, no lighter, no metal: only dry, soft wood, a cord and good technique.
This guide shows you how to make a bow drill from scratch: which woods work, the dimensions of every part, how to cut the notch, how to kneel and bow, and how to turn a fragile coal into a real fire. The troubleshooting section fixes the classic problems: squeaking, glazing, smoke without an ember. For the wider picture, start with fire starting basics and our bushcraft guide for beginners.
Step by step
-
1
Collect dry, soft, dead wood
Find standing dead wood of willow, lime, poplar or cedar that you can dent with a thumbnail. It must be bone dry, not rotten.
-
2
Carve the four parts
Make a straight spindle about 20–25 cm long and 2 cm thick, a flat hearth board, a fist-sized bearing block and an arm-length bow.
-
3
Burn in the hole, cut a notch
Drill a shallow socket until it is black, then cut a notch of about one-eighth of the circle to the centre of the burned hole.
-
4
Bow with long, even strokes
Lock your wrist against your shin, keep the spindle vertical and use the full length of the bow. Increase speed and pressure as smoke builds.
-
5
Nurse the ember into flame
Let the smoking dust sit for a moment, move it into a dry tinder nest and blow gently and steadily until it bursts into flame.
How does a bow drill fire work?
Friction fire is controlled heat production, not brute force. A spindle spinning against a hearth board under pressure grinds both surfaces into fine wood dust, and the friction heats that dust. Because it packs into a notch cut into the side of the hearth, the heat cannot escape. Once the pile is hot enough, it smoulders on its own and forms a small glowing coal: the ember.
Three things must happen at the same time:
- Speed: the spindle must turn fast enough that heat builds up faster than it is lost.
- Pressure: downward force grinds fresh dust. Too little polishes, too much stalls the spindle.
- A place for the dust: the notch collects the dust in one insulated pile where heat concentrates.
The bow is a gearbox for your arm. One loop of cord around the spindle converts a long back-and-forth stroke into many rotations. That is why the bow drill is the most forgiving friction method for beginners.
Read the dust, not the smoke
Smoke only means the wood is hot. An ember needs the right dust: fine, dark brown to black and slightly fluffy, like ground coffee. Pale, coarse dust means the wood is being torn rather than ground. The ember itself is not a flame but a slow, glowing combustion that lasts several minutes if protected. Your job is to transfer it into a natural tinder bundle and add oxygen until the tinder flames, then build up a suitable fire lay.
The parts of a bow drill set
A complete kit has six components. Most failures come from one part being slightly wrong, not from a lack of effort.
- Spindle (drill): the straight rod that spins. Its bottom grinds into the hearth, its top turns in the bearing block.
- Hearth (fireboard): a flat board with a burned-in socket and a notch, where the ember forms.
- Bearing block (handhold): hard wood, stone or bone that presses the spindle down with as little friction as possible.
- Bow: an arm-length stick with a gentle curve that holds the cord.
- Cord: strong string tied to both ends of the bow and wrapped once around the spindle.
- Ember pan: a bark chip or dry leaf under the notch that catches the ember.

What a finished kit should look like
Before your first real attempt, lay the parts out and check them against this list. The spindle is straight when you roll it on the board and it does not wobble. The bottom end is a blunt dome, the top end a short cone, and the top carries a small mark. The hearth lies flat without rocking and is roughly as thick as the spindle. The bow is stiff enough that squeezing the cord does not bend it much. The bearing block has a smooth, shallow socket that the spindle tip turns in without catching. If any part fails one of these checks, fix it now: ten minutes of carving saves an hour of frustrated bowing.
The bow drill stack, top to bottom
- Smooth socket lubricated with green leaves, wax or skin oil. Held in the left hand, braced against the shin.
- Pointed top turns in the bearing block; the cord wraps once around its middle.
- Burned-in socket with a notch to its centre, held down by your foot.
- Bark, a leaf or a thin chip under the notch catches the dust and the ember.
- Bark or a few sticks keep ground moisture away from the hearth.
Pressed down with your body weight, these parts form one vertical column. If any link wobbles, the spindle jumps out. Only the spindle and hearth are consumed; one board yields several embers, one per socket, while bow, cord and bearing block last for years.
What is the best wood for a bow drill?
The best wood for a bow drill is dry, dead, non-resinous wood of medium-soft hardness. Field test: press your thumbnail in firmly. A clear dent means the hardness is right. If the nail sinks in and the wood crumbles, it is too soft or rotten; no mark at all means too hard for a beginner. For your first sets, use the same species for spindle and hearth so both wear evenly.
| Wood | Region | Best use | Notes |
|---|---|---|---|
| Willow | Northern hemisphere, near water | Spindle and hearth | Very reliable once fully dry; standing dead branches are ideal. |
| Western red cedar | Pacific Northwest, widely planted | Spindle and hearth | Soft and light, ember comes fast; its shredded bark is good tinder. |
| Basswood / lime (linden) | N. America, Europe | Spindle and hearth | Classic training wood, sold as carving blanks. |
| Poplar / aspen | Temperate and boreal zones | Spindle and hearth | Soft, even grain; must be completely dry. |
| Cottonwood | N. America | Hearth, also spindle | A poplar; dead limbs are a common choice. |
| Sotol / yucca stalk | Arid SW USA, Mexico | Spindle, also hearth | Dried flower stalks are straight and light; best known for the hand drill. |
| Hazel | Europe, W. Asia | Spindle | Grows in straight shoots; use dead, dry stems. |
| Alder | Europe, N. America | Spindle and hearth | Soft, easy to carve; must be dry. |
| Ivy (thick dead stems) | Europe, UK | Spindle and hearth | Dead, thick vines work surprisingly well. |
| Pine, spruce, fir | Worldwide | Avoid for beginners | Resin glazes the surfaces; save them for fatwood. |
| Oak, beech, maple, hickory | Temperate zones | Avoid for beginners | Too hard: squeaking and smoke, little dust. |
Use dead wood only. Cutting living trees or branches usually needs the landowner's permission, and green wood is too wet anyway.
Why dry, dead wood is non-negotiable
Every drop of water in the wood must be evaporated before the dust can smoulder, and that costs energy you want in the ember. Green wood also tears instead of grinding. Look for standing dead wood: dead branches still on the tree or dead willow and hazel stems, off the damp ground and dried by the wind. Punky or rotten wood crumbles under the spindle. If the outside is wet, split the piece (see batoning) and use the dry core.
Why resinous and hard woods cause trouble
Pine, spruce and fir contain resin that melts under friction and coats the surfaces with a slippery film: the spindle glazes, the cord slips and dust production stops. Very dense woods such as oak, beech or hickory need so much speed and pressure that most beginners give up long before the first ember.
Relative effort to get an ember (lower is easier)
Treat this scale as a rough guide. Moisture and growing conditions matter more than the species name: a perfectly dry piece of alder beats a damp piece of cedar every time.
How to make a bow drill: dimensions of every part
A sharp knife is enough to make a bow drill. A small folding saw speeds up cutting blanks to length. Use these proven starting dimensions and adapt them to your body and wood.
| Part | Size | Shape and material | Why |
|---|---|---|---|
| Spindle | 20–25 cm long, about 2 cm thick | Straight, round or slightly eight-sided; blunt bottom, pointed top | Short spindles wobble less; thumb thickness balances speed and friction. |
| Hearth | About 30 × 5–8 × 1.5–2 cm | Flat on both faces, dry softwood | Room for foot and notch; thick enough not to burn through at once. |
| Bow | 60–80 cm (arm length), 1.5–2.5 cm thick | Stiff dead branch with a slight curve | Long strokes give many turns; stiffness holds cord tension. |
| Cord | About 1.5× bow length | 3–5 mm paracord, bank line or natural cord | Strong under tension, thin enough to grip. |
| Bearing block | Fist-sized | Hardwood, stone, bone or shell with a smooth socket | Low friction on top, so heat is made only at the bottom. |
| Ember pan | Palm-sized | Bark, thin wood chip, dry leaf | Lets you move the ember without touching it. |
Carving the spindle
Choose the straightest piece you can find, because a crooked spindle wobbles out of the socket. Remove the bark and carve it round and even; leaving it slightly eight-sided gives the cord extra grip. The two ends differ, and mixing them up is a classic error:
- Bottom end: blunt. Round it like the end of a thick marker. A broad contact area grinds more dust.
- Top end: pointed. Carve a cone like a pencil, tip slightly rounded, so there is little friction in the bearing block.
Mark the top end with a small nick. A spindle used upside down carries lubricant to the hearth and will not make an ember until that part is cut off. New to knife work? Practise with our carving basics and choose a suitable bushcraft knife; carving tools make the socket work easier.
Making the hearth board
Split a dry log or thick dead branch and carve both faces flat, so the board lies without rocking. Aim for 1.5–2 cm thick, about the spindle's thickness or slightly less. Too thin and the socket burns through before an ember forms; too thick and the notch becomes a deep tunnel.
The bow and the bearing block
A good bow is stiff, not springy. A slight curve lets you fine-tune tension by squeezing the cord against the bow. Tie the cord firmly at one end with a clove or timber hitch and make the other end adjustable; see our essential knots. The bearing block needs a small, smooth socket just deep enough to seat the spindle tip. Lubricate it with a crushed green leaf, wax, lip balm or the skin oil beside your nose. Never get lubricant on the bottom of the spindle or on the hearth.
Burning in the socket and cutting the notch
The hearth needs a burned-in socket as a seat for the spindle, and a notch where the dust collects and the coal gets air. Carve a small pilot hole about 1.5 cm in from the edge of the board. Put the spindle in, set the bow and drill with moderate pressure until the socket is black and as wide as the spindle. This burning in also shapes the spindle end to fit.
Socket and notch, step by step
 1Carve a pilot hole
Twist the knife tip into the board so the centre of a small hole sits about 1.5 cm from the edge. Too close, and the spindle breaks out through the side later.
 2Burn it in
Drill with moderate pressure until the socket is fully black and as wide as the spindle. Never cut a notch into an unburned hole: you cannot yet see where the centre is.
 3Picture a pie
Divide the black circle into eight slices in your mind. The notch is the one slice that points straight at the board edge, about one-eighth of the circle.
 4Cut to the centre
On a firm surface, cut both sides of a wedge of roughly 30–45° and lift it out. The point of the wedge reaches exactly to the centre of the socket, not beyond.
 5Clean the walls
Trim the walls smooth and straight down through the full board thickness, slightly wider at the bottom, so the dust drops freely onto the ember pan.
Why notch geometry matters
Too narrow, and the notch chokes: dust packs too tight and gets no air. Too wide, and the pile cools before it forms a coal, and the spindle may slip out through the gap. Too shallow, and dust spills onto the board instead of dropping into the notch. The one-eighth rule is a reliable start; soft woods often like a slightly narrower notch, harder woods a wider one.

Quick check: look straight down on the socket. You should see the point of the wedge touching the middle of the black circle, and when you look at the board edge, a clean slot through the full thickness. If the tip of the wedge stops short, open it a little more; if it has crept past the centre, start a new socket.
Each socket normally gives one ember, sometimes two. When it becomes too deep, start a new socket beside it, leaving about a finger width of wood so the notches do not merge.
Which cord works best for a bow drill?
The ideal cord is strong, grippy and not too stretchy, because it rubs against the spindle under high tension.
- Paracord (4 mm): the most common choice. If the smooth sheath slips, pull out the inner strands and use just the sheath, or roughen the spindle.
- Bank line or tarred twine: thinner and grippier, but wears faster.
- Leather thong: traditional and grippy, but stretches when warm or damp.
- Natural cordage: twisted plant fibre or inner bark works if thick and well made, a great test of your natural cordage skills.
Wrap the cord once so the spindle sits on the outside of the cord, away from the bow. Tension is right when twisting the spindle into place takes real effort. Keep spare cord in your bushcraft kit; cords break at the worst moment.
Bow drill technique: posture and bowing rhythm
Posture decides between a quick ember and sore arms with nothing to show. The goal: a rock-solid, vertical spindle and strokes that use the whole bow.
The kneeling position (right-handers)
- Lay the ember pan on dry ground and the hearth on top, notch over the pan.
- Kneel on your right knee and put your left foot on the board, close to the socket.
- Twist the spindle into the cord, blunt end down, and seat it in the socket with the bearing block on top in your left hand.
- Wrap your left arm around the outside of your left shin and lock your wrist against the shin.
- Check that the spindle is vertical from the side and from the front.
Left-handers mirror everything. Other postures work too, as long as the wrist is braced and the spindle stays upright.
Setting up the bow drill
 1Build a dry base
Lay a piece of dry bark on the ground, the ember pan on top and the hearth over it, with the notch directly above the pan.
 2Foot on the board
Kneel on your right knee and place your left foot on the board, just beside the socket. The board must not move at all, even under full pressure.
 3Twist in the spindle
Lay the spindle on the cord and twist it into the loop so it sits on the outside, away from the bow. If it goes in easily, the cord is too slack.
 4Lock the wrist
Seat the blunt end in the socket, put the bearing block on the pointed top and wrap your left arm around the outside of the shin. The wrist presses against the shin: that is your anchor.
 5Check vertical
Look at the spindle from the front and from the side. A spindle that leans even slightly will pop out after a few strokes.

The bowing rhythm
Hold the bow at its end and move it horizontally, using the full length with every stroke. Long, steady strokes give more rotations for the same effort than short, fast ones.
- Warm-up: light pressure, slow long strokes to heat and dry the socket.
- Build up: as smoke appears, increase pressure and speed gradually, keeping the rhythm even.
- Full power: when smoke billows and dark dust fills the notch, keep going for another 10 to 20 fast, heavy strokes. Most beginners stop too early.
- Stop smoothly: lift the spindle without knocking the board.
With a well-tuned kit of cedar or lime in dry weather, an ember can come after half a minute. In damp conditions with harder wood, expect several minutes and several attempts. Press as hard as you can while still keeping a smooth, full-length stroke, using body weight rather than arm strength. If the cord slips, ease off slightly or tighten it.
| Phase | Smoke | Dust in the notch | Sound and feel |
|---|---|---|---|
| Warm-up | None to a faint wisp | A few light brown grains | Smooth, quiet hum |
| Build-up | Steady thin smoke from the socket | Dark brown, starting to fill the notch | Even resistance, no squeak |
| Full power | Thick smoke rolling out of the notch | Black, fine, heaping up to the socket | Hard work; the spindle bites |
| After stopping | Smoke keeps rising from the pile itself | Pile holds together, dark core | A coal has formed |
Practice drills
- Dry bowing: without a board, bow the spindle in the air for a minute while watching the cord. The goal is 30 or more full-length strokes without the spindle flipping out of the loop.
- Burn-in only: burn in three new sockets in a row with light pressure. You train the posture without the pressure to produce an ember.
- Ten plus twenty: once you get black dust, practise adding the extra 10–20 hard strokes after heavy smoke. Count out loud; most people stop far too early when tired.
- Left and right: switch sides now and then. It relieves your back and gives you a backup when one arm tires.
From ember to flame: caring for the coal
The notch is full of dark, smoking dust. Now patience beats speed: many people lose a fresh ember in the first seconds by rushing. Prepare your tinder before you start bowing: a nest of dry grass, shredded inner bark (cedar, lime, willow) or other natural tinder, about two fists in size, with a hollow for the ember. Have kindling and fuel ready too; the firewood calculator helps you estimate how much.
From dust to fire
 1Let it grow
Remove the spindle and leave the dust in the notch for 10–30 seconds. If it keeps smoking on its own after you stop, a coal has formed. Fan it gently with your hand.
 2Free the ember
Hold the ember pan down, tap the board lightly and tilt the board away from the coal. The ember stays on the pan in one piece; do not lift the pan out from under the board.
 3Into the nest
Carry the pan to the tinder nest and slide the ember into the hollow. A crumbling ember usually means it needed a few more seconds to consolidate.
 4Fold and blow
Fold the tinder loosely around the coal, hold the nest up with the wind at your back and blow long, gentle breaths, more as the smoke thickens and turns white.
 5Flame to fire
The moment it flames, set it under your prepared fire lay and add thin kindling at once. Have the lay built before you start bowing.
Never poke the ember; it crumbles easily. If it is small, pack a little extra dust around it with the knife tip. Shield it from wind and rain without sealing it off. Start blowing gently, because a strong blast scatters the coal, and keep your face out of the smoke. The moment it flames, set it into a teepee or log cabin lay; the fire lay picker suggests one for your weather and purpose. Then you can boil drinking water or start campfire cooking.
Bow drill troubleshooting: why is there smoke but no ember?
Almost everyone struggles at first. Every symptom has a specific cause, and the set tells you what is wrong. Work through the decision tree, then read the details.
Bow drill troubleshooting tree
Does the spindle keep popping out?
Yes → Check it is straight and vertical, lock your wrist against the shin, deepen the bearing socket and blunt the bottom end.No → Next question.Does the cord slip on the spindle?
Yes → Tighten the cord, ease pressure a little, roughen a glazed spindle or carve it eight-sided.No → Next question.Is the spindle end shiny and squeaking?
Yes → It is glazed: scrape off the shiny layer, check for resin or lubricant, add a few grains of sand and restart lighter.No → Next question.Is the dust coarse or light brown?
Yes → More speed, slightly less pressure. If that fails, the wood may be too soft or damp.No → Next question.Is there black dust, but no coal?
Yes → Bow 10–20 strokes longer, check notch width and depth, shield from wind, add a dry layer under the board.No → If the ember forms and crumbles, let it rest longer and handle it more gently.
The spindle pops out
The most common problem. Causes: a crooked or tilted spindle, a wobbling bearing block, a pointed bottom end or a shallow bearing socket. Brace your wrist firmly, check the spindle from two sides and consider a shorter spindle.
The cord slips
The cord is too loose, the spindle too smooth, or you press too hard. Squeeze the cord against the bow, rough up the spindle or make it faceted. A thicker spindle grips better.
Shiny, glazed spindle and smoke without dust
Polished surfaces mean the wood is burnished instead of ground: too much pressure too early, resinous or hard wood, stray lubricant or moisture. Scrape the shine off both surfaces, add a pinch of fine sand, then restart with lighter pressure and more speed. If it persists, use a softer hearth.
Coarse or light-coloured dust
Sawdust-like pale dust means tearing, usually from too much pressure and too little speed, or from very soft, damp wood. It rarely becomes an ember.

Rub a pinch of the dust between two fingers once it is cold. Good dust feels soft and almost greasy and smears dark. Gritty, pale dust tells you to change something before the next attempt: more speed and less pressure first, then a drier or harder piece of wood if that does not help.
The ember crumbles
The coal had too little time to consolidate or the dust is too coarse. Let it rest longer, move the board away from the ember rather than the ember away from the board, and use a stiff ember pan.
Black dust, but no coal
You were close. Usually you stopped a few strokes early, wind or cold ground cooled the pile, or the notch is too wide or shallow. Add 10–20 strokes after heavy smoke, shield the set and put dry bark under the ember pan.
Bow drill vs hand drill and other friction methods
Hand drill: a long, thin spindle (often 60 cm or more, about 1 cm thick) is spun between the palms, with no bow or bearing block. It needs very light, straight stalks such as mullein, sotol or yucca and a soft hearth. Lighter to carry, but it demands far more technique, stamina and tough palms, and it is much harder in humid climates.
Pump drill: a flywheel on the spindle and a crossbar on cords give smooth, fast rotation. It is mostly a workshop project rather than a field method.
Two-person bow drill: one person presses the bearing block with both hands and keeps the spindle vertical; the other bows with both hands for speed. It helps with difficult wood, damp air or tired arms, and is ideal for teaching children and beginners.
Bow drill vs hand drill
Bow drill
- Easiest friction method to learn
- Mechanical advantage from the bow
- Works with many common woods
- Needs a cord and more parts
- More forgiving in damp conditions
Hand drill
- Needs only spindle and hearth
- Very light, quick to assemble
- Requires specific light, straight stalks
- Demands strong technique and hard palms
- Much harder in humid weather
Friction fire is a rewarding skill, but not the most reliable one. In an emergency, a lighter or a ferro rod is faster and more dependable. Flint and steel sits in between: traditional and reliable, but it needs char cloth or similar tinder.
Preparing a kit in advance and dealing with humidity
Finding good, dry wood in the field can take longer than making the ember. Carve a kit at home or during a dry spell, practise in the garden until your technique is consistent, and carry it with you.
Bow drill kit checklist
- Straight, dry spindle with the top end marked
- Spare spindle blank
- Hearth board with a burned-in socket
- Bearing block with a smooth, lubricated socket
- Cord and spare cord (a bow can be found on site)
- Ember pan of bark or a thin chip
- Dry tinder in a waterproof bag
- Sharp knife
- Everything stored in a dry bag
Humidity, cold and your own energy
Wood and dust absorb moisture from the air. A kit that makes an ember within a minute on a dry day may need several attempts on a foggy autumn morning. Keep it in a waterproof bag, close to your body in the cold, and never on the ground overnight. Warm up with 15–20 seconds of slow drilling to drive moisture out, put dry bark under the ember pan and shield the set from wind.
Bowing is also hard work, and failed attempts cost energy you may need when cold, wet or hungry. Treat friction fire as a skill for practice and a backup at best. For bad weather, read how to make fire in wet weather and carve feather sticks from the dry core of split wood.
Safety and rules for friction fire
Fire bans and local rules
Rules on open fires vary widely between countries, regions and landowners. Many national parks, reserves and forests ban fires completely, especially in dry seasons, or allow them only at designated fire rings. An ember counts as fire: check restrictions and the current fire danger level before practising.
Harvesting wood responsibly
Use dead wood only. Cutting living trees or branches usually requires the landowner's permission and is prohibited in protected areas. Dead standing wood works better anyway.
Protecting your body
Bowing strains wrists, shoulders and back. Keep your back straight, take breaks and switch sides. When teaching children, the adult keeps the knife work and the pressure, and the child bows. For more fire skills, see our fire skills overview.
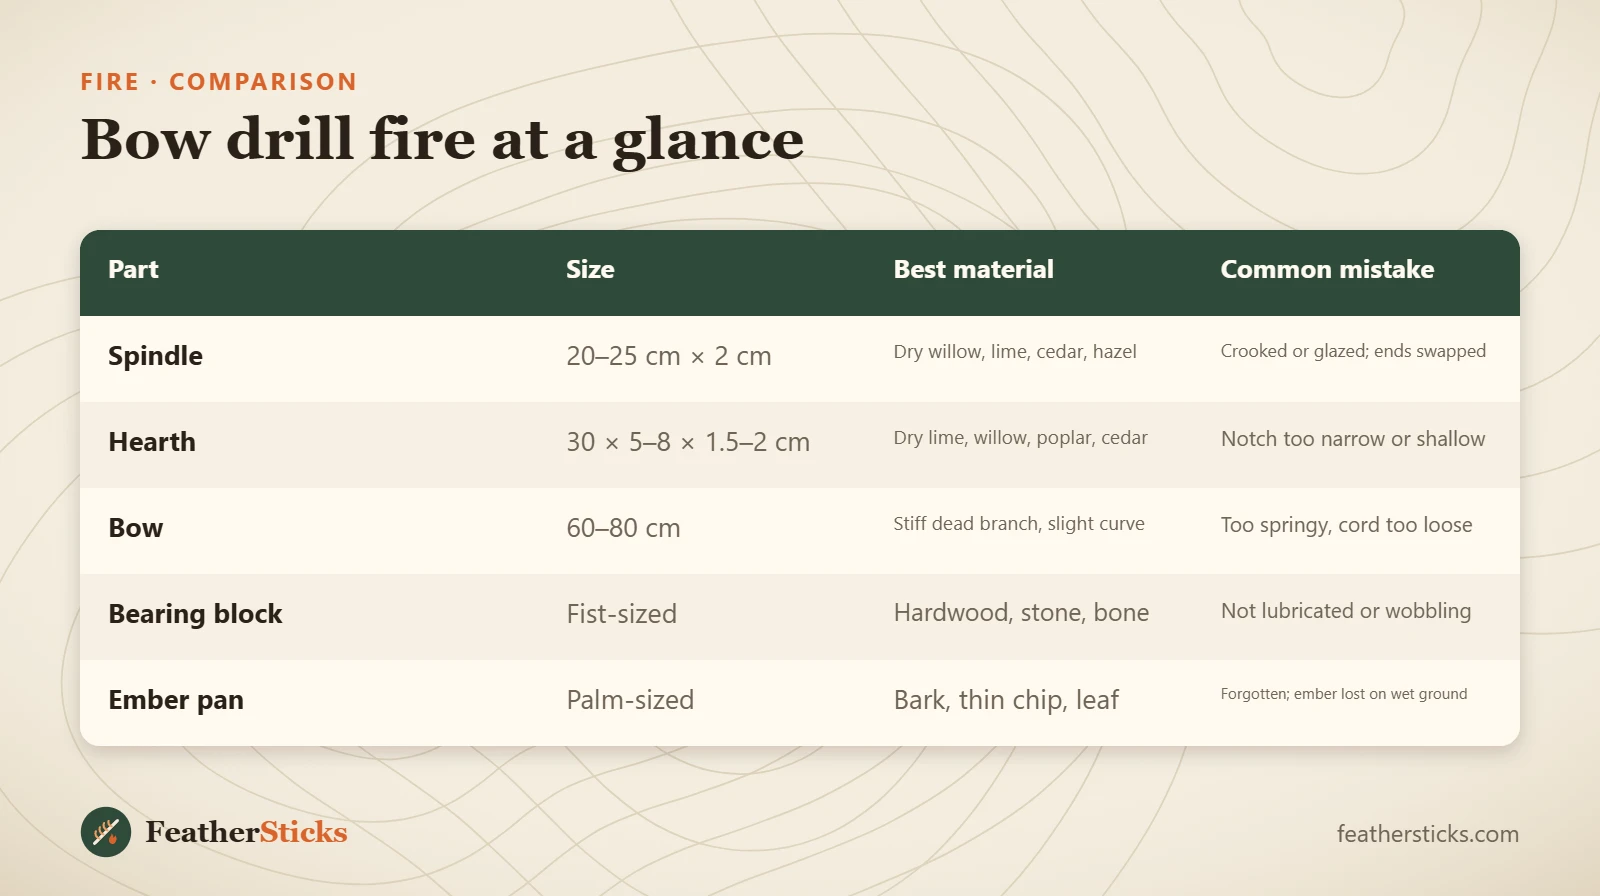
| Part | Size | Best material | Common mistake |
|---|---|---|---|
| Spindle | 20–25 cm × 2 cm | Dry willow, lime, cedar, hazel | Crooked or glazed; ends swapped |
| Hearth | 30 × 5–8 × 1.5–2 cm | Dry lime, willow, poplar, cedar | Notch too narrow or shallow |
| Bow | 60–80 cm | Stiff dead branch, slight curve | Too springy, cord too loose |
| Bearing block | Fist-sized | Hardwood, stone, bone | Not lubricated or wobbling |
| Ember pan | Palm-sized | Bark, thin chip, leaf | Forgotten; ember lost on wet ground |
Common mistakes
- Using damp, green or rotten wood instead of dry, dead, sound wood.
- Putting the pointed spindle end into the hearth, or getting lubricant on the bottom end.
- Cutting the notch before the socket is burned in, or not cutting it to the centre.
- Short, jerky strokes instead of long, full-length strokes.
- Stopping when smoke appears instead of adding 10–20 more strong strokes.
- Not preparing the tinder nest and kindling before bowing.
- Letting the wrist float, so the bearing block wobbles and the spindle pops out.
What you need
- Fixed-blade bushcraft knife
- Small folding saw
- 2–3 m of paracord or bank line
- Pre-carved bow drill kit in a dry bag
- Dry tinder: grass, inner bark, cedar bark
- Water to extinguish the fire