Skills
Wood Carving for Beginners: Bushcraft Carving Grips, Wood and First Projects
Wood carving for beginners starts with three things: fresh green wood, a sharp knife and a handful of safe grips that keep the blade moving away from your body. Get those right and you can carve tent pegs, a pot hanger, a spatula and your first spoon within a few weekends. Bushcraft carving is not about artistic talent; it is controlled, repeatable cuts made in the right wood.
This guide covers which wood to use (and where you may legally take it), the five core knife grips plus bracing, a practice try stick, five first projects step by step, and finishing with food-safe oil. For choosing tools see bushcraft knives and carving tools; for the wider picture start with bushcraft for beginners or browse all bushcraft skills.
Step by step
-
1
Find fresh green wood
Use freshly cut, straight-grained birch, lime, willow, alder or hazel from windfall or prunings, with the landowner's permission. Green wood is soft and carves far more easily than dry wood.
-
2
Sit down and clear your circle
Sit on a log or stool, check that nobody is within arm's length plus blade length, and keep the work to the outside of your knee, never over your lap.
-
3
Learn the safe grips
Practise the forehand grip, chest lever, thumb push and pull cut on a try stick. Short controlled strokes beat long powerful ones.
-
4
Carve simple projects first
Carve tent pegs, a pot hanger and a spatula before a spoon. Each project trains stop cuts, notches and thinning.
-
5
Dry slowly and oil
Let finished pieces dry slowly away from heat, then apply a thin coat of a food-safe drying oil such as raw linseed or walnut oil.
What is bushcraft carving and why learn it?
Bushcraft carving (often called whittling or green woodworking) means shaping wood with hand tools, mostly a knife, into things you actually use: pegs for a tarp shelter, a pot hanger over the fire, toggles for natural cordage, a spoon for your porridge. It is also the foundation of fire craft, because a good feather stick is simply a series of controlled carving cuts.
The skill develops in a clear order: read the wood, learn a small set of safe grips, then combine basic cuts — stop cuts, notches, points, thinning — into projects. Every project on this page uses the same handful of techniques, so progress is fast once the grips feel natural.
To start you need: a sharp fixed-blade knife with a Scandi grind (your bushcraft knife or a 5–8 cm sloyd knife), a small folding saw for stop cuts, a strop for keeping the edge keen and a first aid kit within reach. A hook knife and a small hatchet come later, for spoons. Always carve seated, on a log or a low stool.
Which wood is best for carving? Green vs dry
The single biggest difference for a beginner is not the knife but the wood. Green wood — freshly cut, still full of sap — contains a lot of water, which makes the fibres soft and slippery. A sharp knife glides through it and leaves a shiny surface. The same species, once seasoned for a year, can be two or three times harder to cut and dulls your edge quickly.
Green wood: the beginner's choice
Carve green wood whenever you can, especially for spoons, spatulas and anything with curves. To keep a log workable, leave it whole with the bark on, store it in the shade and seal the end grain with wax or wood glue. Small blanks stay fresh for several days in a plastic bag in a cool place.
Dry wood: small practical items
Tent pegs, toggles, try sticks and feather sticks can be made from dead but sound wood, and dry wood will not shrink or distort after carving. Use thin pieces, keep cuts shallow and strop more often. Wood that crumbles or feels light and spongy is rotten and useless.
Drying without cracks: remove the pith
Wood shrinks as it dries, roughly twice as much around the growth rings as across them. That uneven shrinkage splits logs and ruins spoons. Two rules prevent most cracks:
- Remove or avoid the pith. The soft centre of a branch almost always causes radial cracks. Split round wood through the centre and carve from one half, with the pith cut away.
- Dry slowly and evenly. Carve to an even thickness first, then dry at room temperature in a paper bag or a box of shavings for one to two weeks — never next to a stove or campfire.
Choose straight, knot-free grain without twists or spiral bark. Knots are where most tear-out and slips happen.
| Species | Hardness (green) | Carving ease | Best projects | Notes |
|---|---|---|---|---|
| Birch | Medium | Very good | Spoons, spatulas, cups, handles | Classic Nordic spoon wood; bark is superb tinder; rots fast if left lying |
| Lime / basswood (linden) | Soft | Excellent | Figures, first spoons, practice pieces | Very even grain, few tear-outs; softer, so utensils wear faster |
| Willow | Soft | Very good | Try sticks, pegs, spatulas, whistles | Grows back from pruning; light and fast to carve; not very durable |
| Alder | Soft–medium | Very good | Spoons, bowls, scoops | Cut surface turns orange-red, then fades; easy on tools |
| Sycamore / maple | Medium–hard | Good | Spoons, spatulas, kitchenware | Pale, fine-grained, traditional food-contact wood |
| Cherry | Medium–hard | Good green, hard when dry | Spoons, butter knives, handles | Beautiful colour; prone to cracking — dry slowly |
| Hazel | Medium | Very good | Tent pegs, pot hangers, try sticks, walking sticks | Straight rods from coppice; small stems carry pith, so split thicker ones |
Avoid yew, laburnum and rhododendron for anything that touches food or mouths: they are toxic. If you cannot identify a wood with certainty, do not use it for utensils.
For a first spoon, birch, lime, alder or sycamore are ideal; for pegs and pot hangers, hazel and willow rods. Oak and ash are strong, but green oak stains carbon steel and ash is fibrous for fine work — save them for later.
Where can you get carving wood legally?
All wood belongs to someone, including dead branches and fallen trees. Never cut a living tree or branch without the landowner's permission; rules on collecting dead wood vary by country and type of land. The Nordic right to roam lets you walk and camp, but generally not cut living trees or strip bark, and nature reserves are stricter still. This is orientation, not legal advice — check local rules.
Good legal sources of carving wood
- Windfall after storms, where the owner or forester agrees; it is often still green inside.
- Prunings from gardens, orchards and hedges — fruit-tree prunings are excellent small carving wood.
- Coppice work: hazel and willow rods, ideal for pegs and pot hangers.
- Tree surgeons and firewood suppliers, who often have fresh, unsplit birch or alder rounds.
Ask the forester, landowner or ranger; most are helpful when you explain that you want a few small pieces. Take only what you will use, and cut cleanly rather than tearing branches. The same respect applies at camp — see wild camping rules and camp setup.
Reading the grain: basic cuts every carver uses
Wood fibres run along a branch like a bundle of straws. Cutting with the grain — "downhill", so the edge runs out of the fibres — gives clean shavings. Cutting against the grain lets the knife dive in and tear out chunks. If a cut starts to dig in or split, turn the piece around and cut from the other direction.
- Shaving cut: a long, flat cut with the grain to remove bark or straighten a surface.
- Stop cut: a cut across the grain that marks where a shaving must end. Stop cut plus sloping cut makes a notch.
- Point: three or four flat facets towards the end, like sharpening a pencil.
- Chamfer: a small bevel around the end of a stick that stops it splitting when struck.
Take thin shavings. Three thin cuts are faster and safer than one thick cut that stalls halfway and needs force.

Troubleshooting: what your cut is telling you
| Symptom | Likely cause | Fix |
|---|---|---|
| Tear-out: fibres rip out below the surface | Cutting against the grain ("uphill"), or a dull edge | Turn the piece and cut from the other end; strop the knife |
| Knife digs in and stalls | Angle too steep, shaving too thick | Lower the handle, take thinner cuts, slice with the whole edge |
| Chatter: washboard ripples on the surface | Wobbly wrist, blade pushed straight without slicing, thin stick flexing | Lock the wrist, skew the blade so it slices, hold the work closer to the cut |
| Knife skates off without biting | Angle too flat, dull edge or a knot | Raise the edge slightly, strop, cut around knots instead of through them |
| Split runs ahead of the knife | Thick shaving in green wood follows the fibres | Take thinner cuts; make a stop cut where the shaving must end |
Grain drill: on a curved scrap stick, take five shavings in each direction. The direction that leaves a shiny, smooth surface is "downhill".
Safe knife grips for carving: the five you need
Safe carving is built on grips in which a slip ends harmlessly — in air, in the wood or against a braced arm — rather than in your body. Learn them one at a time on a try stick before using them on a project. The rule behind all of them: know where the blade will go if the wood suddenly gives way, and make sure nothing you value is there.
| Grip | Edge faces | Power / control | Typical use | Key safety point |
|---|---|---|---|---|
| Forehand grip | Away from you | High power, medium control | Removing bark, roughing, points | Work to the side of your legs, brace on a log or stump |
| Chest lever | Away, hands at chest | High power, very high control | Shaping handles, spatulas, spoon backs | Blade travels only a few cm; elbows tucked |
| Thumb push | Away from you | Low power, very high control | Notches, detail, fine trimming | Pushing thumb stays behind the edge |
| Reverse chest lever | Away, blade reversed | Medium power, high control | Cutting the other grain direction without turning the piece | Same short travel as the chest lever |
| Pull (paring) cut | Towards your thumb | Low power, very high control | Finishing, rounding ends, spoon rims | Thumb below the cut line, taped or guarded |
| Knee / log brace | Away from you | Medium power, high control | Long even cuts, peeling, feather sticks | Brace on the outside of the knee, never on the thigh |
The five safe grips at a glance
 1Forehand grip
Full fist, edge down, holding hand behind the edge. Cut down and away along the stick so every stroke ends in the air beside your leg.
 2Chest lever
Both hands at chest height, knuckles of the knife hand towards you, edge facing out. Squeeze the shoulder blades together: the blade moves only 2–5 cm, but with plenty of force. Elbows stay tucked.
 3Thumb push
Knife in forehand grip, edge away; the thumb of the holding hand pushes the spine near the handle. The knife hand is only pivot and brake — ideal for stop cuts, notches and fine trimming.
 4Pull (paring) cut
Edge towards the thumb, thumb on the workpiece below and beyond the cut line. Close the fingers to draw the blade 1–3 cm in a short arc that passes above the thumb. Tape or guard the thumb.
 5Log brace
Rest the end of the workpiece on a stump beside your knee and cut down towards it, so the blade can only end in wood or air. Never brace on the thigh or work between your legs.
1. The forehand grip
Knife in a full fist, edge down, cutting away from the body: the forehand grip delivers the most power for removing bark, roughing and points. It is also behind most accidents, because a stroke that breaks free carries on with full force — so control where it ends.
Using the forehand grip safely
- Position the work Sit with legs apart and hold the stick outside your knee, or rest its end on a log beside you.
- Lock your wrist Wrist straight, move the forearm from the elbow so the blade cannot wander.
- Cut down and away Push the edge away from your body, holding hand always behind and above the edge.
- Plan where it ends Each stroke ends in the air beside your leg or in the log, never pointing at thigh or foot.
- Rotate, do not reach Turn the stick instead of twisting your wrist to cut towards yourself.
2. The chest lever grip
The chest lever grip is the most useful grip in green woodworking and surprisingly safe once you trust it. Hold the knife in your fist with the edge facing away from you and your knuckles towards your chest; hold the workpiece in the other hand, also close to the chest. Now cut by pulling your shoulder blades together, as if opening your chest: the knife hand moves outwards while the holding hand moves slightly in the opposite direction. The blade only travels a few centimetres, but with a lot of force, and your arms physically cannot extend far enough to reach your body.
Chest lever grip at a glance
- Hand position
- Both hands at chest height, 10–20 cm in front of the breastbone
- Knife hand
- Full fist, edge facing outwards, knuckles towards you
- Holding hand
- Holds the workpiece at the far end, fingers behind the edge
- Movement
- Squeeze the shoulder blades together; elbows stay tucked
- Blade travel
- 2–5 cm per stroke
- Best for
- Spatulas, spoon handles and backs, thinning, rounding
Reverse chest lever
When the grain runs the "wrong" way for a normal chest lever, for example on the far side of a spoon's neck, rotate the knife in your hand so the blade points the other way, edge still facing away from you, and cut with the same chest-opening movement. You follow the grain without turning the workpiece — with the same short travel and fingers behind the edge.
3. The thumb push (thumb-assisted cut)
For notches, stop cuts and small details, hold the knife in a forehand grip, edge away, and let the thumb of your holding hand push on the back of the blade while the knife hand acts as pivot and brake. Powered by a thumb, the cut can never be large or wild.
Thumb push: how the cut flows
- GripKnife in forehand grip, edge away, workpiece in the other hand at waist height.
- 2Place the thumbHolding-hand thumb on the spine near the handle, behind the edge at all times.
- 3PushThe thumb pushes the blade forward a few millimetres; the knife hand only guides.
- 4PivotRotate the knife around the thumb for curved cuts and notches.
- RepeatTake tiny shavings; deepen notches in several passes, never in one.
4. The pull cut (paring cut towards the thumb)
The pull or paring cut moves the edge towards your hand, like peeling a potato. It is indispensable for finishing, rounding handle ends and trimming spoon rims — and safe only with the thumb in the right place. Hold the knife edge towards you and place the knife-hand thumb on the workpiece below and beyond the line of the cut, so the blade passes above it. Closing your fingers draws the edge towards the thumb in a short arc and stops it before it gets there. Use a very sharp knife, tape or guard the thumb, and never use this cut for heavy removal or on a knot.
Pull cut: safe vs unsafe thumb position
Safe
- Thumb rests on the workpiece below the cutting line
- Blade path passes above and beside the thumb
- Short strokes of 1–3 cm, powered by closing the fingers
- Thumb taped or in a leather guard
- Razor-sharp edge so little force is needed
Unsafe
- Thumb directly in line with the cut
- Long strokes pulled by the whole arm
- Pull cut used for roughing or through knots
- Dull edge that needs force and suddenly breaks through
- Bare thumb on a wet, slippery workpiece

5. Bracing: knee lock and log brace
For long, even cuts — peeling bark, straightening a stick, feather sticks — brace. In the knee lock the wrist or back of the knife hand rests firmly against the outside of your knee, so the knife is almost fixed, and the other hand draws the workpiece past the blade. With the log brace the end of the workpiece rests on a stump beside you and you cut down towards it. Either way the blade can only go into air or wood. Never brace on top of your thigh or work between your legs: the femoral artery runs along the inner thigh.
The try stick: practise every cut on one stick
A try stick is a straight green stick on which you practise, in a row, all the cuts you will later need. It is the fastest way to learn the grips and shows you which cuts came out clean and which tore.
How to carve a try stick
- Choose the stick: green hazel, willow or birch, straight, 30–40 cm long and 2–3 cm thick, without side branches.
- Chamfer one end with forehand cuts, then peel a 5 cm band of bark to practise straight shaving cuts.
- Stop cut and ramp notch: make a stop cut across the grain with a thumb push or saw, then slope a cut into it from 2–3 cm away. Repeat until the notch is 5–8 mm deep. This is the notch for pot hangers and tent pegs.
- V-notch: two angled cuts from opposite sides, deepened a little at a time.
- Square notch: two stop cuts 2 cm apart, then remove the wood between them in thin layers. Used for joints and to hold a crossbar.
- Groove all around: a shallow ring of stop cuts and slopes, for lashing a line with a knot that should not slide.
- Feather curls: a few long, thin curls left attached to the stick, as for a feather stick.
- Point: finish the other end with four facets like a pencil.
Space the exercises 3–5 cm apart and use each grip at least once. After two or three try sticks you will feel the difference in control.
What a good try stick looks like
- Stop cuts are straight lines across the stick, not ragged grooves.
- Notch walls are flat and shiny; the bottom of each notch is clean, with no torn fibres hanging in it.
- The point has three or four even facets that meet in one tip, not a round cone full of small nicks.
Grip drill: before each session, take ten slow strokes with every grip on your try stick and check where the edge would have gone if the wood had suddenly given way.
Wood carving for beginners: first projects (tent pegs, pot hanger, spatula)
Tent pegs train points and notches, the pot hanger adds forks, the spatula teaches thinning — all preparation for a spoon.
| Project | Wood and size | Time | Skills learned |
|---|---|---|---|
| Try stick | Hazel or willow, 30–40 cm × 2–3 cm | 45–90 min | All basic cuts and grips |
| Tent pegs | Hazel, ash, birch; 20–25 cm × 2–3 cm | 10–20 min each | Points, ramp notch, chamfer |
| Pot hanger | Forked hazel or other hardwood, 40–60 cm | 30–60 min | Forks, notches, fitting to a cooking fire |
| Spatula / butter spreader | Split birch, sycamore or cherry, 20–25 cm × 1.5 cm | 1–2 h | Chest lever, thinning, symmetry |
| Spoon | Split birch, alder, lime or sycamore, 20–25 cm | 3–6 h | Axe roughing, profile, hollowing with a hook knife |
Tent pegs
The classic first project — and the fix for a lost peg of your tarp setup.
- Cut a straight, thumb-thick piece of green hazel, birch or ash about 20–25 cm long with your saw.
- Chamfer the top end all round so it will not split when you drive it in.
- Carve a point with three or four flat facets, about 5–6 cm long. A long thin point breaks in stony soil.
- About 3–5 cm below the top, carve a ramp notch: stop cut first, then a sloping cut into it, deepened to about a third of the diameter. The notch faces away from the tent so the guy line pulls into it.
- Drive the peg with a wooden baton or a log, not the back of an axe.
Carving a tent peg, cut by cut
 1Cut to length
Saw thumb-thick green hazel, birch or ash to 20–25 cm, holding hand well away from the saw.
 2Chamfer the top
Short cuts towards the end, turning the stick after each one, until the head is bevelled all round.
 3Carve the point
Hold the head, cut away from you towards the tip: three or four flat facets, 5–6 cm long.
 4Stop cut
3–5 cm below the head, press the edge straight across the grain and rock it, or saw in.
 5Ramp notch
Slope thin cuts into the stop cut from 2–3 cm below, deepening both in turns to about a third of the diameter. Never lever the chip out.
 6Drive it
Knock it in with a wooden baton, leaning slightly away from the tent, notch facing away so the guy line pulls into it.
Pot hanger (pot hook)
A pot hanger suspends a billy over the fire at the right height: a forked branch cut into a hook, with extra notches if you want it adjustable. Use green hardwood — a thin dry stick close to the heat can char through. Details on fire height and cooking setups are in campfire cooking and suitable pots in bushcraft cookware.
- Find a branch 40–60 cm long and 2–3 cm thick with a side branch that forks off at a sharp angle.
- Cut the side branch back to 4–6 cm so it forms a hook pointing upwards when the stick hangs down. This hook holds the pot handle.
- At the top, carve a ramp notch or a deep square notch so the hanger can hang from a crossbar or a tripod line.
- For an adjustable hanger, carve two or three more notches at 8–10 cm intervals along the stick.
- Test with an empty pot first; the hook should hold the handle securely without slipping off.
Spatula and butter spreader
The bridge to spoon carving: splitting, chest lever work and even thinning, without a bowl to hollow.
- Split a green log 5–10 cm in diameter through the centre and split off a board about 1.5 cm thick, avoiding the pith.
- Draw the outline with a pencil: a blade of 5–7 cm width tapering into a 2 cm handle.
- Make saw stop cuts where the blade meets the handle, then remove the waste with forehand and chest lever cuts.
- Thin the blade gradually towards the tip to about 3–4 mm, working both faces equally.
- Round the handle with chest lever and pull cuts, chamfer every edge, and bevel the working end slightly.
A butter spreader follows the same steps at 15–18 cm with a 2–3 cm blade — an evening's project by the fire.
How to carve a spoon: from log to finished spoon
The spoon is the project most carvers dream of, and it brings together everything above. Expect your first spoon to take several hours and to look a little rustic; the second will be better and the fifth surprisingly good. Use green, straight-grained birch, alder, lime or sycamore about 7–12 cm in diameter.
A spoon has three views to get right: the top view (outline), the side view (profile, usually with the bowl lower than the handle — a "crank") and the bowl itself. Work in that order and keep the blank thick until the outline and profile are right.

Carving your first spoon step by step
- Make the blank Cut 25–30 cm of green log and split it through the centre with an axe or knife and baton (batoning). Remove the pith.
- Draw the outline On the split face draw a bowl about 5 × 7 cm and a 15–18 cm handle, with the grain running straight along the handle.
- Rough out with the axe Saw stop cuts at the neck and hew the waste away on a chopping block, hand above and behind the edge, hewing in the lower half of the block.
- Carve the profile Draw the side view and remove wood from the back of the bowl and under the handle with forehand and chest lever cuts.
- Hollow the bowl With the hook knife, scoop across the grain from rim to centre to a wall thickness of 4–5 mm.
- Refine and thin Shape the back to follow the inside, thin the neck carefully and round the handle.
- Dry slowly One to two weeks in a paper bag at room temperature, away from any heat.
- Finishing cuts and oil Take fine, clean knife cuts on the dry spoon, then apply a food-safe drying oil.
From log to spoon blank
 1Split the log
Split 25–30 cm of green log, 7–12 cm across, on a chopping block with the edge aimed exactly at the pith.
 2Remove the pith
The pith sits in the middle of the split face. Take off a thin layer until none is left — pith left in cracks the spoon.
 3Draw the outline
Bowl about 5 × 7 cm, handle 15–18 cm, with the grain running straight along the handle and through the neck.
 4Stop cuts at the neck
Saw in from both sides, just short of the line, so the axe cannot split waste off into your outline.
 5Hew the waste
Blank upright on the block, hand above and behind the edge; short, controlled chops downwards in the lower half of the block.
 6Check the blank
From above it matches the outline; from the side it is still thick. Removed wood cannot be put back.
Hook knife technique
Work with both hands close together: brace the thumb of the knife hand against the spoon, or push the back of the hook knife with the holding-hand thumb, so the curve scoops a shaving in a short, controlled arc. Cut across the grain or diagonally from rim to centre; cutting along the grain towards the far rim tears out. Leave the rim intact until last, because it guides the depth. Which hook knife suits your hand is explained in carving tools.
Common spoon problems
Cracks mean pith left in the blank or drying too fast. A neck that snaps means the outline did not follow the grain — keep the neck at least 1 cm thick on a first spoon. Tear-out in the bowl comes from cutting uphill or a dull hook knife: change direction and strop.
Finishing and oiling carved wood: food-safe options
A clean knife finish is the traditional look: crisp facets from a sharp blade seal the surface better than rough fibres. Sanding is optional — if you sand, do it on dry wood from about 120 to 240 grit, wipe with a damp cloth to raise the grain and sand once more. On the trail you can burnish instead: rubbing hard with smooth bone, the back of a steel spoon or polished hardwood compresses and polishes the fibres.
Which oil for spoons and kitchen utensils?
Use a drying oil, which reacts with air and hardens inside the wood. Common food-safe choices:
- Raw (cold-pressed) linseed oil: pure, with no additives. It soaks in well and cures hard, but slowly — allow several days to a few weeks before regular use.
- Walnut oil: dries somewhat faster and smells pleasant. People with nut allergies should avoid utensils finished with it.
- Heat-polymerised linseed oil without added driers: cures faster than raw oil and is widely used for kitchenware.
Food-grade mineral (paraffin) oil is a non-drying alternative: it never cures, so it must be renewed more often, but it does not go rancid. Common cooking oils such as sunflower or olive oil do not cure properly and can turn sticky and rancid in the wood.
Apply a thin coat, let it soak for 15–30 minutes, then wipe off all the excess. Repeat after the oil has cured. Boiled linseed oil from hardware stores usually contains metallic driers and is not intended for food contact; only use it on tent pegs, handles and decorative pieces, or check that the product is explicitly declared food-safe.
Wash wooden utensils by hand, dry them straight away, never soak them or use a dishwasher, and re-oil when they look pale.
Carving safety: blood circle, gloves and first aid
Carving is safe when a few habits become automatic. Most injuries are cuts to the thumb or the holding hand; the dangerous ones are to the thigh, where a deep cut near the femoral artery can bleed heavily within minutes. The basic safety rules are the same as in the knife guide, with a few carving-specific additions.
- Blood circle: stretch out your arm with the sheathed knife and turn around; stop carving when anyone enters that circle.
- Sitting position: upright, legs apart, work beside or in front of the knees — never over your lap.
- Glove and thumb guard: reduce minor cuts but are not cut-proof and do not replace good grips.
- Sharp tools: strop every 20–30 minutes; a sharp edge needs less force.
- Fatigue and cold: tired, cold or hurried hands slip. Most accidents happen in the last half hour before dark.
- Children: a rounded-tip carving knife, soft green wood, one grip at a time and an adult beside them.

Before every carving session
- Knife sharp, handle dry, sheath within reach
- Seated on a log or stool, work to the outside of the knee
- Blood circle clear of people, packs and guy lines
- Glove on the holding hand, thumb taped for pull cuts
- First aid kit with pressure bandage open and ready
- Enough daylight and warm hands; stop before you get tired
If you cut yourself
Press firmly on the wound with a clean dressing and raise the limb. Most small cuts stop bleeding within a few minutes and can be closed with wound-closure strips and a plaster. For a deep cut, heavy or spurting bleeding, a cut near the thigh or wrist, or any loss of feeling or movement, apply a pressure bandage and call emergency services. Know your first aid before you need it — a basic course is the best investment you can make alongside your knife.
Bushcraft carving at camp: where to go next
Carving ties bushcraft together. Wooden toggles make tarp lines adjustable with the right knots (practise them with the knot tool), a spoon and spatula replace plastic in your cook kit, and carving shavings are prime kindling for starting a fire. Keep the kit small — knife, hook knife, saw, strop, tape — and add it to your kit list or the Kit Builder. For bowls and larger projects, the tools section covers axes, gouges and drawknives.
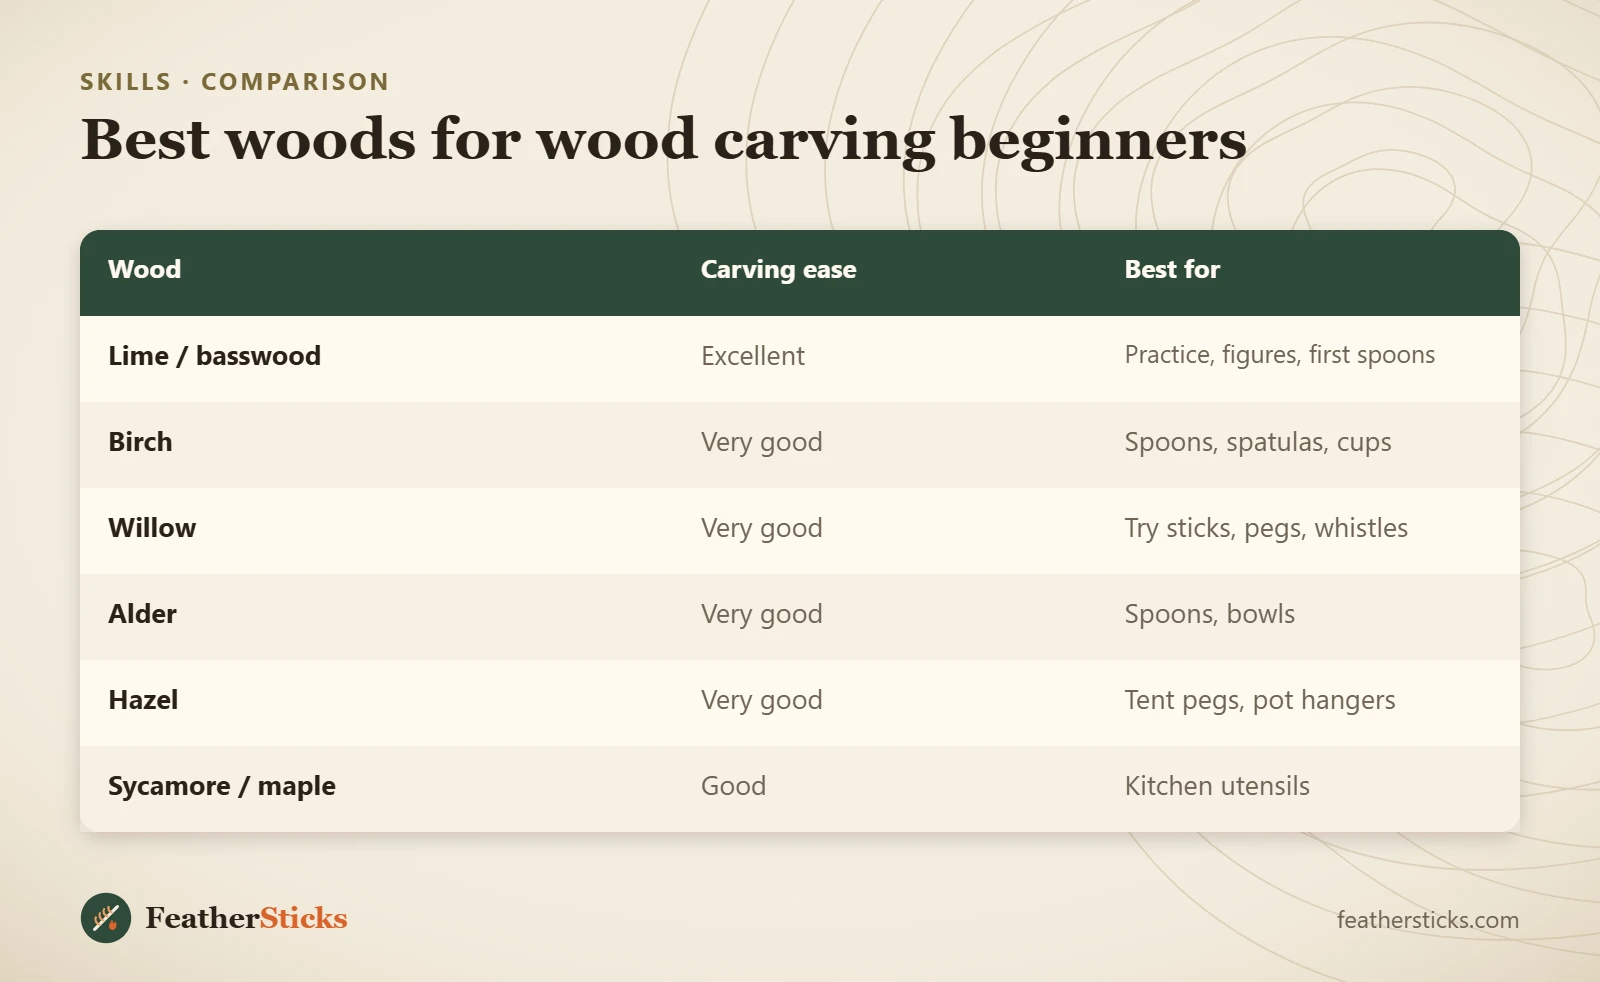
| Wood | Carving ease | Best for |
|---|---|---|
| Lime / basswood | Excellent | Practice, figures, first spoons |
| Birch | Very good | Spoons, spatulas, cups |
| Willow | Very good | Try sticks, pegs, whistles |
| Alder | Very good | Spoons, bowls |
| Hazel | Very good | Tent pegs, pot hangers |
| Sycamore / maple | Good | Kitchen utensils |
Common mistakes
- Carving dry, seasoned hardwood as a beginner instead of fresh green wood.
- Leaving the pith in a spoon blank, so it cracks while drying.
- Drying a green spoon next to the stove or campfire.
- Cutting towards the thigh or working with the stick between the legs.
- Taking thick shavings with a dull knife instead of thin ones with a sharp edge.
- Using the pull cut without a guarded thumb or with the thumb in line with the cut.
- Cutting living trees or branches without the landowner's permission.
What you need
- Fixed-blade bushcraft or sloyd knife with Scandi grind
- Hook knife for your dominant hand (for spoons)
- Folding saw for stop cuts and cutting to length
- Small axe or hatchet for splitting and roughing blanks
- Leather strop with compound and a fine stone
- Cut-resistant glove and thumb tape or leather thumb guard
- Raw linseed or walnut oil and a cloth
- First aid kit with pressure bandage