Cooking
Bushcraft Cookware: Pots, Billy Cans & Pans for the Campfire
Good bushcraft cookware is simple: one sturdy pot with a bail handle and a lid, a steel mug you can put straight on the embers, a long spoon and a way to grip hot metal. For cooking over an open fire, stainless steel is the most forgiving material; titanium saves weight on a stove, aluminium spreads heat best but dislikes flames, and cast iron is for base camps.
This guide compares materials, gives pot sizes per person, explains why the classic billy can still wins over a campfire, and covers lids, pans, utensils, stoves versus open fire and how to deal with soot. It sits in the outdoor cooking hub next to campfire cooking techniques and builds on the bushcraft basics.
Step by step
-
1
Pick one main pot
Choose a stainless steel pot of about 1 L per person for solo trips, with a wire bail handle and a tight lid.
-
2
Match material to heat
Steel for open fire, titanium for stoves and weight saving, aluminium only over controlled flames or gentle embers.
-
3
Add a single-wall mug
A single-walled steel mug boils water, serves drinks and nests inside the pot with fuel or tea inside.
-
4
Pack utensils and a grip
A long spoon or spork, a pot grip or leather gloves and a stick for lifting the bail.
-
5
Cook on embers, not flames
Hang the pot or set it on a stable bed of embers. Use the lid to boil faster and save fuel.
-
6
Clean with sand and ash
Scrub with sand or cold ash, use soap sparingly and scatter wash water far away from streams and lakes.
What makes good bushcraft cookware?
Camping cookware for a stove and bushcraft cookware for a campfire are not quite the same thing. A stove delivers a small, controllable flame under the centre of the pot. A campfire delivers uneven heat from all sides, flames licking up the walls, sparks, ash and soot – and it rarely sits level. Cookware for the fire therefore needs to tolerate high, uneven temperatures, be easy to hang or lift and have no plastic, rubber or glued parts that can melt.
The ideal bushcraft cook kit has as few pieces as possible and each one does two jobs: the lid is also a frying pan or plate, the mug is also a second pot, the pot bag keeps soot off the rest of your backpack.
Features that matter over a fire
- Wire bail handle for hanging and lifting with a stick
- No plastic, silicone or rubber on handles or lid knobs
- Tight-fitting lid that works as a pan or plate
- Wide, flat base for stability on embers or a stove
- Volume markings stamped or etched inside (not printed)
- Nests with your mug and small items to save pack space
Stainless steel, titanium or aluminium: which material is best?
The material decides how your pot behaves in the fire, how much it weighs and how long it lasts. There is no single best material – only the best match for how you cook.

| Material | Weight (1 L pot) | Heat distribution | On open fire | Price tier | Best use |
|---|---|---|---|---|---|
| Stainless steel | approx. 200–350 g | Moderate; hot spots with thin bases | Excellent: tolerates flames, embers and dry heat | Low–medium | All-round campfire pot, billy can, mug |
| Titanium | approx. 100–160 g | Poor; very local hot spots | Good, but thin walls burn food easily | High | Boiling water, lightweight trips, stoves |
| Aluminium (plain) | approx. 150–220 g | Very good; spreads heat evenly | Risky: can warp or even melt if dry or in hot coals | Low | Stove cooking, group pots, simmering |
| Hard-anodised aluminium | approx. 170–250 g | Very good | Better than plain, but coating can be damaged by flames | Medium | Stove cooking with real meals |
| Cast iron | several kg (skillet, Dutch oven) | Excellent; holds heat for a long time | Excellent, but heavy and brittle to thermal shock | Low–medium | Base camp, baking, Dutch oven |
| Carbon steel / enamel | medium–heavy | Good (carbon steel) | Carbon steel very good; enamel chips when knocked | Low–medium | Frying pans; enamel mugs for car camping |
Weights are typical ranges for simple pots without extras; real products vary with wall thickness and fittings.
Stainless steel: the campfire workhorse
Stainless steel is heavier than the alternatives, but it forgives almost everything a fire can throw at it. You can leave it in flames, let it boil dry by mistake, scrub it with sand and bend it back into shape. Its weakness is heat distribution: thin stainless bases develop hot spots, so stirring and cooking over embers rather than high flames matters. For most people starting out, a 1–1.5 L stainless pot with a bail is the best pot for campfire use.
Titanium: light, strong, but unforgiving
Titanium is very strong for its weight, so manufacturers make pots with walls well under half a millimetre thick. That saves weight, and titanium boils water quickly because thin walls carry little metal to heat. But titanium conducts heat poorly, so the heat stays where the flame touches: porridge, rice and sauces burn onto the base in seconds. Bare titanium is excellent for boiling water and rehydrating meals, less good for real cooking.
Aluminium and hard-anodised aluminium
Aluminium spreads heat beautifully, which makes it pleasant to cook with on a stove. On an open fire, however, it is the weak link: aluminium softens well below the temperatures that glowing embers can reach, and a pot that boils dry in the coals can warp, sag or develop holes. Hard-anodising makes the surface harder and more scratch-resistant, but the coating can discolour and degrade under direct flame. Use aluminium for stoves and controlled cooking; if you use it over a fire, keep it hanging above the flames and never let it run dry.
Cast iron, carbon steel and enamel
Cast iron holds heat like nothing else and is perfect for baking and slow stews, but a skillet or camp oven weighs kilos, not grams – it belongs at a base camp or on a canoe trip. Carbon steel pans are lighter than cast iron, take a seasoning and handle high heat well.
What size pot do you need per person?
The right pot size depends on what you cook. For boiling water to rehydrate meals and make hot drinks, you need less volume than for cooking pasta or stew from scratch. A pot should never be filled to the brim over a fire: leave at least a quarter of the volume free so boiling water does not spill onto the embers or your hands. The food calculator helps you plan how much food, and therefore how much volume, you actually need per day.
| Group | Main pot | Extras | Notes |
|---|---|---|---|
| Solo | 0.75–1 L | Steel mug 0.5–0.75 L | Enough for one meal plus a drink; 1.2 L if you cook pasta |
| 2 persons | 1.5–2 L | Two mugs or a second small pot | Cook the meal in the pot, boil tea water in a mug |
| 3–4 persons | 2.5–3 L | Kettle or second pot 1–1.5 L | One pot for food, one for water keeps things moving |
| 5–8 persons | 4–6 L | Kettle, frying pan or Dutch oven | Hang pots from a tripod or crane; share out carrying |
| Large group | 8–12 L | Several pots, big kettle | Base-camp setup; plan fuel with the firewood calculator |
Guide values. Winter trips need more volume if you melt snow for water.

Height and diameter matter too. A tall, narrow billy can suits hanging over a fire and fits long items such as fuel bottles inside it. A wide, low pot is more stable on a stove, heats faster on a small burner and is easier to stir. For boiling water to make it safe, volume per trip is what counts – the boiling calculator estimates time and fuel for a given amount.
The billy can: why a bail handle is king
A billy can is a simple cylindrical pot with a wire bail handle, and it is the classic bushcraft pot for good reasons. The bail lets you hang the pot from a tripod, a crane (a stick angled over the fire), or an adjustable pot hanger, so you control the heat by raising or lowering it rather than by moving the fire. It also lets you lift a boiling pot out of the fire with a forked stick or a notched pot hook, keeping your hands well away from the heat.
Folding side handles, common on camping cookware, are fine on a stove but tricky over a fire: they get hot, they are too short to reach safely across flames and they often have plastic or silicone sleeves. A bail handle also stays cooler when it folds down away from the flames, though it will still be hot enough to burn you – always use a stick, pot grip or glove.

Using a billy can over the fire
 1Build the fire
Light a compact fire lay that gives embers fast, such as a small log cabin – see fire lays.
 2Set the hanger
A tripod, a crane stick or two forked uprights with a crossbar. The hook should hang in the middle, directly over the fire.
 3Hang the pot
Lid on. For the fastest boil, the tips of the flames should just touch the base; flames climbing up the walls only add soot.
 4Adjust the height
Raise the pot for simmering, lower it for boiling. Watch the lid: a steady rattle means boiling, a gentle wisp of steam means simmering.
 5Lift with a stick
Hook the bail with a forked or notched stick, keep the pot level and set it down on flat ground away from people's feet.
Lids, mugs and nesting: save fuel and space
A lid is not optional. Water boils noticeably faster with a lid on because less heat escapes as steam, and that saves wood or gas every single time. Over a fire, the lid also keeps ash and falling bits out of your food. The best lids have a small lip or a folding handle so they double as a shallow frying pan for an egg, a slice of bread or a piece of fish – or simply as a plate.
The steel mug
A single-walled stainless steel mug of 0.5–0.75 L is one of the most useful items in a bushcraft kit. You can set it directly on embers to boil water for tea, cook a small portion of noodles, melt snow or heat a drink while the main pot cooks.

Nesting your kit
Nesting means packing smaller items inside the pot so your cook kit takes up the space of the pot alone. A typical solo nest: the mug inside the pot, inside the mug a small gas canister or fuel bottle, a lighter, a folded pot grip, a tea bag stash and a scrubbing cloth. Wrap the whole nest in a cloth bag – this stops rattling and keeps soot inside the bag and off your sleeping bag.
Nesting a solo cook kit
 1Start with the pot
The pot is the outer shell. Check that the bail folds flat along the side, otherwise the nest will not close.
 2Mug inside
Slide the single-walled mug in. Its handle should fold or sit on the inside edge; a mug that only just fits is ideal because it does not rattle.
 3Small items into the mug
A small gas canister or fuel bottle, a lighter, the folded pot grip, tea bags and a scrubbing cloth. Pack anything that could leak in its own bag.
 4Lid on, into a bag
Close the lid and put the whole nest into a cloth bag. The soot stays in the bag and your pack stays clean.
Frying pan and utensils: what you really need
A separate frying pan is a luxury on a solo trip; the pot lid does the job for occasional frying. For groups or base camps, a carbon steel or cast iron pan with a long handle or a removable handle is worth the weight. Avoid non-stick coatings over a fire: high heat damages them and ash scratches them. A seasoned steel or iron pan becomes naturally slick with use.
Utensils should be long enough to keep your fingers out of the heat and tough enough for rough use. Wooden spoons carved on the spot are a classic – see carving basics – and they do not scratch or conduct heat.
Utensils at a glance
- Long spoon or spork
- Metal or wood, 20 cm or longer reaches the bottom of a tall pot
- Pot grip / gripper
- Clamps onto the rim; lightweight and safe for lifting and pouring
- Leather gloves
- Protect hands when handling hot metal, hangers and firewood
- Pot hook or stick
- Forked or notched stick for lifting the bail out of the fire
- Knife
- Food prep and carving; see bushcraft knives
- Scrubbing cloth
- A small piece of scourer or rag for cleaning
Stove or open fire: which heat source suits your cookware?
In many places an open fire is not allowed at all, or only in designated fire rings, and fire bans during dry periods can include stoves too. Laws vary by country, region and landowner, so check local rules before every trip. The campfire safety guide explains fire danger levels and leave-no-trace practice. That is why most bushcraft kits combine a fire-friendly pot with a stove option.
| Heat source | Pros | Cons | Pot tip |
|---|---|---|---|
| Open fire | Free fuel, warmth, traditional | Often restricted; soot; slow to control | Steel billy can with bail, hung or on embers |
| Gas canister stove | Fast, clean, adjustable | Weak in cold (butane below about 0 °C); canister waste | Wide, low pot; titanium or aluminium fine |
| Alcohol (spirit) stove | Simple, silent, cheap | Slow; nearly invisible flame; spill risk | Use a windscreen; refill only when cold |
| Wood-burning / hobo stove | Burns twigs; less wood than a fire | Needs dry fuel and feeding; still an open flame | Stable pot support; steel or titanium |
| Solid fuel tablets | Tiny and light, emergency backup | Slow, smelly, residue on pot | Small mug or pot only |
A wood-burning stove (also called a twig or hobo stove) is a good compromise: it concentrates a small fire under the pot, needs only a handful of dry sticks and leaves less of a trace than a full campfire. Legally it usually counts as an open fire. A gas stove is the quickest way to boil water and often permitted where fires are not – but always check.
Which pot and heat source?
Are open fires allowed where you are going?
Yes → Take a stainless steel billy can with bail and lid.No → Take a stove and a wide, light pot (titanium or aluminium).Do you mostly boil water for dehydrated meals?
Yes → A 0.75–1 L titanium or steel pot is enough.No → Choose steel or hard-anodised aluminium that cooks more evenly.Are you cooking for a group at a fixed camp?
Yes → Add a large pot, a kettle and possibly a Dutch oven.No → Stay with one pot and a mug.
How to use camping cookware on an open fire
The most common mistake is putting the pot into roaring flames. Flames are dirty, uneven and hard to control; embers give steady, strong heat. Build a small fire, let it burn down to a bed of glowing coals and then cook – or hang the pot high while the fire is still flaming and lower it as the embers develop. The fire lay tool helps you pick a fire shape for cooking.
In practice: prepare water, food, spoon and gloves first; rake embers level or set the pot on two green logs (never on river stones, which can burst); boil with the lid on; then raise the pot or move it to the edge for simmering and stir thin-walled pots often. Fire cooking takes practice. More recipes and techniques are in campfire cooking and bushcraft recipes. When you cook for more than a night or two, keep ingredients cool, dry and away from animals – see storing food at camp.
Troubleshooting at the fire
| Symptom | Likely cause | Fix |
|---|---|---|
| Porridge or rice burns onto the base | Thin titanium or steel base over hot flames | Cook over embers, stir constantly, add a little more water, take the pot off the heat to let it steam |
| Water takes ages to boil | No lid, wind, pot too high above the heat | Lid on, build a windbreak, lower the pot until flame tips touch the base |
| Pot bottom bulges or warps | Pot ran dry or aluminium sat in hot coals | Never leave a pot empty on the heat; keep aluminium above the flames |
| Handles too hot to touch | Side handles or bail lying in the heat | Fold the bail away from the fire; lift with a stick, pot grip or glove |
| Soot all over your gear | Pot packed without a bag | Wipe with grass, pack the nest in its own cloth bag |
Soot and cleaning: how to clean your pot in the field
A pot used over a wood fire turns black on the outside, and that is fine. Soot does not harm the pot, and a blackened outside even absorbs heat slightly better. What matters is that the inside is clean and that soot does not spread through your pack. Keep the pot in its own bag and wipe the worst off with a handful of grass or moss.
Cleaning without a sink
Scrape out leftovers and pack them out; burnt-on food softens if you boil a little water in the pot for a few minutes. Then scrub the inside with a little water and a handful of sand, fine gravel or cold, fine wood ash – ash is slightly alkaline and helps cut grease. Rinse with clean water. If you use soap, use a small drop of biodegradable soap and still never put it directly into a stream or lake: even biodegradable soap harms aquatic life.
Leave-no-trace washing up
 1Collect water
Fill a pot or water container and carry it at least 60 m (about 200 ft) from the water source before you start.
 2Scrape and scrub
Remove food remains with a spoon, then scrub with sand or cold ash and a little water. Stubborn residue softens if you boil some water in the pot first.
 3Strain the wash water
Pour it through a cloth or small sieve. The scraps you catch go into your rubbish bag and are packed out.
 4Scatter the grey water
Fling it in a wide arc on the ground, far from camp, paths and water, so it soaks in rather than pooling.
 5Sterilise if needed
If you washed with untreated water, bring a little water to the boil in the pot before the next meal.
What "clean" looks like: the inside feels smooth and not greasy when you run a finger over it, there are no dark rings at the water line and nothing smells sour. The outside may stay black – that is soot, not dirt.
Building your bushcraft cook kit
Start small and add only what you miss. For most solo trips, a 1 L stainless billy can, a steel mug, a long spoon, a pot grip and a lighter are all you need; add a gas or alcohol stove where fires are not allowed. For two people, step up to a 1.5–2 L pot and a second mug. The bushcraft kit list shows how the cook kit fits into your overall gear, and the Kit Builder lets you total up weights for your own setup.
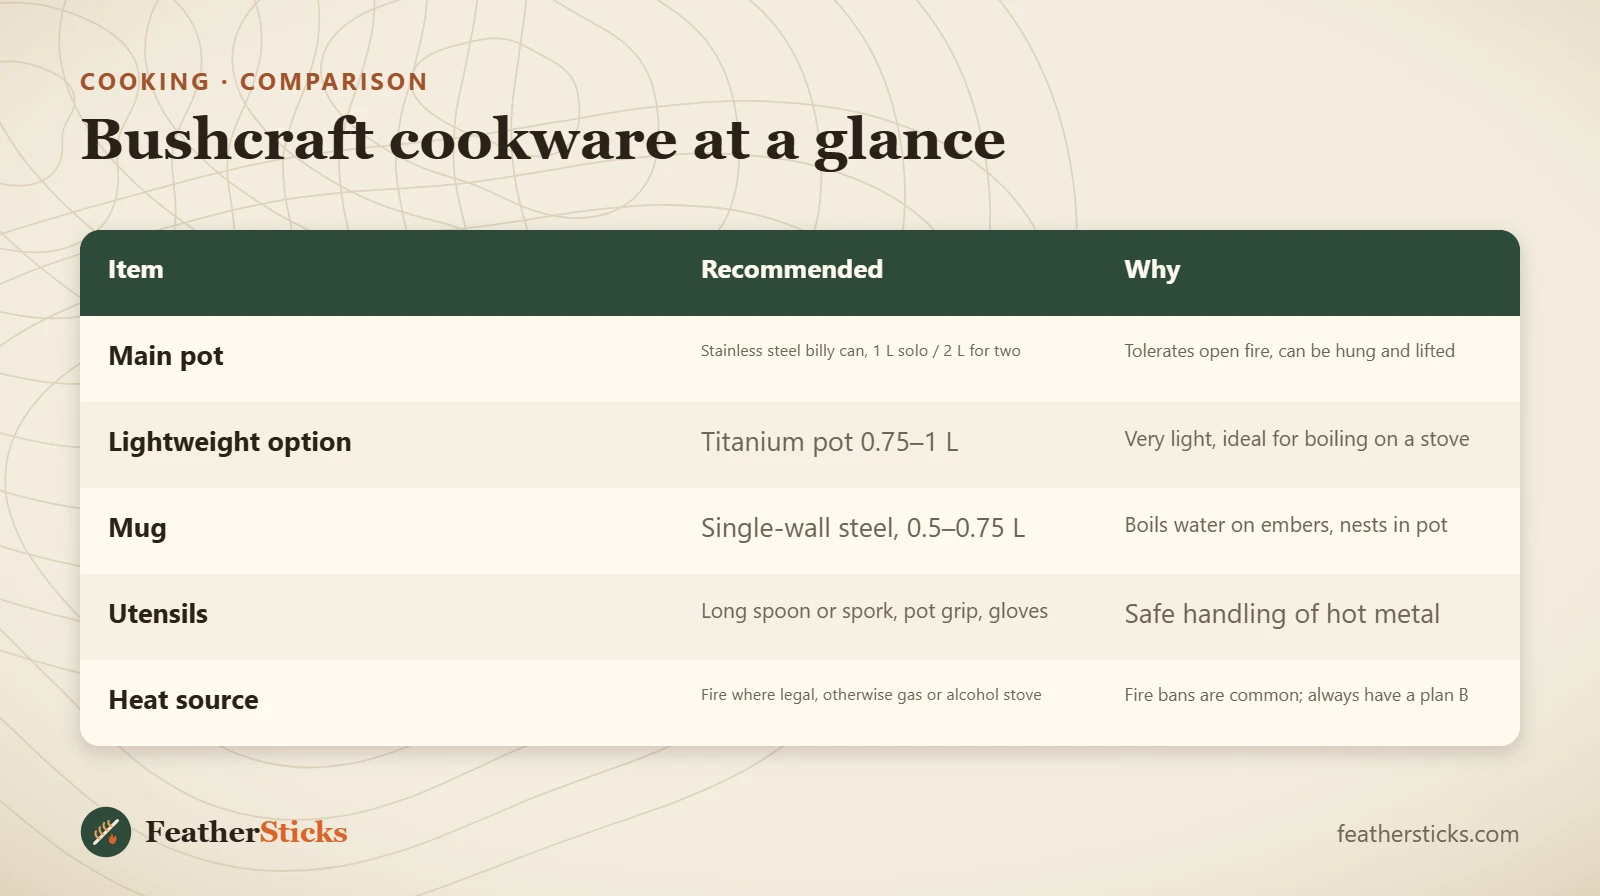
| Item | Recommended | Why |
|---|---|---|
| Main pot | Stainless steel billy can, 1 L solo / 2 L for two | Tolerates open fire, can be hung and lifted |
| Lightweight option | Titanium pot 0.75–1 L | Very light, ideal for boiling on a stove |
| Mug | Single-wall steel, 0.5–0.75 L | Boils water on embers, nests in pot |
| Utensils | Long spoon or spork, pot grip, gloves | Safe handling of hot metal |
| Heat source | Fire where legal, otherwise gas or alcohol stove | Fire bans are common; always have a plan B |
Common mistakes
- Putting a pot straight into high flames instead of cooking over embers.
- Letting an aluminium pot boil dry in the coals – it can warp or melt.
- Cooking thick food in bare titanium without stirring, so it burns onto the base.
- Heating a double-walled or vacuum mug on a stove or fire.
- Buying pots with plastic handles or lid knobs for campfire use.
- Using a stove or charcoal inside a tent or vestibule.
- Washing pots directly in streams or lakes, even with biodegradable soap.
What you need
- Stainless steel billy can with bail and lid (1–2 L)
- Single-wall stainless steel mug (0.5–0.75 L)
- Long spoon or spork
- Pot grip and leather gloves
- Small gas or alcohol stove with windscreen
- Cloth pot bag
- Small scourer or cloth and biodegradable soap