Cooking
Dutch Oven Cooking: Sizes, Coals Chart, Seasoning & Campfire Tips
Dutch oven cooking turns a heavy cast iron pot into a stove, oven and frying pan at camp. Put heat both under the pot and on its flat lid and you can simmer stew, bake bread or brown a cobbler. The classic rule of thumb: diameter in inches × 2 briquettes gives about 175 °C (350 °F), split roughly two thirds on top and one third below for baking.
This guide explains which size to buy, how legs and a flat lid make a real camp oven, how many coals you need for each temperature, how to cook on natural campfire embers, and how to season and care for cast iron. It belongs to the outdoor cooking hub, alongside campfire cooking and bushcraft cookware, and builds on the bushcraft basics.
Step by step
-
1
Prepare coals or embers
Light briquettes in a chimney or burn hardwood down to glowing embers. Allow 20–30 minutes.
-
2
Count coals for the heat
Diameter in inches × 2 briquettes gives about 175 °C. For baking, put two thirds on the lid and one third below.
-
3
Load the oven
Set the oven level on its legs over the bottom coals, add food, close the lid and place coals on top.
-
4
Rotate every 10–15 min
Turn the oven a quarter turn one way and the lid a quarter turn the other to avoid hot spots.
-
5
Check, finish, clean
Lift the lid with a lid lifter, check doneness, then clean warm, dry over heat and oil lightly.
Dutch oven cooking: what is a camp oven?
A Dutch oven is a thick-walled, lidded cast iron pot. Its mass stores a lot of heat and releases it evenly, which is exactly what you need for slow stews and baking. For outdoor use, the campfire Dutch oven – often called a camp oven – has three details that the kitchen version lacks.
- Three short legs hold the pot a few centimetres above the coals, so air can reach them and they keep glowing.
- A flat lid with a raised rim holds coals on top without them sliding off. That top heat is what turns a pot into an oven. Turned upside down on its own small legs or on three stones, many lids double as a griddle.
- A wire bail handle lets you hang the oven from a tripod over a fire and lift it with a hook.

Camp oven vs kitchen Dutch oven
Camp oven
- Three legs, stands over coals
- Flat, rimmed lid holds coals
- Bail handle for hanging
- Bare, seasoned cast iron
- Made for embers and briquettes
Kitchen Dutch oven
- Flat bottom for hob or oven
- Domed lid, coals slide off
- Side handles only
- Often enamelled inside and out
- Enamel can crack over a campfire
A flat-bottomed pot can still be used outdoors on a grate or a ring of stones, but you lose the easy top heat. If you want to bake at camp, buy a camp oven with legs.
Which Dutch oven size do you need?
In North America, camp ovens are sold by lid diameter in inches (8", 10", 12", 14", 16") and volume in quarts; "deep" versions of the same diameter hold more and suit whole birds or tall loaves. European manufacturers often use their own size codes, and the German market commonly uses "ft" numbers (ft3, ft4.5, ft6, ft9...), which roughly relate to capacity. The table gives typical values – real volumes vary by maker and shape, so always check the stated capacity.
| Size | Volume | Diameter | Servings | Typical use |
|---|---|---|---|---|
| 8 in, 2 qt | approx. 1.9 L | approx. 20 cm | 2–3 | Side dishes, small desserts, solo base camp |
| 10 in, 4 qt | approx. 3.8 L | approx. 25 cm | 4–6 | Stew for a small group, bread, cobbler |
| 12 in, 6 qt | approx. 5.7 L | approx. 30 cm | 6–10 | The all-rounder: stews, bread, pizza |
| 12 in deep, 8 qt | approx. 7.6 L | approx. 30 cm | 8–12 | Roasts, whole chicken, tall loaves |
| 14 in, 8–10 qt | approx. 7.6–9.5 L | approx. 35 cm | 12–16 | Groups, big chilli pots |
| German ft3 / ft4.5 | approx. 1.5–2 L / 3–4 L | approx. 20–25 cm | 2–3 / 4–6 | Size codes differ between manufacturers |
| German ft6 / ft9 | approx. 5–6 L / 7–8 L | approx. 30 cm | 6–10 / 8–12 | ft9 is usually the deeper 30 cm pot |
Servings assume a main course. Manufacturers vary in volume, depth and naming – check the listed capacity.
If you buy only one, a 12-inch (about 30 cm) oven with around 5–6 L is the most versatile for a family or small group. A 10-inch is easier to carry and heats with fewer coals. Remember the weight: a 12-inch cast iron camp oven typically weighs in the region of 6–9 kg with its lid, which is why Dutch ovens belong to base camps, canoe trips and car camping, not to a long hike with a light kit list.
Dutch oven coals chart: how many briquettes on top and bottom?
With charcoal briquettes, heat is easy to repeat because each briquette gives off roughly the same heat. The widely used rule of thumb for a dutch oven coals chart works like this:
- Total briquettes = diameter in inches × 2 for about 175 °C (350 °F). A 12-inch oven needs about 24.
- Baking (bread, cobbler, pizza): about two thirds on the lid, one third below. Bottom coals heat the base directly and burn it quickly; top heat browns like an oven grill.
- Simmering and stewing: roughly half and half, or slightly more below.
- Frying, searing and boiling: most or all coals underneath, the lid off or with few coals.
- Adjusting: each extra briquette adds very roughly 8–10 °C (about 15–20 °F). Add or remove them in pairs, one top and one bottom.


Where exactly the coals go: under the oven, set the briquettes in a ring just inside the edge of the pot, not in a heap under the centre – a heap makes a scorched circle in the middle of the bread. On the lid, spread them in a ring along the rim with the rest in a loose checkerboard, leaving a small gap around the handle so you can still get the lid lifter in.
| Oven size | 165 °C / 325 °F | 175 °C / 350 °F | 190 °C / 375 °F | 205 °C / 400 °F | 220 °C / 425 °F |
|---|---|---|---|---|---|
| 8 in (approx. 20 cm) | 10 / 4 | 11 / 5 | 12 / 6 | 14 / 6 | 15 / 7 |
| 10 in (approx. 25 cm) | 12 / 6 | 13 / 7 | 15 / 7 | 16 / 8 | 17 / 9 |
| 12 in (approx. 30 cm) | 15 / 7 | 16 / 8 | 17 / 9 | 19 / 9 | 20 / 10 |
| 14 in (approx. 35 cm) | 17 / 9 | 19 / 9 | 20 / 10 | 21 / 11 | 23 / 11 |
| 16 in (approx. 40 cm) | 20 / 10 | 21 / 11 | 23 / 11 | 24 / 12 | 25 / 13 |
Standard-size charcoal briquettes, mild weather, no wind. Cold, wind, rain and altitude all reduce heat – add briquettes and check more often. Deep ovens may need a few more below.
Treat the chart as a starting point. Briquettes vary in size and quality, a cold wind can steal a lot of heat, and they burn down: a load of coals typically gives useful heat for somewhere around 45–60 minutes, so for long bakes you light a fresh batch in a chimney or at the side of the fire and swap in new coals as the old ones fade. Always light and handle coals on bare mineral ground or in a fire pan, never on dry grass or leaf litter.
Dutch oven on the campfire: cooking with wood embers
You can cook in a Dutch oven on a campfire without briquettes, but you cannot count embers the way you count briquettes. Wood coals vary enormously with the species, the size of the pieces, how long they have burned and the wind. Dense hardwoods such as oak, beech, maple or birch give longer-lasting, even coals; softwoods such as pine and spruce burn fast and leave small embers that die quickly.
Setting up a Dutch oven with wood embers
 1Run an ember factory
Keep a compact fire of split hardwood burning to one side. It is not for cooking; its only job is to turn wood into coals for the next hour or two.
 2Rake a bed beside the fire
Shovel glowing coals onto bare mineral ground next to the fire and spread them into a flat bed a little wider than the oven.
 3Set the oven on the bed
For a 30 cm oven, about one level shovel of embers underneath. The legs keep the base just above the coals so they keep breathing.
 4Shovel embers onto the lid
For baking, about two shovels on the lid, spread evenly to the rim. Look inside after 10 minutes and adjust from there.
How to set up an ember fire for a Dutch oven
Build a fire to one side of your fire area and keep it going as an "ember factory". A compact fire lay with split hardwood produces the best coals – see fire lays and fire starting basics. When the wood has burned down to glowing coals, rake a bed next to the fire, set the oven on it and shovel embers onto the lid. The main fire keeps making new coals for top-ups. Split your wood small with an axe or hatchet so it burns down faster and evenly, and use the firewood calculator to estimate how much you need: an evening of oven cooking uses far more wood than a quick pot of tea.
Never put the oven into flames
Flames lick up the sides, heat unevenly and scorch the food on one side. For soups and stews, you can hang the oven by its bail from a tripod above the fire, but for baking always work with embers. The fire lay tool helps you choose a fire shape that gives good coals.
How to avoid hot spots: rotating the oven
No coal bed is perfectly even, and a breeze makes one side hotter. The standard fix is rotation: every 10–15 minutes, lift the oven by its bail and turn it a quarter turn, then turn the lid a quarter turn in the opposite direction. Hot spots move around instead of burning one spot. For bread and cakes this simple habit makes the difference between an evenly brown crust and a charred corner.
One baking cycle
 1Preheat
Set oven and lid on their coals for 5–10 minutes before the dough goes in. A cold oven makes bread stick and bake unevenly.
 2Load
2LoadLift the lid, put in the dough (on parchment or a trivet protects the base), close the lid and arrange the coals top and bottom.
 3Rotate
Every 10–15 minutes, lift the oven by the bail and give it a quarter turn, then turn the lid a quarter turn the other way.
 4Refresh the coals
Briquettes fade after about 45 minutes. Light a fresh batch in good time and swap them in with tongs, top and bottom.
 5Check
Lift the lid straight up and set it on a clean stone. Bread is done when it sounds hollow and pulls away from the wall; cake passes the stick test.
When you lift the lid, lift it straight up and set it on a lid stand or a clean, flat stone so ash does not fall into the food. Resist the urge to peek too often: every look lets heat escape, just like opening an oven door at home.
Reading the oven by symptom
| What you see | Cause | Fix |
|---|---|---|
| Burnt base, pale top | Too many coals below or bunched in the middle | Move coals to a ring at the edge, shift some to the lid, use parchment or a trivet |
| Dark top, doughy middle | Too much top heat, or the loaf is very tall | Take 2–3 coals off the lid, give it more time, bake lower loaves |
| One side darker than the other | Wind or skipped rotations | Rotate every 10–15 min, build a windbreak |
| Stew boils hard, sticks | Too much bottom heat | Remove coals from below, stir, add a splash of liquid |
| Cooking stalls after an hour | Coals burnt out | Add fresh coals from a chimney or the ember fire |
What can you cook in a Dutch oven? Recipe overview
Dutch oven cooking is not limited to stew: almost anything that works in a pot or an oven at home works in a camp oven. The table shows classic dishes with a rough heat setup; full recipes are collected in bushcraft recipes, and simple flatbreads without an oven are in bannock and campfire bread.
| Dish | Heat split | Approx. time | Tip |
|---|---|---|---|
| Stew / goulash | Half top, half bottom; or hanging | 90–150 min | Brown meat with all coals below first |
| Chilli | More bottom than top | 60–90 min | Stir now and then; tomatoes are fine in a well-seasoned oven |
| Bread / damper | Two thirds top, one third bottom | 35–50 min | Use parchment or a trivet to protect the base |
| Fruit cobbler | Two thirds top, one third bottom | 35–45 min | Sticky sugar: line the oven or clean promptly |
| Pizza | Lots of top heat, few coals below | 15–25 min | Preheat lid well; inverted lid works as a griddle |
| Roast chicken | Two thirds top, one third bottom | 60–90 min | Use a deep oven; check the core reaches 74 °C |
| Breakfast casserole | Even split | 30–45 min | Eggs, potatoes, bacon layered together |
For meat, poultry and egg dishes, cook to a safe core temperature – food safety agencies such as the USDA give 74 °C (165 °F) for poultry – and keep raw ingredients cool beforehand; see storing food at camp. Spit roasts are a different technique altogether and are covered in spit cooking. Plan portions for a group with the food calculator.
How to season a Dutch oven
Seasoning is a thin layer of oil baked onto the iron until it polymerises into a hard, slick, dark coating. It protects bare cast iron from rust and makes it naturally non-stick. Many ovens are sold pre-seasoned, but every oven benefits from extra layers, and a rusty oven needs to be seasoned again from scratch.
Seasoning cast iron step by step
 1Clean
Wash with hot water (a little soap is fine for a new or rusty oven) and scrub off any rust until you see bare grey iron.
 2Dry completely
Heat the oven until every trace of moisture has gone. Any water left in the pores turns into rust spots under the new layer.
 3Oil very thinly
Rub a small amount of oil over every surface, inside and out, lid and legs – then wipe it off again as if you had made a mistake. Thick layers turn sticky.
 4Bake upside down
At around 200–250 °C for about an hour, in a home oven, a covered barbecue or over a steady fire outdoors. Upside down, excess oil runs off instead of pooling. It smokes.
 5Cool and repeat
Let it cool in place, then repeat 2–4 times. A good base layer is evenly dark, dry to the touch and not tacky.
Which oil is best for seasoning?
Most neutral fats with a reasonably high smoke point work: vegetable, canola (rapeseed) or sunflower oil, shortening or lard. Flaxseed (linseed) oil forms a very hard, glossy layer and is popular, but some people find it can flake off if applied too thickly. Whatever you use, the rule is the same: many thin layers beat one thick one. Cooking fatty food – frying bacon, for example – adds seasoning with every use.
Caring for cast iron: cleaning, rust and storage
Cast iron is tough against heat but brittle against shock and vulnerable to water. The biggest rule: never pour cold water into a hot oven or set a hot oven in snow or a stream. The sudden temperature difference can crack or warp the iron, and a cracked Dutch oven cannot be repaired in the field.

Dutch oven care routine
- Scrape out food while the oven is still warm, using a wooden or plastic scraper
- Clean with hot water and a brush or chainmail scrubber; avoid long soaking
- Use soap sparingly – a small amount does not destroy good seasoning
- Dry over heat until completely dry, then wipe on a very thin layer of oil
- Do not store food in the oven overnight, especially acidic dishes
- Remove light rust with steel wool, wash, dry and re-season
- Store dry with a paper towel inside and the lid slightly ajar for air
- Keep it in a padded bag or box – cast iron can chip if dropped
Wash water at camp belongs at least 60 m (about 200 ft) away from lakes and streams; strain food scraps out and pack them away. A sticky layer after seasoning means too much oil – bake it again at high heat. A metallic taste or grey residue usually points to worn seasoning, often after long simmering of acidic sauces; simply add a few fresh layers.
Dutch oven safety at camp
A camp oven combines weight, heat and glowing coals, so a few safety habits matter. Lay out your cooking area first: level mineral ground, clear of dry grass and leaf litter, away from paths and tents. Our guide to camp setup shows how to separate kitchen, fire and sleeping areas.
- Use a lid lifter and heat-proof leather gloves. Lids and bails reach temperatures that burn skin instantly.
- Lift with your legs and keep a flat, stable place ready to set the oven down.
- Keep children and dogs out of the cooking zone; a tipped oven full of stew can cause serious scalds.
- Respect fire bans. Many areas ban open fires and even charcoal during dry periods, and rules vary by country and landowner. Check before you go – see campfire safety.
- Put coals out completely. Briquette ash can stay hot for many hours. Douse with water, stir, and feel for heat before you leave.
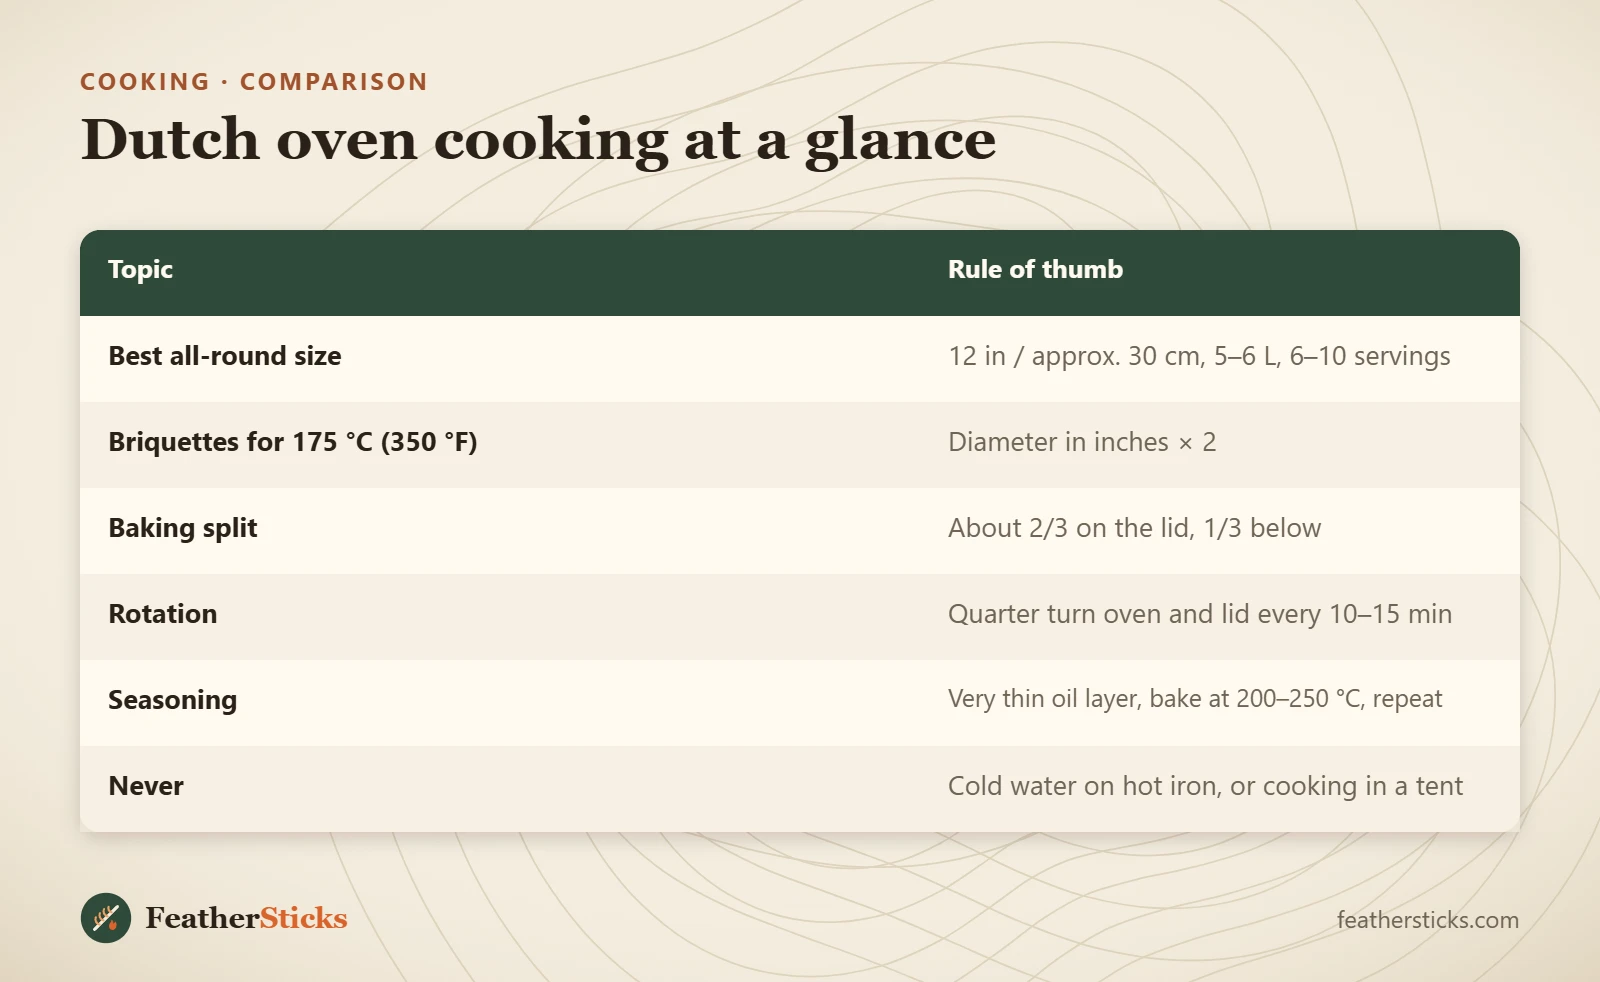
| Topic | Rule of thumb |
|---|---|
| Best all-round size | 12 in / approx. 30 cm, 5–6 L, 6–10 servings |
| Briquettes for 175 °C (350 °F) | Diameter in inches × 2 |
| Baking split | About 2/3 on the lid, 1/3 below |
| Rotation | Quarter turn oven and lid every 10–15 min |
| Seasoning | Very thin oil layer, bake at 200–250 °C, repeat |
| Never | Cold water on hot iron, or cooking in a tent |
Common mistakes
- Too much bottom heat when baking, so bread and cobbler burn underneath.
- Setting the oven into flames instead of on a bed of embers.
- Treating wood embers like briquettes and not checking the food.
- Forgetting to rotate the oven and lid every 10–15 minutes.
- Pouring cold water into a hot oven – the iron can crack.
- Storing the oven damp or with a tightly closed lid, which causes rust.
- Using charcoal or a hot oven inside a tent or enclosed space.
What you need
- Cast iron camp oven with legs and flat lid (10 or 12 in)
- Lid lifter
- Heat-proof leather gloves
- Charcoal chimney starter and briquettes
- Small shovel for embers
- Lid stand or trivet
- Chainmail scrubber, scraper and cooking oil
- Fire pan or metal tray for coals