Cooking
Bannock Bread Recipe: Campfire Bread on a Stick, in a Pan and in the Ashes
Bannock bread is a simple unleavened or quick-leavened bread made from flour, water, fat, salt and baking powder, cooked in a pan, on a stick or in the embers. The basic bannock recipe is about 100–125 g of flour per person, one teaspoon of baking powder, a pinch of salt, a spoonful of fat and just enough water to make a soft, non-sticky dough.
Bannock came to Canada with Scottish fur traders and became a staple across the North, where Indigenous communities have made it their own for generations. Wrapped around a stick it becomes twist bread, the classic campfire bread on a stick. This guide gives you ratios, a take-along premix, three cooking methods, variations, a kids section and a troubleshooting table. It builds on campfire cooking basics and our bushcraft for beginners guide.
Step by step
-
1
Let the fire burn to embers
Bake over glowing coals, not flames. Allow 20–30 minutes for a small hardwood fire to burn down.
-
2
Mix a soft dough
Per person, mix 100–125 g of flour premix with a spoon of oil and 60–75 ml water added gradually. Knead briefly until soft but not sticky.
-
3
Prepare a safe stick
Use a thumb-thick green stick of a known safe hardwood such as hazel or birch, 1–1.5 m long, and peel the top 20–25 cm.
-
4
Wind the dough on
Roll the dough into a snake about 1 cm thick and wind it around the warm stick end with small gaps. Press both ends.
-
5
Bake slowly and turn
Hold it 15–20 cm above the embers and turn steadily for 10–15 minutes until golden and hollow-sounding.
What is bannock bread?
The word bannock originally described a flat, round bread from Scotland and northern England, once made from oats or barley and baked on a griddle stone. In Canada and the northern United States, bannock usually means a quick wheat bread raised with baking powder and fried or baked in a pan. Around campfires in Europe the same dough is wound around a stick as twist bread – in Germany called Stockbrot.
What makes bannock perfect for bushcraft is that it needs no oven, no kneading marathon and no yeast. The dry ingredients keep for weeks, weigh little and are dense in energy. Add water at camp and you have fresh, hot bread in minutes – on a stick, in a pan or in the ashes.
Basic bannock recipe: ratios per person
Bannock is about ratios rather than exact recipes. Once you know them, you can scale for one person or a group of twelve without a scale. The quick version uses baking powder and goes straight onto the fire; the yeast version is fluffier but needs time to rise.
| Ingredient | Quick bannock (baking powder) | Yeast twist bread | Why |
|---|---|---|---|
| Flour (plain/all-purpose) | 100–125 g (about 1 cup) | 100–125 g | Structure; 100 g suits a snack, 125 g a meal |
| Baking powder | 1 level tsp (4–5 g) | – | Gas bubbles make it light without waiting |
| Yeast | – | 1.5–2 g dried (¼ sachet) | Better flavour and texture, needs 30–60 min |
| Salt | 1 pinch (1–2 g) | 1–2 g | Taste; too much slows yeast |
| Fat (oil, butter, lard) | 10–15 g (1 tbsp) | 10 g | Tenderness and calories |
| Milk powder (optional) | 10 g (1 tbsp) | 10 g | Browning and flavour |
| Water (or milk) | 60–75 ml | 55–65 ml, lukewarm | Add gradually until soft, not sticky |
Rule of thumb: water is roughly 55–65 % of the flour weight.
Quick baking-powder bannock
This is the classic trail version. Mix the dry premix with oil, add water gradually, knead for 30 seconds and cook immediately. Baking powder starts reacting as soon as it gets wet and again with heat, so do not let the dough sit for more than 10–15 minutes.
Mixing and kneading bannock dough
 1Pour the premix into a bowl
Tip one portion of premix (flour, baking powder, salt, optional milk powder) into a bowl, a pot or the open zip bag. Break up any lumps with your fingers.
 2Add the fat
Rub in about 1 tbsp of oil or soft butter per person until the mix looks like coarse crumbs. Fat coats the flour and keeps the crumb tender.
 3Add water a little at a time
Pour in 60–75 ml of water in two or three splashes and stir. Stop as soon as no dry flour is left – it is easy to add water and impossible to take it out again.
 4Knead for about 30 seconds
Fold and press the dough just until it holds together and feels smooth. Long kneading makes baking-powder bannock tough; only yeast dough needs the full 5 minutes.
 5Portion and bake soon
Divide it into pieces of 80–100 g for sticks, or press one round for the pan. Get baking-powder dough onto the heat within 10–15 minutes.

What the dough should look like
Press a floured fingertip into the dough. Good bannock dough feels like soft modelling clay: the dent stays, nothing sticks to your finger, and the surface is matt rather than shiny. If strings of dough cling to your finger, work in a teaspoon of flour at a time. If the edges crack when you flatten a piece, wet your hands and knead once more – that adds just enough water without making the dough slack.
Yeast version (for twist bread)
For softer, more bread-like twist bread, use yeast. For four people: 500 g flour, 7 g dried yeast (one sachet), 1 tsp salt, 1 tsp sugar, 3 tbsp oil and about 250–300 ml lukewarm water. Knead for 5 minutes, cover and leave somewhere warm – beside the fire, not on it – for 30–60 minutes until roughly doubled. On a cold evening rising can take much longer, which is why many campers mix the yeast dough at home or before setting up camp.
Quick bannock vs. yeast twist bread
Baking powder
- Ready to cook in 5 minutes
- Works in cold weather
- Denser, scone-like crumb
- Best for pans and long trips
Yeast
- Needs 30–60 min rising, longer when cold
- Softer, fluffier, more flavour
- Great for twist bread and groups
- Best for car camping and events
Make a bannock premix at home
The smartest bannock trick happens in your kitchen. Weigh out portions of flour, baking powder, salt and milk powder into zip bags, one bag per meal. Label it with the amount of water and fat to add. At camp you just pour in water, squeeze the bag to mix, and you never need to carry separate tins or measure in the dark.
Keep the premix dry and airtight; baking powder loses strength when damp. Stored cool and dry, a premix keeps for several weeks. For packing tips and protecting food from moisture and animals, see storing food at camp. The trail food calorie planner helps you work out how many portions you need for a trip, and the bushcraft kit list shows where the bag fits into your pack.
Premix per person (one meal)
- 110 g plain flour (or 80 g plain + 30 g wholemeal)
- 1 level tsp baking powder
- 1 pinch salt
- 1 tbsp milk powder (optional)
- 1 tsp sugar (optional, helps browning)
- Label: "add 1 tbsp oil + about 70 ml water"
Campfire bread on a stick (twist bread)
Twist bread is the most fun way to cook bannock and the one children love. The trick is a good stick and patience over the embers.
Choosing and preparing the stick
Use a straight, green stick about thumb-thick (1.5–2.5 cm) and 1–1.5 m long. A thin stick gives a thin ring of dough that burns quickly; a thicker stick gives a hollow bread you can fill later. Stick to species you can identify with certainty and that are known to be safe, such as hazel or birch. Never use yew, laburnum, holly, or any wood you cannot identify, and never use painted, treated or pressure-impregnated timber. Peel the bark from the top 20–25 cm with a bushcraft knife – bark can taste bitter and carries dirt. If you cut sticks yourself, only do so where you are allowed; see our carving basics for safe knife technique.
How to bake twist bread
 1Warm the stick
Hold the peeled end over the embers for about a minute. Dough sticks better to a warm, dry stick and also cooks from the inside.
 2Roll a snake
Roll 80–100 g of dough between your palms into a snake about 1 cm thick and 40–50 cm long. Work from the middle outwards so it stays even.
 3Twist it on
Wind the dough in a spiral around the warm end with small gaps between the turns, then press both ends firmly so they cannot unroll.
 4Bake over embers
Hold the bread 15–20 cm above glowing coals – never in flames – and turn it slowly and continuously, a quarter turn every few seconds.
 5Test for doneness
After 10–15 minutes it should be golden brown all round, sound hollow when tapped and slide off the stick with a gentle twist.

Checkpoints while it bakes
- After 2–3 minutes: the dough turns from glossy to matt and firms up. If it already browns, you are too close.
- After 5–8 minutes: pale golden patches all round, and the spiral has swollen and closed most of the gaps.
- After 10–15 minutes: even golden brown, dry to the touch, and the bread turns loosely on the stick. That loose turn is the most reliable sign that the inside is baked.
A useful drill for beginners: bake the first twist bread of the evening as a test piece and break it open. You then know how long your embers need tonight and can time the rest of the group's bread to it.
Pan bannock: the traditional way
In the Canadian North, bannock is usually made in a frying pan. It is less fiddly than twist bread and feeds several people at once.
Press the dough into a round about 1.5–2 cm thick that fits your pan. Heat a little oil in the pan over low heat – a few coals raked to the edge of the fire, or the lowest stove setting. Cook for 6–10 minutes per side with a lid on, so the top sets in the trapped heat. Flip once. When both sides are golden and the bannock sounds hollow when tapped, it is done.
A heavy steel or cast-iron pan spreads heat evenly; thin aluminium pans burn the bottom easily. Our guide to bushcraft cookware compares materials. For a thicker, oven-baked bannock, a Dutch oven with coals on the lid works beautifully. You can also prop the pan upright facing the fire for the last few minutes to brown the top – the old "reflector" method.
Pan bannock step by step
 1Press a round
Flatten the dough with your palm into a round 1.5–2 cm thick, a little smaller than the pan. An even thickness gives an even bake.
 2Oil the pan on low heat
Rake a thin layer of coals to the edge of the fire and set the pan on stones above them. Add a little oil and wait until it just starts to shimmer.
 3Lid on
Lay in the round and cover the pan. Bake for 6–10 minutes; the trapped heat sets the top while the bottom browns.
 4Flip once
When the underside is golden and the edges look dry, turn the bannock with a spatula or by sliding it onto the lid and back. Bake the second side the same way.
 5Check it is done
Both sides golden, the sides firm and a hollow sound when tapped. If the bottom browns in under 5 minutes, halve the coals for the next one.
Ash cake and hot-stone bannock
No pan and no stick? Bannock can be baked straight in the fire, as people have done for centuries.
Ash cake: make a flat round of stiff dough about 1–1.5 cm thick. Rake a patch of hot, white ash and embers flat, lay the bread on it and cover with a thin layer of hot ash. Bake for about 5–8 minutes per side, then tap and brush off the ash. The crust will carry some ash; that is part of the method, but avoid ash from treated wood, rubbish or anything but clean natural wood.
Hot stone: heat a flat, dry stone beside the fire for 30 minutes and bake thin rounds on it like on a griddle. Never use stones from rivers or wet ground – trapped water can make them crack or burst violently when heated.
Baking an ash cake
 1Rake a flat bed
Pull hot, white ash and small embers into a level patch slightly larger than the bread. No flames and no big glowing logs.
 2Lay the round on it
Use a stiff dough pressed 1–1.5 cm thick. Softer dough soaks up ash and sticks.
 3Cover with hot ash
Spread a thin layer of hot ash over the top. Bake about 5–8 minutes, turn it with a stick and bake the other side the same way.
 4Tap and brush off
Lift it out, knock it against a log and brush off the loose ash. It is done when it sounds hollow and the crust is firm all over.
| Method | Dough thickness | Heat | Time | Best for |
|---|---|---|---|---|
| On a stick (twist bread) | 1 cm snake | Embers, 15–20 cm away | 10–15 min | Kids, groups, snacks |
| Pan with lid | 1.5–2 cm round | Low, few coals | 12–20 min total | Breakfast, several people |
| Dutch oven | 2–4 cm loaf | Coals below and on lid | 20–30 min | Bigger loaves, base camp |
| Ash cake | 1–1.5 cm round | Hot ash and embers | 10–15 min total | No gear at all |
| Hot stone | 0.5–1 cm flatbread | Preheated dry stone | 3–5 min per side | Flatbreads |
Bannock variations: savoury, sweet and wholemeal
The base dough is a blank canvas. Add extras to the premix or knead them in at camp.
- Savoury: grated hard cheese (20–30 g per person), dried herbs, garlic powder, chopped bacon or salami, a few chilli flakes. Use herbs you bought, not foraged ones.
- Sweet: 1–2 tsp sugar, cinnamon, raisins or chopped dried fruit, chocolate chips. Sweet dough burns faster, so bake further from the heat.
- Wholemeal: replace up to half the flour with wholemeal or spelt. It needs a little more water and gives a nuttier, more filling bread.
- Oat bannock: swap 20–30 % of the flour for fine oats – a nod to the Scottish original.
More camp meals that pair well with bannock – stews, soups and one-pot dishes – are in our bushcraft recipes.
How many calories are in bannock?
Plain wheat flour provides roughly 340–360 kcal per 100 g, and oil or butter about 7–9 kcal per gram. A typical portion of 110 g flour with 1 tbsp oil and some milk powder therefore comes to an estimated 450–550 kcal. The premix itself has an energy density of around 3.5–4 kcal per gram – comparable to the "standard" setting in our calorie planner.
Estimated energy per portion
These are rough estimates; exact values depend on your flour, fat and extras. Check the nutrition labels on your ingredients if you need precise numbers.
Twist bread with kids: safety first
Bread on a stick is often a child's first real campfire job. With a few rules it is safe and a lot of fun.
Kids and campfire bread checklist
- An adult supervises the fire at all times
- Mark a safety ring of about 1–1.5 m around the fire with stones or a stick in the ground
- Use long sticks (1–1.5 m) so children can stay well back
- Adults cut and peel sticks in advance; children only carve with instruction and a safe knife
- Tie back long hair, avoid loose scarves and synthetic clothing near the fire
- No running or play-fighting with sticks around the fire
- Let the bread cool for a minute – molten fillings and steam burn mouths
- Keep cool water ready for burns
Bannock troubleshooting: raw inside, burnt outside
Nearly every bannock problem comes down to too much heat, too thick a dough, or the wrong water content.

| Method | Look | Touch and sound | If in doubt |
|---|---|---|---|
| Twist bread | Even golden brown all round | Dry surface, turns loosely on the stick, hollow tap | Pull one off and break it open: the inside should be airy, not wet |
| Pan bannock | Golden on both sides, dry edges | Firm when pressed in the middle, hollow tap | Push in a clean splinter: it should come out without wet dough |
| Ash cake | Firm crust, no soft patches | Hollow knock after brushing | Give it 2–3 more minutes per side in the ash |
| Dutch oven loaf | Browned top, loaf pulls away from the wall | Hollow tap on the bottom | Splinter test in the thickest part |
| Problem | Likely cause | Fix |
|---|---|---|
| Raw and doughy inside | Too hot and too fast, or dough too thick | Thinner snake or round, more distance, longer time; warm the stick first |
| Burnt outside | Held in flames or too close to coals | Bake over embers only, 15–20 cm away, turn constantly |
| Dough falls off the stick | Dough too wet or stick too thin and smooth | Add flour, use a thicker stick, press the ends firmly |
| Dense and hard | Old baking powder, overworked or too dry | Fresh premix, knead briefly, a little more water |
| Sticky, will not shape | Too much water | Dust with flour, oil your hands |
| Bitter taste | Bark left on, resinous or unknown wood | Peel the stick, use known safe hardwood |
The right fire for baking bread
Bread needs steady, moderate heat from embers. A small fire of dry hardwood – beech, oak, birch or ash – burned down for 20–30 minutes gives a bed of coals that lasts long enough for a round of twist bread. A keyhole fire, with a flame side for feeding and an ember side for baking, is ideal for groups; see fire lays. The firewood calculator estimates how much fuel you need.
Check local fire rules before you light anything. Open fires are banned in many forests and parks, especially in dry periods, and rules vary by country and region. Our campfire safety guide covers safe fire sites, fire bans and putting a fire out completely. For more ideas, head back to the cooking hub.
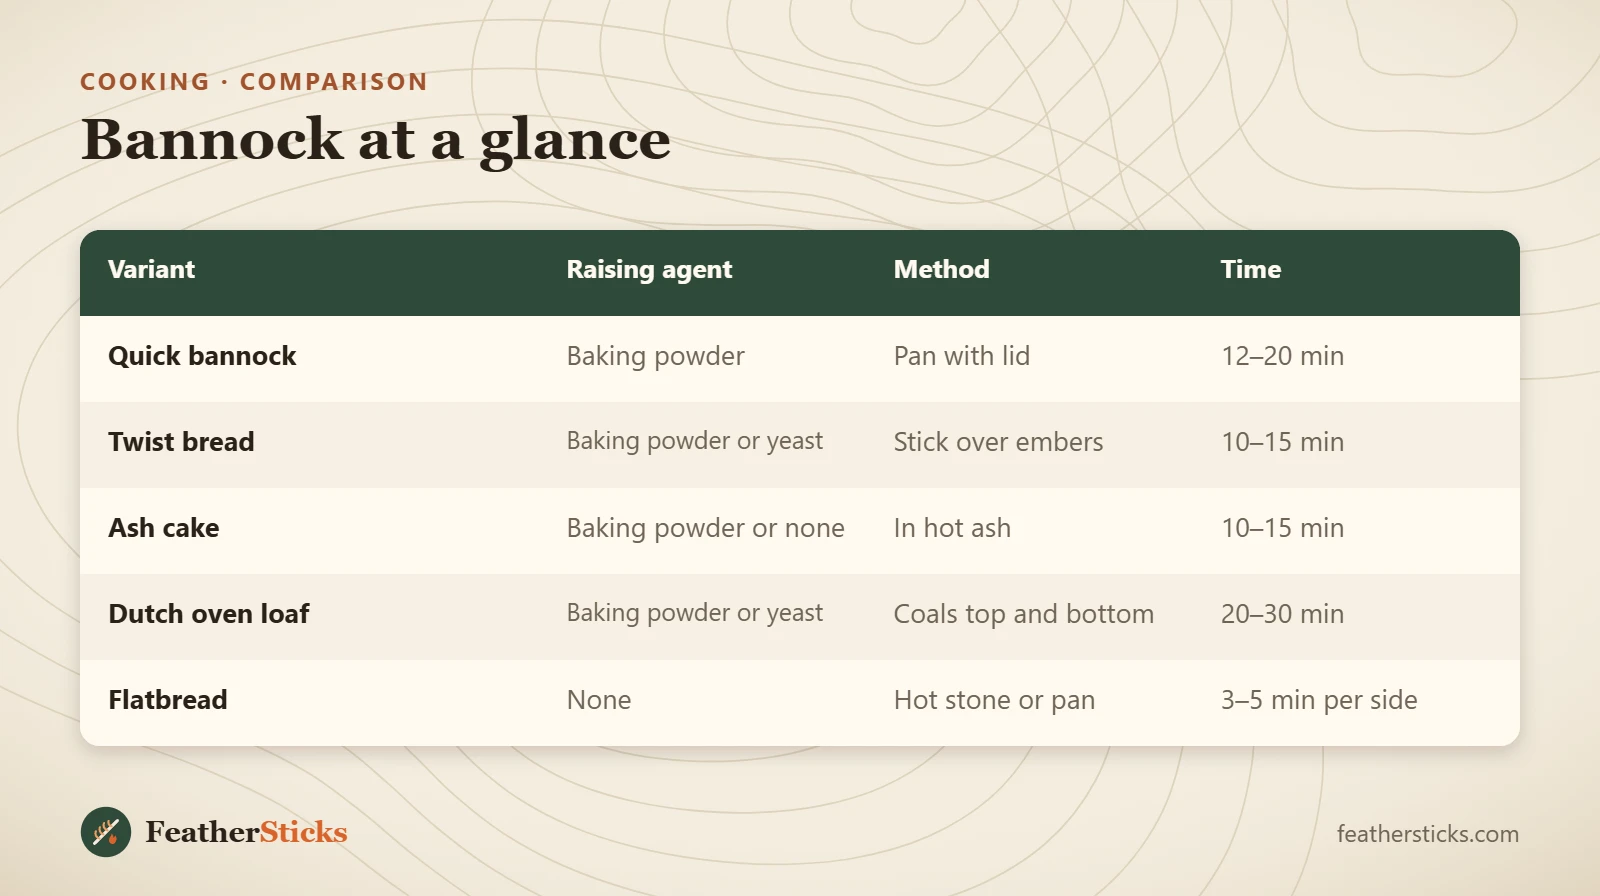
| Variant | Raising agent | Method | Time |
|---|---|---|---|
| Quick bannock | Baking powder | Pan with lid | 12–20 min |
| Twist bread | Baking powder or yeast | Stick over embers | 10–15 min |
| Ash cake | Baking powder or none | In hot ash | 10–15 min |
| Dutch oven loaf | Baking powder or yeast | Coals top and bottom | 20–30 min |
| Flatbread | None | Hot stone or pan | 3–5 min per side |
Common mistakes
- Baking in flames instead of over embers, so the bread burns outside and stays raw inside.
- Making the dough too wet, so it slides off the stick.
- Using a thin, dry or unidentified stick – or treated wood.
- Letting baking-powder dough sit for an hour before cooking.
- Packing baking powder where it gets damp.
- Letting children crowd the fire without a safety ring and supervision.
What you need
- Pre-weighed premix in zip bags
- Small bottle of cooking oil
- Knife for peeling sticks
- Frying pan with lid
- Collapsible water bottle or mug for measuring
- Heat-resistant glove
- Burn dressings in the first aid kit