Tools
Bushcraft Knives: How to Choose, Use and Carry One Safely
A bushcraft knife is a sturdy fixed-blade knife with a blade of roughly 9–11 cm, a full or wide tang, a simple grind that is easy to sharpen in the field and a handle that stays secure when wet. It carves feather sticks, prepares food, makes tent pegs and pot hangers and splits small wood. It is not a tactical or "survival" monster: simple, medium-sized and sharp beats big and aggressive.
This guide explains every decision in turn: blade shape, grind (Scandi, flat, convex, sabre, hollow), carbon or stainless steel, tang, handle, length, sheath, safe grips and the law. When you have chosen, continue with sharpening in the field and carving basics, or go back to the tools overview.
Step by step
-
1
Choose a fixed blade
Pick a fixed-blade knife with a 9–11 cm blade and a full or wide tang. It is stronger and safer than a folder for carving and splitting.
-
2
Pick the grind for your jobs
A Scandi grind is easy to sharpen and bites cleanly into wood. Flat and convex grinds slice food better and are more robust.
-
3
Check handle and sheath
The handle should fill your hand without hot spots. The sheath must hold the knife securely upside down and protect the edge.
-
4
Clear the blood circle
Stretch out your arm with the sheathed knife and turn once. Nobody should be inside that circle while you work.
-
5
Keep it sharp, dry and oiled
Dry the blade after use and wipe a thin film of oil onto carbon steel. Strop spine first, before the edge gets dull.
What makes a good bushcraft knife?
The best bushcraft knife is the one you can use safely for hours: comfortable, controllable and easy to keep sharp. Almost every experienced instructor ends up recommending the same basic pattern, because it has proved itself over generations of woodland use in Scandinavia, Britain and North America.
Think of the knife as the centre of a small tool system. The folding saw cuts wood to length, the axe or hatchet splits and shapes larger pieces, and the knife does everything fine: carving, notching, scraping tinder, preparing food. Because the saw and axe take the heavy jobs, the knife does not need to be large.
The classic bushcraft knife at a glance
- Blade length
- 9–11 cm; up to 12–13 cm if it also has to replace a small hatchet
- Blade thickness
- 3–4 mm at the spine
- Blade shape
- Drop point or spear point with a straight or gently curved edge
- Grind
- Scandi (woodwork) or flat/convex (all-round)
- Steel
- Carbon or tough stainless, about 56–60 HRC
- Tang
- Full tang or a wide, well-fitted stick tang
- Handle
- 10–12 cm long, oval cross-section, no sharp edges
- Sheath
- Secure retention, drain hole, belt or neck carry
- Weight
- Around 120–250 g including handle
A few features are worth checking before anything else: a sharp 90° spine (to strike a ferro rod and scrape bark without dulling the edge), a tip that sits roughly in line with the handle (for precise drilling and control) and no serrations — serrated sections are hard to sharpen and useless for carving.

Blade shapes: drop point, spear point and others
The blade shape decides where the tip sits and how much straight edge you have for carving. For bushcraft, you want a strong, controllable tip and a long working edge close to the handle, where leverage is greatest.

- Drop point – the spine curves gently down to a strong tip that sits slightly below the spine line. It has a little belly for food and skinning, a controllable tip for drilling and a long straight section for carving. This is the best all-rounder.
- Spear point (classic Scandi style) – the tip sits in the centre of the blade, in line with the handle. It feels symmetrical, drills precisely and carves beautifully, but has less belly for slicing on a board.
- Clip point – the spine is "clipped" to a fine, raised tip. Good for piercing and detail work, but the thin tip snaps if you pry with it.
- Sheepsfoot and Wharncliffe – a straight edge with a blunt or very low tip. Safe and excellent for whittling, poor for drilling holes. A fine second knife, less ideal as the only one.
- Tanto and recurve blades – designed for piercing or aggressive slicing. The angular or concave edges are hard to sharpen on a flat stone and awkward to carve with. Avoid them for bushcraft.
Most people are best served by a drop point: it carves, it cuts food, it drills a bow-drill socket and it survives being used as a wedge now and then. A straight or only slightly curved edge is easier to sharpen evenly than a pronounced belly or recurve, because the whole edge meets the stone at the same angle without lifting the handle.
Also look at where the edge begins. A short unsharpened section (ricasso) in front of the handle is normal, but a long one wastes the part of the edge where you have the most leverage and control for carving notches.
Blade height and spine
A blade height of 22–28 mm gives enough "wedge" for splitting and enough room for your knuckles on a board. The spine should be ground to a crisp 90° corner. If a new knife has a rounded spine, a few strokes on a file or coarse stone make it ferro-ready — see field sharpening.
Knife grinds explained: Scandi, flat, convex, sabre, hollow
The grind is the cross-section of the blade from spine to edge. It influences how the knife cuts, how robust the edge is and — crucially in the woods — how easy it is to sharpen with a small stone.

| Grind | Cross-section | Woodwork | Food | Field sharpening | Edge robustness |
|---|---|---|---|---|---|
| Scandi (zero secondary bevel) | One wide flat bevel on each side, meeting at the edge | Excellent – bevel guides the cut | Good, a little wedgy | Very easy: lay bevel flat | Medium |
| Scandi with micro-bevel | As above plus a tiny steeper edge bevel | Very good | Good | Easy | Good |
| Flat (full flat) + secondary bevel | Tapers from spine to a small edge bevel | Good | Excellent slicer | Medium: hold the angle | Good |
| Convex | Curved, like an apple seed | Good, very strong | Good | Medium: strop or rock on a stone | Excellent |
| Sabre (high/low flat) | Flat grind starting halfway down the blade | Good | Good | Medium | Very good, thick spine |
| Hollow | Concave, thin behind the edge | Poor – chatters, edge rolls | Excellent slicer | Easy | Low |
Scandi vs flat grind
Scandi grind
- Wide bevel acts as a built-in angle guide when sharpening
- Bites into wood and holds a controlled depth – ideal for feather sticks and carving
- Easy to restore with a single stone and a strop
- Thin edge can chip on knots or frozen wood
- Wedge shape splits food rather than slicing it
Flat grind
- Thin behind the edge, slices food and cordage beautifully
- Small secondary bevel is more robust than a zero edge
- Needs a steady hand or guide to hold the angle
- Slightly less "bite" for controlled carving cuts
- Good all-round choice if you cook and carve equally
Which grind is best for bushcraft?
If woodwork is your main interest, choose a Scandi grind. It is the traditional Nordic choice for good reasons: you can feel when the bevel lies flat on the stone, so even beginners sharpen it correctly. If you mostly cook, fish and cut cord, a flat or convex grind is more versatile. A Scandi with a very small micro-bevel is a popular compromise: it keeps most of the carving control but resists chipping.
Avoid deep hollow grinds for hard use. They are superb razors but the thin edge rolls when you carve hard wood or baton through small logs.
Carbon or stainless steel for a bushcraft knife?
Both steel families make excellent bushcraft knives. The difference is mostly about maintenance and how the edge behaves in the field. Heat treatment matters more than the name of the steel: a well-hardened simple steel beats a badly treated "super steel" every time.
Carbon steel: keen, tough, needs care
Carbon steels take a very keen edge and are easy to sharpen on simple stones, even a smooth river pebble in an emergency. At the same hardness they tend to be tougher, so the edge rolls or dents rather than chipping. The back of a carbon blade throws sparks from a flint for traditional flint and steel fire lighting. The price: carbon steel rusts quickly when left wet, and acidic food (apples, onions) stains it within minutes. Over time it develops a grey-blue patina, which offers some protection.
Stainless steel: low maintenance
Stainless steels contain at least around 12–13 % chromium, which forms a protective layer. They suit wet climates, fishing trips and salt water and do not discolour food. Modern fine-grained stainless grades sharpen almost as easily as carbon steel. Some high-alloy grades hold an edge for a long time but are hard to restore with small field stones — you may need a diamond plate. Stainless is rust-resistant, not rust-proof: still clean and dry it.
| Steel type | Examples of grade names | Typical hardness | Character |
|---|---|---|---|
| Simple high-carbon | 1075, 1095, C75, C100 | 56–60 HRC | Very easy to sharpen, tough, rusts |
| Low-alloy carbon/tool steel | 80CrV2, O1, 1.2519 | 57–61 HRC | Tough, keen edge, rusts, popular for bushcraft |
| Fine-grained stainless | 12C27, 14C28N, AEB-L type | 57–60 HRC | Easy to sharpen, good edge, low care |
| Mid-range stainless | 420HC, 440C, N690 type | 56–60 HRC | Good all-round, varies with heat treatment |
| Powder / high-alloy | Various PM steels | 59–64 HRC | Long edge retention, harder to sharpen in the field |
| Laminated | Hard core between softer layers | Core 58–62 HRC | Hard edge with tough, forgiving body |
Grade names are given only as orientation; performance depends mainly on heat treatment and geometry.
What does hardness (HRC) mean for you?
Hardness is measured on the Rockwell C scale. Around 56–58 HRC, an edge is tough and very easy to sharpen but dulls sooner. Around 59–61 HRC, it holds longer but needs more care against chipping on knots and frozen wood. Above 62 HRC, you usually need diamond abrasives in the field. For a knife that is sharpened on a small stone by the campfire, the middle of the range is the sweet spot.
Rule of thumb: if you are disciplined about drying and oiling, carbon steel is a joy. If your knife often goes back into the sheath wet — rain, fish, fruit — choose stainless. For a first knife, a fine-grained stainless or a low-alloy carbon steel around 58 HRC is hard to beat.
Full tang, hidden tang or stick tang?
The tang is the part of the blade that continues into the handle. It carries all the leverage when you pry, split or baton, so it matters more than most buyers realise.
Tang types from strongest to weakest
- Steel runs the full length and width of the handle, scales riveted or screwed on. Strongest; slightly heavier.
- Wide tang through most of the handle, glued or pinned. Very strong in practice, lighter.
- Narrower tang through a one-piece handle, often peened. Traditional Nordic design; fine for carving, gentle batoning.
- Thin rod welded to the blade. Weak point at the transition. Avoid for bushcraft.
A full tang gives the greatest margin of safety if you plan to split wood with a baton. But many traditional stick-tang knives have served woodworkers for a lifetime — they simply are not meant to be used as crowbars. Whatever the construction, never pry sideways with the tip; that breaks more knives than anything else.
Handle shape and materials
You will hold your knife for hours while carving, so the handle is as important as the blade. A good handle is 10–12 cm long, oval rather than round (so you feel where the edge is), free of sharp corners and has a slight swell that keeps your hand from sliding forward.
Handle materials compared
- Wood (birch, curly birch, oak, walnut): warm in the cold and grippy when oiled rather than varnished. Needs occasional oil and can crack if it is soaked and dried repeatedly.
- Stabilised wood: wood impregnated with resin — the look of wood with almost no maintenance.
- Micarta (resin-bonded linen or canvas): very durable and actually grips better when wet. A favourite for hard use.
- Rubber and polymer: excellent grip in rain and cold, cheap and warm; soft rubber can degrade after many years in sun and heat.
- Antler and bone: traditional and handsome, but can be slippery with wet or greasy hands.
- G10 (glass-fibre laminate): indestructible and maintenance-free, but it feels cold in winter and smooth versions get slick.
A small finger guard or choil helps stop your hand slipping onto the edge, but a large guard gets in the way during close carving. Many Scandinavian designs have no guard at all and rely on the handle's swell and correct grips. If you are new to knife work, a modest guard adds a margin of safety. Bright colours or a lanyard hole make a dropped knife easier to find in leaf litter.
How to test a handle: hold the knife in forehand, reverse and chest-lever grip and look for pressure points. The butt should not dig into your palm. Close your eyes — with an oval cross-section you can feel which way the edge faces. Wet your hands under the tap and try again, and if you work in winter, try it with gloves. Finally check for gaps between tang and scales where water and dirt could collect.
What blade length is best for bushcraft?
For most people the answer is 9–11 cm (about 3.5–4.5 in). That is long enough to baton through wrist-thick wood and short enough to carve spoons, make feather sticks and cut food precisely. Longer blades move your hand away from the work and make fine cuts clumsy; shorter blades struggle with splitting.
| Blade length | Best for | Limitations |
|---|---|---|
| 5–8 cm | Fine carving, whittling, a light second knife (sloyd-type carving knives) | Too short for batoning |
| 9–11 cm | All-round bushcraft: carving, fire prep, food, light splitting | Not a chopper |
| 12–15 cm | Knife plus light chopping when you carry no axe | Less precise; legal limits in some countries (e.g. over 12 cm in Germany) |
| 16–25 cm | Large camp knives, machete tasks in tropical vegetation | Heavy, poor carver; often restricted in public |
Quick decision: which knife size do I need?
Will you carry a saw and/or hatchet?
Yes → A 9–11 cm blade is enough – let the other tools do the heavy work.No → Consider 11–13 cm and a thicker spine, but a small saw is still the better investment.Is carving (spoons, pegs) your main interest?
Yes → Choose a Scandi grind around 9–10 cm, perhaps plus a carving knife.No → A flat or convex drop point of 10–11 cm is the most versatile.Do you travel through towns or on public transport a lot?
Yes → Check local knife laws; a shorter blade or a legal folder for the journey may be sensible.No → Pick what suits the work, then carry it responsibly.
Choosing and carrying a sheath
A knife is only as safe as its sheath. The sheath must hold the knife when turned upside down and shaken, protect the edge from cutting through, and let you draw and re-sheath with one hand without looking at your fingers.
Leather sheaths are quiet, traditional and comfortable; a good one has a plastic or wooden insert so the edge cannot cut through the stitching. Leather absorbs water, though, and can rust a carbon blade if the knife stays in a wet sheath. Kydex and other thermoplastics are waterproof, click positively into place and are easy to rinse, but they are noisy and can scratch the blade finish. Moulded plastic sheaths are light, cheap and drain well; their retention may loosen over the years. Nylon sheaths often have handy pockets for a stone or ferro rod but need a solid liner.
Carry options: on the belt (classic, quick access), dangler (hangs lower, clears a backpack hip belt), neck carry (for small knives only) or inside the pack. When you walk through towns or travel, the pack — not the belt — is usually the right place. Never store a carbon-steel knife long-term in a leather sheath: leather holds moisture and tanning chemicals.
Re-sheathing safely
Many cuts happen not while carving but while putting the knife away. Finish the cut, then look at the sheath mouth instead of doing it blind. Hold the sheath at the back, well away from the opening, slide the spine along the back of the sheath so the edge points away from your fingers, and push home until it clicks or seats firmly. A gentle tug confirms that it is locked. If a retention strap is fitted, close it every time.
Re-sheathing a knife in four moves
 1Finish, then look
Complete the cut, then look at the sheath mouth. The typical error: sheathing blind while talking or watching the fire.
 2Hold the sheath low
Grip the sheath low at the back, well away from the mouth, so no finger lies across the opening.
 3Spine along the back
Set the tip in and slide the spine along the back of the sheath, edge away from your fingers. Push straight down — a twisted blade can cut leather stitching.
 4Click, then tug
Push home until it clicks, close any strap and give a gentle tug. If it moves, see the troubleshooting table below.
Knife safety: the blood circle and safe grips
Most outdoor knife injuries are cuts to the free hand, the thigh or the knee, caused by a blade slipping out of a cut. A few habits reduce that risk dramatically. They are the same habits taught in any good bushcraft course for beginners.
The blood circle (safety circle)
Before you start, hold the sheathed knife at arm's length and turn around slowly. Nobody — and no tarp, guy line or pack — should be inside that circle. If someone approaches, stop cutting. When passing a knife, hand it over handle first with the edge facing away from both of you, or put it down and let the other person pick it up.
Handing a knife over safely
 1Handle first, edge away
Hold the blade by the spine, edge down and away from both of you, and offer the handle into the other person's open hand. Your fingers never wrap around the edge.
 2Confirm before letting go
The receiver grips the handle: "Got it?" — "Got it!". Let go only then. Pulling while the giver still holds on drags the blade through fingers.
 3Or put it down
Lay the knife on a log, handle towards the other person, and step back. The simplest method, and the one to teach children first.

The red zone runs along the inside of both thighs from groin to knee. A stick propped between the knees, a forehand cut that ends in the lap or a knee lock on the inside of the knee all send the edge into it. If a cut feels awkward, move the work, not your legs.
The five grips, frame by frame
Every safe grip either sends the edge away from your body or limits how far it can travel, so a slip stops before it reaches you.
The five grips every bushcrafter should know
 1Forehand, cut away
Full fist, edge down, cutting down and away along the stick. Brace the far end on a log; the free hand holds the near end, behind the blade. Typical error: bracing the stick on your thigh.
 2Chest lever
Both hands close to the chest, blade across the wood. Pull your shoulders back so the hands move apart: short, powerful cuts that stop when your shoulder blades meet. If the hands drift forward, you lose that brake.
 3Knee lock
Brace the knife fist on the outside of the knee, edge up, and keep it still. The other hand pulls the wood past the edge for long, even shavings. The fist never leaves the knee.
 4Thumb push
The free hand holds the stick and its thumb pushes on the spine for small, precise cuts such as notches; the knife hand only steers. The thumb stays behind the edge.
 5Pull cut towards the thumb
A short paring cut towards the thumb, like peeling an apple. The thumb rests below the cut line, taped or guarded. Only with a very sharp knife, never for power.
The detailed technique, with practice exercises for each grip, is in our carving guide. Rules that apply every time:
- Sit down for carving. Standing cuts are harder to control and a slip goes further.
- Cut away from the body unless you are using a controlled grip such as the chest lever.
- Keep the free hand behind the edge, never in front of or beneath the cutting line.
- A sharp knife is safer than a dull one: it needs less force and follows your intention.
- Sheath it the moment you put it down. A knife stuck in a log or lying in the leaves is a trap.
- Stop when tired, cold or hurried. Most accidents happen in the last minutes before dark.
- Children learn with rounded-tip knives, close supervision and one grip at a time.
What a safe carving position should look like
- Seated on a log or sit pad, feet flat — not standing over the work
- Knife elbow or forearm braced on the knee or body, so the arm cannot swing through
- Free hand behind the edge, never in front of or under the cutting line
- Work outside the knee or braced on a log, never between the thighs
- Every cut away from body and legs, except the controlled grips above
- Blood circle clear; sheath and first aid kit within reach
Knife troubleshooting and a practice drill
When a knife "does not work", the cause is usually the edge, the angle or the grip rather than the knife itself. Start with the symptom you notice and work through the fix before blaming the steel.
| Symptom | Likely cause | Fix |
|---|---|---|
| Knife slips out of the cut | Blade angle too steep, dull edge, long forced strokes | Lay the bevel flatter, take shorter cuts, sharpen; brace the work |
| Cuts tear instead of shaving | Dull or rolled edge, cutting against the grain | Strop or hone (sharpening guide); turn the stick and cut with the grain |
| Hand cramps or hot spots | Gripping too tight, handle too small or with sharp corners | Relax between cuts, round off corners, wear a thin glove |
| Blade chatters | Angle too high, wood hard or frozen | Let the bevel ride on the wood, take thinner cuts |
| Knife falls out of the sheath | Worn retention, stretched wet leather, dirt | Rinse, dry leather slowly, add a strap or replace the sheath |
| Rust spots | Put away wet, acidic food, damp leather | Fine abrasive pad and oil; dry and oil after every use |
A short practice drill: one grip per session
Grips become safe through repetition. Take a straight, dry, thumb-thick stick, sit down, clear your blood circle and practise one grip per session:
- Check the edge on paper; strop if it snags.
- 20 controlled cuts with the chosen grip, resetting after each one.
- Check the shavings: long, even curls mean a good angle; dust and chips mean the edge or angle needs work.
- Try stick: finish with one notch — a stop cut and a slanted cut into it — using the thumb push.
Then combine the grips on a tent peg or a feather stick. Spoons and pot hooks follow in carving basics; hook and sloyd knives in carving tools.
Everyday jobs for your bushcraft knife
A good knife earns its place by doing many small jobs well. Knowing the jobs also helps you choose features.
- Fire preparation: carving feather sticks, splitting kindling and shaving curls needs a keen Scandi or flat edge. The whole sequence from tinder to fuel is in fire starting basics.
- Scraping tinder: the sharp spine scrapes birch bark, dry grass and fatwood dust into a fine tinder pile without dulling the edge.
- Striking a ferro rod: always with the crisp 90° spine, never the edge — it chips the edge and gives fewer sparks.
- Splitting small wood: needs a solid tang, a 3–4 mm spine and a blade longer than the log is thick. How and when to do it is covered in batoning safely.
- Camp crafts: tent pegs, pot hangers, spoons and toggles call for a controllable tip and a comfortable handle — see carving basics.
- Food: slicing vegetables and preparing fish for campfire cooking is easier with a flat or convex grind and stainless or well-oiled carbon steel.
- Cord and fibres: cutting paracord for tarp setups and processing plant fibres for natural cordage needs a sharp, fine edge.
Notice what is missing: chopping trees, digging and prying. Those jobs belong to the saw, the axe and a trowel. A knife used as a crowbar or shovel loses its edge and eventually its tip.
Buying your first bushcraft knife: what to look for
You do not need an expensive custom knife to start. Many simple, inexpensive Nordic-pattern knives with a Scandi grind and a plastic sheath carve superbly and are ideal for learning, because you will not be afraid to sharpen them — and make mistakes while sharpening. Spend more later, once you know which features you really value.
Before buying, check these points in order of importance: a blade length of about 9–11 cm, a grind you can sharpen yourself, a comfortable handle, a sheath that holds the knife securely, a sharp 90° spine and solid construction. Decorative extras such as serrations, saw backs, hollow handles with "survival kits" or compasses in the pommel reduce strength and usually get in the way.
Your knife is one item in a balanced kit. See the bushcraft kit list or plan a complete, weighted packing list with the Kit Builder — and budget for a folding saw early on, because it takes the heaviest work off the knife.
Knife care and maintenance
A little care keeps a knife working for decades. The two enemies are moisture (rust, handle cracks) and neglect of the edge (letting it get so dull that a full re-grind is needed).
Care routine after every trip
- Wipe the blade clean and dry, including the area near the handle where moisture hides.
- Oil carbon steel with a thin film of food-safe oil such as mineral or camellia oil.
- Strop the edge; hone it on a fine stone if it no longer slices paper cleanly.
- Dry a leather sheath slowly at room temperature, never next to a stove or radiator — hot leather shrinks and cracks.
- Oil unsealed wooden handles occasionally with a drying oil.
- Store the knife out of the sheath in a dry place.
In the field, a small double-sided stone and a strop are enough to keep the edge in shape; the full technique, angles and grits are in our sharpening guide. Rust spots on carbon steel can be removed with a fine abrasive pad and oil; a forced patina (for example from vinegar or mustard) gives some protection but is no substitute for drying.
Knife laws: carrying a bushcraft knife legally
Knife laws vary widely by country, state and even city, and they change. What is normal equipment in a Swedish forest can be an offence on a British high street. The following overview is general orientation, not legal advice — always check the current rules where you live and travel.
| Region | General situation |
|---|---|
| United Kingdom | Carrying a bladed article in public without "good reason" is an offence. Non-locking folding knives with a cutting edge under 3 in (7.62 cm) are the general exception. A fixed blade for a genuine bushcraft trip may count as good reason, but carry it in the pack, not on the belt, when you are in public places. |
| United States | Laws differ by state and city (blade length limits, concealed carry, some knife types). Federal land may have extra rules. Check state and local law. |
| Canada | Carrying a knife for a utility purpose is generally accepted; carrying one for self-defence or concealing it can be an offence. Some knife types are prohibited. |
| Scandinavia | Knives are common outdoor tools, but carrying them in public places without a legitimate purpose is restricted in Norway, Sweden and Denmark; Denmark is particularly strict. |
| Germany | Section 42a of the Weapons Act restricts carrying one-hand-opening knives and fixed blades over 12 cm in public without a legitimate interest; knife-free zones and a knife ban at many public events apply. See the German version of this page. |
Practical rules that work almost everywhere
- Carry the knife only where you actually need it — in the woods, at camp, on the river.
- On the way there, transport it in the pack, ideally in a closed container, not on the belt or in a pocket.
- Never take it to schools, public events, public buildings or into aircraft hand luggage.
- Never present or describe it as a weapon, and never carry it "for self-defence" — in many countries that alone turns a tool into an offence.
- Landowner, park and nature-reserve rules also apply, including rules about cutting living wood — see wild camping rules and our beginner's guide.
Kept this way, a bushcraft knife is what it should be: a woodworking and camp tool, carried discreetly and used with respect.
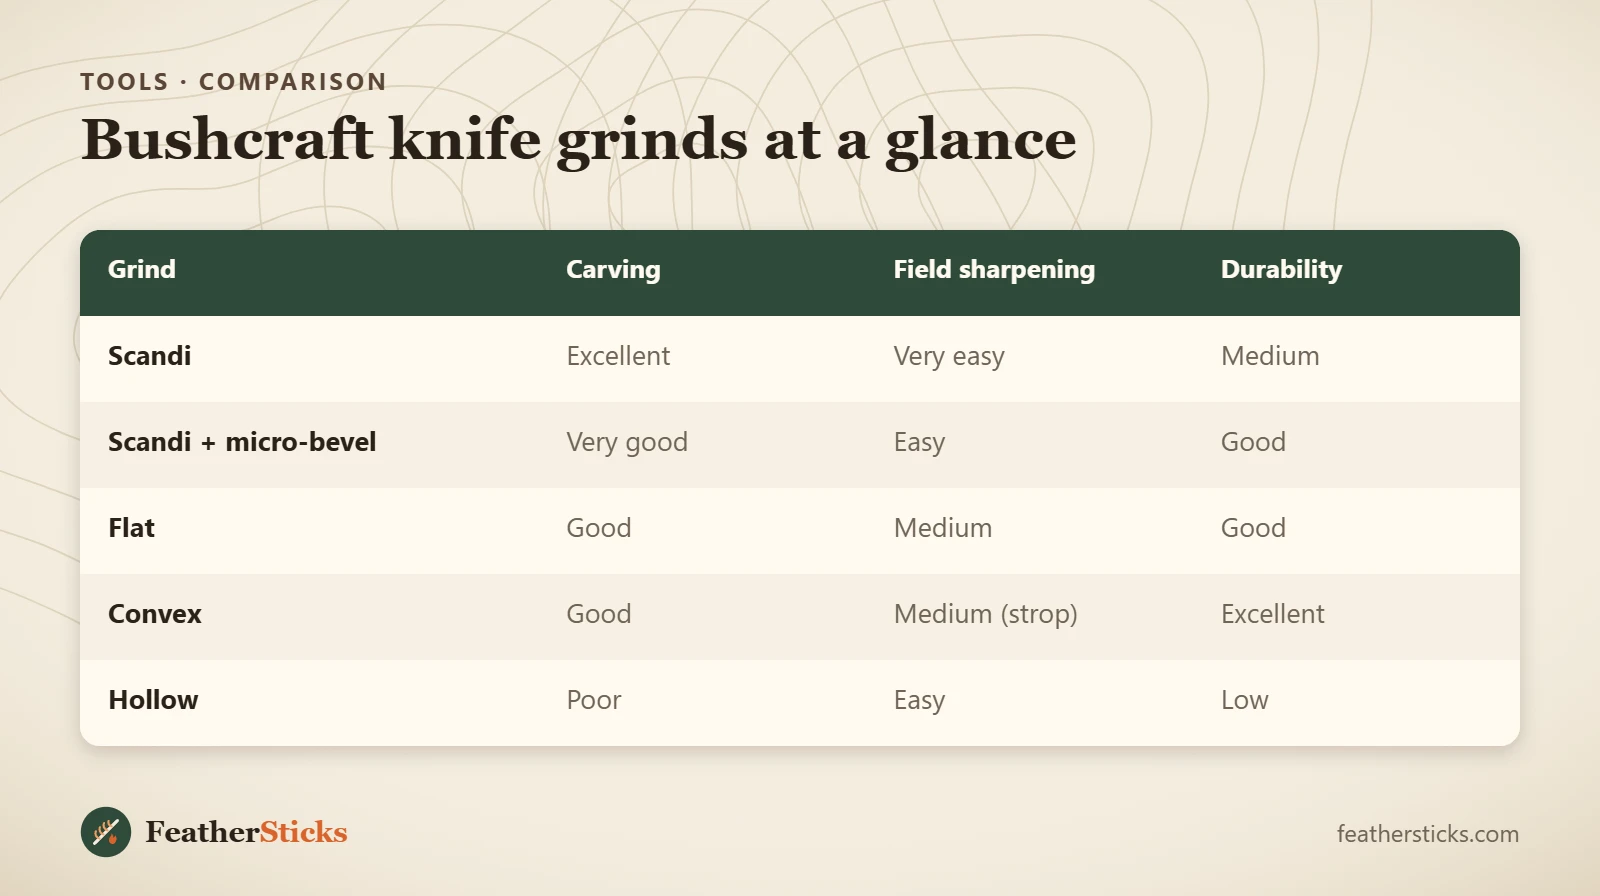
| Grind | Carving | Field sharpening | Durability |
|---|---|---|---|
| Scandi | Excellent | Very easy | Medium |
| Scandi + micro-bevel | Very good | Easy | Good |
| Flat | Good | Medium | Good |
| Convex | Good | Medium (strop) | Excellent |
| Hollow | Poor | Easy | Low |
Common mistakes
- Buying a huge "survival" knife: too heavy for carving, too short for chopping.
- Cutting towards your hand, thigh or knee, or working with the wood between your legs.
- Striking a ferro rod with the edge instead of the 90° spine.
- Prying sideways with the tip – it snaps.
- Putting carbon steel away wet or leaving it in a damp leather sheath.
- Letting the edge get completely dull before sharpening.
- Wearing a fixed blade openly on the belt in towns or on public transport.
What you need
- Fixed-blade knife, 9–11 cm, with a secure sheath
- Small double-sided sharpening stone or diamond plate
- Leather strop with compound
- Food-safe oil (mineral or camellia oil)
- Hardwood baton for splitting
- Pressure bandage in your first aid kit