Skills
Natural Cordage: How to Make Rope from Plant Fibres
Natural cordage is string or rope twisted from plant fibres such as stinging nettle, the inner bark (bast) of lime and willow, cattail leaves or split spruce roots. With nothing more than a knife and your hands, you can turn a handful of stems into a cord strong enough for lashings, a bow drill, a pot hanger or tying a bundle of firewood.
This guide explains which fibres work best, how to harvest them ethically and legally, how to process each one, and how to twist two-ply cord with the classic reverse wrap. It also shows honestly where natural cordage falls short of modern paracord. Cordage-making is one of the traditional bushcraft skills, and it pairs naturally with essential knots and our bushcraft for beginners guide.
Step by step
-
1
Harvest fibres responsibly
Take mature nettle stems or bark and roots only with the landowner's permission and in small amounts, away from protected areas.
-
2
Extract the fibres
Crush and split nettle stems, strip the woody core, or peel and soak bark until the bast layers separate.
-
3
Dry, then dampen
Dry fibres to store them. Dampen them slightly before twisting so they are supple and do not crack.
-
4
Twist with the reverse wrap
Fold a bundle off-centre, twist the far strand away from you, wrap it towards you over the other. Repeat.
-
5
Splice, finish and test
Add fibres before a strand runs out, tie off the end with an overhand knot and load-test gradually.
What is natural cordage — and why make it?
Cordage is any flexible line made by twisting fibres together. Twisting is the trick: a single fibre is weak and short, but when two twisted bundles are wrapped around each other in the opposite direction, the tension in each strand locks the other in place. The result is a cord that is far stronger than its loose fibres and can be made as long as you like by adding more material.
People have made string this way for an extraordinarily long time — archaeologists have found evidence of twisted plant fibres tens of thousands of years old, and the famous Alpine "Iceman" carried items made from lime bast. For a modern bushcrafter, making cordage is less about survival than about understanding plants, seasons and materials. It teaches you to see fibre everywhere, and it gives you a backup when you run out of paracord.
Be realistic, though: hand-made cordage takes time — often half an hour or more per metre for a neat two-ply cord, not counting harvesting and drying. It is ideal for small jobs, crafts and practice, not for replacing the 20 metres of line you need for a tarp ridgeline.
The best natural fibres for cordage
In temperate forests five materials cover almost every need. They differ in when to harvest, how much work they take and how strong the final cord is.
| Fibre | Part used | Best season | Processing | Typical use |
|---|---|---|---|---|
| Stinging nettle | Stem fibres (outer bast) | Late summer to winter (mature or dead stalks) | Crush, split, remove core; dry | Fine, strong string; bow drill cords, nets, sewing |
| Lime / basswood bast | Inner bark | Late spring to early summer (sap rising) | Peel bark, ret in water for weeks, separate layers | Strong rope and cord, mats, containers |
| Willow bark | Inner bark of young shoots | Spring and summer | Peel, separate inner bark; use green or dry and soak | Quick lashings, baskets, medium cord |
| Cattail (reed mace) | Leaves | Late summer to autumn | Dry, then dampen before twisting | Mats, quick ties, practice cord |
| Spruce roots | Thin surface roots | Spring to autumn (unfrozen soil) | Dig, heat or soak, peel, split | Lashings, sewing birch bark, basketry |
Many other plants yield fibre — bramble, clematis, dogbane and milkweed in North America, yucca in drier regions, grasses and sedges almost everywhere — but the five above are widely available in European and North American woodland and illustrate all the main processing methods: crushing and stripping, retting, peeling and splitting. Whatever you use, check that the plant is not protected where you are.

Harvesting fibres ethically and legally
Every fibre comes from a living system, and in most countries the plants and trees belong to someone. Cutting bark from a living tree can kill it by interrupting the flow of sap; digging roots damages the tree and the forest floor; wetlands where cattail grows are often protected habitats. Responsible cordage-making starts before the knife comes out.
Ethical harvesting checklist
- Ask the landowner or forest manager before taking bark, roots or larger quantities of plants
- Never collect in nature reserves, national parks or other protected areas
- Never ring-bark or strip a living tree — use prunings, coppice shoots, windfall or trees felled for other reasons
- Take nettles from large, common patches and leave most of the stand; they regrow from roots
- Take only a few spruce roots per tree, from different sides, and backfill the soil
- Keep out of reed beds and wetlands during bird breeding season, and only harvest where permitted
- Use the whole harvest: leaves for compost, pith and fluff for tinder, offcuts for kindling
How to process each fibre
Stinging nettle — the best beginner fibre
Nettle (Urtica dioica) is widespread, grows back every year and produces fine, strong fibres. Choose the tallest, straightest stems — ideally 1–2 m long in late summer or autumn, when the fibres are mature. Dead, dry stalks standing in winter also work well, because weathering has already loosened the fibres from the woody core. Wear gloves until the stinging hairs have been removed.
Processing nettle stems
 1Strip the leaves
With gloves on, close your hand loosely around the top of the stem and pull it down in one smooth stroke. Leaves and stinging hairs come off; the stem should end up bare along its whole length.
 2Crush the stem
Lay the stem on a board or flat log and press and roll it flat from end to end with a rounded stone, a smooth stick or your fingers, until it splits into four flat strips. Press and roll rather than hammer — hard blows break the fibres into short pieces.
 3Remove the core
Open the strips, bend the woody core outwards every few centimetres until it snaps, and peel the fibre skin away. The core breaks with a crisp snap, while good fibre bends without breaking — that is how you tell them apart.
 4Clean the fibre
For fine cord, lay the ribbon on a board and scrape the thin green outer skin off with the back of your knife, pushing away from your body. Use light pressure: you want to lift the green film, not cut into the pale fibre underneath. For rough cord, leave it on.
 5Dry and store
Hang the ribbons over a stick for a few days until they are dry and have lost their fresh green colour. Store them in loose bundles, where they keep for months; dampen them again before twisting.
Checkpoint — good nettle fibre: long ribbons that run the full length of the stem, bend without cracking and can be split lengthways into finer strips with a fingernail. If the ribbons break into short pieces, the stems were too young or you crushed too hard; if the core will not come away, try dead winter stalks, where weathering has done part of the work.
Lime (basswood) bast — the traditional rope fibre
The inner bark of lime or linden trees (Tilia, called basswood in North America) was one of the most important rope materials in prehistoric and medieval Europe. The bark peels easily in late spring and early summer, when the sap rises. Use coppiced shoots, prunings or trees that have been felled or blown down — with the owner's permission — never a standing living tree.
Peel long strips of bark, then ret them: submerge the strips in a pond, a slow stream or a tub of water for several weeks (often four to eight, depending on temperature). Bacteria break down the binding tissue, and the bast separates into thin, paper-like layers that can be pulled apart. Rinse, dry and store them in bundles. Lime bast makes strong, smooth cord and flat ribbons for tying and weaving.
Willow bark — fast and flexible
Young willow shoots (Salix) peel easily in spring and summer. Cut shoots from a willow you are allowed to prune — willow regrows vigorously — slit the bark lengthways and peel it off. Separate the inner bark from the brittle outer bark by bending and peeling. Willow bark is strongest used green, straight away, for quick lashings and baskets. Dried willow bark becomes brittle and should be soaked before use.
Cattail — easy, but weak
Cattail or reed mace (Typha) leaves are long, flat and easy to twist. Harvest mature leaves in late summer or autumn, dry them for a few days to prevent shrinking and loosening later, then dampen them just before twisting. The cord is relatively weak and not very durable, but it is quick to make and ideal for practising the reverse wrap, weaving mats or tying bundles. The seed heads provide excellent fluffy tinder. Only harvest from permitted areas — reed beds are often protected habitats.
Spruce roots — the lashing specialist
Spruce trees (Picea) have long, flexible roots running just below the surface, especially in soft, mossy ground. Traditional craftspeople in northern Europe and North America used split spruce roots to sew birch bark containers and lash frames. With permission, gently expose a root of pencil to thumb thickness, cut a length of a metre or more, and backfill the soil. Warm the root briefly over embers or in hot water to loosen the bark, pull it through a split stick to peel it, then split it in half from one end with your knife, steering the split by bending towards the thicker side. Use roots fresh or soak dried roots before use.
From plant to cord
- HarvestMature stems, bark or roots, with permission
- ExtractCrush, peel, ret or split to free the fibres
- DryStore dry fibre in bundles for months
- DampenMist or dip before twisting for suppleness
- TwistReverse wrap into two-ply cord
The reverse wrap twist: how to make two-ply cord
The reverse wrap is the universal hand method for making cordage. Each strand is twisted in one direction, and the two strands are wrapped around each other in the opposite direction. The opposing forces lock the cord together — that is why it does not unravel. Start with a bundle of prepared, slightly damp fibres about as thick as the finished cord you want.

In the drawings below, the two strands are tan and green so you can follow each one; in real cord they usually look the same, but each wrap still shows up as one diagonal band.
Reverse wrap step by step
 1Fold off-centre
Fold the dampened fibre bundle at about one-third of its length, so one strand is roughly twice as long as the other. The unequal ends make sure your splices later fall at different points.
 2Make the first kink
Pinch the fold and twist the two strands in opposite directions until a small loop kinks up at the fold. Hold this point firmly between thumb and index finger of your left hand — it is the anchor for everything that follows.
 3Twist the far strand away
Take the strand furthest from you and twist it tightly away from you (clockwise, seen from the end). Twist until it feels firm and just starts to kink; a limp strand makes a limp cord.
 4Wrap it towards you
Bring that twisted strand towards you over the other strand, so it becomes the near strand, and pinch the new crossing at once. If you let go here, the twist runs out and the wrap loosens.
 5Repeat and move the pinch
Again take the far strand, twist it away, wrap it towards you. Every few wraps, move your pinch forward to just behind the last crossing. Keep the twists even and tight so every band is the same length.
Splicing in new fibre and finishing the end
Fibres are short, so every cord longer than your bundle needs splices. A good splice is invisible: the strand keeps the same thickness, and the join is locked by the wraps on either side of it.
Splicing and finishing
 1Stop at about 5 cm
When one strand is about 5 cm from its end, stop and prepare a new fibre bundle of the same thickness. Thanks to the off-centre fold, the other strand still has plenty of length left.
 2Lay in the new fibre
Taper the end of the new bundle and lay it along the short strand, overlapping by several centimetres. A blunt, thick end would leave a lump in the cord.
 3Twist them as one
Twist the old tail and the new bundle together as a single strand, then wrap as usual. After two or three wraps the splice is locked. Never splice both strands at the same point.
 4Finish and trim
Tie an overhand knot at the end, or whip it with a thin fibre. Trim fibre ends that stick out with a sharp knife, cutting away from your body and from the hand that holds the cord.
What good cord looks like

Checkpoints for every 10 cm of cord
- Both strands are equally thick, and the diagonal bands have the same length along the whole piece
- There are no gaps between the strands — you should not see through the cord anywhere
- Released, the cord stays together and does not unwind or twist back on itself
- Splices are hard to find, only slightly thicker than the cord, and never at the same point in both strands
Thigh rolling — faster for long lengths
Once you have the reverse wrap in your fingers, try thigh rolling: hold the two strands apart on your thigh and roll them forward under your palm so that each strand twists; then let them go at once and they wrap around each other in the opposite direction. It takes practice to keep the tension even, but it produces cord much faster. Many people make the first few centimetres by the reverse wrap and then switch to rolling.
Thigh rolling
 1Strands apart on the thigh
Hold the finished cord in one hand and lay the two strands on your thigh a few centimetres apart. They must not touch, or they twist together too early.
 2Roll forward under the palm
Roll both strands forward under your flat palm in one steady stroke, so each strand twists on its own. Keep the pressure even on both strands.
 3Let go
Lift your palm and release both strands at the same moment: they wrap around each other in the opposite direction. Check the new section, pinch it and roll the next length.
Practice drills
- Two-colour drill: practise with two visibly different fibres, for example cattail leaves for one strand and paler dry grass for the other, so you can follow each strand as in the drawings. Once the pattern is automatic, switch to one fibre.
- 10 cm check: twist 10 cm, stop and go through the checkpoints above. Untwist and repeat until three pieces in a row pass.
- Splice drill: on a practice cord, splice in new fibre every 10 cm on alternating strands until you can no longer find the joins by feel.
Three-ply cord and braids
For thicker rope, make three lengths of two-ply cord and twist them together in the opposite direction to their final ply. Alternatively, braid three strands for a flat, non-twisting line that is great for straps and handles. Both take much more material — roughly three to four times the length of fibre per length of finished cord.
How strong is natural cordage?
Strength depends on the fibre, the quality of processing, the evenness of the twist, the thickness and whether the cord is wet or dry. Hand-made cord varies from metre to metre, so exact figures are misleading. The comparison below is a qualitative guide; always test your own cord by loading it gradually, never with your body weight.
Relative strength of 3–4 mm two-ply cord (qualitative)
| Fibre | Relative strength | Wet performance | Durability | Good jobs |
|---|---|---|---|---|
| Nettle | High | Good; some fibres are stronger wet | Good if kept dry between uses | Bow drill string (short-lived), lashings, nets, sewing |
| Lime bast | High | Good — traditionally used in water | Good | Rope, cord, ties, weaving |
| Willow bark | Medium | Best used green or soaked | Low once dry and brittle | Quick lashings, baskets, bundles |
| Cattail | Low | Softens | Low | Mats, bundles, practice |
| Spruce root | Medium–high (as a lashing) | Good | Good | Lashing frames, sewing bark containers |
A realistic goal for a beginner: a neat, even 3–4 mm nettle or lime cord that can hold a pot on a tripod lashing, bind a bundle of firewood, or serve as the string of a bow drill for a few attempts. Natural bow drill strings do work, but they wear quickly from friction — have spare cord ready.
Paracord vs natural cordage
Paracord or natural cordage?
Paracord and synthetic cord
- Much stronger and consistent
- Ready to use, no time needed
- Rot-proof and long-lasting
- Does not biodegrade — pack out every scrap
- Melts near fire
Natural cordage
- Free and made on the spot
- Biodegradable — ideal for temporary structures
- Teaches plants, seasons and patience
- Slow to make, variable strength
- Rots if stored wet
The sensible approach is both. Carry synthetic cord for your tarp, ridgeline and guylines — our bushcraft kit list suggests how much — and use natural cordage for crafts, practice and temporary structures that you will take apart and leave to decompose, such as a practice lean-to frame. Natural cord is also a good choice where synthetic scraps would otherwise be left behind.
Uses for natural cordage and troubleshooting
Once you can make a few metres, natural cordage finds many uses in camp: lashing a pot tripod or drying rack, binding the frame of a practice debris shelter, tying bundles of kindling, hanging a small food bag (see storing food at camp), making a lanyard for your knife, sewing a birch bark container, or knotting a small net. Combine it with your carving skills to make toggles, pegs and handles, and use the Knot Finder to choose the right knot for each job — grippy natural cord holds knots very well.
| Problem | Cause | Fix |
|---|---|---|
| Cord unravels when released | Wrap not opposite to twist, or too little twist | Twist each strand tighter and always wrap the opposite way |
| Lumpy, uneven cord | Strands of different thickness | Keep bundles even; add or remove fibres as you go |
| Cord breaks at one spot | Splices at the same place in both strands | Fold off-centre and stagger splices |
| Fibres crack while twisting | Too dry | Mist or dip the fibres; work with damp fingers |
| Cord loosens after drying | Fibres shrank | Pre-dry fibres, then dampen slightly before twisting |
| Nettle fibres break short | Immature stems or damaged when crushing | Use tall, mature stems; crush gently and evenly |
| Cord kinks and curls back on itself | Strands twisted much harder than the wrap | Twist the strands a little less or wrap a little tighter, and keep that ratio constant |
| Start loop pulls apart | Pinch released before the first wraps locked | Hold the kink firmly for the first few wraps, then move the pinch forward |
| Lump at every splice | New bundle too thick or cut off square | Taper the new bundle and match it to the strand it replaces |
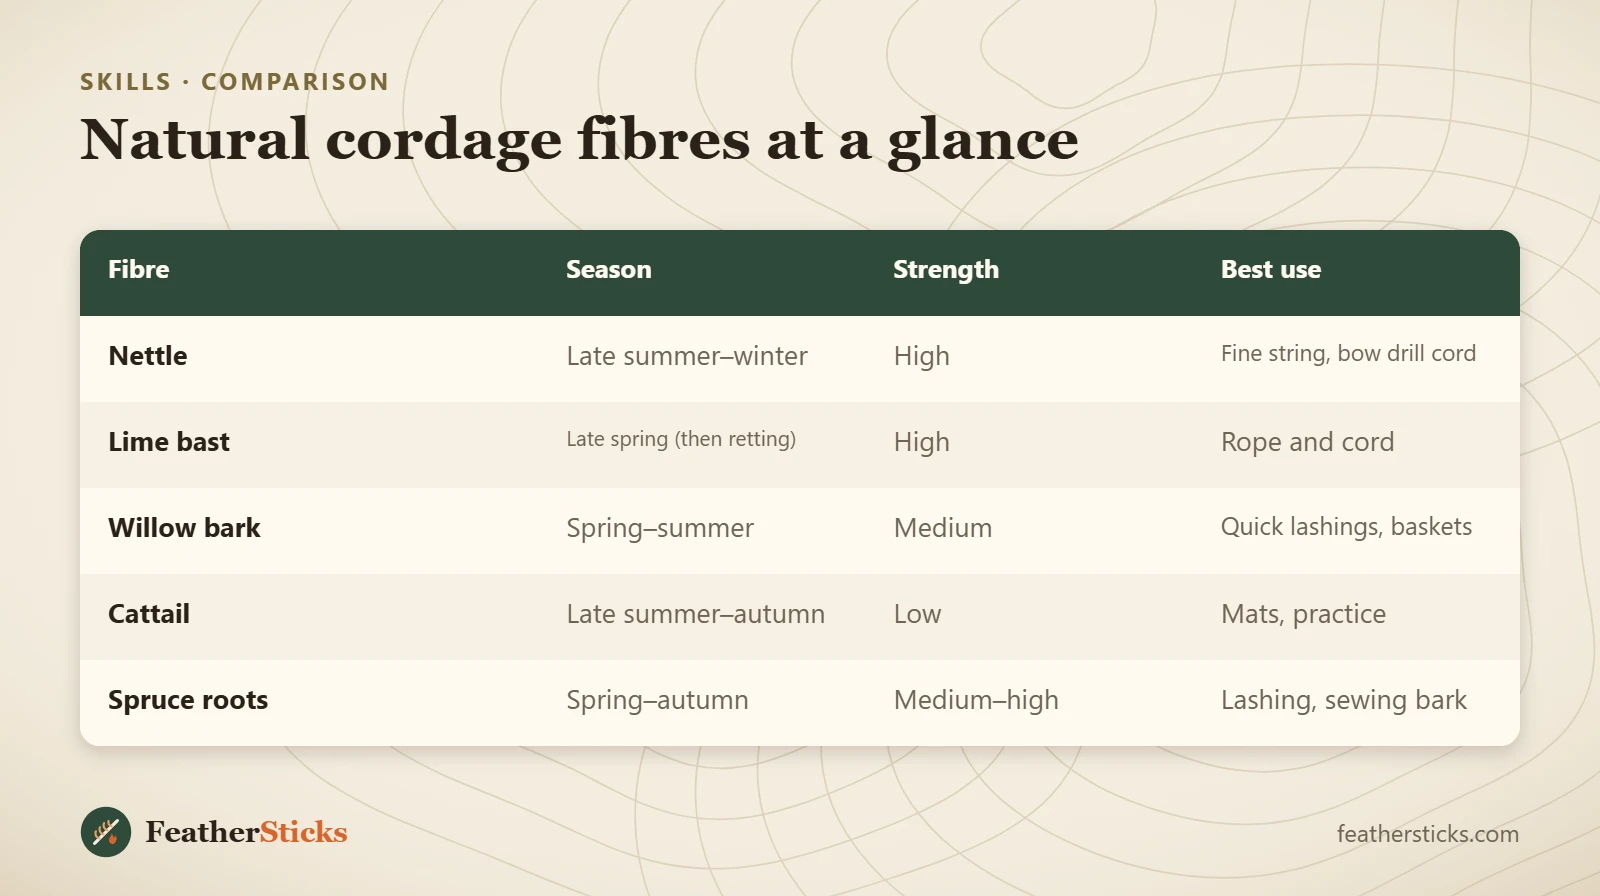
| Fibre | Season | Strength | Best use |
|---|---|---|---|
| Nettle | Late summer–winter | High | Fine string, bow drill cord |
| Lime bast | Late spring (then retting) | High | Rope and cord |
| Willow bark | Spring–summer | Medium | Quick lashings, baskets |
| Cattail | Late summer–autumn | Low | Mats, practice |
| Spruce roots | Spring–autumn | Medium–high | Lashing, sewing bark |
Common mistakes
- Stripping bark from living trees — it can kill them and is usually illegal without permission.
- Twisting fibres that are too dry, so they crack and break.
- Folding the bundle in the middle, so both strands need splicing at the same point.
- Changing twist direction halfway, which unlocks the cord.
- Using young, immature nettle stems with short, weak fibres.
- Trusting hand-made cord with heavy or critical loads without testing it.
What you need
- Sharp knife with a comfortable handle
- Gloves for handling nettles
- Smooth stick or rounded stone for crushing stems
- Container or tub for soaking and retting bark
- Small spray bottle to dampen fibres
- Paracord as a reliable backup