Shelter
How to Build a Lean-To Shelter: Natural & Tarp Lean-Tos
To build a lean-to shelter, you fix a horizontal ridgepole between two trees, lean a sloping roof against it with the back to the wind, and face the open side towards a fire. It is the simplest and oldest bushcraft shelter: quick with a tarp, a few hours’ work with natural materials, and warm when a long fire and a reflector wall bounce heat into it.
This guide covers both versions — the natural lean-to built from dead wood and debris, and the tarp lean-to pitched in ten minutes — plus orientation, dimensions, reflector walls and the safety points that matter. For all other shelter types, see the shelter hub.
Step by step
-
1
Read the wind
Find the prevailing wind and a site with two trees 2.5–3 m apart. The back of the lean-to will face the wind.
-
2
Fix the ridgepole
Lash a sturdy dead pole or tie a tight ridgeline at 1.2–1.8 m between the trees. Test it with your full weight.
-
3
Build the sloping roof
Stake a tarp down behind you, or lean rafters at 45–60° and cover them with lattice and thick thatch from the bottom up.
-
4
Make a raised bed
Pile 20–30 cm of dry leaves, bracken or boughs under the roof, or use a pad, so the cold ground does not drain your heat.
-
5
Add fire and reflector
Where fires are allowed, build a long fire 1–1.5 m in front with a log reflector wall behind it, and never leave it unattended.
What is a lean-to shelter?
A lean-to is a single sloping roof supported along its high edge and grounded along its low edge. The closed, low back blocks wind and rain from one direction; the high, open front lets in light, air and — most importantly — the heat of a fire. That combination is why lean-tos appear in every bushcraft tradition, from Scandinavian gapahuk shelters to North American trapper camps.
There are two basic versions. The tarp lean-to is the fastest pitch you can make with a tarp and is covered in detail, with eleven other pitches, in our tarp shelter setups guide. The natural lean-to uses a framework of dead poles and a thick thatch of leaves, bracken or boughs. It takes longer but needs no gear beyond a knife, a saw and some cordage — a classic exercise in any bushcraft beginners course.
Tarp lean-to vs natural lean-to
Tarp lean-to
- Up in about 10 minutes
- Fully waterproof, light to carry
- Leaves no trace when struck
- Synthetic fabric is vulnerable to sparks
- Needs a 2 × 3 m tarp or larger
Natural lean-to
- 2–4 hours for one person
- Built from dead wood and debris only
- Thick thatch insulates and blocks wind
- Only waterproof with dense, steep thatch
- Needs landowner permission and must be dismantled
A lean-to is not the best shelter for every night. It is weak when the wind swings into the open side, it holds little warm air without a fire, and a natural thatch roof needs to be thick to stay dry. Choose it for dry or showery weather, stable wind and fire-based camps; choose a closed tarp pitch, a debris shelter or a tent for stormy, fireless nights.
How to orient a lean-to to wind and fire
Orientation decides whether a lean-to is snug or miserable. The rule is: back to the wind, face to the fire. The sloping roof deflects wind over the shelter, and the fire in front sits in the calm pocket the lean-to creates, so smoke rises and drifts away instead of blowing into your face.
In practice, wind is rarely perfectly steady. Watch treetops, smoke or a strand of fluff for a few minutes; check the forecast for the night, since wind often shifts at dusk; and use the landscape. A lean-to backed against a boulder, a root plate or a dense thicket gains extra protection. In valleys, cold air drains downhill after sunset, so a lean-to facing downhill may catch a steady cool draught — the camp site selection guide explains these microclimates in detail.
Where should the open side face?
Is there a steady prevailing wind?
Yes → Put the low back squarely into it; the open side faces downwind.No → Face the open side towards the morning sun (east to south-east) for warmth at dawn.Are you planning a fire?
Yes → Fire goes in front of the opening, parallel to it, 1–1.5 m away, with a reflector wall behind the fire.No → Pitch lower and steeper, close the ends and rely on your sleep system.Is the wind shifting or gusting?
Yes → Add side wings or switch to a closed pitch or a debris shelter.No → A plain lean-to is fine; keep a tarp ready as a backup.

How to build a natural lean-to frame
A natural lean-to for one or two people needs a strong frame. Use only dead, sound wood — standing dead wood that is dry and not rotten, or fallen poles that are still firm. Never cut live trees or branches: it damages the forest and in most places it is illegal without permission. A folding saw (see our saw guide) makes the work far faster and safer than chopping.
| Part | Size | Quantity | Notes |
|---|---|---|---|
| Ridgepole | 2.5–3.5 m long, 8–12 cm thick | 1 | Rests in forks or is lashed to trees at 1.2–1.5 m |
| Supports (if no trees) | 1.8–2 m, 6–8 cm thick | 2 bipods or tripods | Lashed with shear or tripod lashing |
| Rafters | 2.2–2.8 m, 4–6 cm thick | 8–12 | Spaced 20–30 cm, leaning at 45–60° |
| Lattice sticks | 2.5–3 m, 2–3 cm thick | 6–10 | Woven or laid across the rafters |
| Thatch | 30 cm+ deep, more for rain | Many armfuls | Dead leaves, bracken, grass, fallen boughs |
| Bed | 20–30 cm dry debris or boughs | 1 × 0.8 × 2.2 m | Contained by two logs |
For two people, lengthen the ridgepole to 3–3.5 m and add rafters; the depth stays the same.
Building the frame step by step
 1Mount the ridgepole
Rest it in natural forks of two trees, or lash it with a square lashing or a few round turns of cord at 1.2–1.5 m. Hang on it with your full body weight before you build anything on top.
 2Lay the rafters
Lean 8–12 rafters from the ridgepole to the ground behind it at 45–60°, 20–30 cm apart. Let them overhang the ridge by 10–20 cm so water drips off in front of the opening, not inside.
 3Close the lattice
Weave thinner sticks horizontally through or across the rafters every 20–30 cm. Test it with your hand: a fist-sized gap is fine, anything larger will let leaves fall through.
 4Add side walls if needed
Lean shorter poles against the ends to form triangular wings that block side draughts, and thatch them like the roof. Leave them out on calm nights for more light and air.
 5Thatch from the bottom up
Start at the ground and work upwards in overlapping rows, like roof tiles, so each row sheds water onto the row below. Finish with a layer of sticks to hold everything down in wind.
Lashings do not need to be pretty, but they must hold. A square lashing, a round lashing or several turns of cord finished with a clove hitch will do; see our essential knots guide for the basics, and natural cordage if you want to make your own from bark or plant fibres.
Thatching and insulation: how thick is thick enough?
The roof of a natural lean-to is only as good as its thatch. A thin layer looks like a roof but lets rain drip straight through. As a rule, you need at least 30 cm of loose, dry debris for showers and 50 cm or more — compressed — for steady rain. Steeper roofs (55–60°) shed water far better than shallow ones.
Natural lean-to roof, outside to inside
- Dead sticks and small branches laid over the top so wind cannot strip the thatch.
- Bracken, grass or fallen conifer boughs laid tips down, overlapping like tiles.
- Dry leaf litter, 30–50 cm deep — the bulk of the warmth and wind block.
- Horizontal sticks every 20–30 cm hold the debris up.
- The structural frame, from dead, sound wood only.
The bed matters as much as the roof. Cold ground conducts heat away from your body far faster than air, so build a platform of 20–30 cm of dry debris, boughs or a layer of dead poles covered with leaves, held in place by two logs. A foam or inflatable pad on top improves it greatly. Leaf litter compresses overnight, so heap it higher than you think.

Checkpoints for a rainproof thatch
- No daylight: crawl inside and look up. Every spot of sky you can see is a future drip.
- Fist test: push your fist into the thatch from outside; it should sink in without reaching the lattice.
- Tips down: bracken, grass and boughs must point downhill, so water runs from one layer onto the next.
- Overhang at the front: the top row reaches past the ridgepole, so drips fall outside the bed.
Gathering debris is the time-consuming part: expect to move dozens of armfuls. Rake it from a wide area rather than scraping one patch bare, and scatter it back when you leave.
How to pitch a tarp lean-to
A tarp lean-to is the fastest shelter you can pitch: tie a ridgeline between two trees, attach one edge of the tarp along it and stake the opposite edge down behind you. A 2 × 3 m tarp is enough for one person; a 3 × 3 m or 3 × 4 m tarp shelters two and allows side wings or an awning.
The geometry is simple. Because the whole width forms one slope, height = tarp width × sin(angle) and covered depth = tarp width × cos(angle). Steeper means better rain shedding and more reflected fire heat, but less floor.
| Tarp width (across the slope) | At 35° | At 45° | At 55° |
|---|---|---|---|
| 2 m | 1.15 m high · 1.64 m deep | 1.41 m · 1.41 m | 1.64 m · 1.15 m |
| 3 m | 1.72 m · 2.46 m | 2.12 m · 2.12 m | 2.46 m · 1.72 m |
| 4 m | 2.29 m · 3.28 m | 2.83 m · 2.83 m | 3.28 m · 2.29 m |
You can lower the ridge and fold the last 50 cm of tarp under you as a floor. Calculate your own pitch with the tarp pitch planner.

Pitching a tarp lean-to in four moves
 1Tight ridgeline
Tie a ridgeline between two trees at the height from the table — about 2.1 m for a 3 m tarp at 45°. Tension it with a trucker’s hitch; a sagging line makes a sagging roof.
 2One edge along the line
Tie or clip the tarp’s long edge to the ridgeline with prusiks or short cords at each tie-out, so the edge hangs straight and evenly along its full length.
 3Stake the back edge
Pull the opposite edge back and down and stake corners first, then the middle. The back faces the wind; check that the fabric is taut with no belly.
 4Wings when the wind shifts
Fold the ends in and stake them forward as triangular wings. They block side draughts and turn the lean-to into a half-closed shelter in minutes.
For a fire-facing lean-to, around 45° is a good compromise: high enough to sit up, steep enough to reflect heat downwards. For fair weather without a fire, 30–35° gives a roomy, airy shelter. Fold the ends in and stake them as wings when the wind shifts, and tension the ridgeline with a trucker’s hitch — the knot finder shows how.
Fabric and fire: nylon and polyester tarps melt from a single ember. Keep synthetic tarps at least 3 m from a fire, or use a cotton canvas or poly-cotton tarp for a close fire-facing lean-to. More on fabrics in our tarp buying guide.
Reflector walls and the lean-to fire
The real magic of a lean-to happens when you combine it with a fire and a reflector wall. A long, low fire parallel to the opening warms your whole body length instead of one side. The reflector — a wall of stacked dead logs or rocks on the far side of the fire — throws radiant heat back into the shelter, and the sloping roof reflects it down onto you.
The heat loop of a lean-to fire camp
- Long fireA fire as long as your body, 1–1.5 m in front of the opening.
- Reflector wall60–90 cm high, 0.5–1 m behind the fire, from dead logs held by stakes.
- Sloping roofCatches rising heat and reflects it down onto the sleeper.
- Insulated bedKeeps the heat you gain from draining into the ground.
To build a reflector, drive two pairs of stakes into the ground and stack dead logs between them, or pile flat rocks — never river stones that may be wet inside, as they can crack or burst in heat. Keep the reflector no higher than about 90 cm so smoke can escape. A long log fire or a star fire suits this setup; see our fire lays guide for how to build them and the firewood calculator to estimate how much wood a full night needs — often far more than people expect.
Building a log reflector wall
 1Two pairs of stakes
Drive two pairs of stakes cut from dead wood into the ground 0.5–1 m behind the planned fire, about a hand’s width apart per pair. Use a baton or a log, not the back of an axe.
 2Stack the logs
Stack dead logs between the stakes to 60–90 cm. Wider logs at the bottom, no gaps; a slight lean towards the fire helps throw the heat forwards.
 3Light the long fire
Build a long fire parallel to the opening, 1–1.5 m in front of your bed. The wall throws the heat back, the sloping roof bounces it down onto you. Keep water ready and never leave it unattended.
Lean-to troubleshooting: what went wrong and how to fix it
A lean-to tells you quickly when something is off: smoke in your eyes, drips on your sleeping bag, a cold back. Most problems come from orientation, thatch thickness or the distance to the fire, and all of them can be fixed without starting again.
| Symptom | Likely cause | Fix |
|---|---|---|
| Smoke curls into the shelter | Fire too close, reflector too high or wind eddying | Move the fire 30 cm further out, lower the reflector, add side wings |
| Drips through the roof | Thatch too thin or roof flatter than 40° | Add 20 cm of debris, lay a tiled layer tips down, steepen the rafters |
| Cold back, warm front | Bed too thin or open ends | Heap the bed to 20–30 cm compressed, thatch the side wings |
| Too hot at the fire side, cold feet | Fire shorter than your body | Lengthen the fire to your full body length |
| Thatch blown away overnight | No weight layer | Lay dead sticks and branches over the thatch |
Practice drills
- The ten-minute tarp lean-to. Pitch a tarp lean-to at 45° from a packed bag. Then add wings. Repeat until you can do both in under fifteen minutes.
- The one-metre roof. On permitted land, build a natural lean-to only 1 m long: ridgepole, rafters, lattice and thatch. Pour a litre of water over it and see where it comes through. You learn thatching far faster at this scale than on a full shelter.
- The reflector test. Where fires are allowed, sit 1.5 m from a small fire and note the warmth on your face; then build a reflector wall behind the fire and compare. The difference convinces most people to carry a saw.
When is a lean-to the right shelter?
A lean-to shines on cold, clear, calm nights with a fire, and as a day shelter or kitchen fly in any weather. It is also ideal for groups: a large lean-to with a long fire can shelter three or four people side by side. It is a poor choice in strong or shifting wind, in heavy rain without a waterproof tarp, and where fires are forbidden — in those conditions a closed tarp pitch, a hammock setup or a well-insulated debris shelter keeps you warmer.
Always consider the cold. Wind turns a mild evening into a chilly night under an open shelter; check the felt temperature with the wind chill calculator and dress in layers (see bushcraft clothing). Plan your time too: a natural lean-to takes hours, so start early — the daylight calculator tells you how much light is left.
| Conditions | Tarp lean-to | Natural lean-to | Better alternative |
|---|---|---|---|
| Mild, dry, calm | Excellent | Excellent | — |
| Cold, dry, fire allowed | Very good (canvas) | Very good | — |
| Showers, steady wind | Good with wings | Good if thatch is thick | Adirondack or C-fly tarp pitch |
| Heavy rain | Moderate | Poor | A-frame or storm pitch |
| Strong or shifting wind | Poor | Moderate | Low storm A-frame, debris shelter |
| Cold, no fire allowed | Poor | Moderate | Debris shelter or tent with warm sleep system |
Rules, leave no trace and dismantling
Building a natural shelter changes the forest floor, so it is regulated in most countries. Use designated sites or get the landowner’s permission, take only dead material, avoid protected areas and nesting seasons, and dismantle the shelter when you leave: scatter the thatch, return poles to where you found them and restore the fire site. In Germany, the rules for overnight stays and shelter building depend on the federal state — see wild camping in Germany. Elsewhere, check national and regional access rules. The camp setup guide covers low-impact camp layout in more detail.
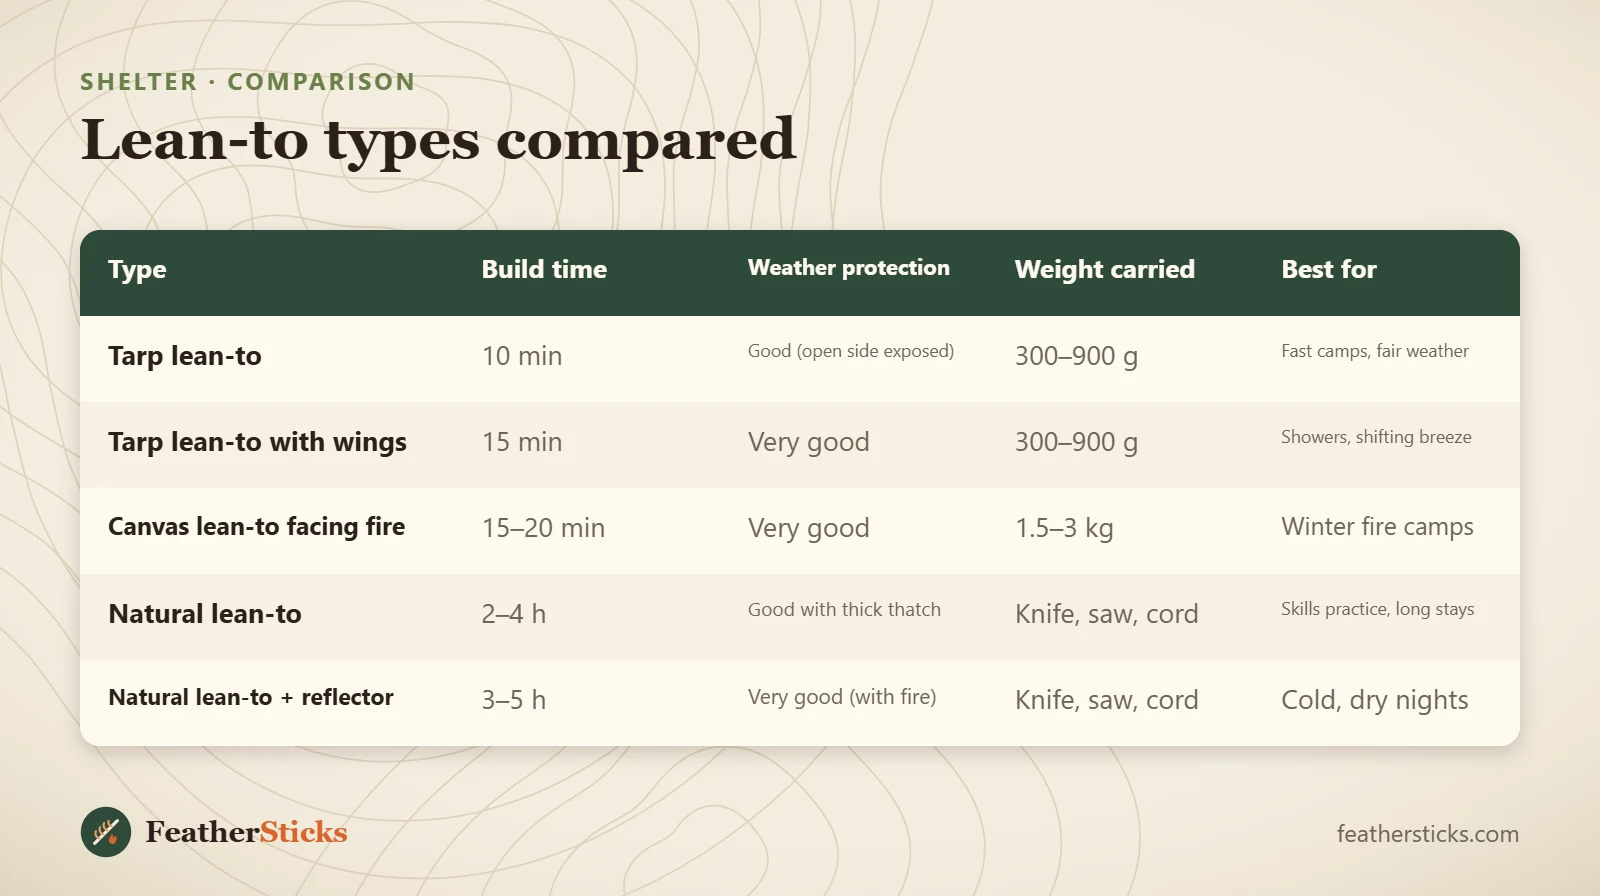
| Type | Build time | Weather protection | Weight carried | Best for |
|---|---|---|---|---|
| Tarp lean-to | 10 min | Good (open side exposed) | 300–900 g | Fast camps, fair weather |
| Tarp lean-to with wings | 15 min | Very good | 300–900 g | Showers, shifting breeze |
| Canvas lean-to facing fire | 15–20 min | Very good | 1.5–3 kg | Winter fire camps |
| Natural lean-to | 2–4 h | Good with thick thatch | Knife, saw, cord | Skills practice, long stays |
| Natural lean-to + reflector | 3–5 h | Very good (with fire) | Knife, saw, cord | Cold, dry nights |
Common mistakes
- Facing the open side into the wind, so smoke and rain blow straight in.
- Thin thatch that looks like a roof but lets rain drip through.
- A flat roof under 40° that holds water instead of shedding it.
- Sleeping on bare ground without a raised, insulating bed.
- Fire too close to a synthetic tarp or a dry natural roof.
- Cutting live wood or leaving the shelter standing when you go.
What you need
- Tarp 3 × 3 m (canvas or poly-cotton for fire-facing camps)
- Ridgeline cord, 10–15 m
- Folding saw and fixed-blade knife
- 10–20 m of lashing cord
- 4–6 stakes
- Sleeping pad and groundsheet
- Water container for fire safety