Shelter
How to Hang a Hammock for Camping: 30° Rule, Tarp & Insulation
To hang a hammock for camping, pick two healthy trees 4–5 m apart, wrap wide tree straps around them at about head height, and let the suspension run down to the hammock at roughly 30° from horizontal so the hammock sags deeply. Then lie diagonally: the fabric flattens out and you sleep almost flat, off wet, rocky or uneven ground.
This guide covers the whole hammock shelter system: hanging geometry and strap heights, tree protection, the tarp above you, the insulation below you, bugs and comfort. Hammocks are one of the most comfortable ways to sleep outdoors — once you know the tricks. Browse the shelter hub for the alternatives.
Step by step
-
1
Choose two healthy trees
Find living trees at least 15–20 cm thick, 4–5 m apart, with no dead branches overhead and no rocks or slopes underneath.
-
2
Wrap wide straps
Put 2.5 cm or wider tree straps around both trunks at about head height. Never tie thin rope directly round the bark.
-
3
Hang at about 30°
Attach the hammock so the suspension angles down about 30° and the lowest point is at chair height, around 45 cm. Sit-test it.
-
4
Pitch the tarp above
Tie a ridgeline about 30 cm above the strap attachment points, centre the tarp and stake it out. Add drip lines.
-
5
Insulate and lie diagonally
Hang an underquilt or place a pad, set the foot end slightly higher, and lie 15–30° off the centreline for a flat lay.
Why sleep in a hammock? Hammock vs ground
A hammock turns any two trees into a bed. You are off the ground, so roots, rocks, slopes, puddles and crawling insects no longer matter. Many people sleep better in a well-hung hammock than on a pad, because there are no pressure points — but only if the hammock is hung with enough sag and the sleeper lies diagonally.
The price is complexity. A hammock needs trees, a tarp for rain and, above all, insulation underneath, because air moving under you steals heat quickly. It is also a solo shelter; two people need two hammocks. Compare it with the other options on the shelter hub and with a classic tarp shelter on the ground.
Hammock vs ground sleeping
Hammock
- No roots, rocks, slopes or puddles
- No pressure points when lying diagonally
- Doubles as a camp chair
- Needs two trees 3.5–6 m apart
- Requires underneath insulation below about 18 °C
Ground (tarp or tent)
- Works anywhere, including above the tree line
- Simple insulation: one pad
- Room for two, gear under cover
- Needs a flat, dry, clear spot
- Cold, damp or rocky ground hurts comfort
How to hang a hammock: the 30° rule and sag
The most common beginner mistake is hanging a hammock as tight as a washing line. It feels secure, but it folds you into a banana shape, squeezes your shoulders and puts huge loads on the trees and straps. The fix is the 30° rule: the suspension should leave the hammock at roughly 30° below horizontal on both sides.
Why 30°? Physics. The tension in each strap equals your weight divided by twice the sine of the hang angle. At 30°, each strap carries roughly your body weight. Hang it flatter and the load rises steeply — at 10°, each strap carries almost three times your weight, which strains the hammock, the suspension and the tree.
Load on each strap as a multiple of body weight

Sag, sit height and the structural ridgeline
With a 30° hang, the lowest point of the hammock should be about chair height, 40–50 cm above the ground when you sit in it. That makes it easy to get in and out and keeps the fall height minimal. Many hammock campers add a structural ridgeline: a fixed-length cord tied between the two ends of the hammock, typically about 83 % of the hammock’s length (for a 3.3 m hammock, roughly 2.7 m). It sets the same sag every night regardless of tree spacing, and it gives you a handy line for a bug net, a small organiser or a head torch.
How high should the straps be? Strap heights table
The wider the trees, the higher the straps must go to keep a 30° angle. A good rule of thumb is about head height at 4.5 m spacing. The table gives approximate values for a gathered-end hammock of 3.3 m (11 ft) and a sit height of about 45 cm.
| Tree distance | Strap height on trunk | Suspension per side | Comment |
|---|---|---|---|
| 3.5 m | ≈ 1.5 m | ≈ 0.4 m + wrap | Tight; hammock barely clears trees |
| 4.0 m | ≈ 1.6 m | ≈ 0.7 m + wrap | Good |
| 4.5 m | ≈ 1.75 m | ≈ 1.0 m + wrap | Ideal: about head height |
| 5.0 m | ≈ 1.9 m | ≈ 1.3 m + wrap | Good |
| 5.5 m | ≈ 2.05 m | ≈ 1.6 m + wrap | Reach up; longer straps needed |
| 6.0 m | ≈ 2.2 m | ≈ 1.85 m + wrap | Near the limit of 3 m straps |
Approximate values: strap height ≈ hammock end height (about 1.3 m) + half the extra distance × tan 30°. Longer hammocks need less strap height; heavier sleepers sag more. Always sit-test and adjust.
Hanging the hammock step by step
 1Straps at head height
At 4.5 m tree spacing, wrap the straps at about 1.75 m — roughly your head height. Wider trees: go higher; closer trees: lower. Keep both straps at the same height to start with.
 2Connect the hammock
Clip or tie the hammock ends to the straps with load-rated carabiners, whoopie slings or a marlinspike hitch with a toggle. Check that every carabiner gate is closed and nothing rubs on bark.
 3Check the 30° angle
Stand side-on and compare the suspension with a horizontal line: it should drop at about 30°, like a clock hand pointing at four o’clock. Flatter than that, lengthen the suspension; steeper, shorten it.
 4Sit test
Sit in the middle before you lie down. Your seat should be at chair height, 40–50 cm, with your feet flat on the ground. Too high: lower both attachment points. Touching the ground: raise them.
 5Raise the foot end
Set the foot end 15–20 cm higher than the head end. Without it, you slowly slide towards the middle during the night and wake up curled in the lowest point.
What a good hang looks like: a smile-shaped sag with the lowest point slightly towards the head end, straps level and snug on the trunks, straight suspension lines with nothing rubbing on bark, and at least 40 cm of clear space under the lowest point with you in it. If the hammock feels tippy, it is usually hung too tight — more sag makes it more stable, not less.
Attach the hammock to the straps with a method you trust: whoopie slings, cinch buckles, daisy-chain straps with carabiners, or a simple marlinspike hitch with a toggle. Whatever you use, check the load rating of every piece against your weight and remember that dynamic loads — flopping in — are higher than static ones. The knot finder and our knots guide cover the hitches used in hammock suspensions.
Choosing trees and protecting bark
Trees are your anchors and your responsibility. A healthy, living tree of at least 15–20 cm diameter handles a sleeper easily at a 30° hang. Dead trees, trees with dead limbs, cracked or leaning trunks and shallow-rooted trees on waterlogged soil are not safe. Look up: the dead branches that are dangerous for any camp are even more relevant when you spend the night strapped to the tree they hang from. See our camp site selection guide for how to read the canopy.
Always use wide tree straps. Thin rope or cord wrapped under load saws into bark and damages the cambium layer beneath it, which the tree needs to transport water and nutrients. Straps of 2.5 cm (1 inch) or wider spread the load. Many parks and forest authorities require them. On soft-barked trees, or when you camp in one spot for several nights, add padding or move to different trees.
Tree check before you hang
- Living, healthy trunk at least 15–20 cm thick
- No dead branches or dead neighbouring trees above
- No cracks, fungus brackets or loose bark at strap height
- Firm, not waterlogged ground; no rocks, stumps or slopes under the hammock
- Distance 3.5–6 m (4–5 m ideal)
- Wide straps (2.5 cm+) and padding on soft bark
- Hanging from trees is permitted here
Tarps over hammocks: size, pitch and drip lines
A hammock needs a tarp in any weather that could turn wet. The tarp hangs on its own ridgeline, independent of the hammock, about 30 cm above the point where the hammock suspension meets the trees. That way you can pitch the tarp first, stay dry while you hang the hammock, and adjust each without touching the other.
The tarp must be longer than the hammock: plan at least 15–30 cm of overhang beyond each end. For a 3.3 m hammock, that means a ridge length of about 3.3–3.6 m — a 3 × 3 m square hung as a diamond gives a 4.2 m diagonal, a 3 × 4 m rectangle or a hex tarp cut for hammocks gives full coverage with walls.
| Tarp | Ridge length | Weather | Notes |
|---|---|---|---|
| 3 × 3 m square as diamond | 4.2 m (diagonal) | Fair to showers | Light; sides open to wind-driven rain |
| 3 × 3 m square as A-frame | 3 m | Rain | Tight for hammocks over 3 m |
| 3 × 4 m rectangle | 4 m | Rain and wind | Full coverage, room for gear |
| Hex or cat-cut hammock tarp | 3.3–3.6 m | Rain, some wind | Good weight-to-coverage ratio |
| Winter tarp with doors | 3.5–4 m | Storm, snow, cold wind | Ends close fully; heaviest option |
Pitching the tarp over the hammock
 1Ridgeline above the straps
Tie the tarp ridgeline to the same two trees, about 30 cm above the strap attachment points. Pitch it first when rain is coming, so you can set up the hammock in the dry.
 2Centre with overhang
Slide the tarp until it overhangs each hammock end by 15–30 cm. Check from the side: the gathered ends of the hammock must not stick out past the tarp.
 3Stake the sides low
Guy the side edges out and down. The windward side goes lower and closer to the hammock; the lee side can stay higher for air and view.
 4Drip lines on straps and ridge
Tie a short cord round each strap just outside the hammock and on the tarp ridgeline. Water running down the trunk now drips off before it reaches the fabric.
Pitch the A-frame for rain, the diamond for fair weather, and a storm mode — steep, low and with the ends folded in as doors — for wind. All pitches, ridge heights and knots are explained in our tarp setups guide, and the tarp pitch planner calculates ridge height, cord and stakes for hammock setups. For choosing fabrics and cuts, see choosing a tarp.
Drip lines are essential. Rain running down the tree hits your straps and follows them straight into the hammock. Tie a short piece of cord around each strap just outside the hammock ends and let it hang down, or use a strap with a built-in drip ring. Do the same on the tarp ridgeline.
Underquilts and insulation: stopping cold from below
Here is the secret of warm hammock nights: insulation under you matters more than on top. A sleeping bag loses most of its warmth underneath, because your body weight compresses the fill flat. Air moving below the hammock then carries heat away — hammock campers call the result "cold butt syndrome". Even on summer nights around 15–18 °C, many people feel chilled without something underneath.
Two solutions work. An underquilt hangs on the outside underneath the hammock, so nothing compresses its loft — it is the warmest and most comfortable option. A sleeping pad inside the hammock is cheaper and doubles for ground use, but it tends to slide around; a double-layer hammock with a pad sleeve, or a wide pad with side wings, solves most of that. On top, a quilt or an unzipped sleeping bag is enough.
Why you get cold from below — and the two fixes
 1No insulation underneath
Your weight squashes the sleeping bag flat under you, and the breeze under the hammock carries the heat away. Typical sign: warm chest, cold back and bottom.
 2Pad inside
A pad with R 2 or more inside the hammock stops most of the heat loss. Use a wide pad or one with wings so your shoulders do not hang over the edge, and a pad sleeve so it stays put.
 3Underquilt outside
Hung snugly under the hammock, an underquilt keeps its full loft because nothing presses on it. Check for gaps: there should be no draught at shoulders or hips when you lie diagonally.
Hammock sleep system (top = outside)
- Rain, wind and dew protection; pitch lower and close the ends in cold wind.
- Rated to the night’s low — size it with the sleeping bag calculator.
- Dry base layer, hat and socks; see clothing layers.
- Single or double layer; a double layer holds a pad and slows bug bites.
- The key layer: uncompressed insulation against moving air below.
| Night low | Underneath | On top | Extras |
|---|---|---|---|
| Above 18 °C | Often nothing, or a thin foam pad | Light blanket or liner | Bug net |
| 10–18 °C | Pad R 2+ or 3-season underquilt | Summer quilt or bag | Hat for the night |
| 0–10 °C | Underquilt rated to about 0 °C, or pad R 3+ with wings | 3-season quilt or bag | Tarp lower, windward end closed |
| Below 0 °C | Winter underquilt, plus pad for backup | Winter quilt or bag | Storm tarp with doors, underquilt protector |
Guidance values; individual needs vary widely. Wind under the hammock makes a big difference, so pitch the tarp low on the windward side.
For the full picture on bags, quilts and pads, read our sleeping gear guide. And remember that the felt temperature under a tarp drops with wind — check it with the wind chill calculator before an exposed night.
Bugs, ticks and hammocks
Hanging keeps you away from ants, beetles, slugs and most ticks on the ground, but mosquitoes and midges still find you. Choose a hammock with an integrated bug net or add a separate full-enclosure net hung from the structural ridgeline. Mosquitoes can bite through a single thin fabric layer from below, so an underquilt or a double-layer hammock also protects your back.
Ticks still wait in grass and bushes on the way to your trees. Check yourself thoroughly every morning and evening, especially in tick-endemic areas; public health agencies publish local risk information. Store food away from your hammock where wildlife is an issue — see storing food at camp.
Comfort: the diagonal lay and other tricks
If a hammock feels like a banana, you are lying in it wrong. Lie diagonally, with your head 15–30° to one side of the centreline and your feet to the other. The fabric pulls taut across your body and you lie almost flat, even on your side. Gathered-end hammocks of at least 3.0–3.3 m long and 1.4 m wide make this much easier; short, narrow hammocks cannot be laid flat.

Five tweaks for a flat, comfortable lay
- Deep sagKeep the 30° hang; tighter hangs fold you up.
- Foot end higherRaise the foot end 15–20 cm so you do not slide to the middle.
- Diagonal layHead and feet 15–30° off the centreline.
- Knee pillowA rolled jacket under your knees stops hyperextension.
- Stable padPad in a sleeve or an underquilt, so nothing shifts.
A few more habits help: keep a small gear hammock or organiser on the ridgeline for your head torch, water and glasses; hang your pack under the tarp off the ground; and practise getting in and out a few times at home. Sleeping well outdoors is a big part of enjoying bushcraft — and a big part of making good decisions the next day.
Hammock troubleshooting: symptoms, causes and fixes
Most hammock problems can be read from how the night felt. Use the table the next morning, change one thing at a time and note what worked — after three or four nights your setup is dialled in.
| Symptom | Likely cause | Fix |
|---|---|---|
| Shoulders squeezed, back bent | Hung too tight or lying straight | Lengthen the suspension to 30°, lie 15–30° diagonal |
| Sliding to the middle all night | Foot end too low | Raise the foot end 15–20 cm |
| Knee pain, legs overstretched | Fabric pulls the knees straight | Rolled jacket under the knees, lie slightly more diagonal |
| Cold back, warm chest | Compressed bag, no insulation below | Pad R 2+ or an underquilt; pitch the tarp lower on the windward side |
| Wet ends in the morning | No drip lines or tarp too short | Drip lines on the straps; tarp 15–30 cm longer than the hammock at each end |
| Hammock lower each night | Straps stretching or knots settling | Re-tension before getting in; use low-stretch polyester straps |
Two drills before your first night out
- The garden hang. Hang the hammock between two trees or posts at home and lie in it for an hour with a book. Adjust the angle, the foot end and your diagonal until you can lie on your back and your side without pressure points. Write down the strap height and suspension length for next time.
- The cold test. On a cool evening below 15 °C, spend an hour in the hammock with only your sleeping bag, then with a pad or underquilt added. You will feel the difference insulation below makes — and know your limits before you depend on them.
Where can you hang a hammock? Rules and leave no trace
Hammock camping has a light footprint when done well: no trampled ground, no cleared tent spots. Still, rules vary. Some parks forbid attaching anything to trees; others require wide straps. In Germany, overnight stays in the forest are regulated by each federal state and are often only allowed on designated sites — see wild camping in Germany. In the UK, US, Canada and Scandinavia, check national and local access rules. Wherever you are, use wide straps, change trees on long stays, pack out everything and keep campfires to permitted spots, following our campfire safety guide. For planning when to stop and hang before dark, the daylight calculator helps.
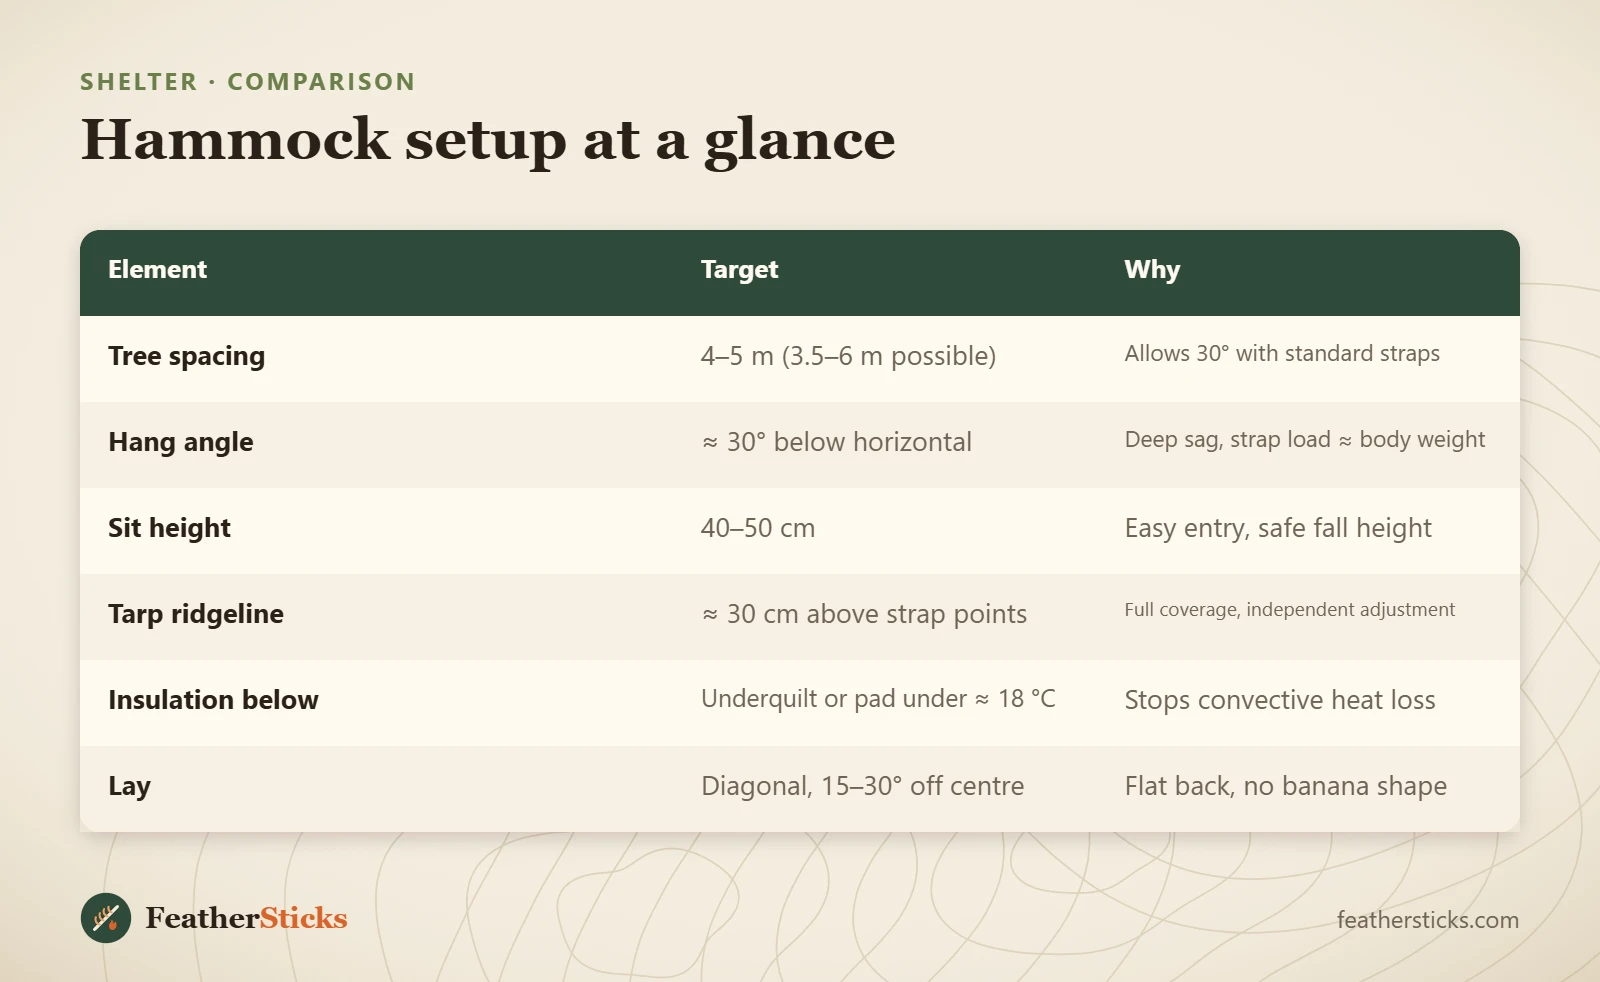
| Element | Target | Why |
|---|---|---|
| Tree spacing | 4–5 m (3.5–6 m possible) | Allows 30° with standard straps |
| Hang angle | ≈ 30° below horizontal | Deep sag, strap load ≈ body weight |
| Sit height | 40–50 cm | Easy entry, safe fall height |
| Tarp ridgeline | ≈ 30 cm above strap points | Full coverage, independent adjustment |
| Insulation below | Underquilt or pad under ≈ 18 °C | Stops convective heat loss |
| Lay | Diagonal, 15–30° off centre | Flat back, no banana shape |
Common mistakes
- Hanging the hammock too tight — uncomfortable and it overloads trees and straps.
- Using thin rope around trees instead of wide tree straps.
- Relying on a compressed sleeping bag underneath and getting cold.
- Lying straight along the centreline instead of diagonally.
- Forgetting drip lines, so rain runs down the straps into the hammock.
- A tarp too short for the hammock, leaving the ends exposed.
- Hanging from dead trees, under dead branches or high above rocks.
What you need
- Gathered-end hammock, 3.0–3.3 m long, 1.4 m+ wide
- Two tree straps, 2.5 cm+ wide, 2.5–3 m long
- Carabiners, whoopie slings or cinch buckles (load-rated)
- Tarp with 3.3 m+ ridge length and ridgeline cord
- Underquilt or wide sleeping pad
- Top quilt or sleeping bag
- Bug net (integrated or separate)
- Drip lines and 4–6 stakes