Gear
Bushcraft Clothing: The Layering System, Fabrics & Fire-Safe Outerwear
Good bushcraft clothing follows the layering system: a base layer that moves sweat away from your skin, a mid layer that traps warmth, an insulating jacket for camp and an outer shell against wind and rain. Wool and synthetics keep you warm when damp; cotton and poly-cotton outer layers resist sparks by the fire but are dangerous when wet and cold.
This guide explains which fabric belongs where, how to dress for each season, what to look for in trousers, jackets, boots and rain gear, and how wind changes everything – with the numbers from our wind chill calculator. The seasonal lists match our Kit Builder. It is part of our bushcraft gear guides.
Step by step
-
1
Start with a wicking base layer
Merino wool or synthetic next to the skin moves sweat away and stays warm when damp. Avoid cotton here in cool weather.
-
2
Add a warm mid layer
A fleece or wool jumper traps warm air while you are active. Take it off before you start to sweat.
-
3
Carry insulation for camp
A synthetic or down jacket goes on the moment you stop – in autumn and winter this is the most important layer.
-
4
Top it with a shell
A rain jacket stops wind and rain on every trip; a wool or poly-cotton outer layer is better by the fire.
-
5
Adjust constantly
Start slightly cool, vent early and add layers before you get cold. Keep one set of dry clothes for sleeping.
The layering system: how bushcraft clothing works
Clothing does not produce warmth; it slows down heat loss and manages moisture. Several thin layers do this better than one thick garment, because you can add or remove them as your activity and the weather change. Sawing firewood makes you sweat in a T-shirt at 5 °C; an hour later, sitting still at dusk, you need a warm jacket. The layering system lets you respond to both.
The layering system (top = outermost)
- Rain jacket against wind and rain; wool or poly-cotton smock or jacket for fire work
- Synthetic or down jacket for breaks and camp – autumn and winter
- Fleece, wool jumper or wool shirt – warmth while active
- Merino or synthetic next to the skin – moves sweat away
Your legs, hands, head and feet follow the same principle: thermal leggings under robust trousers, liner gloves under mittens, a thin hat under a hood. The Kit Builder packs exactly these items by season: a rain jacket, merino base layer and spare wool socks on every trip, a fleece in summer and autumn, a synthetic insulated jacket in autumn, a down or synthetic parka in winter, plus thermal leggings, hat and gloves from autumn onwards.
Why sweat is the enemy
Water conducts heat many times faster than air – the wind chill tool uses a factor of about 25. Clothing soaked with sweat loses much of its insulation, and when you stop moving you cool down fast. That is why experienced people "start cold": they set off feeling slightly chilly, open zips before they sweat and add layers the moment they stop. It is the single most effective habit for staying warm outdoors.

Temperature control on the move
 1Start slightly cool
Set off feeling a little chilly. After ten minutes of walking with a pack you will be warm – if you start warm, you will be sweating by then.
 2Vent before you sweat
Open the front zip, pit zips and cuffs at the first sign of warmth, not when your back is already wet. Pushing up sleeves and taking off the hat also dump a lot of heat.
 3Mid layer off for hard work
Before sawing, splitting wood or a long climb, take the fleece or jumper off and stow it at the top of the pack. Work in the base layer, plus the outer layer if it is windy.
 4Stop = insulation on
The moment you stop for more than a few minutes, put the insulated jacket on over everything – before you feel cold. Take it off again just before you set off.
| What you notice | What it means | What to do |
|---|---|---|
| Damp back, sweat on the forehead | Too much insulation for the effort | Open zips, take off the mid layer, slow down a little |
| Warm body but cold hands and ears | Heat loss from extremities, often wind | Hat and gloves on; windproof layer on top |
| Cold in wind despite a fleece | Wind blows straight through the fleece | Put the windproof smock or rain jacket over it |
| Wet inside the rain jacket | Condensation from sweat, not a leak | Use pit zips, reduce pace, wear a thinner mid layer |
| Shivering at a break | Insulation went on too late | Jacket on now, eat and drink something warm, then move gently |
| Cold feet in camp | Damp socks, cold ground | Change to dry socks, stand on a foam pad, put on camp shoes |
Shivering that will not stop, clumsiness or confusion can be signs of hypothermia – act at once, see recognising hypothermia.
Wool vs synthetic vs cotton: which fabric where?
Every fibre has a place in a bushcraft wardrobe – the question is which layer and which conditions.
| Fabric | Warmth when wet | Drying | Odour | Near the fire | Durability | Best use |
|---|---|---|---|---|---|---|
| Merino / wool | Good – stays warm when damp | Slow to medium | Very low | Good – chars rather than melting, self-extinguishing | Medium (thin merino) to high (dense wool) | Base layer, socks, jumpers, outer layers |
| Synthetic (polyester, nylon, fleece) | Good | Fast | Can smell quickly | Poor – melts and can stick to skin | High | Base layer, fleece, insulation, rain shells |
| Cotton | Very poor – cold when wet | Very slow | Medium | Good – does not melt, but can burn | Medium | Hot, dry weather; bandanas |
| Poly-cotton (e.g. 65/35) | Poor to medium | Medium | Medium | Fairly good – spark-resistant surface | Very high, windproof when tightly woven | Bushcraft trousers, smocks, jackets |
| Down | Poor – collapses when wet | Slow | – | Poor – thin shell fabric melts | High if cared for | Camp insulation in cold, dry weather |
"Near the fire" is about stray sparks and embers, not flames. No normal clothing fabric is fireproof.
"Cotton kills" – true, but with nuance
The mountaineering saying "cotton kills" refers to cold, wet conditions: a wet cotton shirt clings to the skin, dries very slowly and drains heat until hypothermia becomes a real risk. As a base layer in autumn and winter, cotton has no place in your kit. But cotton is not bad in general. In hot, dry weather its slow drying actually cools you, it is comfortable and it does not melt. As a tightly woven outer fabric (poly-cotton or waxed cotton) it is windproof, robust and much more tolerant of sparks than nylon.
The practical rule: wool or synthetics next to the skin, wool or poly-cotton outside if you work by the fire, and a waterproof shell in your pack for rain.
Clothing near the fire: sparks, melting and safety
Bushcraft revolves around the fire, and that affects your clothing choices. Synthetic fabrics – fleece, nylon, polyester and most technical rain jackets – melt when an ember lands on them. A melted hole in a jacket is annoying; molten synthetic material on your skin causes serious burns. Wool chars and tends to self-extinguish; cotton and poly-cotton do not melt, though cotton can burn.

Dressing for fire work
 1Fire-tolerant layer outside
Pull a wool or tightly woven poly-cotton smock over fleece and synthetic layers before you sit down at the fire. The synthetics stay underneath, where sparks cannot reach them.
 2Sleeves down, hair tied, no loose ends
Roll sleeves down, tie back long hair and tuck in scarves, drawcords and hood toggles. Kneel or crouch to the side of the fire, not over it, and keep upwind of the smoke.
 3If clothing catches fire
Stop, drop to the ground and roll to smother the flames – running fans them. Then cool the burn with cool running water and get help; see first aid for burns.
Resinous woods such as spruce, larch and pine throw more sparks than hardwoods like beech or oak. A smaller, well-managed fire – built with the right fire lay – throws fewer sparks and needs less feeding, which protects both your clothes and the forest.
Bushcraft trousers and jackets: what to look for
Trousers
Good bushcraft trousers are tough enough for kneeling, brambles and sitting on logs, move freely and dry reasonably fast. Look for:
- Robust fabric: tightly woven poly-cotton or a durable synthetic with reinforced knees and seat. Poly-cotton can be waxed for water resistance.
- Freedom of movement: gusseted crotch and pre-shaped knees for squatting at the fire and climbing over trunks.
- Useful pockets with closures, including one for a map and one for a small knife or fire steel.
- Leg openings that fit over boots or can be tucked into gaiters – important against ticks.
Avoid jeans for anything beyond a dry day trip: heavy cotton denim soaks up water and is extremely cold and slow to dry. In cold weather, wear thermal leggings underneath instead of a thicker pair of trousers – they are easier to take off when you are active.
Jackets and smocks
The classic bushcraft outer layer is a smock or jacket in poly-cotton, waxed cotton or wool. It is windproof enough for most days, breathes well, resists sparks and thorns and has big pockets for gloves, a hat and a knife. It is not waterproof in sustained rain – that is the job of the rain jacket in your pack. Many bushcrafters wear a wool jumper or shirt as mid layer and a poly-cotton smock on top, reaching for the rain shell only when it really pours.
Boots and socks for bushcraft
Your feet carry you and everything you own, so boots deserve careful choice. For bushcraft in forests, a mid- to high-cut walking boot with good ankle support and a grippy, non-marking sole is the usual choice. Boots must fit perfectly; try them on in the afternoon (feet swell during the day) with the socks you will wear.
Leather vs synthetic boots
Full-grain leather
- Very durable, can be resoled
- Tolerates sparks and embers far better
- Water-resistant when waxed, breathes well
- Heavier, needs breaking in
- Needs regular care with wax or grease
Synthetic / fabric
- Light and comfortable straight away
- Dries faster when soaked
- Usually cheaper
- Melts from embers, wears faster
- Less supportive under heavy loads
Waterproof membranes keep water out on wet grass and in shallow puddles and are welcome in cold, wet conditions. But once water gets in over the top, a membrane boot dries slowly, and in summer it can make feet sweat. In warm weather, non-membrane boots or trail shoes that dry fast are often more comfortable. Gaiters keep snow, mud and ticks out of the boot top.
Socks matter as much as boots: wool or wool-blend hiking socks cushion, manage moisture and stay warm when damp. Carry one spare pair per day, as in the Kit Builder, and keep one dry pair only for sleeping. Change wet socks in the evening and dry them inside your jacket or sleeping bag, not at the fire. Treat hot spots early with tape – blisters are covered in our first aid kit guide.
Rain gear: jackets, trousers and ponchos
A rain jacket goes on every trip, in every season – the Kit Builder always includes one. The most common types:
- Hardshell with waterproof-breathable membrane: the standard. Look for taped seams, a hood that turns with your head, pit zips for ventilation and a water column rating of several thousand millimetres. No membrane breathes fast enough for hard work, so ventilate through zips.
- Waxed cotton or oilskin: traditional, robust, spark-tolerant, heavy and less breathable. Good for base-camp use.
- Poncho: covers you and your pack, ventilates well and can double as an emergency shelter. It flaps in wind and snags in dense undergrowth.
- Rain trousers: worth carrying in autumn and winter, when wet legs cool you quickly. Side zips make them easy to pull on over boots.
Membrane jackets lose water repellency over time: when the outer fabric "wets out" and darkens, wash and re-proof it according to the label. Keep it away from sparks – it is almost always a synthetic that melts.
Bushcraft clothing by season
The table shows what you wear and what goes in the pack for a typical trip, consistent with the Kit Builder lists. Adjust for your climate and how warm you run.
| Layer | Summer | Autumn | Winter |
|---|---|---|---|
| Base | Light merino or synthetic T-shirt; cotton fine in dry heat | Merino long-sleeve (200 g), thermal leggings (250 g) | Merino long-sleeve and leggings, spare base top |
| Mid | Fleece (350 g) for evenings | Fleece or wool jumper (350 g) | Wool jumper or thick fleece |
| Insulation | – | Synthetic insulated jacket (450 g) | Down or synthetic parka (700 g) |
| Outer | Light poly-cotton shirt or smock | Poly-cotton or wool smock | Wool or poly-cotton smock, windproof |
| Rain | Rain jacket (350 g) | Rain jacket + rain trousers | Rain jacket (+ trousers in wet snow) |
| Hands & head | Sun hat, head net | Hat + gloves (150 g) | Hat, liner gloves + mittens, neck gaiter |
| Feet | Wool socks, 1 spare pair per day | Wool socks, 1 spare pair per day | Thick wool socks, 1 spare pair per day, gaiters |
Weights in brackets are the Kit Builder's typical values for carried items.
Winter additions: staying warm when it freezes
Winter bushcraft adds two challenges: long, inactive hours in camp and moisture that freezes. The layering system still works – you simply need more insulation and better moisture management.
Winter clothing checklist
- Parka or thick insulated jacket that fits over all other layers
- Mittens over liner gloves, plus a spare pair of gloves
- Warm hat and a neck gaiter or balaclava for wind
- Thermal leggings and insulated or windproof trousers
- Thick wool socks and a dry pair reserved for sleeping
- Gaiters or high boots for snow
- Dry base layer to change into at camp
- Insulated booties or camp shoes for the evening (optional)
Put the insulated jacket on before you get cold at every stop, and take it off before you start working hard. Keep gloves and a hat in your pockets so they stay warm. Mittens are warmer than gloves because the fingers share warmth; use thin liner gloves for fine work like striking a ferro rod and slip the mittens back on straight after. At night, dry clothing is part of your sleep system – the sleeping bag calculator counts a warm layer worn in the bag as about 3 °C.
Wind chill: why wind decides what you wear
Wind strips away the thin layer of warm air around your body. The wind chill index (NWS / Environment Canada, 2001) expresses this as a "feels like" temperature for exposed skin. It applies at air temperatures of 10 °C and below and wind speeds from about 5 km/h. Some examples from our wind chill calculator:
| Air temperature | Wind | Feels like | Risk |
|---|---|---|---|
| 5 °C | 20 km/h | ≈ 1 °C | Low – uncomfortable, dress in layers |
| 0 °C | 20 km/h | ≈ −5 °C | Low – cover up |
| −5 °C | 25 km/h | ≈ −12 °C | Moderate – hypothermia risk with long exposure |
| −10 °C | 30 km/h | ≈ −20 °C | Moderate – cover face, hands and ears |
| −20 °C | 30 km/h | ≈ −33 °C | High – exposed skin can freeze in 10–30 min |
Wind chill affects people and animals, not objects: water still freezes only below 0 °C.
Two practical lessons follow. First, a windproof outer layer adds more warmth in wind than another fleece – fleece is warm but lets wind straight through. Second, where you camp matters: pitch with your back to the wind and use terrain and trees as a windbreak (see choosing a camp site). Wet clothing makes all of this worse, because water conducts heat around 25 times faster than air: if you get soaked, change into dry layers or get to a fire straight away. For fire-lighting in these conditions, read fire in wet weather.

Drying and caring for clothes in the field
Keeping clothes dry is easier than drying them. Change out of sweaty layers when you reach camp, hang damp items under the tarp in a breeze, and dry small things like socks and gloves with body heat inside your jacket or sleeping bag. Near the fire, hang clothing on a line or stick well away from the flames and sparks, never directly above them, and check it often – wool and leather shrink or crack when overheated, and synthetics melt.
Evening routine: getting and staying dry
 1Swap the sweaty base layer
Change out of the damp base layer as soon as camp is set up – while you are still warm from walking. A wet layer against the skin cools you all evening.
 2Keep one set only for sleeping
Dry base layer, socks and hat live in their own dry bag and are worn only in the sleeping bag. Never put them on for camp chores, however tempting.
 3Hang damp items in a breeze
String a line under the tarp where air moves. Turn socks inside out and spread items so they do not touch; even humid air dries clothes faster when it flows.
 4Use body heat for small items
Damp socks, gloves and liners dry overnight inside your jacket or in the sleeping bag footbox, next to the body – not on your skin. Wring them out well first.
 5Near the fire: to the side
Hang clothes on a line or stick beside the fire, never above it, and check them often. If an item is too hot to hold against your cheek, move it further away.
How to tell when something is dry: press it against the inside of your wrist or your cheek. Dry fabric feels neutral; fabric that still feels cool is still damp, even if the surface looks dry. Wool can hold a lot of moisture while still feeling only slightly damp and will keep you reasonably warm – but a wet sock stays a wet sock, so rotate pairs daily.
At home, wash wool with a wool detergent at low temperature and dry it flat; wash membrane jackets with a technical cleaner and re-proof them; re-wax cotton and leather. Mend small tears early – a needle and strong thread are part of every bushcraft kit list. If you are just starting, remember that you do not need a special wardrobe: most outdoor-capable clothing you already own works. Our bushcraft for beginners guide shows how to begin with what you have.
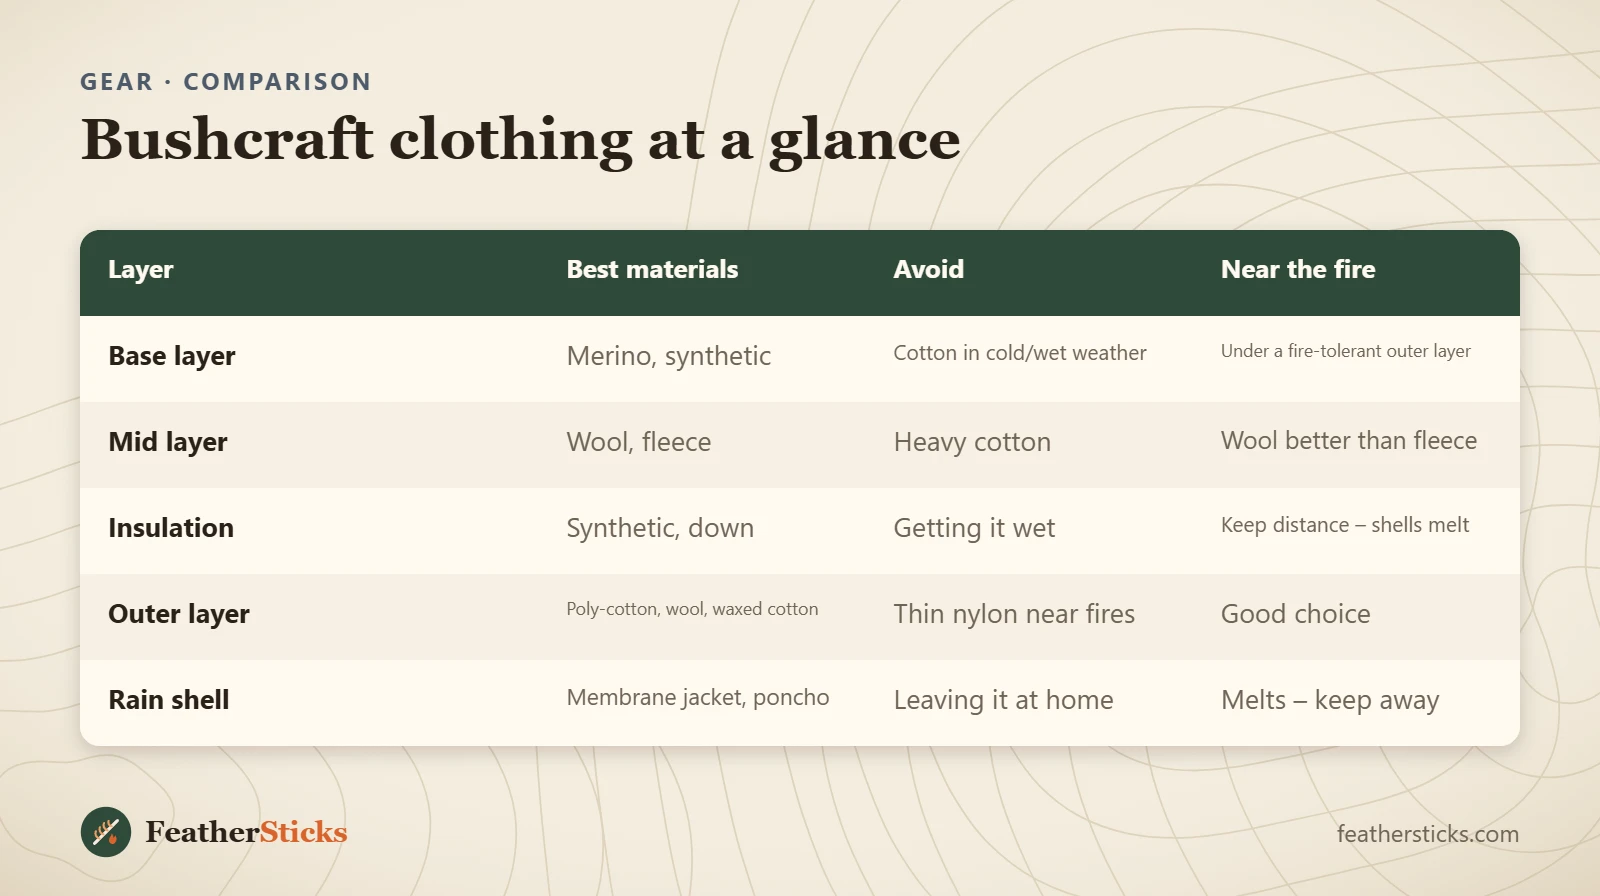
| Layer | Best materials | Avoid | Near the fire |
|---|---|---|---|
| Base layer | Merino, synthetic | Cotton in cold/wet weather | Under a fire-tolerant outer layer |
| Mid layer | Wool, fleece | Heavy cotton | Wool better than fleece |
| Insulation | Synthetic, down | Getting it wet | Keep distance – shells melt |
| Outer layer | Poly-cotton, wool, waxed cotton | Thin nylon near fires | Good choice |
| Rain shell | Membrane jacket, poncho | Leaving it at home | Melts – keep away |
Common mistakes
- Wearing a cotton base layer or jeans in cold, wet weather.
- Sweating heavily while working and then cooling down fast at camp.
- Sitting close to the fire in a fleece or nylon jacket.
- Waiting until you are cold before putting on the insulated jacket.
- Leaving the rain jacket at home because the forecast looked dry.
- Drying socks and boots too close to the fire.
- Sleeping in the damp clothes you wore during the day.
What you need
- Merino or synthetic base layer
- Fleece or wool jumper
- Synthetic or down insulated jacket
- Poly-cotton or wool smock
- Waterproof rain jacket (and trousers in autumn/winter)
- Robust bushcraft trousers
- Broken-in boots and wool socks
- Hat and gloves (mittens in winter)