Shelter
How to Choose a Camp Site: The 5 W's, Ground, Drainage & Safety
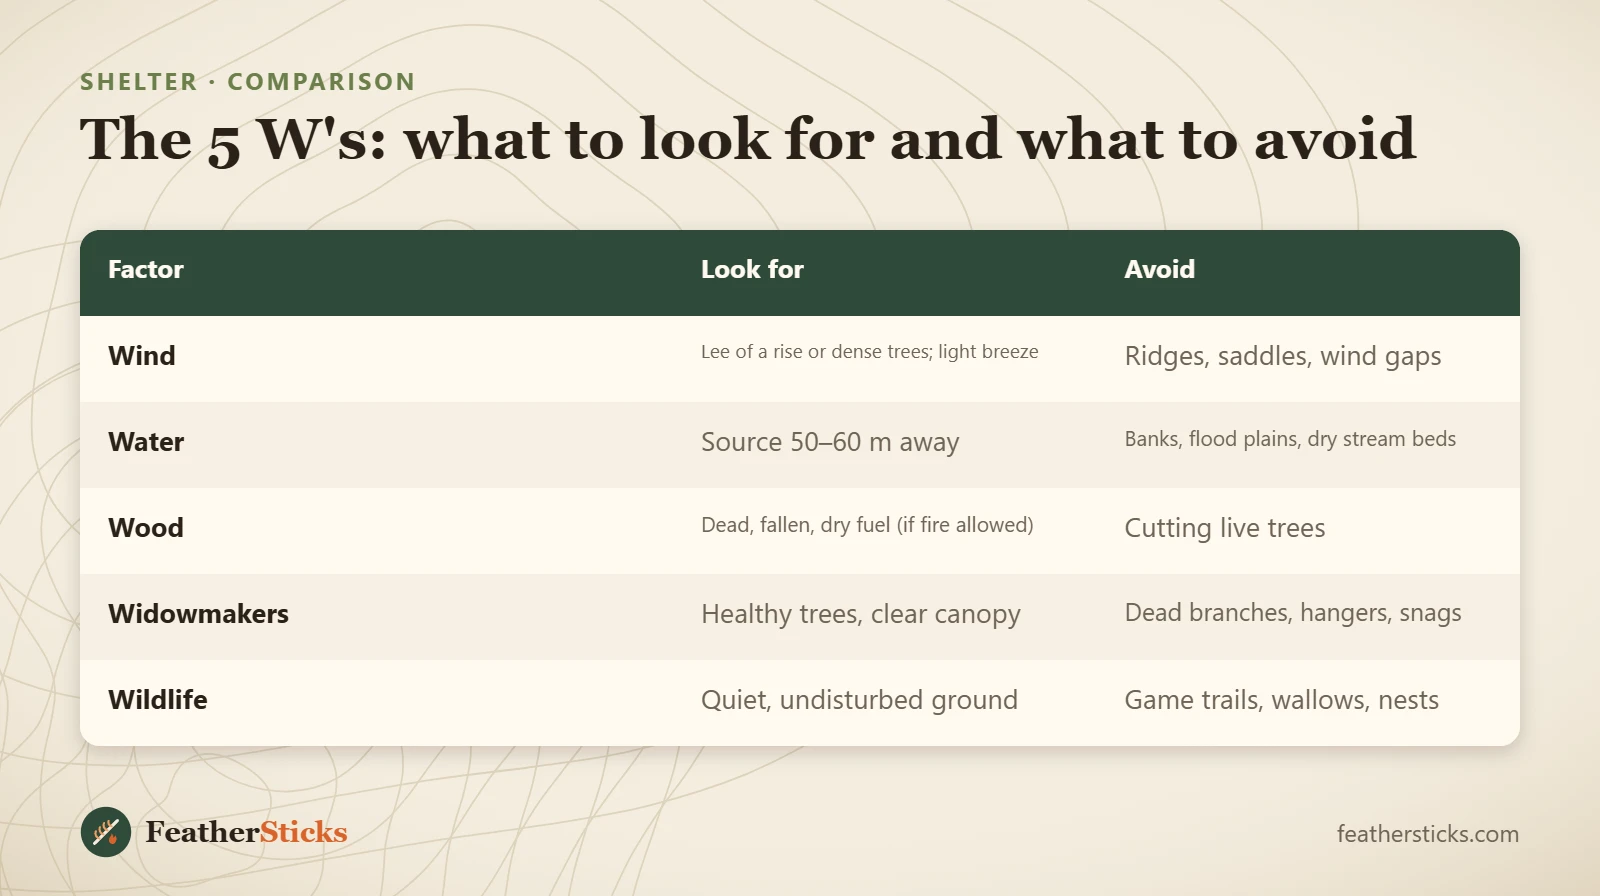
To choose a camp site well, check five things before you unpack: wind, water, wood, widowmakers and wildlife – the classic 5 W's. Then look at the ground itself: is it level, well drained, above the cold-air pool in the valley floor and away from insect swarms? Finally, make sure you are allowed to be there at all.
A good site makes every other job easier: the tarp pitches cleanly, the fire behaves, water is close but not too close, and you sleep warm and safe. A bad site can undo all your skill in one windy, wet night. This guide gives you a repeatable system, a printable checklist and a decision path you can run through in ten minutes – part of the core bushcraft basics.
Step by step
-
1
Start looking early
Begin your search two to three hours before sunset so you can reject poor spots without panic.
-
2
Look up for widowmakers
Scan every tree within falling distance for dead branches, hung-up trunks, rot and root plates lifting from the soil.
-
3
Read the ground and drainage
Choose level, slightly raised ground. Avoid hollows, dry stream beds and compacted paths where water collects.
-
4
Check wind and cold air
Find shelter from the prevailing wind but stay off the valley floor, where cold, damp air pools overnight.
-
5
Place water, wood and zones
Camp 50–60 m from water, with dead fuel nearby, and lay out sleep, fire and kitchen areas.
-
6
Confirm permission
Make sure camping, and especially fire, is allowed here – or that the landowner has agreed.
The 5 W's of camp site selection
The 5 W's are a memory aid used in bushcraft schools, scouting and military field craft. They do not rank in a fixed order – on a stormy night wind comes first, in a dry summer water and fire risk do – but you should consciously tick off all five before you commit to a spot.
Wind
Wind strips heat from your body and shelter, blows sparks and smoke around and can turn a tarp into a sail. Check the forecast for direction and gusts, then use terrain and vegetation as a windbreak: the lee side of a low rise, a dense stand of young conifers or a thicket. A light breeze is good – it keeps midges and mosquitoes down and carries smoke away – so you want shelter, not total stillness. Avoid exposed ridges, saddles and gaps between hills, which accelerate wind. The wind chill calculator shows how quickly an extra 20 km/h can make a mild evening feel freezing.
Water
You need water for drinking, cooking and putting out your fire, so a source within a few minutes' walk is ideal (see finding water). But camping right on the bank is a mistake: air near water is colder and damper, levels can rise quickly after rain upstream, banks attract insects and wildlife needs undisturbed access to drink. The widely taught rule is at least 50–60 m (about 200 ft) from lakes and streams. All natural water should be treated – read up on purifying water before you drink.
Wood
If fire is permitted, look for plenty of dead, dry, fallen wood nearby, from pencil-thin kindling to wrist-thick fuel. A site that forces you to wander far for fuel wastes daylight; the firewood calculator tells you how much you actually need for an evening or a full night. Never cut live trees, and in many places even collecting deadwood needs permission. Where fire is not allowed – which in much of Central Europe is the norm – "wood" simply becomes "a safe spot for your stove". The campfire safety guide covers fire bans and safe fire placement.
Widowmakers
Falling branches and trees are one of the most serious real dangers in woodland camping, and they are easy to overlook in the evening light. Look up at every tree whose height could reach your sleeping spot. Details and warning signs follow in the next section.
Wildlife
Animals follow the same logic you do: water, shelter, easy paths. Well-trodden game trails, wild boar wallows and rooting areas, ant hills, wasp nests in the ground and burrows are all poor neighbours. In bear country (parts of Scandinavia, the Carpathians, North America), cooking and food storage well away from the sleeping area is essential. In Central Europe the more practical problems are mice, foxes and wild boar raiding food – see storing food at camp.

Widowmakers: how to spot dangerous trees
A "widowmaker" is any dead or detached branch, or unstable tree, that can fall without warning – often in wind, after rain, or under snow load, but sometimes on a perfectly calm night. The rule is simple: nothing dead or unstable within falling distance of where you sleep, sit or cook. Falling distance for a whole tree is roughly its height; for a branch it can be a little less, but wind throws debris further.
Tree check: warning signs
- Dead branches without leaves or bark, especially large ones high in the crown
- Branches broken and hung up in other trees ("hangers")
- Trees leaning against other trees
- Fungal brackets on the trunk – often a sign of internal rot
- Cracks, cavities or peeling bark on the trunk
- Root plate lifting or soil cracked around the base
- Standing dead trees (snags) – birch and spruce snags are especially brittle
- Beech and spruce stands damaged by drought or bark beetle
In many European forests drought and bark beetle have left large numbers of dead spruce, and drought-stressed beech is known for dropping heavy limbs even in summer. Forestry authorities regularly warn against entering woods during and after storms. If the forecast shows strong winds, pick open ground, young trees or a stand with no dead timber – or do not camp in the forest at all that night.
Four warning signs to look for in every tree
 1Dead, bare branches
Branches without leaves, needles or bark — especially thick ones high in the crown. In winter, compare with the neighbouring branches: dead wood is greyer and has no buds.
 2Hangers
Broken branches caught in the crown of the same or a neighbouring tree. They can drop at the next gust or when you tension a line on the tree.
 3Snags, lean and fungus
Standing dead trees, trunks leaning on others and fungal brackets on the trunk are signs of rot inside. Treat the whole falling radius as off-limits.
 4Lifting root plate
Cracked or bulging soil around the base means the roots are working loose. Such trees fall in wind, often towards the side with the most crown.
Check twice, sleep once — the routine
 1From the sleeping spot
Lie down where your head will be and look straight up and around. You see the crown the way it will hang over you all night.
 2Walk a full circle
Walk around the site at about tree-height distance. Pause at four points and look at every tree that could reach you.
 3Look again from outside
Hangers and cracks hidden from below often show against the sky from the side. If you find one, move — do not negotiate with a dead branch.

Ground and drainage: where water goes at 3 a.m.
Imagine heavy rain at night and ask: where will the water run? Ideal ground is level, slightly raised and naturally drained – a gentle hump, a terrace a little above the valley floor, or a slope's shoulder. A very slight slope is fine: sleep with your head uphill.
What to avoid
- Hollows and depressions – even a 10 cm dip becomes a puddle.
- Dry stream beds and gullies – they are channels waiting for water; flash flooding happens in mountains even far from the storm.
- Compacted paths and forest tracks – water doesn't soak in and runs along them.
- Flood plains and gravel banks – look for debris lines (twigs, grass, litter) caught in bushes above the current water level.
- Moss carpets and rushes – rushes and sedges often indicate waterlogged soil.
Surface and comfort
Clear away pine cones, sticks and stones from your sleeping area, but don't dig trenches – they damage the ground and are rarely necessary if you choose well. A deep layer of leaf litter or needles insulates and cushions; bare rock or clay under a tent stays cold and hard. A good sleeping pad matters more than anything: the sleeping bag & pad calculator helps you pick the right R-value for the ground temperature.
Reading the ground: four quick checks
 1Hollows
Crouch down and look across the ground at eye level: dips show up much better than when standing. Even 10 cm is enough to collect a puddle under your pad.
 2Dry stream beds
Rounded pebbles, sorted sand and bare channels mean water flows here — sometimes after rain far away. Never sleep in one, even when the sky is clear.
 3Flood marks
Twigs, grass and litter caught in bushes above the water show how high it has risen before. Camp well above that line.
 4The good spot
Level, slightly raised, with soft leaf litter or needles that drain well. Lie down on it for a minute before you unpack: roots and stones you feel now will be worse at 3 a.m.
The ideal sleeping spot, top to bottom
- No dead branches overhead; ideally some tree cover for less dew.
- Tarp, tent or hammock pitched to the wind.
- Insulated pad and bag matched to the night's low.
- Dry leaves or needles – cushion and insulation.
- Slightly raised, level, no hollows or channels.
Cold air pooling: why valley floors are colder
On clear, calm nights the ground radiates heat into the sky. The air in contact with it cools, becomes denser and flows downhill like water, collecting in valley bottoms, basins and hollows. This cold air pooling (a temperature inversion) can make the valley floor several degrees colder than a slope just a few tens of metres higher – and it is also where fog and heavy dew form.
The best compromise is usually a terrace or bench part-way up the slope: above the cold pool, below the exposed, windy ridge. This is sometimes called the "thermal belt". In summer the effect matters less, but in spring, autumn and winter it can be the difference between a comfortable night and one spent shivering.
Relative night-time cold on a clear, calm night
Trees as a blanket: a canopy of trees reduces radiative cooling, so you get less dew and frost under trees than in an open clearing. Just make sure those trees are healthy.
Insects, ticks and other small nuisances
Mosquitoes and midges breed in still water and love calm, damp, shaded spots at dusk. A site with a light breeze, a little distance from bogs and ponds, and some sun during the day will have noticeably fewer of them. In Scotland and Scandinavia, where midges can be severe, a breezy knoll can be the only bearable place to camp in summer.
Ticks wait in tall grass, bracken and undergrowth, and can transmit Lyme disease and, in parts of Central Europe, tick-borne encephalitis (TBE). Prefer sites with short vegetation or leaf litter, check your body every evening and morning, and carry a tick remover in your first aid kit. Ants and wasps nesting in the ground are easy to overlook: sit quietly for two minutes and watch the ground before you pitch.
Legal and permission: can you camp here?
The best spot physically is useless if you aren't allowed to be there. Rules vary enormously: Scandinavian right of public access allows short stays on most uncultivated land, Scotland has a statutory access right with an outdoor code, while in Germany, Austria and much of England and Wales camping in the woods generally requires the landowner's permission, and nature reserves and national parks usually forbid it entirely. In the US and Canada the rules depend on whether you are on public land (national forest, BLM, Crown land) and its regulations.
For Germany in particular – where the difference between pitching a tent and simply sleeping out matters – read our detailed guide to wild camping in Germany. As a rule: ask the landowner or forester when in doubt, use designated sites where they exist, never light a fire without explicit permission, and always leave no trace.
| Region | General situation | Fire |
|---|---|---|
| Norway, Sweden, Finland | Right of public access: short stays on uncultivated land, away from houses | Seasonal bans common; check local rules |
| Scotland | Access rights with the Scottish Outdoor Access Code; some seasonal management zones | Small fires tolerated responsibly; stoves preferred |
| England & Wales | Generally needs landowner permission (Dartmoor has special arrangements) | Usually not allowed |
| Germany, Austria | Camping in forests generally needs permission; protected areas forbidden | Generally forbidden in the forest |
| USA / Canada | Dispersed camping on much public land, with site rules | Depends on fire restrictions |
Simplified overview, not legal advice. Rules change and vary by region – always check locally.
From site to camp: placing shelter, fire and water
Once you've chosen the site, place the elements so they work together. The sleeping area goes on the best, flattest, safest patch. The fire (if allowed) sits downwind of the shelter at a safe distance – at least 2–3 m from a synthetic tarp – on mineral soil or an existing fire ring. The kitchen is next to the fire, water storage near the kitchen, and the toilet area at least 60 m from water and camp, downhill and downwind. Our full guide to camp setup explains the zone layout in detail, and the tarp pitch planner helps you choose the right pitch for the conditions you found.
The site selection process
- MapPick candidate areas at home: terraces, forest edges, near water, allowed land.
- ApproachArrive 2–3 h before sunset; check the sunset time.
- OverheadWidowmakers and tree health first.
- GroundLevel, drained, above cold air, no nests or trails.
- CommitPitch shelter, then fetch water and wood.
How the best site changes with the seasons
| Season | Top priority | Look for | Avoid |
|---|---|---|---|
| Spring | Drainage | Raised, sun-exposed ground that dries quickly | Snowmelt channels, saturated meadows |
| Summer | Insects, heat, fire risk | Breezy spots, shade in the afternoon, water nearby | Still, boggy hollows; dry grass near fire |
| Autumn | Widowmakers, cold air | Healthy trees, mid-slope terraces | Valley floors, storm-damaged stands |
| Winter | Wind and cold | Dense conifers as windbreak, morning sun from the east | Snow-loaded branches, avalanche slopes, frost hollows |
In winter, add snow load to your widowmaker check: branches heavy with wet snow break easily. Aim for a spot that gets the first morning sun – facing east or south-east – to warm you and dry your gear. For snow camping, see snow shelters.
Decision path: is this a good camp site?
Run through these questions in order
Are you allowed to camp here?
Yes → Continue.No → Move on, ask the landowner, or use a designated site.Is there any dead wood or unstable tree within falling distance?
Yes → Reject the spot or move well clear.No → Continue.Could water flow or pool here in heavy rain?
Yes → Find higher, level ground.No → Continue.Is it a valley floor, hollow or right on the water's edge?
Yes → Move up the slope or back 50–60 m.No → Continue.Is it sheltered from the forecast wind but not stagnant?
Yes → Continue.No → Use terrain or trees as a windbreak, or lower your pitch.Are you clear of game trails, nests and insect hot spots?
Yes → Good site – pitch camp.No → Shift a few metres and check again.
Typical spots compared
Good site
- Level terrace a little above the valley floor
- Healthy trees, no hangers overhead
- Water 50–60 m away, easy path
- Light breeze, dry leaf litter underfoot
- Landowner permission or designated site
Poor site
- Hollow or dry stream bed that fills in rain
- Dead spruce or broken branches above
- Right on the bank: cold, damp, insects
- Exposed ridge or wind gap
- Nature reserve or private land without permission
Learning from the night: symptoms of a poor site
Every night outdoors tells you something about the site you chose. Use the table the next morning to link what you felt to its likely cause — and what to look for next time.
| What happened in the night | Likely site cause | Next time |
|---|---|---|
| Much colder than forecast, heavy dew or frost | Valley floor or hollow — cold air pool | Move up to a mid-slope terrace or under trees |
| Water under the groundsheet | Slight dip, compacted path or run-off channel | Crouch-check the ground; pick a raised spot |
| Tarp flapping, sparks blowing | Exposed ridge, saddle or gap | Use the lee of a rise or dense young trees |
| Swarmed by midges at dusk | Still, damp spot near standing water | Choose a breezy knoll further from bogs and ponds |
| Animals rustling through camp | On or beside a game trail | Look for trodden paths and droppings before pitching |
Practice drill: rate three sites in ten minutes
On your next day walk, stop three times in woodland and give each spot a score out of five for the 5 W's, plus one point each for ground and cold air. Take a photo of the best and worst. After a few walks you will read a site at a glance — which is exactly what you need when the light is fading.
Camp site checklist (printable)
Before you pitch
- Camping (and fire, if needed) is permitted here
- Sunset time known, at least 90 minutes of light left
- No widowmakers within tree height of the shelter
- Level, slightly raised ground; no hollows or channels
- Above the valley floor; not right beside water
- Sheltered from forecast wind direction
- Water source 50–60 m away
- Deadwood available (if fire allowed) or safe stove spot
- No game trails, burrows, ant or wasp nests
- Toilet area possible 60 m+ from water and camp
- Escape route known in case of storm or flooding
Add the checklist to your kit list or save it on your phone. With practice you'll run through it almost unconsciously as you walk. For more foundations, browse all shelter guides or read about debris shelters and the lean-to for emergency situations.
| Factor | Look for | Avoid |
|---|---|---|
| Wind | Lee of a rise or dense trees; light breeze | Ridges, saddles, wind gaps |
| Water | Source 50–60 m away | Banks, flood plains, dry stream beds |
| Wood | Dead, fallen, dry fuel (if fire allowed) | Cutting live trees |
| Widowmakers | Healthy trees, clear canopy | Dead branches, hangers, snags |
| Wildlife | Quiet, undisturbed ground | Game trails, wallows, nests |
Common mistakes
- Starting to look for a site at dusk and accepting the first flat spot.
- Checking the ground but never looking up at the trees.
- Camping in the valley bottom or right on the lakeshore and waking up cold and wet.
- Pitching in a hollow or dry stream bed that fills with water in the night.
- Ignoring the forecast wind direction and pitching the open side of the tarp into it.
- Assuming that a remote spot is automatically a legal one.
What you need
- Topographic map (1:25,000) and compass
- Headlamp for late arrivals
- Tick remover and insect repellent
- Small trowel for the toilet area
- Collapsible water container
- Weather forecast app or radio