Tools
Folding Saw vs Bow Saw: Choosing and Using a Bushcraft Saw
Folding saw vs bow saw comes down to the size of wood you cut: a folding saw with an 18–33 cm blade handles everything up to about wrist or forearm thickness and fits in a pocket, while a bow saw with a 53–76 cm blade eats through logs of 15–25 cm and is the fastest way to process a winter's worth of firewood. For most bushcraft trips, a folding saw is the better first saw.
A good saw is quieter, safer and far less tiring than an axe for cross-cutting. This guide compares both types, explains teeth per inch (TPI) and tooth patterns, and walks you through technique, safety and care. It is part of our bushcraft tools hub and fits alongside axes and hatchets and your bushcraft knife.
Step by step
-
1
Match the saw to the wood
Use a folding saw for wood up to about 10–12 cm thick and a bow saw for bigger logs. Choose coarse teeth for green wood, finer teeth for dry wood.
-
2
Support the log firmly
Rest the log on a sawhorse or across another log so the cut sits just beyond the support and the wood cannot roll or drop onto the blade.
-
3
Place your guard hand safely
Hold the wood with your free hand well away from the cut line, never in front of the blade. Kneel or stand to the side, out of the blade's path.
-
4
Use long, relaxed strokes
Start with a few light pull strokes to set the kerf, then use the full blade length. Let the teeth do the work instead of pressing down.
-
5
Finish, clean and lock away
Support the offcut on the last strokes, wipe resin off the blade, close or cover it, and check the lock before you pack the saw.
Folding saw vs bow saw: which is better for bushcraft?
Neither saw is simply "better". A folding saw weighs 150–400 g and rides in a pocket or hip pouch, so it is the saw you actually carry all day. A bow saw (also called a buck saw) uses a thin blade tensioned in a steel or wooden frame. It weighs 500 g to over 1 kg and is bulky, but its long, stiff blade cuts thick wood much faster with less effort.
The deciding question is: what is the thickest wood you will cut regularly? For tent pegs, pot hangers, lean-to poles and kindling-sized fuel for a small cooking fire, a folding saw is enough. For a base camp or winter camp with a large fire, a bow saw earns its weight.
On a folding saw, the pivot and lock carry every stroke: the lock must click home when open and hold the blade without play.

Folding saw vs bow saw at a glance
Folding saw
- Blade 18–33 cm, weight roughly 150–400 g
- Pocket or belt carry, blade folds into the handle
- Best up to about 10–12 cm diameter
- Ideal for pruning, shelter poles, carving blanks
- Usually cuts on the pull stroke
Bow saw
- Blade 53–76 cm (21–30 in), weight roughly 0.5–1.2 kg
- Carried strapped to or inside a pack, blade covered
- Comfortable up to 20–25 cm diameter
- Ideal for firewood rounds and base camps
- Cuts on push and pull strokes
| Feature | Folding saw | Bow saw |
|---|---|---|
| Typical blade length | 18–33 cm (7–13 in) | 53–76 cm (21–30 in) |
| Practical max. log diameter | About half the blade length | Up to about half the blade length (frame depth can limit it) |
| Weight | 150–400 g | 500–1,200 g |
| Speed on 15 cm logs | Slow, tiring | Fast |
| Portability | Excellent | Moderate; take-down frames pack flat |
| Best use | Day trips, light camps, carving blanks | Base camps, winter fires, big fire lays |
Diameter limits are rules of thumb: a saw needs spare blade length on each side of the log to clear sawdust.
Which blade length do you need?
Blade length decides how thick a log you can cut comfortably. Each stroke must carry sawdust out of the cut, so the blade should be at least twice as long as the wood is thick.
Folding saw lengths
18–21 cm blades are pocket saws for pruning, notching and cutting sticks up to 5–7 cm. 24–27 cm is the all-round bushcraft size: still compact, but it handles arm-thick deadwood and shelter poles. 30–33 cm folding saws cut 10–15 cm logs and come close to a small bow saw, at the cost of a longer, heavier package.
Bow saw lengths
A 53 cm (21 in) bow saw is the lightest useful size and packs well; many take-down models use this length. A 61 cm (24 in) blade is the classic camp size and the best compromise. A 76 cm (30 in) bow saw is for serious firewood at base camp.
Comfortable cutting diameter by blade length
Teeth per inch (TPI) and tooth patterns explained
TPI means teeth per inch (2.54 cm). Fewer, larger teeth remove more wood per stroke and clear wet sawdust well, but leave a rough cut. More, smaller teeth cut smoothly and handle hard, dry wood, but clog in green, sappy wood. Many makers label blades "coarse", "medium" and "fine" instead.
| TPI | Grade | Best wood | Typical use |
|---|---|---|---|
| About 5–7 | Coarse | Green, wet or soft wood (spruce, pine, poplar) | Fast firewood cutting, fresh poles |
| About 7–9 | All-round | Mixed deadwood, seasoned softwood | Everyday bushcraft, the best single choice |
| 10 and more | Fine | Dry hardwood (oak, beech, maple), small branches | Clean cuts, joints, carving blanks, bone and antler |
Ranges are general guidance; manufacturers measure and label TPI differently.

Raker teeth vs peg teeth
Bow saw blades come in two main patterns. A raker blade has groups of cutting teeth separated by a deeper, flat-topped raker tooth. The cutters sever the fibres and the raker scoops the loose shavings out of the kerf. This design clears wet, stringy sawdust and is the standard choice for green wood. A peg-tooth blade has a continuous row of evenly spaced triangular teeth. It cuts dry and hard wood smoothly but tends to clog in fresh, resinous wood.
Pull-cut, Japanese-style teeth
Most modern folding saws use Japanese-style tooth geometry: tall, narrow teeth ground with three bevelled faces and angled to cut on the pull stroke. Pulling keeps a thin blade under tension, so it does not buckle, which allows a thinner blade, a narrower kerf and less effort. These teeth are usually impulse-hardened: the tips are hardened far beyond the rest of the blade, so they stay sharp a long time but cannot be filed.
Set is how far teeth are bent alternately left and right. More set gives a wider kerf that resists binding in wet wood; less set gives a cleaner, easier cut in dry wood.
How to use a bushcraft saw: cutting technique
Good sawing looks lazy. Pressing hard with short, fast strokes bends the blade and clogs the teeth. Use the whole blade, keep a steady rhythm and let the sharp teeth do the cutting.
A clean cut, start to finish
 1Support
Log on a sawhorse or across a second log, cut marked just outside the support so the end hangs free. Cutting on the ground or between two supports is the typical error.
 2Mark with light strokes
Draw the blade towards you three or four times with almost no pressure until a shallow groove holds it. Guard hand well to the side; never steady the blade with your thumb.
 3Full, square strokes
Use the whole blade with light pressure and a steady rhythm. Look along it: the blade must stand square to the log at 90 degrees, or the cut wanders and binds.
 4Watch the kerf
If the saw suddenly gets heavy, the sagging log is closing the kerf. Stop, lift the free end or change the support; never yank or twist the blade free.
 5Finish and hold
Slow down on the last strokes and support the offcut from below, well away from the blade. That prevents a torn splinter and keeps the round off your foot.
Supporting the log
A log lying flat on the ground will roll, and the saw will hit soil and stones, which dulls teeth in seconds. Lift the work: a sawhorse made of two crossed pairs of stakes lashed together (see natural cordage and camp setup) or simply a second log laid across the first will do. Cut just beyond the support so the offcut hangs free and the kerf opens as you saw.
Avoiding pinching
Wood under load either compresses or stretches. On the compressed side, the kerf closes and grips the blade; on the stretched side it opens. A log supported at both ends sags in the middle, so the top is compressed: cut about a third from below first, then finish from above. A log that overhangs a single support is stretched on top: cut from above. If the blade binds, stop, lift the free end or shift the log, and never yank or twist the saw free. A wooden wedge tapped into the kerf also keeps it open.
Avoiding pinching: read the load first
 1Wrong: top cut, two supports
A log on two supports sags in the middle, so the top is compressed. Cut from above and the kerf closes on the blade after a few centimetres.
 2First: one third from below
Turn the saw teeth-up and cut about one third of the diameter from underneath with short, controlled strokes. The bottom is under tension, so this kerf opens.
 3Then finish from the top
Line up the second cut exactly above the first and saw until the kerfs meet. Slow down at the end so the halves separate cleanly.
 4Overhang: cut from the top
Beyond a single support the free end droops and the top is stretched. Saw from above: the kerf opens by itself.
Where should you cut from?
Is the log supported at both ends with the cut in between?
Yes → Cut about one third from below, then finish from the top.No → Go to the next question.Does the cut overhang a single support?
Yes → Cut from the top; the kerf will open as the end droops.No → Go to the next question.Is the log thicker than half your blade length?
Yes → Cut halfway from one side, roll the log, and meet the cut from the other side.No → Cut straight through with full strokes.
Cutting from both sides
When a log is almost too thick for your saw, cut halfway through, roll it 180 degrees and cut down to meet the first kerf. Mark the second cut carefully so both kerfs line up. This doubles the log size a folding saw can handle and is the standard trick for 12–15 cm deadwood with a 24 cm blade.
Cutting from both sides
 1Cut halfway through
Saw straight down to the middle of the log, blade square. Going deeper with a short blade only packs the kerf with sawdust.
 2Roll the log 180°
Turn the uncut half up and check the log rests firmly. The first kerf in the end grain shows where the second must go.
 3Meet the first kerf
Saw down on the same line until the kerfs meet. A 24 cm blade handles 12–15 cm logs this way; a small step at the meeting point is normal.
What a good cut should look like
Kneel on one knee beside the sawhorse with a folding saw, or stand with a bow saw, wrist straight and elbow in line with the blade. Then check these points; each is easier to fix after two strokes than after twenty.
Checkpoints for a clean cut
- The kerf is straight and follows your mark on the top and on the side of the log
- Sawdust comes out evenly on both sides in coarse crumbs, not as fine powder
- The blade stays flat and does not flex, whip or ring on the push stroke
- Your guard hand sits at least a hand width beside the cut, never in front of or under the blade
- You kneel or stand to the side, so a slipping blade would pass your knee and thigh
- The offcut hangs free beyond the support and the kerf opens as you saw
Troubleshooting by symptom
Most saw problems show early: the saw feels heavy or starts to drift. Fix the cause instead of pushing harder.
| Symptom | Likely cause | Fix |
|---|---|---|
| Saw binds or gets pinched | Cutting on the compressed side; log sagging between two supports | Stop, lift the free end, cut one third from below first or tap a wedge into the kerf |
| Cut wanders off the line | Blade not square, twisted wrist, dull or damaged teeth on one side | Restart with light marking strokes, straighten wrist and elbow, replace a worn blade |
| Blade flexes or jumps out on the first stroke | Too much pressure, push stroke on a pull saw, no groove yet | Three or four light pull strokes first; guard hand well beside the cut |
| Clogged teeth or only fine dust | Resin build-up, too fine TPI for green wood, or dull teeth | Clean off the resin, use a coarse 5–7 TPI or raker blade in fresh wood, replace if dull |
| Offcut tears a splinter | Full-speed strokes at the end, unsupported offcut | Slow down on the last strokes and hold the offcut from below |
| Bow saw blade twists or wanders | Too little tension or a bent blade | Tighten the lever until the blade pings, replace a kinked blade |
Practice drills
Ten rounds to a line: mark ten cuts on a log with a knife scratch and saw ten equal rounds. Stand each round on its end: if it leans, the blade was not square.
Both-sides drill: take a 12–15 cm log for a 24 cm folding saw, cut halfway, roll it and meet the first kerf. With practice the step where the cuts meet shrinks to a millimetre or two. The rounds are then ready for splitting with knife and baton or an axe; the firewood calculator tells you how many you need.
Saw, axe or baton: which tool for which job?
A saw is the best tool for cross-cutting (across the grain), an axe for splitting (along the grain), and a knife with a baton for splitting small pieces. In practice, the saw cuts rounds to length, and then an axe or batoning splits them into kindling and fuel. Sawing first gives flat, stable rounds that split more safely than angled, chopped ends.
For many trips, a folding saw plus a sturdy knife replaces a hatchet completely, and it is the safer choice when you are tired or teaching beginners. Use our fire lay planner to see how much wood of which thickness you really need for your fire.
| Task | Best tool | Why |
|---|---|---|
| Cutting firewood rounds to length | Saw | Fast, precise, low effort, flat ends |
| Splitting rounds over 10 cm | Axe | Uses the grain and momentum |
| Splitting small rounds for kindling | Knife and baton | Controlled, no axe needed |
| Shelter poles and ridge lines | Folding saw | Clean, square cuts; quiet |
| Notches and joints | Fine-tooth saw plus knife | Saw the shoulders, carve out the waste |
Saw safety: guard hand, blade guards and carrying
Saw injuries are usually cuts to the guard hand, knee or thigh when the blade jumps out of the kerf on the first stroke. Saw teeth tear rather than slice, so these wounds bleed heavily. The rules:
- Guard hand: keep your free hand at least a hand's width to the side of the cut line, never directly in front of or under the blade. Do not use your thumb as a guide for the first stroke; set the kerf with gentle pull strokes instead.
- Start gently: most slips happen on the first strokes. Short, light strokes until the teeth have bitten.
- Folding locks: check that the lock clicks fully into place in the open position before every use. A blade that folds while you saw can close onto your fingers.
- Blade guard: a bow saw always travels with its blade cover on. Store it where nobody can step on it or sit on it.
- Carrying: close folding saws before you walk anywhere, and carry a bow saw with the covered blade pointing down and away from your body.
- Keep a clear zone: the same safety circle you use for knives and axes applies: nobody within reach of the blade, especially children.

Where you may cut
Cutting living trees or branches without the landowner's permission is illegal in most places, and even collecting dead wood is restricted in many parks and nature reserves. Rules vary by country and by site, so check before you go. Where fires and wood gathering are allowed, use fallen deadwood, keep fires small, and follow good campfire safety and Leave No Trace practice.
Saw maintenance: cleaning, oiling and blade care
Saws need little care, but resin is their enemy. Sticky sap builds up on the blade sides and between the teeth, increasing friction until the saw binds in every cut.
Saw care routine
- After use: brush sawdust out of the teeth and the folding slot
- Remove resin with a cloth and a little oil, alcohol or a resin cleaner
- Dry the blade fully, then wipe on a thin film of oil
- Check the pivot, lock and rivets for play; tighten screws if the design allows
- Bow saw: check blade tension and the condition of the blade cover
- Replace dull or bent blades instead of forcing them
Replace, don't sharpen, impulse-hardened teeth
Most folding saws and many modern bow saw blades have impulse-hardened teeth, which are too hard for a file. Trying to sharpen them usually ruins the tooth geometry. Replacement blades are inexpensive, so carry a spare for longer trips and swap when cutting slows down, the saw wanders off line or teeth are chipped. Only older, non-hardened blades can be filed; otherwise spend your time on sharpening your knife and axe.
Bow saw tension
A bow saw only cuts straight when the blade is taut. Most frames use a cam lever: close it until the blade "pings" when plucked and does not twist when you push sideways. A slack blade wanders and binds; an over-tightened one can snap. Wooden take-down frames tensioned with a twisted cord should be slackened when not in use so the frame does not warp.
Packing a saw in your bushcraft kit
A folding saw belongs on almost every bushcraft kit list: it goes in a hip pocket or a small pouch on your belt, where you can reach it without taking off your pack. A bow saw rides on the outside of a pack, strapped vertically with the blade cover facing inward, or broken down inside it if it is a take-down model; see our guide to bushcraft backpacks for attachment options.
In wet weather, the saw is often the key to dry fuel: cutting through a standing dead branch or a fallen log exposes the dry core that you can split and shave, as described in fire in wet weather. If you are new to all of this, start with bushcraft for beginners and plan your tool set with the Kit Builder.
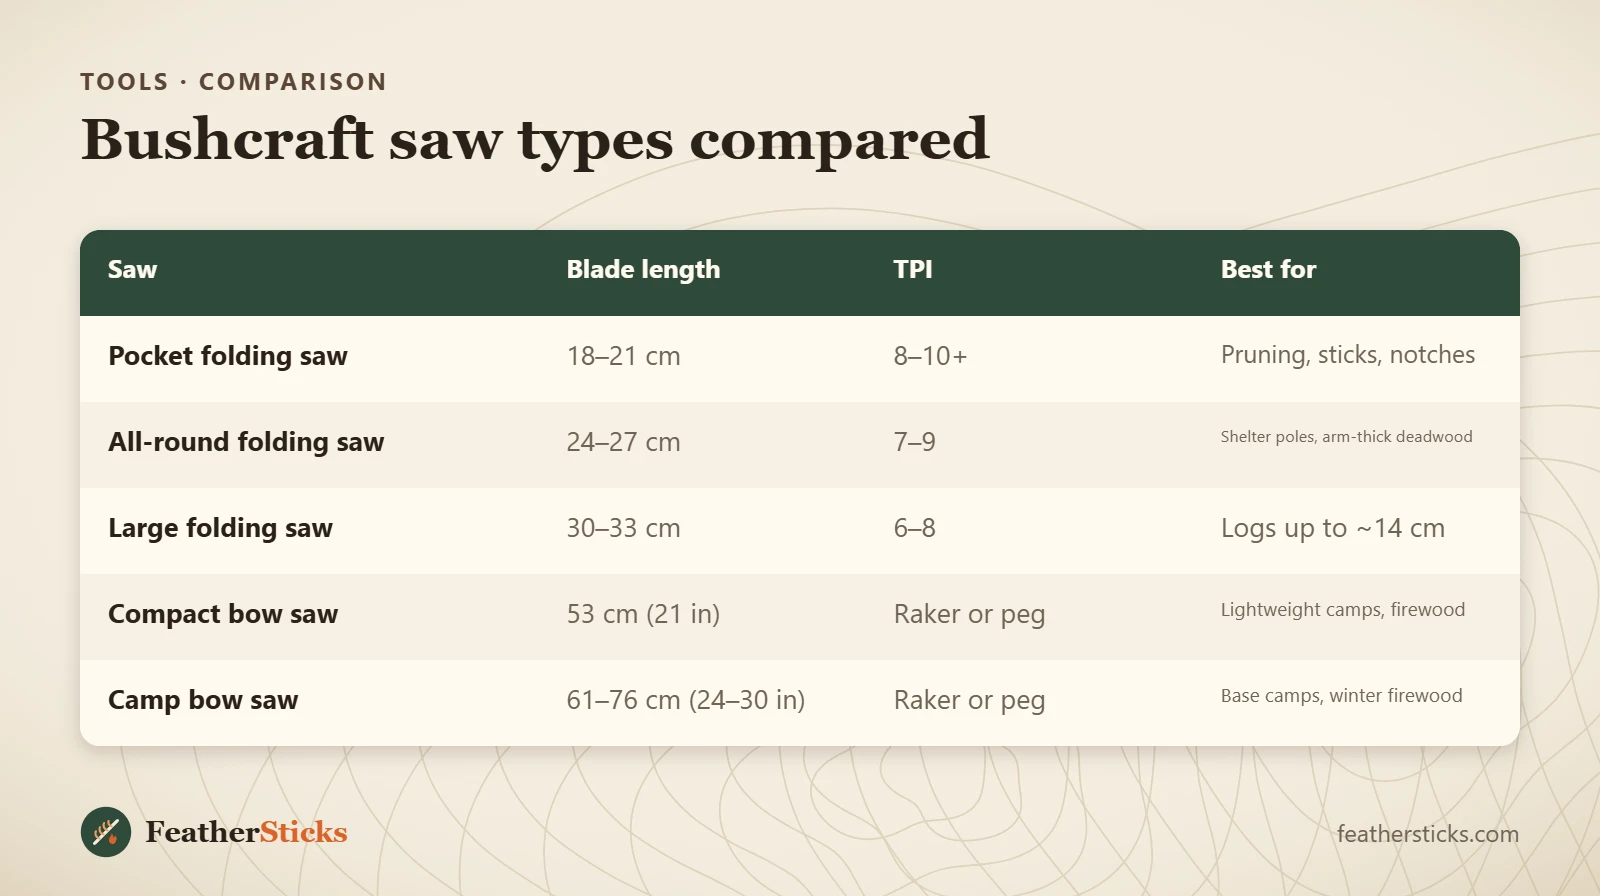
| Saw | Blade length | TPI | Best for |
|---|---|---|---|
| Pocket folding saw | 18–21 cm | 8–10+ | Pruning, sticks, notches |
| All-round folding saw | 24–27 cm | 7–9 | Shelter poles, arm-thick deadwood |
| Large folding saw | 30–33 cm | 6–8 | Logs up to ~14 cm |
| Compact bow saw | 53 cm (21 in) | Raker or peg | Lightweight camps, firewood |
| Camp bow saw | 61–76 cm (24–30 in) | Raker or peg | Base camps, winter firewood |
Common mistakes
- Pressing down hard with short, fast strokes instead of using the full blade with light pressure.
- Sawing a log lying flat on the ground, so the teeth hit soil and stones.
- Cutting from the compressed side of a supported log and getting the blade pinched.
- Holding the wood right next to the cut line or using the thumb as a guide.
- Trying to file impulse-hardened teeth instead of replacing the blade.
- Packing a folding saw wet and full of resin, then finding it rusted and stiff.
- Carrying a bow saw without a blade cover.
What you need
- Folding saw with 21–27 cm blade and positive lock
- Bow saw (53–61 cm) with raker blade and blade cover for base camps
- Spare blade
- Leather or cut-resistant work gloves
- Small rag and a few drops of oil
- Cord for lashing a sawhorse