Tools
Batoning Wood with a Knife: Technique, Safety & When Not To
Batoning wood with a knife means setting a fixed-blade knife on the end of a piece of wood and striking its spine with a wooden club, the baton, to split the wood along its grain. It is the way to get dry kindling out of wet wood when you carry no axe – but only with a strong, full-tang knife, only on straight-grained wood thinner than your blade is long, and never with a folding knife.
Done well, batoning turns wrist-thick sticks into kindling and feather-stick blanks in minutes. Done badly, it breaks knives and hands. This guide covers the right knife, making a baton, technique, safety, splitting for kindling and the alternatives – often a saw or an axe is the better choice. It is part of our bushcraft tools section and builds on the bushcraft basics.
Step by step
-
1
Check knife and wood
Use a full-tang fixed blade with a 3–5 mm spine. Choose straight, knot-free wood clearly thinner than the blade is long.
-
2
Make a baton
Cut a hardwood stick about 40–50 cm long and 5–8 cm thick. Never use a rock or metal hammer.
-
3
Set up safely
Kneel, stand the wood on a log or stump, keep your legs out of line and the tip pointing away from you.
-
4
Tap the blade in
Set the edge across the centre of the end grain and tap the spine until the blade is seated.
-
5
Strike the tip, keep level
Strike the protruding tip to drive the blade down evenly. Keep it level and never hit the handle.
-
6
Split down to kindling
Halve, quarter, then split to thumb- and pencil-thick sticks and sort them by size for your fire.
What is batoning?
Batoning uses a knife as a wedge. The blade is placed on the end grain of a stick, and a wooden baton drives it down through the wood. Because wood splits easily along its fibres, very little force is needed on straight, dry pieces. The inside of a wet stick is usually dry, so batoning is one of the most reliable ways to get burnable fuel in rain – see fire in wet weather.
Batoning became popular because many people carry only a knife. It is a legitimate technique, but it is also the most abusive thing you can do to a knife. Understanding when it makes sense saves you broken blades and wasted energy.
When to baton – and when not to
Baton when you need small, dry fuel from sticks up to about wrist thickness and you have no axe, or when you want precise control for kindling and feather-stick blanks. Do not baton just because you can: if smaller dead wood lies around, gathering it is faster, quieter and easier on your gear.
Read the stick first: bark and surface cracks should run straight from end to end, and drying checks in the end grain show where it wants to split. A knot, a fork or spiralling bark means the grain will steer your blade sideways.

Batoning: good idea or bad idea?
Good situations
- Straight-grained, knot-free sticks 3–8 cm thick
- Wet weather: splitting to reach the dry core
- Making feather-stick blanks and fine kindling
- Lightweight trips with no axe
- Splitting fatwood into thin slivers
Bad situations
- Knots, twisted or forked wood – the blade jams or twists
- Big rounds thicker than the blade can span
- Folding knives of any kind – the lock can fail
- Thin or hollow-ground blades and small knives
- Hard carbon steel in severe frost, when it chips more easily
Should you baton this piece?
Is there enough thin dead wood lying around?
Yes → Gather it instead – no splitting needed.No → Continue.Is the piece straight, knot-free and thinner than your blade minus a hand's width of tip?
Yes → Baton it with a full-tang fixed blade.No → Saw it shorter, choose another piece, or use an axe.Do you have a saw or hatchet?
Yes → Use them for rounds; keep the knife for kindling and fine work.No → Baton small pieces only, and carefully.
Which knife is best for batoning?
A batoning knife takes shock loads on the spine and sideways stress in the wood. The requirements are simple, and most of them are the same features that make a good all-round bushcraft knife.
| Feature | Recommended | Why |
|---|---|---|
| Construction | Fixed blade, full tang | The steel runs through the handle; no lock or pivot to fail |
| Spine thickness | 3–5 mm | Thinner blades flex and break; thicker ones wedge and bind |
| Blade length | 10–15 cm; always longer than the wood's diameter | You need 3–5 cm of tip protruding to strike |
| Spine shape | Flat, square spine | Takes baton strikes without denting the baton unevenly |
| Grind | Scandi, flat or sabre; convex also works | Robust edge; avoid very thin hollow grinds |
| Steel | Tough rather than extremely hard | Very hard steels are more prone to chipping |
Rule of thumb: maximum wood diameter = blade length minus 3–5 cm. A 12 cm blade splits wood up to about 7–9 cm.
Why never a folding knife?
A folding knife's lock and pivot are not designed for blows on the spine. Batoning can shear the lock, bend the pivot or fold the blade onto your fingers. The same goes for multi-tools. Knives with partial tangs (rat-tail or hidden tangs) can also snap at the junction of blade and handle.

Cold weather
Steel becomes less tough in severe frost, and hard, thin edges are then more likely to chip under shock. In deep cold, split only small pieces, strike gently, or warm the blade inside your jacket first. An axe is the better tool in winter conditions.
How to make a baton
The baton is just a club of wood, but a good one makes batoning safer and more controlled. Dead, sound hardwood is ideal: beech, oak, maple or birch work well. Softwood batons work but break down faster.
Baton at a glance
- Length
- 40–50 cm – long enough to swing, short enough to control
- Diameter
- 5–8 cm, comfortable in one hand
- Wood
- Dead, sound hardwood; no rot, no cracks
- Handle
- Optionally carve one end thinner for grip with your carving skills
- Never use
- Rocks, hammers, the back of an axe or another knife
If you cannot break a suitable stick to length, saw it with a folding saw. A baton lasts the trip; leave it at the fire pit or burn it at the end.
Batoning technique step by step
Good technique is about keeping the blade level and letting the wood's grain do the work. Before you begin, look at the end grain: radial cracks (checks) show where the wood wants to split, and knots show where it will resist.
Splitting a stick by batoning
 1Stand it on a base
Stand the stick upright on a log, stump or thick round. Never on soil or stones: when the blade breaks through, a stone chips the edge and soil hides grit that dulls it.
 2Edge along a check
Lay the edge across the centre of the end grain, ideally along a drying check, with a relaxed grip on the handle. Off-centre, the split runs out to the side and leaves a thin sliver.
 3Tap until seated
Tap the spine just above the wood with light strokes until the edge sits about 1 cm deep and the knife stands by itself. Hard blows at this point make the blade jump off the end grain.
 4Strike the protruding tip
Now strike the 3–5 cm of spine that sticks out beyond the wood. A crack runs ahead of the blade; follow it down with steady, medium blows rather than a few heavy ones.
 5Correct a rising handle
If the tip dives and the handle side rises, strike the spine on the handle side, just above the wood, until the blade is level again. Never hit the handle – it is not built for blows.
 6Slow down at the end
Near the bottom the halves suddenly fall apart. Use lighter strikes for the last centimetres so the edge does not slam into the base.
What it should look like
Pause every few strikes and compare what you see with this list. Correct anything that is off before the next blow.
Checkpoints during the split
- The blade is level: spine parallel to the base, not tilted towards tip or handle
- 3–5 cm of the tip protrude beyond the wood, so you always have something to strike
- The split follows a check and runs straight down through the centre of the piece
- Your knife hand is relaxed – it guides the knife, it does not force it
- Tip and edge point away from your legs and body; the piece stands firmly on the base
Keeping the blade level
Most failed splits happen when the tip goes deep while the handle end rises, or vice versa. A tilted blade wedges, binds and puts huge leverage on the knife. Watch the angle after each strike and correct it immediately with a strike to the higher side of the spine. Keep your grip on the handle relaxed – a death grip transmits shock into your wrist and tempts you to twist.

If the blade gets stuck
Do not pry sideways and do not wiggle the handle: that is how blades snap. Instead, carve a small wooden wedge and drive it into the split beside the knife with the baton, or keep striking the tip gently while holding the blade straight. If a knot is holding, give up on that piece.
Freeing a stuck blade
 1Never pry or wiggle
Do not lever the handle sideways or rock it. The blade is clamped in the wood, and that leverage bends or snaps it.
 2Drive in a wedge
Carve a short hardwood wedge and drive it into the split right beside the blade with the baton. Strike the wedge, not the knife.
 3Knife comes free
As the split opens, the pressure drops and the knife slides out undamaged. If a knot still holds the piece, put it aside.
Cross-grain batoning
Some people baton across the grain to cut a stick to length. It works on thin, dry sticks, but it is much harder on the edge and the knife. Snap sticks over your knee or a tree, or use a saw instead.
Batoning problems: causes and fixes
Most problems show early. Find your symptom and fix the cause before the next strike.
| Symptom | Likely cause | Fix |
|---|---|---|
| Blade twists or runs out to the side | Edge set off-centre, twisted grain, or a tight grip steering the knife | Reset through the centre along a check; relax your hand; choose straighter wood |
| Split runs out of the piece | Blade too close to one side, or a knot deflecting the crack | Split in halves only; turn the piece and start from the other end |
| Handle end rises | Only the tip is being struck, so the tip dives | Strike the spine on the handle side just above the wood until level – never the handle |
| Knife stuck | Tilted blade, knot, or wood too thick for the blade | Drive a wooden wedge beside the blade; no prying; next time pick thinner wood |
| Baton splinters or crushes | Rotten, dry-brittle or softwood baton | Carve a new baton from sound hardwood, 40–50 cm × 5–8 cm |
| Edge chipped or rolled afterwards | Blade hit the base, a stone or a knot; very hard steel in frost | Use a log base, slow down at the end; hone or re-sharpen – see sharpening |
| Piece jumps off the base | Uneven base, crooked end cut, or heavy blows while seating | Saw a flat end; use a level stump; seat the blade with light taps |
Batoning safety
Batoning feels controlled because the blade barely moves, but the combination of a sharp edge, a striking tool and a stick that can suddenly split apart causes real injuries – mostly to the holding hand, the thighs and the shins.
Batoning safety checklist
- Kneel or crouch beside the base, so your legs are not under or in line with the blade
- Tip and edge point away from your body and from other people
- Keep a clear space of at least an arm plus baton length around you
- Strike only the spine, never the handle, and never with metal or stone
- Slow down near the end of the split so the edge does not hit through
- Sheath the knife when you move, fetch wood or hand it to someone
- Keep a first aid kit with a pressure bandage nearby
Splitting kindling: from log to pencil sticks
A fire needs fuel in graded sizes: tinder, pencil-thin kindling, thumb-thick sticks, then wrist-thick fuel. Batoning is excellent at producing the middle sizes from a single dry-cored piece. Work in halves: each split should divide a piece roughly in two, which keeps the blade centred and the pieces even.
From wrist-thick stick to kindling
- Wrist-thick piece6–8 cm, 25–30 cm long, knot-free
- HalvesSplit through the centre along a check
- QuartersSplit each half again
- Thumb-thick sticksMain kindling for the fire lay
- Pencil sticksFinest kindling and feather-stick blanks
Kindling from one stick
 1Pick the right stick
Choose a wrist-thick, knot-free piece, Ø 6–8 cm, and saw it to 25–30 cm. Dead wood that snaps cleanly is dry inside, even if the bark is wet.
 2Halve through the centre
Split through the centre along a check. Two even halves keep every following split centred.
 3Quarter, then thumb-thick
Split each half into quarters, then keep halving to thumb-thick sticks. If a split drifts towards the bark, restart from the other end.
 4Pencil-thin and blanks
Split some thumb-thick sticks once more into pencil-thin kindling. Keep a few quarters whole: their 90° corner is the ideal start for feather sticks.
Practice drills
Practise in dry weather at a safe fire site before you need the skill in the rain.
- Level-blade drill: split one quarter of a 25–30 cm piece into 10 thumb-thick sticks, checking after every strike that the spine stays level.
- Centre drill: split five pieces in half. If one half is always thinner, your edge starts off-centre.
- Feather-stick blank drill: make three straight, thumb-thick blanks with one clean 90° corner each and carve a feather stick from each – crooked splits show up at once.
Feather-stick blanks
For feather sticks, split thumb-thick pieces with a sharp 90° corner along one edge – a split face gives you a clean start for the first curls. Choose the straightest, driest pieces and set aside a few extra, because the first sticks you carve in wet weather rarely turn out perfect. The inner faces of split wood are also the driest surfaces, which is why split kindling lights far better than round sticks.
How much do you need?
For a small cooking fire, two big handfuls each of pencil-thin and thumb-thick kindling are a good start, plus fuel. The firewood calculator estimates totals, and the guide to starting a fire shows how to build it up.
Alternatives to batoning
Batoning is one tool among several. Each alternative has its place, and combining them is usually most efficient.
| Method | Best for | Pros | Cons |
|---|---|---|---|
| Batoning with a knife | Kindling from sticks up to ~8 cm | One tool, precise, quiet | Hard on the knife; limited diameter |
| Axe or hatchet | Rounds of any size, fast splitting | Built for splitting; fast | Heavy; higher injury potential |
| Saw + split | Cutting to length before splitting | Clean, short, easy-to-split rounds | Extra weight; saw cannot split |
| Wooden wedges | Stuck splits, larger pieces | Carved on site, spare the knife | Slower; needs a baton |
| Gathering small dead wood | Dry weather, rich woodland | No tool wear, fastest | Wet wood is wet all through when thin |
A good combination for lightweight trips is a folding saw to cut 25–30 cm lengths and a sturdy knife to baton them into kindling. Keep your knife performing with regular touch-ups – batoning dulls edges faster than carving; see sharpening in the field. In Germany and many other countries, only use dead wood and respect local rules on collecting it; rules vary by country.
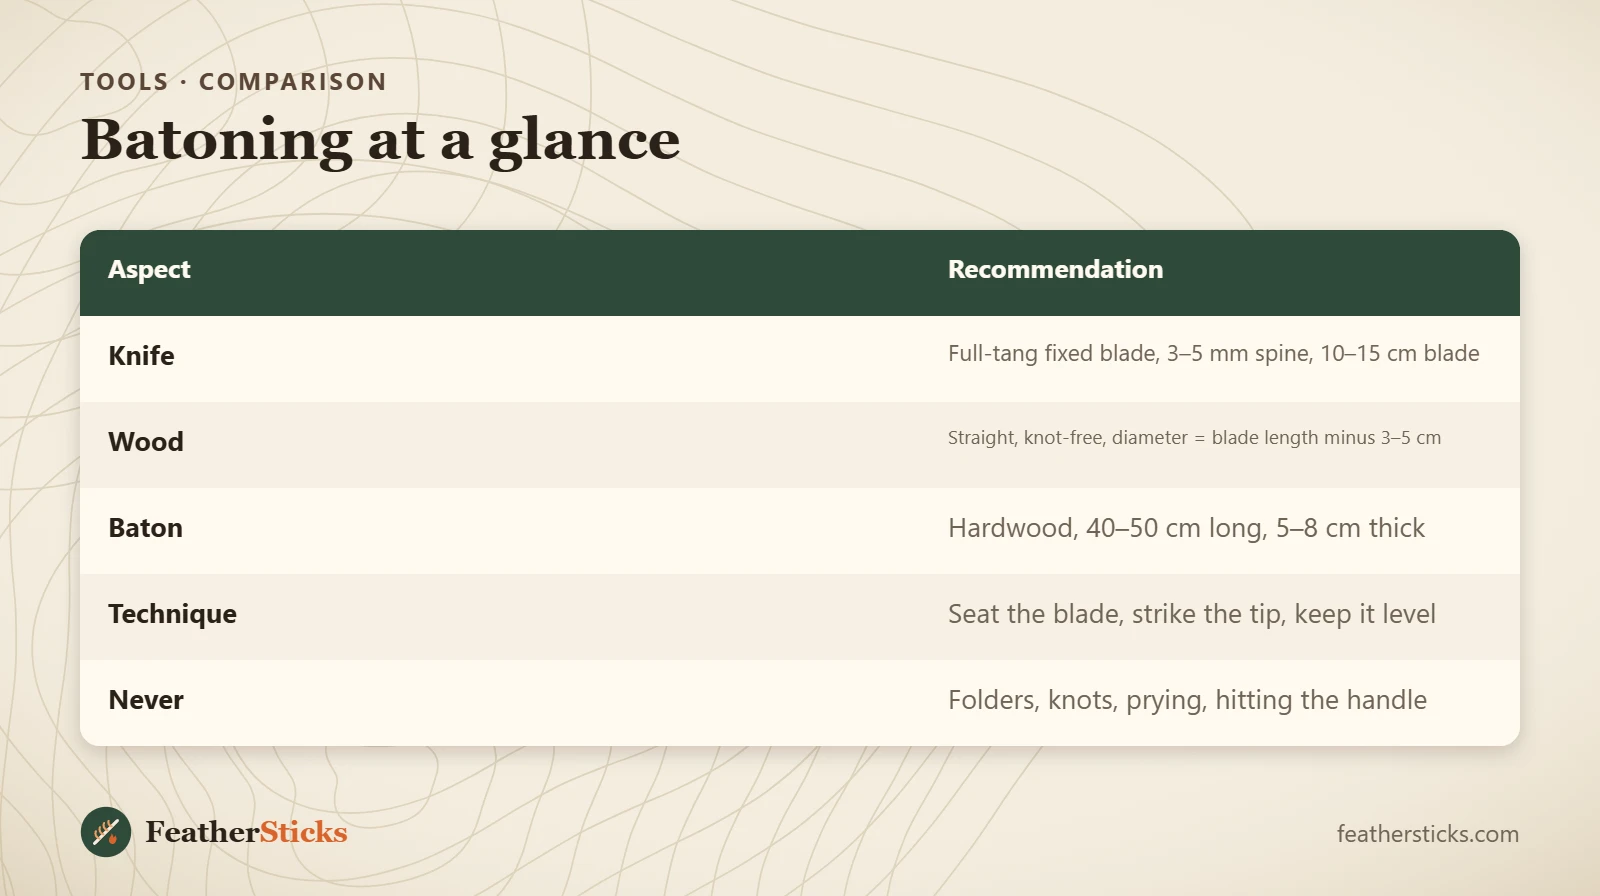
| Aspect | Recommendation |
|---|---|
| Knife | Full-tang fixed blade, 3–5 mm spine, 10–15 cm blade |
| Wood | Straight, knot-free, diameter = blade length minus 3–5 cm |
| Baton | Hardwood, 40–50 cm long, 5–8 cm thick |
| Technique | Seat the blade, strike the tip, keep it level |
| Never | Folders, knots, prying, hitting the handle |
Common mistakes
- Batoning with a folding knife or a partial-tang knife.
- Choosing wood thicker than the blade, so there is no tip left to strike.
- Trying to split through knots or forked pieces.
- Striking the handle or using a rock or metal hammer as a baton.
- Prying or twisting a stuck blade sideways.
- Batoning on stones or soil, or with legs under the blade.
What you need
- Full-tang fixed-blade knife with a 3–5 mm spine
- Hardwood baton (carved on site)
- Folding saw to cut wood to length
- Pocket sharpening stone or strop
- Work gloves
- First aid kit with pressure bandage