Fire
How to Start a Fire: Fire Starting Basics for the Outdoors
To learn how to start a fire, remember one rule: prepare everything first, then light the smallest, driest material and feed it gradually with thicker wood. A fire needs heat, fuel and oxygen in the right balance, and almost every failure comes from skipping preparation, not from the lighter or the ferro rod.
This guide covers the fire starting basics from the ground up: how the fire triangle works, how to choose and prepare a site, how much tinder, kindling and fuel to gather, which wood burns and which does not, every common ignition method from matches to the bow drill, how to nurse a young flame, what to do when it smokes but will not burn, and how to put it out without leaving a trace. It is part of our complete fire skills section and builds on the essentials in bushcraft for beginners.
Step by step
-
1
Pick a safe, legal site
Use an existing fire ring or bare mineral soil, at least 3 m from tents, roots and overhanging branches. Check fire bans and keep water within reach.
-
2
Gather all wood first
Collect two fistfuls of tinder, a big armful of matchstick- to pencil-thin kindling and thumb- to wrist-thick fuel. Sort it by size before lighting.
-
3
Build a small fire lay
Place the tinder bundle on a dry base and lean pencil-thin kindling around it as a teepee. Leave an opening on the windward side.
-
4
Light the tinder low
Ignite the tinder at its base on the windward side, so the flame climbs upward into the finest kindling. Shield it from gusts with your body.
-
5
Feed it thin to thick
Add kindling only when the previous size burns strongly. Move from pencil to thumb to wrist thickness, keeping gaps for air.
-
6
Drown, stir, feel
To finish, drown the embers with water, stir the ashes and drown again until everything is cold to the back of your hand.
The fire triangle: heat, fuel and oxygen
Every fire, from a candle to a forest fire, needs three things at the same time: heat, fuel and oxygen. Remove one side of this fire triangle and the flame dies. Understanding it is the fastest way to understand why a fire catches, why it smokes and why it goes out.
Heat: getting fuel to ignition temperature
Wood does not burn directly. When it is heated, it releases flammable gases, and those gases burn as flame. Dry wood starts to release enough of them at roughly 250–300 °C. A match flame or a spark can easily reach that temperature, but only on a tiny area. That is why you start with material that is so thin that a small heat source can heat it all the way through within seconds: hair-fine tinder, then matchstick-thin twigs.
Water is the enemy of heat. Before damp wood can burn, all the moisture in it must boil away, and boiling water consumes a great deal of energy while holding the wood at around 100 °C. A young fire that has to dry out its fuel first often runs out of energy and dies in a cloud of white smoke.
Fuel: surface area beats size
A thick log contains far more energy than a handful of twigs, but it has very little surface compared with its mass. A small flame cannot heat it fast enough. Thin material has a huge surface in relation to its mass, so it heats quickly and passes the flame on. The whole art of fire starting is building a bridge of ever larger fuel, where each size creates enough heat to ignite the next.
Oxygen: the forgotten side
Beginners tend to smother fires. Packing tinder tightly, piling on too much kindling at once or laying a big log directly on the flame cuts off air. A fire needs gaps so that fresh air can flow in from below and hot gases can rise out of the top. Gentle blowing or fanning adds oxygen at the right moment; blowing too hard scatters the embers and cools them.
Keep the triangle in mind when something goes wrong: lots of smoke usually means too little heat or too much moisture, a flame that shrinks when you add wood usually means too little oxygen or too big a jump in fuel size, and a fire that only glows needs air.

Choosing and preparing a fire site
Before you think about ignition, think about where the fire will burn. A good fire site is safe, legal and practical. If there is an existing fire ring or designated fireplace, use it: it concentrates the impact in one place and is often the only spot where fires are allowed at all. Our guide to choosing a camp site explains how the fireplace fits into the rest of the camp layout.
If you have permission to build a fire elsewhere, look for bare mineral soil, gravel, sand or rock. Avoid peat, deep leaf litter and forest duff, because fire can creep underground through roots and organic soil and flare up again hours later. Stay well away from overhanging branches, dry grass, tents and tarps; synthetic fabrics melt from a single ember. Keep a clear circle of about 3 m around the fire.
Wind matters too. Note where it comes from and set up so that smoke and sparks drift away from your shelter and away from dry vegetation. In strong or gusty wind, the safest choice is often no open fire at all.
Fire site checklist
- Fires are allowed here today: no fire ban, landowner permission if required
- Existing fire ring or bare mineral soil, no peat or deep duff
- At least 3 m clear of tents, tarps, gear and dry grass
- No overhanging branches or dead leaves directly above
- Sheltered from strong wind, smoke drifting away from camp
- Water (at least 5 litres) or a shovel within arm reach
- Tinder, kindling and fuel gathered and sorted by size
- A plan for putting it out and leaving no trace
Clear the fireplace of leaves and twigs down to bare soil. If you have to remove turf, cut it out in one piece and store it grass side up in the shade, so you can put it back later. On snow or wet ground, lay a platform of thumb-thick dead sticks side by side. It keeps the tinder off the moisture and lets air reach the flame from below.
Preparing the fire site
 1Check the rules first
Look up today's fire danger rating and any fire ban for the area, and make sure the landowner or campsite allows fires. If in doubt, use a stove.
 2Clear to bare soil
Rake leaves, needles and twigs away from the fireplace down to mineral soil, and keep a clear circle of about 3 m around it.
 3Cut and store the turf
Where there is no ring and turf must be removed, cut it out in one piece and store it grass side up in the shade, so it survives until you put it back.
 4Platform on wet ground
On snow, bog or soaked soil, lay thumb-thick dead sticks side by side as a platform. The fire stays dry and gets air from below.
Gather everything before you strike
The single most common reason a fire fails is that the fire maker lights the tinder and only then starts looking for kindling. Tinder burns for seconds, not minutes. By the time you have found the next handful of twigs, the flame is gone. So collect and sort everything first, then light.
Sort the wood into separate piles by thickness, and gather more of the thin sizes than you think you need. Kindling is where most fires run out of steam. If you need to plan wood for cooking or a full evening, the firewood calculator estimates how much tinder, kindling and fuel to collect for your purpose.
| Size | Diameter | Examples | Rough amount |
|---|---|---|---|
| Tinder | Hair-fine fibres | Birch bark, dry grass, fatwood shavings, feather stick curls | Two loosely packed fistfuls |
| Small kindling | Matchstick (2–3 mm) | Dead spruce twigs, split slivers | A thick bundle you can just close your hand around |
| Medium kindling | Pencil (5–10 mm) | Dead lower branches, split sticks | Two big handfuls |
| Large kindling | Thumb (1.5–2.5 cm) | Dead branches, split quarters | An armful |
| Fuel | Wrist (5–8 cm) and up | Split dead wood, sawn branch sections | Two to three armfuls per hour of burning |
Amounts are rough guides for a small fire; wet weather needs about double the tinder and small kindling.
A sharp knife lets you make fine shavings and split small sticks, a saw cuts fuel cleanly, and a small axe or batoning splits wet rounds to reach the dry core. See our guides to bushcraft knives, folding saws, axes and hatchets and batoning wood with a knife for safe technique. Always prefer small, dead, down wood you can break by hand; it is easier to process and has less impact on the forest.
The fire ladder: from tinder to kindling to fuel
Think of fire starting as climbing a ladder. Every rung is a size of wood roughly two to three times thicker than the previous one. If you skip a rung, the flame cannot heat the next size fast enough, and the fire stalls. A useful way to remember the sizes is by comparing them with your body: hair, matchstick, pencil, thumb, wrist.
The fuel ladder (top = added last)
- Split dead logs. Added only once a bed of embers glows. Burns for a long time and gives heat for cooking.
- Carries the fire from flame to embers. Add when pencil sticks burn strongly.
- The critical rung. Most fires die here because too little was gathered.
- Catches directly from the tinder flame within seconds. Dead spruce twigs are ideal.
- Takes a spark or small flame. Birch bark, grass, fatwood shavings, feather stick curls.

Tinder
Tinder is the finest, driest material in your fire. It must catch from a match, a lighter or a spark and burn long enough to ignite small kindling. Good natural options include thin outer birch bark, dry grass, the fluffy seed heads of some plants, shredded inner bark, fatwood scrapings and fine curls carved from dry wood. Our guide to natural tinder explains how to find and process each of them. Carry a backup such as cotton pads with petroleum jelly in wet seasons.
Kindling
Kindling bridges the gap between tinder and fuel. The best kindling is dead, dry and brittle: it should snap with a clear crack. Dead lower branches of spruce and pine, which often remain on the trunk in the shelter of the living crown, are a classic source. If you cannot find thin dry sticks, split larger pieces into slivers or carve feather sticks, which combine tinder and kindling in one piece of wood.
Fuel
Fuel wood is what keeps the fire alive for cooking and warmth. Add it only when you have a strong flame and the first embers. Softwoods such as pine and spruce catch quickly but burn fast; hardwoods such as oak, beech and ash take longer to light but produce long lasting coals, which is what you want for campfire cooking. A mix works well: softwood to build heat, hardwood to hold it.
Dry, dead or standing dead: which wood burns?
Not all dead wood is dry, and not all dry-looking wood burns. Understanding the difference saves a lot of frustration.
Green wood is living or freshly cut. It can contain about half its weight in water and hisses, steams and smokes instead of burning. It is also a matter of respect: cutting living trees for a campfire damages the forest and is prohibited in most places.
Dead, down wood lies on the ground. It is often the easiest to find, but it soaks up moisture from the soil and quickly starts to rot. Sticks lying in leaf litter can be damp all the way through even in dry weather. Rotten wood that crumbles or feels spongy burns poorly and smoulders.
Standing dead wood is the gold standard. Dead branches still attached to a tree, dead saplings and snags that have lost their bark are exposed to the wind and dry out quickly after rain. The rule of thumb: if it snaps cleanly, it will burn; if it bends, it is too wet or still alive.
Good fire wood vs poor fire wood
Use this
- Dead branches still on the tree, off the ground
- Sticks that snap with a sharp crack
- Light for their size, grey or bark-free
- Split wood from the dry core of a dead log
- Resinous pine and spruce for a fast start
Avoid this
- Living or green branches that bend
- Wood lying in wet leaf litter or moss
- Rotten, spongy or crumbling wood
- Heavy, cold-feeling wood that smells fresh
- Painted, treated or glued timber and plastics

After rain, split wood to reach the dry heart. The outer few millimetres of a dead branch may be soaked, but the core usually stays dry. Our guide to starting a fire in wet weather goes deeper into finding dry material when the whole forest is dripping.
Ignition methods: with and without a lighter
Once the wood is ready, you need a heat source. Some methods produce a flame directly, others a spark or ember that you must blow into flame inside a tinder bundle. Carry at least two different methods, stored in different places, and practise each one before you rely on it. Knowing how to make a fire without a lighter is your insurance.
Lighter
A cheap disposable lighter is the most reliable way to start a fire in most conditions. It gives hundreds of flames and works with one hand. Its weaknesses: butane loses pressure in cold weather, so carry it in an inside pocket, and a wet striker wheel must be dried before it sparks. Even an empty lighter still throws sparks from its flint.
Matches and storm matches
Ordinary matches are cheap and simple but sensitive to moisture and wind. Store them in a waterproof container with a striker strip. Storm matches (also called stormproof matches) have a long coating that burns fiercely for several seconds and keeps burning in strong wind and even after brief immersion. They are an excellent emergency backup, but they are consumed quickly, so count them.
Ferro rod
A ferrocerium rod throws a shower of extremely hot sparks when scraped with a sharp edge. It works when wet, in cold weather and at altitude, and lasts thousands of strikes. The catch: sparks need very fine, well prepared tinder. Learn the technique in our guide on how to use a ferro rod.
Flint and steel
The traditional method strikes a high-carbon steel striker against a hard, sharp stone such as flint or quartz. The tiny sparks are much cooler than ferro rod sparks and need char cloth or a similar charred material to catch. The resulting ember is then folded into a tinder nest and blown into flame. See flint and steel fire starting for the full process.
Bow drill and other friction methods
Friction fire creates an ember by spinning a wooden spindle against a hearth board. The bow drill is the most accessible version; the hand drill and fire plough are harder. It requires the right, completely dry woods, good technique and a lot of energy, but it needs no manufactured tools except a knife and cord. Our bow drill guide covers wood choice and form.
Solar ignition: lenses and mirrors
A magnifying glass, a fresnel lens or even a clear water-filled bottle can focus sunlight onto a dark, charred spot of tinder until it smoulders. It costs nothing but needs strong direct sun, so it is a fair-weather bonus rather than a primary method.
Battery and steel wool
Touching both terminals of a 9-volt battery to very fine steel wool (grade 0000) makes the thin strands glow and ignite instantly. It works well as an improvised method. Keep steel wool and batteries apart in your pack, because contact can start a fire unintentionally.
Fire piston
A fire piston compresses air in a sealed tube so quickly that it heats up enough to ignite a small piece of char cloth at the tip of the piston. It is fascinating and compact but needs a good seal and prepared char material, so treat it as an interesting extra.
| Method | Produces | Works when wet | Skill needed | Best use |
|---|---|---|---|---|
| Lighter | Flame | After drying the wheel | Very low | Everyday primary method |
| Matches | Flame | No (storm matches: yes) | Low | Backup in waterproof case |
| Ferro rod | Hot sparks | Yes | Medium | All-weather, long-lasting primary |
| Flint and steel | Small sparks, ember | Char cloth must stay dry | Medium to high | Traditional skill |
| Bow drill | Ember | No | High | Skill practice, no-gear situations |
| Lens or mirror | Ember | Needs sun | Medium | Sunny days only |
| Battery + steel wool | Glowing wire, flame | Steel wool works damp | Low | Improvised method |
| Fire piston | Ember | Char must stay dry | Medium | Compact curiosity |
For most people, the sensible combination is a lighter as the primary method and a ferro rod as the backup, plus a small container of storm matches for emergencies. Friction and flint and steel are rewarding skills, but learn them at home or in camp, not when you are cold and wet. Our bushcraft kit list shows where fire tools fit in a complete kit.
How to start a fire: lighting and nursing the flame
The first two minutes after ignition decide whether you get a fire or a pile of charred twigs. The goal is to protect the young flame from wind, give it just enough air and feed it at the right pace.
Lighting sequence in detail
 1Kneel upwind
Position yourself with your back to the wind so your body acts as a windbreak. Have the kindling piles within reach without standing up.
 2Light low
Flames travel upward. Hold the lighter or match under the edge of the tinder, or throw ferro rod sparks into its finest part, at the bottom of the lay.
 3Wait for the flame to climb
Let the tinder burn up into the matchstick kindling. Do not poke or rearrange it in the first seconds: every touch breaks the young flame.
 4Add small kindling in pinches
Place a few matchstick twigs at a time directly into the tallest flames, crossing them loosely so air can flow.
 5Step up only when it burns strongly
Move to pencil-thick sticks once the matchstick layer burns with a steady, self-sustaining flame. Then thumb-thick, then wrist-thick.
 6Blow gently if it falters
Get low and blow a long, soft stream of air at the base of the glowing part, not at the top of the flame. Turn your head away to breathe in.
What a healthy young fire looks like
- After 30 seconds: the tinder has burned down and the matchstick twigs carry their own flames, taller than your hand.
- After 2–3 minutes: pencil-thick sticks burn along their length, there is little smoke, and the first red embers glow at the base.
- After 10 minutes: thumb-thick wood burns with a steady flame and a small bed of embers has formed. Now the fire forgives mistakes.
- Warning signs: thick white smoke, flames that shrink when you add wood, or only glowing ends. Go back one size and give it air.
Wind: friend and enemy
A light breeze helps the fire by supplying oxygen, but strong gusts blow out a match and chill the flame. Build the lay with its opening facing the wind, so the breeze pushes the flame into the fuel. In stronger wind, shelter the fire behind a log, rock or your own body, and use a lighter or storm matches rather than ordinary matches.
Blowing without smothering
Blowing is useful when you have glowing embers and a weak flame. Take a deep breath, get your head close and blow slowly, like cooling soup. A short, hard puff scatters light ash and embers. Some people use a hollow elder stem or a short tube to direct the air precisely and keep their face away from the heat.
Adding fuel at the right pace
Too slow and the fire burns through its kindling and fades. Too fast and you smother it. A good rhythm: add the next size when the current layer burns fully and you can see flames rising above it. Place new wood where the flames are hottest and keep the structure open. Once you have a bed of glowing embers, the fire has become forgiving and you can add larger fuel.
Basic fire lays for fire starting
How you arrange the wood controls the airflow. For starting, a few simple lays cover almost every situation:
- Teepee: kindling leaned together in a cone over the tinder. Lights quickly and is the easiest for beginners.
- Lean-to: kindling leaned against a larger log on the windward side. The log blocks wind and later reflects heat.
- Log cabin: pairs of sticks stacked crosswise around a small teepee. Stable, burns evenly and collapses into a good bed of coals for cooking.
- Upside-down (top-down) fire: thick wood at the bottom, kindling and tinder on top. Needs more preparation but then burns for a long time with little attention.
Each has strengths depending on purpose, weather and ground. Our guide to fire lays explains how to build each one, and the fire lay picker suggests the best structure for your conditions. If the fire is mainly for boiling water, a compact teepee or log cabin under the pot works well; the boiling point and fuel calculator estimates how much wood a boil needs, and the guide on boiling water explains how long to boil for safety.
Troubleshooting: why won't my fire start?
Every fire maker has knelt over a smoking pile of twigs. The good news: the causes are few, and the fire triangle points to the fix almost every time.
Fire troubleshooting
Does the tinder catch at all?
Yes → Go to the next question.No → Tinder is too coarse or damp. Make it finer and fluffier, add fatwood shavings or feather stick curls, and check your ignition technique.Does the flame reach the small kindling?
Yes → Go to the next question.No → Too little tinder or the kindling is too thick. Double the tinder, add matchstick-thin twigs directly above it.Is there lots of white smoke but no flame?
Yes → Too much moisture or too little air. Open the structure, blow gently at the base and add drier, thinner wood.No → Go to the next question.Does the fire die when you add bigger wood?
Yes → You skipped a size or added too much at once. Go back one rung and build more heat first.No → Your fire is established. Keep feeding it steadily and keep the structure open.

Smoke but no flame
Thick white smoke is mostly water vapour and unburnt gases. The material is either damp or not getting enough air to ignite the gases. Loosen the structure, add a few pieces of very dry, thin kindling or fatwood right into the smoking area and blow gently. Often the smoking pile bursts into flame once enough heat builds up.
Fire dies after the tinder burns
This is the classic symptom of too little small kindling or kindling that is too thick. The tinder flame only lasts a few seconds, so the next rung must be thin enough to catch in that time. Prepare more matchstick-thin twigs and put them directly above the tinder before you light it.
Too much smoke from an established fire
A burning fire that keeps smoking heavily is usually fed with wet, green or rotten wood, or it is smothered by too much fuel at once. Pull back some of the logs to open airflow, add dry wood only and let it burn hotter. A hot fire burns cleaner and produces less smoke than a smouldering one.
Everything is wet
Look for standing dead wood, dead lower branches under dense conifers and dry material in sheltered spots. Split larger pieces to get at the dry core, carve feather sticks and make a raised platform so the fire stays off wet ground. Gather double the amount of tinder and kindling. A resinous fire starter such as fatwood can save the day. The guide to fire in wet weather covers these techniques in depth.
Putting out a fire and leaving no trace
A fire is only finished when it is cold. Embers can stay hot enough to reignite for many hours, and fire can creep through roots and organic soil. Plan the end of your fire from the start: let it burn down to ash well before you leave or go to sleep, and do not add large logs in the last hour.
Drown, stir, feel: the four moves
 1Drown
Pour water slowly over all embers, including the edges, until the hissing stops. Stand upwind: the steam is hot.
 2Stir
2StirStir ashes and half-burnt wood with a stick, turn over larger pieces and scrape embers off them. Hidden embers sit underneath.
 3Drown again
Pour a second round over everything you stirred up. If it hisses again, stir and pour once more.
 4Feel
4FeelHold the back of your hand just above the ashes, then touch them carefully. Only when nothing feels warm is the fire out.
Leave no trace means the next person should not see where your fire was, unless you used an existing ring. Burn wood down completely to fine ash so there are no charred logs left over. Once everything is cold, scatter the ash widely, return any stones to where you found them, and put back the turf you cut out. Pack out any litter, including foil and food scraps that did not burn. Small fires use less wood, leave less ash and are easier to put out, so build only as big a fire as you need.
Is it legal to start a fire outdoors?
Rules for open fires vary widely by country, region, land ownership and season, and they change with the weather. Before you start a campfire, check the local rules. This section gives orientation only and is not legal advice.
- Fire bans: in dry periods, authorities often ban all open fires, sometimes including stoves that burn wood. Fire danger ratings are published by national weather or forestry services in many countries.
- Land ownership: on private land you usually need the landowner's permission. In many national parks, nature reserves and protected areas, fires are restricted to designated fireplaces or forbidden entirely.
- Permits: some regions require a free campfire permit or allow fires only in established rings at campgrounds.
- Access rights: even in countries with generous access rights, such as parts of Scandinavia or Scotland, the right to light a fire comes with the duty to do it responsibly and to respect seasonal bans.
If in doubt, use a camping stove or skip the fire. Being able to start a fire is a skill; knowing when not to is part of the same skill.
How to practise fire starting
The fire starting basics are simple, but confidence comes only from repetition. Practise at home in a fire bowl or at a legal fireplace, and change one variable at a time: use only natural tinder, light with a ferro rod instead of a lighter, try it with damp wood, or restrict yourself to a single match. Time yourself from the moment you start gathering to the moment the first wrist-thick piece of fuel burns.
Working on your knife skills pays off directly, because fine shavings and feather sticks turn marginal wood into good tinder. The guide to carving basics covers safe grips and cuts. Once you can start a fire reliably with a lighter in any weather, work through the harder methods one by one: ferro rod first, then flint and steel, and finally the bow drill.
Three drills that build real confidence
- The one-match fire: gather, sort and build everything, then allow yourself a single match. If it fails, the problem was preparation, not luck: look for the missing rung.
- The ladder check: before lighting, lay one stick of each size next to each other on the ground. If the jump between two neighbours is more than about three times the thickness, collect the missing size.
- The rain round: after a wet day, find dry wood only from standing dead branches and split cores. Note where you found the driest material; that knowledge is worth more than any gadget.
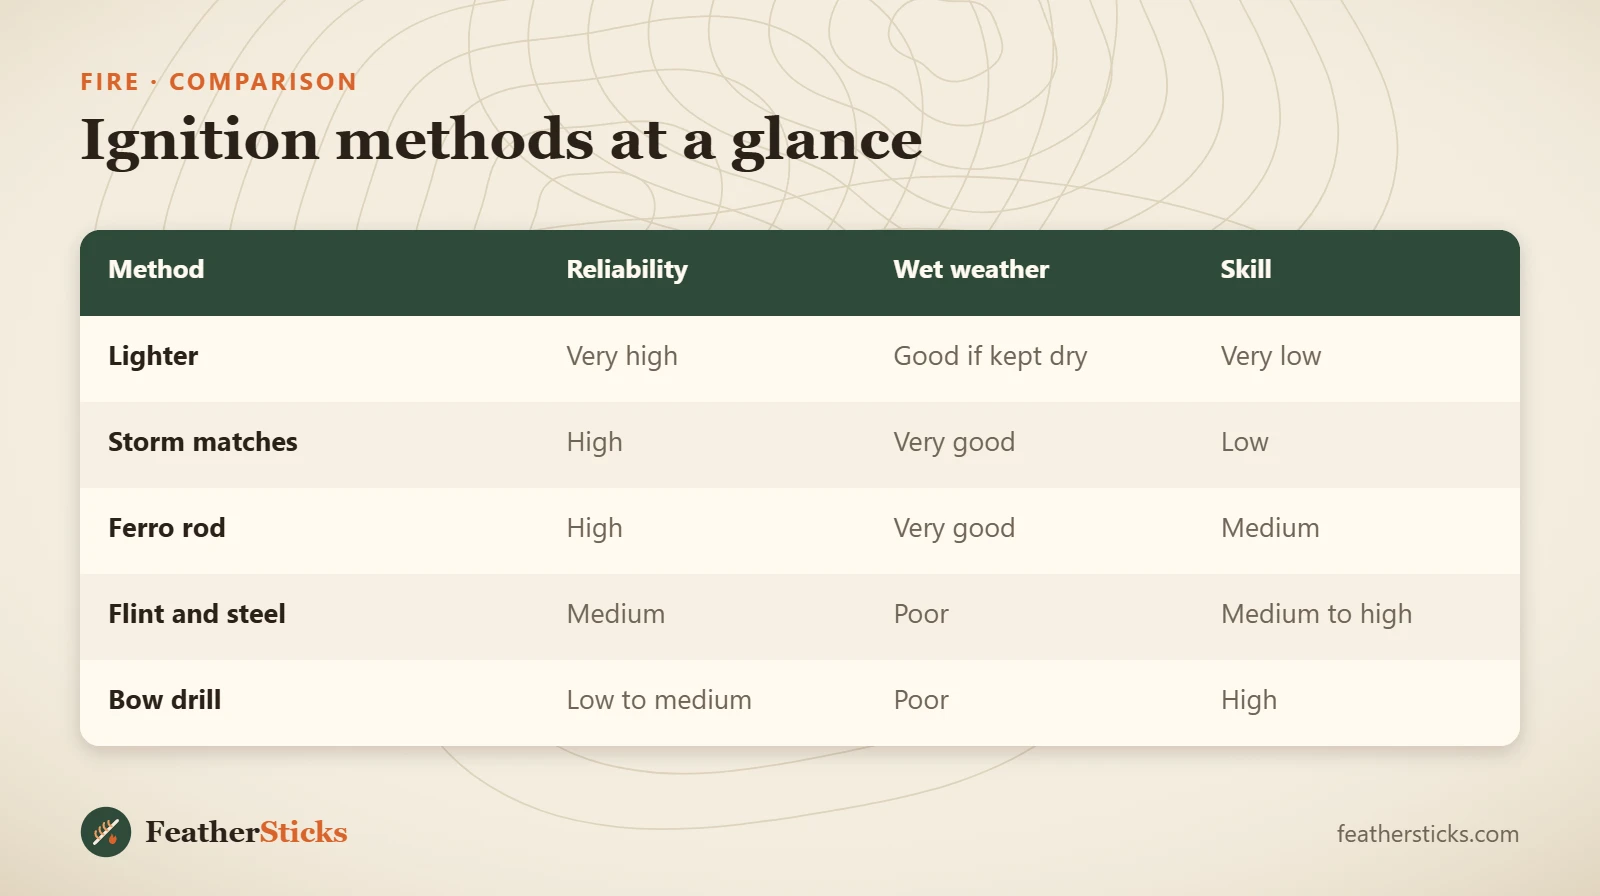
| Method | Reliability | Wet weather | Skill |
|---|---|---|---|
| Lighter | Very high | Good if kept dry | Very low |
| Storm matches | High | Very good | Low |
| Ferro rod | High | Very good | Medium |
| Flint and steel | Medium | Poor | Medium to high |
| Bow drill | Low to medium | Poor | High |
Common mistakes
- Lighting the tinder before all kindling and fuel is gathered and sorted.
- Not enough matchstick- and pencil-thin kindling: the fire dies after the tinder.
- Using wood from the wet forest floor instead of standing dead branches.
- Packing the fire tightly or dumping on too much wood, which smothers it.
- Jumping from twigs straight to thick logs without the intermediate sizes.
- Building a fire bigger than needed, close to tents or under branches.
- Leaving before the ashes are cold to the touch.
What you need
- Lighter kept in an inside pocket
- Ferro rod as a backup
- Storm matches in a waterproof case
- Knife for shavings and feather sticks
- Folding saw for fuel wood
- Natural tinder plus a backup such as cotton pads with petroleum jelly
- Water container for putting the fire out