Water
How Long to Boil Water to Make It Safe to Drink
How long to boil water to make it safe? Bring it to a rolling boil for 1 minute — or 3 minutes above about 2,000 m altitude. That is the guidance of the CDC and WHO, and it kills bacteria, viruses and protozoa, including Giardia and Cryptosporidium. Boiling is the most reliable water treatment there is: it works in cloudy and cold water, needs no chemicals and cannot be "used up" like a filter.
This guide explains why one minute is enough, how the boiling point drops with altitude, how much fuel you need, which containers are safe and how to cool and store boiled water. For all other methods, see water purification methods and the water hub.
Step by step
-
1
Collect the clearest water
Take water from a flowing stream or the surface of a clear lake, upstream of trails and camps. Avoid anything with algae or near farms and roads.
-
2
Pre-filter cloudy water
Let muddy water settle or pour it through a bandana or coffee filter. This removes sediment, not germs, and saves fuel.
-
3
Bring to a rolling boil
Heat with the lid on until large bubbles rise constantly and do not stop when you stir. Small bubbles at the bottom are not enough.
-
4
Boil 1 minute (3 above 2,000 m)
Hold the rolling boil for one full minute. At altitudes above about 2,000 m, keep it boiling for three minutes.
-
5
Cool covered, store clean
Let the water cool with the lid on and pour it into clean containers. Never dip dirty cups or hands into treated water.
How long should you boil water?
The short answer: one minute at a rolling boil. A rolling boil means big bubbles rising continuously across the whole surface, not a few bubbles at the bottom of the pot. Once you reach it, start counting. Above about 2,000 m (6,500 ft), extend the time to three minutes. This is the recommendation of the US Centers for Disease Control and Prevention (CDC) and consistent with the World Health Organization (WHO), which notes that bringing water to a rolling boil is sufficient to inactivate pathogens.
You do not need to boil for 10 or 20 minutes, as older books sometimes claim. Longer boiling wastes fuel, evaporates water you have carried or collected, and — if the water contains nitrate or other chemicals — even concentrates them slightly.
Boiling time at a glance
- Below 2,000 m
- 1 minute at a rolling boil
- Above 2,000 m
- 3 minutes at a rolling boil
- Cloudy water
- Settle or prefilter first, then boil as above
- Snow melt
- Treat like any wild water — boil as above
- Water for infants
- Follow local health advice; boiled water must cool to a safe temperature
Why one minute is enough
Most waterborne pathogens are killed at temperatures well below 100 °C. Pasteurisation of milk works at around 72 °C for 15 seconds or 63 °C for 30 minutes — the same principle of heat plus time. By the time water reaches a rolling boil, it has already passed through the lethal temperature range on the way up, and a minute at full boil adds a large safety margin, even for more heat-tolerant organisms such as hepatitis A virus.
Bacterial spores (for example from Clostridium species) can survive boiling, but they are not a significant cause of waterborne illness when you drink the water soon after treatment. What boiling does not touch are chemical contaminants, covered below.
What happens as water heats up
- ≈ 55–65 °CProtozoan cysts and many bacteria are inactivated with enough time.
- ≈ 70–75 °CPasteurisation range: most bacteria and viruses die within seconds to minutes.
- Rolling boilVisible, unmistakable signal that the water is hot enough everywhere.
- +1 min (3 min high up)Safety margin for all common waterborne pathogens.
Boiling point by altitude: why 3 minutes above 2,000 m
Air pressure falls as you climb, and water boils at a lower temperature. At sea level it boils at 100 °C; at 2,000 m at about 93 °C; at 4,000 m at under 87 °C. Lower temperature means slower killing of germs, which is why the recommended time triples above 2,000 m. The values below come from the barometric formula and the Antoine equation for water — the same method as our boiling point and fuel calculator, where you can enter your exact altitude.
| Altitude | Boiling point | Safe boil time |
|---|---|---|
| 0 m (sea level) | 100.0 °C | 1 min |
| 500 m | 98.3 °C | 1 min |
| 1,000 m | 96.7 °C | 1 min |
| 1,500 m | 95.0 °C | 1 min |
| 2,000 m | 93.4 °C | 3 min |
| 2,500 m | 91.7 °C | 3 min |
| 3,000 m | 90.0 °C | 3 min |
| 4,000 m | 86.7 °C | 3 min |
| 5,000 m | 83.3 °C | 3 min |
Actual values shift by a few tenths of a degree with the weather. Cooking takes longer at altitude too — pasta and rice need more time and fuel.

How to recognise a rolling boil
Water goes through several stages as it heats. First, tiny bubbles form on the bottom and sides — that is dissolved air coming out, at maybe 60–70 °C. Then larger bubbles form at the hottest spot and collapse before they reach the surface, making a hissing sound. Only when big bubbles rise and break the surface continuously, and stirring does not stop them, do you have a rolling boil.
- Keep the lid on while heating: it saves a lot of fuel. Lift it briefly to check.
- Stir once: if the bubbles stop, it is not yet a rolling boil.
- Time it: use a watch, or count slowly to 60 (180 above 2,000 m).
- Reduce the flame once the boil is rolling — a gentle but continuous rolling boil is enough and saves fuel.
The four stages to a rolling boil
 1Tiny bubbles on the bottom
At roughly 60–70 °C, pinhead bubbles cling to the base and walls. That is dissolved air escaping, not boiling. Do not start counting yet.
 2Bubbles collapse, the pot hisses
Larger bubbles form over the flame but shrink and burst before they reach the surface. The hiss or rumble is the typical sign — still not a rolling boil.
 3Big bubbles break the surface
Large bubbles rise from the whole base and break the surface continuously; the water visibly churns and steam pours out when you lift the lid.
 4Stir test, then start the clock
Stir once with a spoon or stick. If the bubbling carries on without pause, start timing: 1 minute, or 3 minutes above about 2,000 m. If it stops, wait and test again.
What a correct rolling boil looks like — checkpoints
- Surface: moving all over, not just a column of bubbles above the burner.
- Sound: the hissing has changed into a steady, deep bubbling.
- Steam: a thick cloud as soon as you lift the lid; it keeps coming.
- Stir test passed: bubbles continue during and right after stirring.
- Timer running: you started counting only after all of the above were true.
With a lid on you cannot see the water all the time. Lift the lid briefly with a glove or pot grabber and turn your face away from the steam — steam burns as badly as the water itself.
Boiling in a kettle, over a fire, or on a stove
Over a campfire, hang the pot from a tripod or crane or set it on a stable bed of embers between two logs. Flames licking up the sides waste energy; embers under the base work best. Our fire lays guide shows which lay suits a pot, and the fire lay picker helps you choose. On a gas stove, a windscreen that leaves a gap for air is the biggest fuel saver — but never fully enclose a canister stove, as the canister can overheat.
Boiling water over a campfire
 1Rake embers between two logs
Let the fire burn down and rake a bed of glowing embers between two logs of similar thickness. Flames are not needed — embers give steady, even heat.
 2Bridge the pot across the logs
Set the pot so that it rests securely on both logs, with the embers directly under the base, and put the lid on. If it wobbles, dig one log in a little until it sits level.
 3Lift it off with a stick
Slide a sturdy stick through the bail or use a pot grabber and gloves. Lift slowly, keep your body out of the steam and set the pot down on flat ground away from the fire.
How much fuel does boiling water take?
Heating one litre of water from 8 °C to boiling needs about 385 kJ of heat. How much of your stove’s energy reaches the water depends above all on wind and whether you use a lid. Our calculator uses a simple model: a 2.6 kW canister stove at full flame, 55 % efficiency in calm conditions or behind a windscreen, 40 % in a breeze, 25 % in strong wind, and 20 % less without a lid. That boils a litre in about 4–5 minutes in calm air, like a real stove. Gas provides roughly 46 kJ per gram.
Gas per litre boiled (8 °C start, 1 min boil, calculator model)
If you treat 3 litres per day by boiling for two days in a breeze, that is around 135 g of gas — a 230 g canister with a margin. Double that for melting snow, which first needs extra energy to change ice into water (see water from snow). Over an open fire, efficiency is very low — the calculator assumes about 6 %, which means roughly 0.4–0.5 kg of dry wood per litre. Gathering enough dry wood is covered in the firewood calculator and our guide to fire starting basics.
Stove vs campfire for boiling water
Gas or alcohol stove
- Fast, controllable, works in rain
- Predictable fuel use (≈ 17–35 g gas/L)
- Allowed in many places where fires are banned
- Canisters weaken below about 0 °C — keep them warm
Campfire
- Free fuel if wood is plentiful and allowed
- Low efficiency (≈ 0.4–0.5 kg wood/L)
- Soots pots, needs time and dry wood
- Often prohibited — check local rules and fire danger
Which containers can you boil water in?
You need a container that tolerates direct heat. That rules out more gear than you might think.
| Container | Boil-safe? | Notes |
|---|---|---|
| Stainless steel pot | Yes | Robust, cheap, heavier; ideal over fires |
| Titanium pot or mug | Yes | Very light, heats fast; can scorch food, hot spots |
| Hard-anodised aluminium pot | Yes | Light, good heat spread; avoid scraping the coating |
| Single-wall stainless steel bottle | Yes (lid off!) | Boil directly in the fire; never boil with the cap on |
| Double-wall / vacuum bottle | NO | Trapped air can burst the bottle — never heat |
| Plastic bottle (PET, Tritan, HDPE) | No (direct heat) | Can hold boiled water after it cools below its rated temperature |
| Lined aluminium bottle | No | The inner lining can be damaged by heat |

If you have no metal container, there is one primitive method: stone boiling. Heat fist-sized, dry, non-porous stones in a fire (never stones from rivers or wet ground — trapped water can make them explode), then drop them into water held in a bark container, a wooden bowl or a hole lined with a tarp. It works, but it is slow and ash gets into the water. Our water containers guide compares materials, and the bushcraft cookware guide explains which pots do double duty for cooking and water treatment.
What boiling does not do
Boiling kills germs, but it does not remove chemicals, pesticides, heavy metals, salt, fuel residues or the toxins produced by blue-green algae (cyanobacteria). Some of these even concentrate as water evaporates. Water near mines, industry, intensive farmland or roads may be contaminated in ways heat cannot fix — the only real protection is to choose a better source. Boiling also does nothing against cloudiness: silt stays in the pot, so settle or prefilter first, for example with an improvised sediment filter.
Finally, boiling has no residual effect. Once cool, boiled water can be recontaminated by a dirty bottle, cup or hand. That is why storage matters as much as the boil itself.

Boiling water myths, checked
- "You must boil for 10 minutes." No. One minute at a rolling boil is enough below 2,000 m, three minutes above. Longer boiling only costs fuel and water.
- "Water that is too hot to touch is safe." Not reliably. Without a thermometer and a timed hold you cannot know whether it reached a killing temperature everywhere in the pot. The rolling boil is your visible proof.
- "Boiling makes any water drinkable." Only as far as germs are concerned. Salt, fuel, heavy metals, pesticides and algal toxins stay in.
- "Clear mountain water does not need boiling." Giardia, Cryptosporidium and bacteria are invisible, and clear water can carry plenty of them from animals or people upstream.
- "At altitude you can never make water safe because it boils cooler." Wrong — it just takes longer, which is exactly why the three-minute rule exists.
- "Boiling kills everything, so storage does not matter." Boiling has no residual effect. A dirty cup or unwashed hand recontaminates the water instantly.
Boiling is also the reference method for special situations: water for someone with a weakened immune system, water in regions with poor sanitation, and water after floods — as long as the source is not chemically polluted. In those cases, prefilter carefully and never shorten the boil.
Cooling, storing and improving the taste
Let boiled water cool in the covered pot, or pour it into clean, heat-tolerant bottles. To speed things up, stand the pot in a cold stream (without letting stream water splash in) or, in winter, in snow. Do not "cool" boiled water by mixing in untreated water — that undoes the treatment.
Boiled water often tastes flat because dissolved air escapes during heating. Pour it back and forth between two clean containers a few times to add air, or shake a partly filled bottle. A pinch of salt, a tea bag or drink powder also helps. Treated water stored in clean, closed containers stays safe for a day or more; if stored longer, check that the containers were clean and keep them in the shade.
A practical trick at camp: boil the next day’s water in the evening, fill it hot into a single-wall steel or suitable heat-tolerant bottle, and use it as a hot water bottle in your sleeping bag. By morning it is cool enough to drink and your bottle has not frozen.
From hot pot to clean bottle
 1Cool with the lid on
Leave the lid on while the water cools, so nothing falls or drips in. Set the pot on flat, stable ground out of the way of feet and dogs.
 2Speed it up from the outside
Stand the covered pot in snow or in a shallow, cold stream. The rim must stay well above the surrounding water so that no raw water splashes in.
 3Pour into a clean, marked bottle
Pour directly into a bottle you use only for treated water. Do not dip the bottle into the pot — its outside may have touched the stream.
 4Aerate for taste
Boiled water tastes flat because the air has gone. Pour it back and forth between two clean containers a few times, or shake a half-full bottle.
Should you boil or use another method?
Do you have fuel or a fire (and fires are allowed)?
Yes → Boiling is the most reliable choice, especially for cloudy or cold water.No → Use a filter plus chlorine dioxide, or UV for clear water.Are you cooking anyway?
Yes → Boil drinking water in the same session — no extra effort.No → Consider a filter for quick refills on the move.Is chemical pollution possible?
Yes → Boiling will not help — find a different source.No → Boil for 1 minute (3 above 2,000 m) and store clean.
Troubleshooting: when boiling does not go to plan
Most problems with boiling water outdoors are problems of heat getting lost on the way to the pot. Work through the symptom you see before you blame the stove.
| Symptom | Likely cause | Fix |
|---|---|---|
| Water never reaches a rolling boil | Wind, no lid, weak flame, cold canister | Windscreen with an air gap, lid on, keep the canister warm in your jacket, boil smaller batches |
| Takes far longer than usual | Altitude, ice-cold start water, big volume | Normal to a degree — plan fuel with the calculator and boil only what you need |
| Pot spits or boils over | Flame too high once boiling | Turn the flame down: a gentle but continuous rolling boil is enough |
| Smoky or ashy taste | Open pot over flames and smoke | Keep the lid on, cook over embers, let ash settle and pour off carefully |
| Water still cloudy after boiling | Silt — heat does not remove particles | Microbiologically treated, but settle or prefilter next time for taste and clean pots |
| Pot wobbles on the fire | Uneven logs or stones | Level the supports before you fill the pot; never balance a full pot on one point |
Practice drill: know your numbers
At home or on a day hike, boil exactly one litre in your trail pot with your own stove. Start a timer when you light the stove, note when you see the first tiny bubbles, when the hissing starts and when the stir test passes. Weigh the canister before and after. Repeat once with and once without the lid, and once in a breeze. After three runs you know how long a litre really takes and how much gas you need — far more useful than any rule of thumb.
Planning water and fuel for your trip
Start with how much water you need: the water needs calculator estimates drinking and cooking water from your weight, temperature, effort and altitude — often 4–6 litres per person per day. Then enter that amount and your altitude in the boiling point and fuel calculator to see how much gas or wood boiling it all would take. Many people filter drinking water on the move and boil only in camp, where the stove runs anyway for cooking.
Boiling water is one of the fundamental skills in our bushcraft for beginners guide, alongside fire and shelter. Add a pot, lid and backup treatment to your kit list, and practise on a day hike until you can recognise a rolling boil and time it without thinking.
Boiling kit
- Metal pot with lid (or single-wall steel bottle)
- Stove and enough fuel, or fire kit and permission for a fire
- Windscreen (not fully enclosing a canister)
- Bandana or coffee filter for prefiltering
- Pot grabber or gloves
- Clean, heat-tolerant bottles for storage
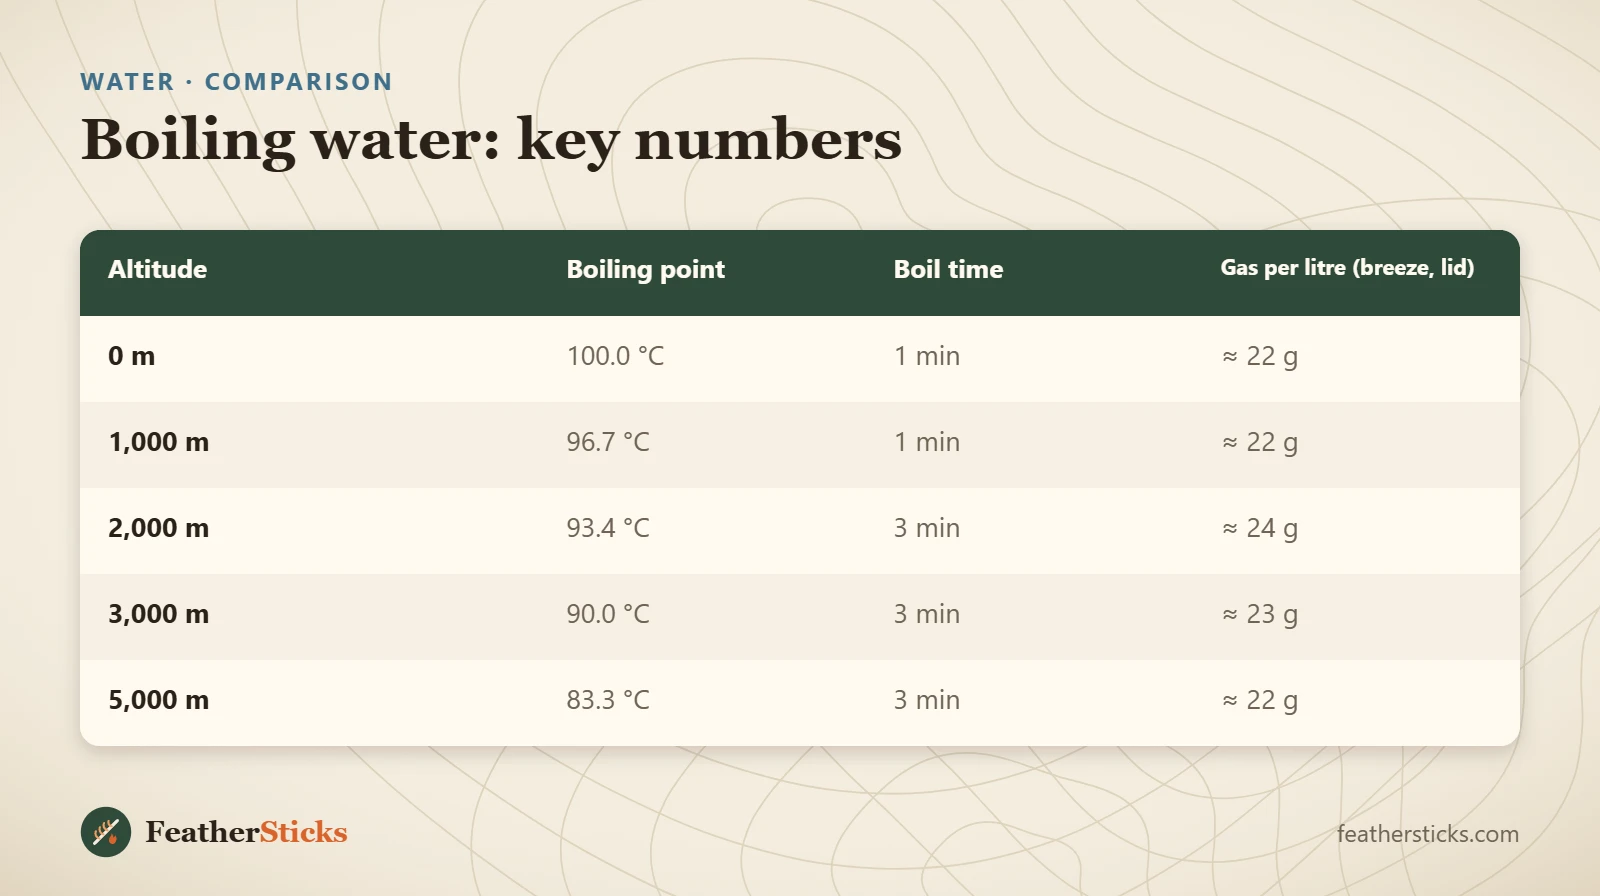
| Altitude | Boiling point | Boil time | Gas per litre (breeze, lid) |
|---|---|---|---|
| 0 m | 100.0 °C | 1 min | ≈ 22 g |
| 1,000 m | 96.7 °C | 1 min | ≈ 22 g |
| 2,000 m | 93.4 °C | 3 min | ≈ 24 g |
| 3,000 m | 90.0 °C | 3 min | ≈ 23 g |
| 5,000 m | 83.3 °C | 3 min | ≈ 22 g |
Common mistakes
- Stopping at the first small bubbles instead of a real rolling boil.
- Boiling for 10–20 minutes and wasting fuel and water.
- Forgetting the 3-minute rule above 2,000 m.
- Assuming boiling removes chemicals, heavy metals or algal toxins.
- Heating a double-wall bottle or a bottle with the cap on.
- Cooling boiled water by adding untreated water.
- Recontaminating treated water with dirty cups, hands or bottle threads.
What you need
- Metal pot with lid or single-wall steel bottle
- Stove with windscreen and fuel, or fire kit
- Bandana or coffee filter
- Pot grabber or heat-resistant gloves
- Clean water bottles
- Backup treatment (chlorine dioxide tablets)