Water
How to Make a DIY Water Filter (and Why It Is Not Enough)
A DIY water filter — layers of cloth, sand, charcoal and gravel in a cut-off bottle or a bark cone — turns muddy, cloudy water into clear water. That is useful: clear water clogs your real filter less, lets tablets and UV work properly and tastes better. But an improvised sediment filter does not make water safe to drink. Bacteria, viruses and parasites pass straight through sand and campfire charcoal.
So think of it as a prefilter. After the DIY filter, always boil the water or disinfect it using one of the water purification methods. This guide shows the layer order, step-by-step build, materials, troubleshooting and the limits — part of our water section.
Step by step
-
1
Prepare a container
Cut the bottom off a plastic bottle and turn it upside down, or roll birch bark into a cone. Plug the neck loosely with cloth.
-
2
Crush and rinse charcoal
Take charcoal (not ash) from a burnt-out hardwood fire, crush it to pea size and smaller, and rinse off the dust.
-
3
Build the layers
From the bottom up: cloth, coarse gravel, fine gravel, charcoal, fine sand, and a cloth or grass layer on top.
-
4
Flush until it runs clear
Pour water through several times and discard it until the output runs clear. Then pour slowly to keep the layers intact.
-
5
Boil or disinfect the result
The filtered water looks clean but can still make you ill. Boil it for 1 minute (3 above 2,000 m) or disinfect it.
What does a DIY water filter actually do?
An improvised filter is a sediment filter. Water trickles through progressively finer layers, and particles get stuck in the gaps: leaves and insects in the top cloth, sand grains and silt in the sand, fine particles and some colour in the charcoal. The result can look impressively clear.
What it cannot do is remove microorganisms reliably. The gaps between sand grains are many times larger than bacteria (around 0.2–5 µm) and viruses (0.02–0.1 µm), and even the tiny protozoa such as Cryptosporidium (4–6 µm) can pass. Campfire charcoal is not the same as the activated carbon in commercial filters: its surface area is far smaller and its ability to adsorb chemicals is limited and unpredictable. And unlike a municipal slow sand filter, which relies on a biological layer that takes weeks to develop, a filter built in half an hour has none of that biological effect.
What an improvised filter does — and does not do
It does
- Remove mud, silt, sand and debris
- Reduce cloudiness (turbidity)
- Improve taste, smell and colour somewhat
- Protect your real filter from clogging
- Make boiling, tablets and UV more effective
It does NOT
- Remove bacteria reliably
- Remove viruses
- Remove Giardia or Cryptosporidium reliably
- Remove dissolved chemicals, heavy metals or salt
- Make water safe to drink on its own

The layers of a DIY water filter
The principle is coarse to fine in the direction of flow, with a support layer at the bottom that keeps the fine material from washing out. Water goes in at the top and comes out of the bottleneck or cone tip.
Layer order in a bottle filter (top = water in)
- Catches leaves, insects and coarse debris; spreads the inflow so it does not dig holes in the sand.
- Main sediment layer: traps silt and fine particles.
- Traps fine particles; reduces some taste, smell and colour.
- Holds the charcoal in place.
- Support layer; keeps the outlet from clogging.
- Stops gravel and charcoal from falling out. Water drips out here.

Some builders place the charcoal above the sand, others add a second sand layer below the charcoal. Both work; what matters more is that each layer is well rinsed, the sand is fine and the water flows slowly. The longer the water stays in contact with the layers, the more particles are caught.
Materials: what you need and how to prepare it
| Material | Purpose | Where to find it | Preparation |
|---|---|---|---|
| Container | Holds the layers | Plastic bottle, birch bark cone, sock, trouser leg, cloth on a tripod | Cut the bottom off the bottle; seal bark cones with a peg or cord |
| Cloth | Top and bottom layer | Bandana, T-shirt, buff, sock | Clean; several layers for the neck plug |
| Fine sand | Sediment removal | Stream banks, beaches (not sea salt crust) | Rinse repeatedly until the rinse water is almost clear |
| Charcoal | Fine particles, taste | Burnt-out hardwood fire | Use black charcoal pieces, not grey ash; crush, rinse off dust |
| Gravel and pebbles | Support, drainage | Stream beds, paths | Rinse; two sizes if possible |
| Grass or moss | Coarse pre-screen | Meadow, forest floor | Clean, not from sprayed field edges |
Making charcoal for a filter
The best charcoal comes from a hardwood fire that has burned down: pick out black, light, brittle pieces that break with a clean glassy surface. Avoid grey or white ash — it is alkaline and makes water taste soapy — and never use charcoal from painted, treated or glued wood, or from barbecue briquettes with additives. Crush the charcoal between two stones to pieces from pea-size down to coarse powder, then rinse it in water to remove the fine black dust. Getting a good fire going is covered in fire starting basics and our fire lays guide.
Preparing filter charcoal
 1Pick the right pieces
Wait until the fire is completely out and cold. Pick black, light, brittle pieces from the edge of the fire bed — they should snap with a clean, slightly glassy break.
 2Charcoal yes, ash no
Grey or white ash is alkaline and makes water taste soapy; leave it behind. Pieces that are still brown inside are only half-burnt wood.
 3Crush between two stones
Lay the pieces on a flat stone and press or tap them with a second stone, from pea size down to coarse grit. Do it over a cloth so you lose less.
 4Rinse off the dust
Swirl the crushed charcoal in a pot of water and pour off the black water. Repeat until it runs only faintly grey — this saves you long flushing later.
How to build a DIY water filter step by step
Bottle filter build
 1Cut the bottle
Cut off the bottom of a 1–2 L plastic bottle with a knife, cutting away from your hand. Remove the cap or pierce a few small holes in it.
 2Plug the neck
Push a folded piece of cloth into the neck from inside — firm enough to hold gravel, loose enough to let water drip. Too tight and nothing comes out.
 3Hang or support it
Hang the bottle upside down from a branch with cord, or wedge it into a forked stick, with a clean pot directly underneath the neck.
 4Add the layers
From the neck upwards: coarse gravel, fine gravel, charcoal, fine sand, and finally a cloth or grass layer on top. Level each layer before adding the next.
 5Flush it
Pour water through and throw away the output until it runs clear. Charcoal dust comes out black first, then sand fines make it cloudy.
 6Filter slowly — then treat
Pour gently onto the top cloth; a slow drip gives clearer water than a gush. Then boil, disinfect or run the clarified water through a proper filter before drinking.
What it should look like — checkpoints
- Layers: clearly separated bands, each level, no gravel mixed into the sand. Through the bottle wall you can see them like a cross-section.
- Top cloth: lies flat on the sand. When you pour, no hole or channel forms in the sand below.
- Flow: a steady drip or thin trickle from the neck. A gush means the plug is too loose or the layers are too thin; no drip at all means the plug is too tight.
- Output: after flushing, clear — not grey, not yellowish, no black specks. Only then collect it in the clean pot for treatment.
A sharp knife makes cutting bottles and bark much easier — see our guide to bushcraft knives. To hang the filter, a simple loop of cord around the bottle and a branch is enough; natural fibres work too, as shown in natural cordage.
Other improvised filters: bark cone, sock and tripod
Birch bark cone
Roll a large sheet of birch bark (from a fallen or dead tree, never peeled from a living tree) into a cone and pin it with a split stick or tie it with cord. Push a tuft of grass or cloth into the tip, then build the layers as in a bottle. Bark cones leak a little, so place the pot directly underneath.
Sock or trouser leg
A clean sock or trouser leg, knotted at the bottom and hung from a branch, can be filled with the same layers. Fabric filters are quick to make and pack flat — the fabric itself does much of the work as a prefilter.
Three-tier tripod filter
Lash three poles into a tripod and tie three squares of cloth one above the other, like hammocks. Fill the top one with grass, the middle one with sand and the bottom one with charcoal, and pour water in from the top. It handles larger volumes for a camp and is easy to clean. The lashing techniques are covered in camp setup.
Even simpler: settling
Often the easiest "filter" is time. Let muddy water stand in a pot or bag for 30 minutes to a few hours; most sediment sinks, and you can pour off the clear top layer carefully. Settling plus a cloth prefilter is enough for many situations.
Three improvised filter variants
 1Birch bark cone
Bark from a fallen or dead tree, rolled into a cone and pinned with a split stick. Grass or cloth in the tip, then the usual layers. Place the pot right under the tip, as cones leak a little.
 2Sock or trouser leg
A clean sock or trouser leg, knotted at the bottom and hung from a branch, filled with the same layers. The fabric itself works as a prefilter.
 3Three-tier tripod
Three squares of cloth tied into a tripod one above the other: grass on top, sand in the middle, charcoal at the bottom. Handles larger volumes for a camp.
After filtering: how to make the water safe
The DIY filter is only the first stage of the treatment chain. Once the water is clear, choose a method that actually kills or removes germs:
From muddy water to drinking water
- SettleLet the heaviest mud sink first.
- DIY filterSand, charcoal and gravel remove the rest of the sediment.
- TreatBoil 1 min (3 min above 2,000 m), disinfect or use a real filter.
- StoreClean, marked container.
- Boiling is the most reliable method and works well after a sediment filter. Estimate fuel with the boiling point and fuel calculator.
- Chlorine dioxide tablets work much better in clear water; follow the contact times on the label.
- UV purifiers need clear water — a DIY prefilter makes them usable with murky sources.
- A commercial hollow-fibre filter lasts far longer when the worst silt has been removed first.
Store the treated water in clean containers — see water containers — and never let raw water touch the treated side.
Troubleshooting your DIY filter
The water that comes out of the neck tells you what is wrong inside. Hold a clear bottle or cup under the drip and compare it with the picture below before you change anything.

| Problem | Likely cause | Fix |
|---|---|---|
| Water comes out black | Charcoal dust not rinsed | Keep flushing; rinse charcoal better next time |
| Water still cloudy | Sand too coarse, flow too fast | Add finer sand, pour more slowly, settle first |
| Nothing comes out | Neck plug too tight or clay clogging | Loosen the plug; prefilter through cloth; replace top sand |
| Sand in the output | Gravel layers too thin | Add more gravel and a thicker cloth plug |
| Soapy or bitter taste | Ash instead of charcoal | Rebuild with clean charcoal pieces |
| Filter works less well over time | Layers clogged with sediment | Replace or rinse the top sand; rebuild after heavy use |
Do not keep an improvised filter for days: organic material and trapped dirt in the layers can allow germs to grow. Build it, use it, and take it apart before you leave, scattering natural materials and packing out the bottle.
When is a DIY water filter worth building?
Should you build one?
Is your only water source muddy or full of debris?
Yes → Yes — settle it and build a DIY filter to clear it before treatment.No → Clear water does not need it; treat directly.Do you have a commercial filter that clogs quickly in this water?
Yes → A DIY prefilter protects it and extends its life.No → Continue.Can you boil or disinfect the water afterwards?
Yes → Good — that is what makes it safe.No → Find another source or treatment method; DIY-filtered water alone is not safe.
Building a DIY water filter is a great teaching exercise for groups and children, because it shows how water treatment works — as long as everyone understands the second step. A good group drill: fill two identical clear bottles, one with the raw muddy water and one with the filter output, and try to read large print through each from above. The difference is obvious — and it is the moment to explain that the invisible germs are still there, before the clear water goes into the pot to be boiled. As part of your bushcraft basics, practise it alongside finding water and boiling. For real trips, pack a proper filter or tablets in your kit list; the water needs calculator tells you how much capacity you need.
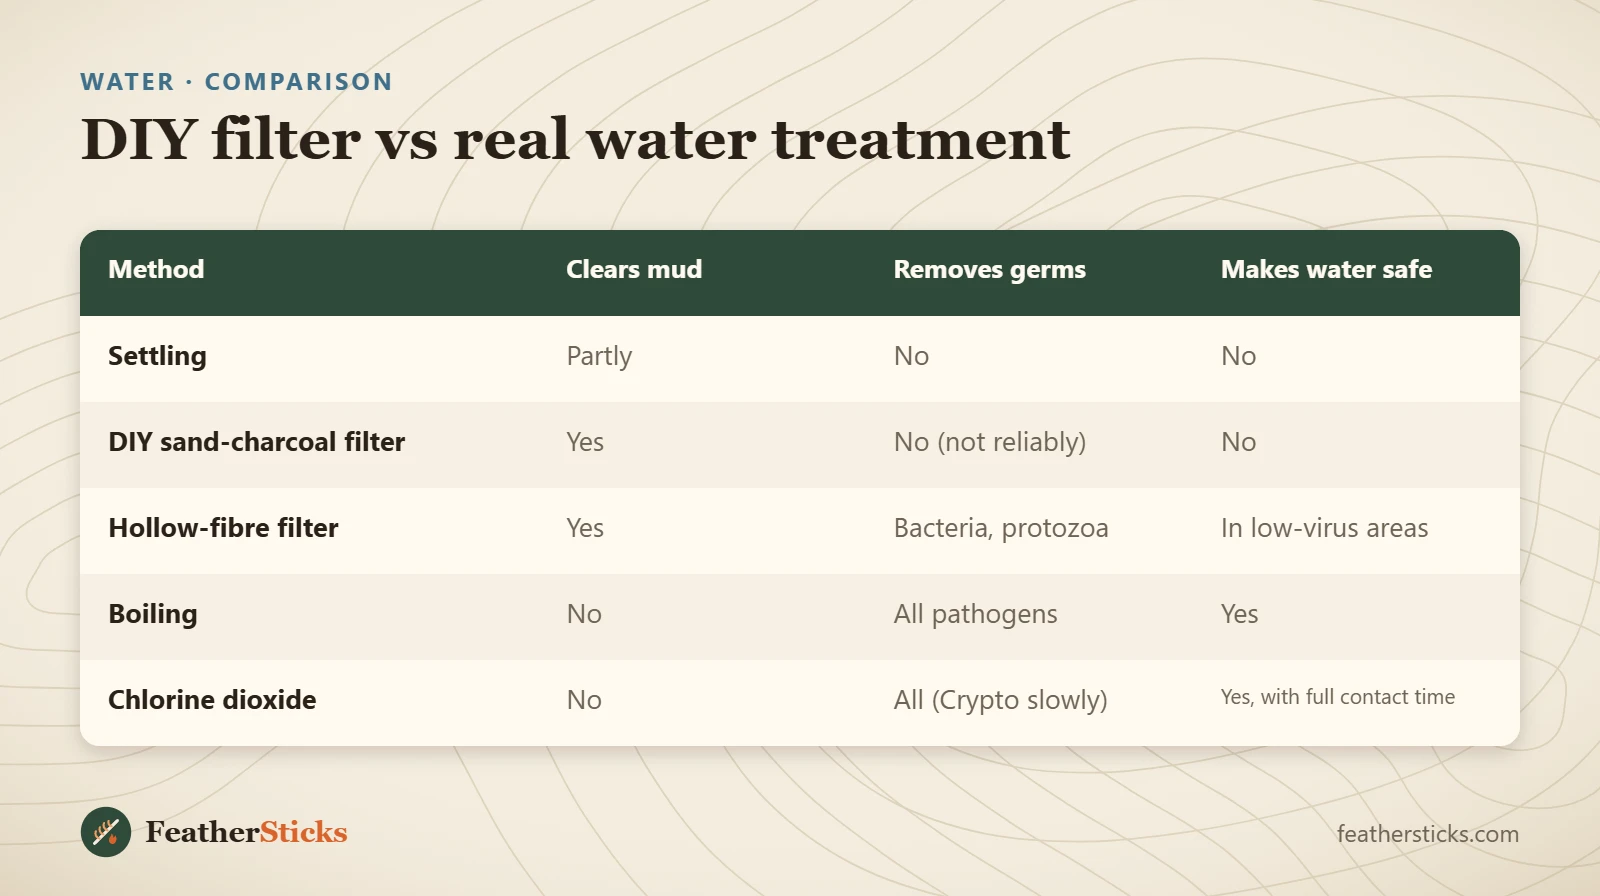
| Method | Clears mud | Removes germs | Makes water safe |
|---|---|---|---|
| Settling | Partly | No | No |
| DIY sand-charcoal filter | Yes | No (not reliably) | No |
| Hollow-fibre filter | Yes | Bacteria, protozoa | In low-virus areas |
| Boiling | No | All pathogens | Yes |
| Chlorine dioxide | No | All (Crypto slowly) | Yes, with full contact time |
Common mistakes
- Drinking DIY-filtered water without boiling or disinfecting it.
- Using grey ash instead of black charcoal.
- Not rinsing sand and charcoal, so the water comes out black or cloudy.
- Pouring too fast, which washes sediment through.
- Expecting charcoal to remove chemicals or pollutants.
- Keeping and reusing an improvised filter for days.
What you need
- Plastic bottle (1–2 L) or birch bark
- Bandana or clean cloth
- Knife for cutting
- Cord for hanging
- Clean pot to collect the water
- Stove, fire kit or purification tablets for the second stage