Water
How to Filter Water Outdoors: Filter Types, Pore Sizes and Care
To filter water outdoors, you push or let it flow through a membrane or ceramic element with pores so small that bacteria and parasites cannot pass — typically 0.1–0.2 micrometres (µm) for hollow-fibre filters. A good filter removes protozoa such as Giardia and Cryptosporidium and almost all bacteria, and it makes cloudy water clear. What most filters do not stop are viruses, which are up to a hundred times smaller.
This guide compares hollow-fibre, ceramic, gravity, pump and straw filters, explains pore sizes, shows how to prefilter and maintain your filter, and why a single frosty night can ruin it. For the full picture of all treatment methods, see water purification methods and our water hub.
Step by step
-
1
Collect from the clearest spot
Fill your dirty bag or bottle from flowing, clear water. Every grain of silt you avoid now saves filter life.
-
2
Prefilter cloudy water
Let muddy water settle, then pour it through a bandana or coffee filter. This keeps the fine pores from clogging.
-
3
Filter into a clean container
Squeeze, pump or hang the filter and let clean water run into a separate, clean bottle. Keep dirty and clean sides apart.
-
4
Add disinfection if needed
Where viruses are likely — near settlements, pasture or in countries with poor sanitation — add chlorine dioxide or boil as well.
-
5
Backflush and protect from frost
Backflush when the flow slows. On cold nights keep the filter in your sleeping bag or inner pocket so it cannot freeze.
How does a water filter work?
A mechanical water filter is a sieve on a microscopic scale. Water is pushed through a material full of tiny channels — hollow plastic fibres, porous ceramic or a dense carbon block. Anything larger than the channels stays behind: sand, silt, algae, protozoan cysts and bacteria. Water molecules and anything dissolved in them pass through.
That last point matters. A filter does not change the chemistry of water. Salt, nitrate, most pesticides and heavy metals are dissolved and slip straight through a microfilter. Activated carbon can adsorb some organic chemicals and improve taste and smell, but it is not a reliable barrier against chemical pollution or germs. The first and best defence against chemicals is still choosing a clean source.
Inside a typical filtering setup (top = water in)
- Sediment, organic matter, protozoa, bacteria, viruses, dissolved chemicals
- Catches sand, silt and debris — protects the fine membrane
- Removes protozoa (Giardia, Crypto) and bacteria
- Improves taste and smell, reduces some chemicals and chlorine
- Viruses and dissolved chemicals may still be present
Pore sizes: what a filter can and cannot remove
The pore size of a filter is given in micrometres (µm; 1 µm = 1/1000 mm). Compare it with the size of what you want to stop. An absolute pore size means no pore is larger than the stated value; a nominal value means most pores are that size, but some are larger. For drinking water, only absolute ratings and independent test standards give reliable protection.
| Organism / filter | Typical size | Stopped by 0.1–0.2 µm filter? |
|---|---|---|
| Giardia cysts (protozoa) | ≈ 8–12 µm | Yes |
| Cryptosporidium oocysts (protozoa) | ≈ 4–6 µm | Yes |
| Bacteria (E. coli, Campylobacter, Salmonella) | ≈ 0.2–5 µm | Yes (≥ 99.9999 % with good filters) |
| Viruses (norovirus, hepatitis A, rotavirus) | ≈ 0.02–0.1 µm | No — need disinfection, boiling or a virus-rated purifier |
| Hollow-fibre microfilter | 0.1–0.2 µm | — |
| Ceramic filter | ≈ 0.2–0.5 µm | — |
| Virus-rated purifier (ultrafilter) | ≈ 0.02 µm | Also removes viruses |

In North America and Europe, the wild water risk is dominated by protozoa and bacteria from animals and livestock, which is why many hikers rely on a microfilter alone in remote country. Viruses are mainly spread by human faeces. The closer you are to people — huts, villages, popular lakes, campsites — and the poorer the local sanitation, the more important virus protection becomes. For such water, combine your filter with chemical disinfection or UV or boil the water.
A product sold as a purifier (rather than a filter) is designed to remove or inactivate viruses too. Look for independent testing to recognised protocols, such as the US EPA guide standard for microbiological purifiers, which demands a 99.9999 % reduction of bacteria, 99.99 % of viruses and 99.9 % of protozoan cysts.
Water filter vs water purifier
Filter (microfilter)
- Removes protozoa and bacteria
- Does not stop viruses
- Lighter, faster, cheaper
- Fine for remote wilderness with low human impact
Purifier
- Also removes or kills viruses
- Ultrafilter, electroadsorption or filter + chemical
- Heavier, slower or more expensive
- Needed near settlements and for travel abroad
Which water filter is best? Types compared
There is no single best water filter — there is the best filter for your group size, route and climate. The main designs all use one of two elements: hollow fibre (bundles of thin plastic tubes with microscopic pores in their walls) or ceramic (a porous clay cartridge). They differ in how you move the water through.
Squeeze and inline hollow-fibre filters
A small cartridge screws onto a soft bottle or pouch; you squeeze dirty water through it into a clean container, or suck through it like a straw. Light (often under 100 g), fast and cheap to run. Squeezing seams on the pouches is the most common failure point, so carry a spare pouch or use a sturdy bottle.
Gravity filters
A dirty-water bag of 3–10 litres hangs from a branch, and a hose leads through a hollow-fibre cartridge into a clean container. You walk away and let gravity work — ideal for groups and base camps. Flow drops as the bag empties; a higher hanging point increases pressure.
Pump filters
A hand pump pushes water through a ceramic or fibre element. Pumps can draw from shallow puddles and rock pools where a bottle cannot be filled. They are heavier and have more moving parts, but ceramic pumps can be scrubbed clean again and again.
Straw and bottle filters
Straws let you drink directly from a source; bottle filters have the element in the lid. Both are great as emergency backups, but you cannot easily fill a pot for cooking, and suction is tiring for larger volumes.
Ceramic filters
Ceramic cartridges are slower and heavier but very robust, often combined with a carbon core. You can scrub off the clogged outer layer until a gauge shows the wall is too thin. They can crack if dropped or frozen wet.
| Type | Weight | Speed | Best for | Weak points |
|---|---|---|---|---|
| Squeeze / inline hollow fibre | ≈ 40–100 g | Fast | Solo hikers, fast trips | Pouches burst, frost damage |
| Gravity hollow fibre | ≈ 200–350 g | Hands-free, fast when full | Groups, base camp | Needs a hanging point, slows when bag empties |
| Pump (fibre or ceramic) | ≈ 300–600 g | Medium, tiring | Shallow sources, expeditions | Heavy, moving parts, seals |
| Straw / bottle filter | ≈ 30–200 g | Sip only | Emergency backup, day hikes | Hard to fill pots, suction effort |
| Ceramic gravity / pump | ≈ 400–1,000 g | Slow | Silty water, long base camps | Cracks when dropped or frozen |

Which filter should you choose?
Are you filtering for a group or a fixed camp?
Yes → Gravity filter with a 4–10 L dirty bag.No → Continue.Do you need to draw from shallow puddles or rock pools?
Yes → Pump filter (ceramic if the water is silty).No → Continue.Is weight your priority on a solo trip?
Yes → Squeeze or inline hollow-fibre filter plus tablets as backup.No → Squeeze filter or ceramic system for durability.Will you be near settlements or travelling abroad?
Yes → Choose a virus-rated purifier or add chlorine dioxide / boiling.No → A microfilter is usually enough in remote wild areas.
Filtering in practice: speed, capacity and daily routine
How much water you filter per day decides which system is comfortable. A solo hiker on a mild day may need 4–5 litres including cooking water; a group of four easily needs 20 litres. Check your own figure with the water needs calculator and multiply by trip days to see whether your filter’s rated capacity is sufficient.
Speed depends on pressure and on how clean the element is. A fresh squeeze filter fills a litre bottle in about a minute with firm pressure; a gravity bag hung high does the same hands-free while you pitch the tarp. As the filter loads up, times double or triple — which is your signal to backflush. Pumping is the slowest per litre but lets you work from sources other systems cannot reach.
A simple daily routine
- Evening: fill the gravity bag or dirty pouch at the source, filter enough for dinner, breakfast and the first hours of walking.
- Night: filter in a zip bag in your sleeping bag whenever frost is possible.
- Day: refill and filter at every good source rather than waiting until you are empty — the best water is often the one you pass, not the one you reach.
- Weekly on long trips: backflush thoroughly, check seals and pouches, and dry the outside.
Filtered water tastes like the source: a peaty moorland stream stays slightly brown and earthy, because dissolved humic substances pass the membrane. That colour is harmless in itself, but it can be a hint that the water also carries dissolved chemicals from the catchment, so judge the source, not just the glass.
Using a squeeze filter step by step
 1Fill the dirty pouch
Hold the pouch in the main current with the opening facing upstream, just below the surface. Keep it off the bottom and away from the silty edge.
 2Screw the filter on
Screw the cartridge onto the pouch hand-tight. From now on the pouch, its thread and your wet hand count as the dirty side.
 3Turn it over and squeeze
Hold the pouch upside down above a clean bottle and press it gently with both hands. A steady jet is right; hard squeezing only strains the seams.
 4Roll, do not wring
As the pouch empties, roll it up from the far end towards the filter. Twisting or wringing it is the most common way to burst a pouch seam.
 5Cap the clean outlet
Close the outlet cap before you put the filter down. Treated water stays in its own marked bottle, and the clean outlet never touches the pouch or the stream.
What a healthy filter run looks like
- Flow: a fresh squeeze filter fills a litre bottle in about a minute with firm, steady pressure. If it takes two or three times as long, backflush.
- Output: clear water, even from slightly cloudy input. Cloudy output means a damaged or wrongly assembled filter — stop and switch to another method.
- Pouch: smooth seams, no drips from the thread. Wet fingers on the clean side mean a leak somewhere.
- Clean side: the outlet, the clean bottle and its thread have not touched raw water at any point.
Setting up a gravity filter
 1Fill the dirty bag
Fill the 3–10 L bag at the source, scooping from the clearest spot. Close it firmly before carrying it to camp.
 2Hang it from a branch
Hang the bag by its loop from a sturdy branch or trekking pole. Check that the branch holds the weight — a full 4 L bag weighs about 4 kg.
 3Connect the filter and walk away
Run the hose through the hollow-fibre cartridge into a clean bottle or bag on the ground. Pitch your tarp while gravity does the work.
 4Higher means faster
The flow depends on the height between bag and filter. When it slows as the bag empties, hang it higher before you blame the filter.
Prefiltering: the cheapest way to double filter life
Nothing kills a hollow-fibre filter faster than silt. Fine clay and glacial rock flour lodge in the pores, and each backflush removes less of it. Prefiltering takes out the coarse load before it reaches the membrane, so the filter works faster and lasts longer. It also helps every other treatment: cloudy water shields germs from UV light and uses up chemical disinfectants.
- Settle: let muddy water stand in a pot or bag for 30 minutes to several hours, then pour off the clear top layer.
- Cloth: pour through a bandana, a buff folded several times or a coffee filter. Coffee filters catch surprisingly fine particles.
- Intake screen: many pumps have a foam or mesh prefilter on the intake hose; keep it off the bottom.
- Improvised sediment filter: for very dirty water, a layered sand-and-charcoal filter can clear it — see our DIY water filter guide. It clears water but does not make it safe.
Field routine for muddy water
- CollectScoop from the calmest, clearest spot, not the bottom.
- Settle30 min or longer; pour off the top.
- PrefilterBandana or coffee filter.
- FilterInto a clean, marked bottle.
- Disinfect if neededChlorine dioxide or boil for virus risk.
Filter maintenance: backflushing, cleaning and storage
Every filter slows down as it collects dirt. The fix depends on the element: hollow-fibre filters are backflushed, ceramic elements are scrubbed, carbon elements are replaced. Always follow your manufacturer’s instructions — the steps below are the general principle.
How to backflush a hollow-fibre filter
 1Use clean water only
Fill the backflush syringe with already filtered or treated water from your clean bottle. Raw water would push germs straight into the clean side.
 2Push it the wrong way
Press the syringe onto the clean-side outlet and push firmly. Water runs backwards through the fibres and brown debris comes out of the dirty-side inlet.
 3Repeat until clear, discard
Two or three strong pushes usually restore much of the flow. Let the dirty water drain onto the ground, well away from the source and your clean bottles.
 4Dry the outside and store it safely
Some models must never dry out, others should be dried; check the manual. Before storing for months, many makers recommend a weak disinfectant run. Pack it where it cannot be crushed or freeze.
Avoiding cross-contamination
The weakest point of any filter is not the membrane but your hands. A single drop of raw water on the clean outlet, the clean bottle thread or your drinking cup undoes the whole process. Mark dirty and clean bottles clearly (tape, colour, a knot in the cord), never let the clean outlet touch the source, and keep hoses capped. After filtering, wash or sanitise your hands before handling clean containers — our water containers guide shows systems that make this easy.

When is a filter worn out?
A hollow-fibre filter that no longer flows well after backflushing is clogged for good. A ceramic element is spent when the gauge shows the wall is too thin. Carbon stages are spent when taste improvements stop or the stated litre capacity is reached. And any filter that was dropped hard, frozen wet or shows cracks should be treated as compromised.
| Symptom | Likely cause | What to do |
|---|---|---|
| Flow slows to a trickle | Pores loaded with silt | Backflush with clean water; settle and prefilter the next batches |
| Flow stays slow after backflushing | Clogged for good | Replace the cartridge; use boiling or tablets meanwhile |
| Flow suddenly faster than new | Fibres cracked by frost or impact | Treat as broken: switch to boiling or chemicals and replace it |
| Water drips from the thread | Missing or twisted O-ring, cross-threaded | Unscrew, seat the O-ring, screw on straight and hand-tight |
| Pouch leaks at the seam | Squeezed or wrung too hard | Use the spare pouch or a sturdy bottle; roll instead of wringing |
| Output looks cloudy | Damaged element or wrong assembly | Stop using it; the water is not reliably filtered |
Freezing damage: the invisible filter killer
Wet hollow fibres contain water. When that water freezes, it expands and can crack the fibre walls, creating holes far larger than the rated pore size. The filter still looks normal and may even flow faster — but bacteria and protozoa can now pass through. Most manufacturers state that a hollow-fibre filter that may have frozen when wet can no longer be trusted, and many models offer no reliable way to test it in the field.

In winter, a stove and pot are usually the better primary treatment anyway — you need them for melting snow, and boiling is unaffected by cold. Chemical tablets work in the cold but need longer contact time. A squeeze filter can still be useful by day if you keep it warm, but always carry a backup method.
Before every trip: filter check
Filter pre-trip checklist
- Flow rate normal after a test run with tap water
- No cracks on housing, hoses or cartridge; O-rings in place
- Dirty pouch or bag free of leaks and seam damage
- Backflush syringe or cleaning pad packed
- Clearly marked dirty and clean containers
- Backup treatment packed: tablets or stove and pot
- Filter capacity sufficient for the trip — see the water needs calculator
Include your filter and backup in your bushcraft kit list or build a weighted list with the Kit Builder. Store the filter where it cannot be crushed in your backpack — the lid pocket or a side pocket of a hard bottle is ideal.
Filtering plus: when to combine methods
Filtering is excellent as the first stage of a treatment chain. Combined with a second method, it covers every group of pathogens:
- Filter + chlorine dioxide: the filter removes Cryptosporidium (which chemicals are slow against), the chemical inactivates viruses. A strong, light combination for travel.
- Filter + boiling: filtering clears the water, boiling handles everything else. Useful when you cook anyway — boiling costs fuel, which the boiling point and fuel calculator estimates.
- Filter + UV: filtered, clear water is exactly what UV lamps need to work reliably.
At camp, boiling in your cookware over a stove or a fire you lit with solid fire-starting skills makes the second stage almost free. Water treatment is one of the core topics of bushcraft for beginners.
Pathogen groups covered
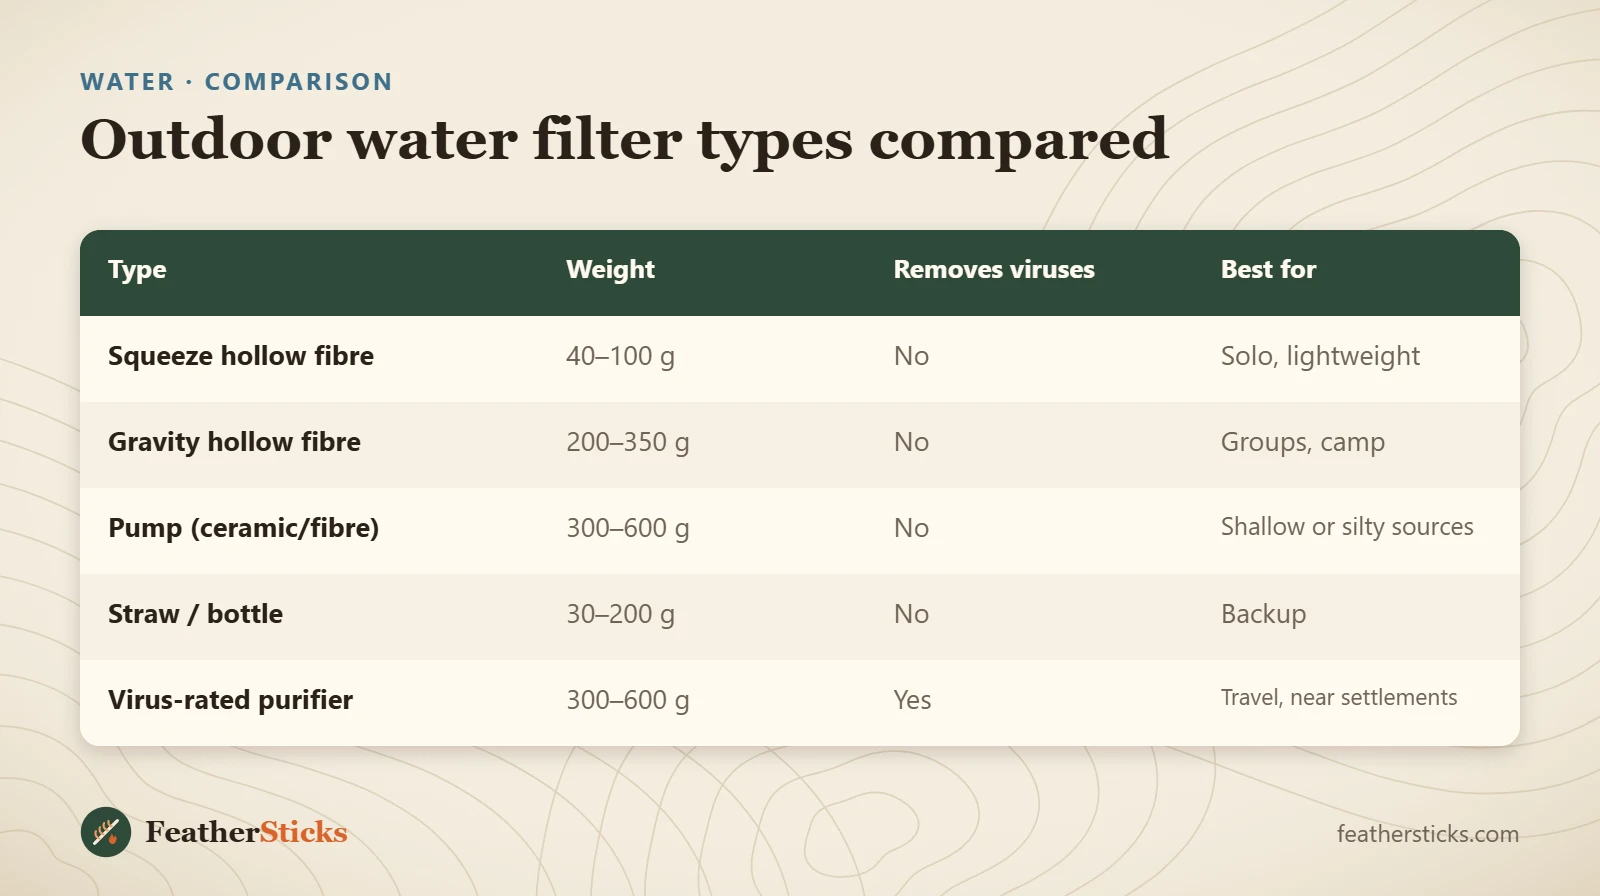
| Type | Weight | Removes viruses | Best for |
|---|---|---|---|
| Squeeze hollow fibre | 40–100 g | No | Solo, lightweight |
| Gravity hollow fibre | 200–350 g | No | Groups, camp |
| Pump (ceramic/fibre) | 300–600 g | No | Shallow or silty sources |
| Straw / bottle | 30–200 g | No | Backup |
| Virus-rated purifier | 300–600 g | Yes | Travel, near settlements |
Common mistakes
- Believing a microfilter removes viruses.
- Letting a wet hollow-fibre filter freeze overnight.
- Filtering silty water without settling or prefiltering.
- Touching the clean outlet or clean bottle with dirty water or hands.
- Backflushing with unfiltered water.
- Expecting a filter to remove chemicals, nitrate or salt.
- Carrying no backup treatment if the filter breaks or clogs.
What you need
- Hollow-fibre squeeze or gravity filter
- Backflush syringe
- Marked dirty bag and clean bottle
- Bandana or coffee filters for prefiltering
- Chlorine dioxide tablets as backup
- Zip bag to keep the filter warm at night