Water
How to Get Water from Snow and Ice Efficiently
To get water from snow, start with a little liquid "seed" water in the pot, add snow gradually, keep the lid on and use a windscreen. Choose dense old snow or ice wherever possible: a litre of water can take 10–20 litres of fresh powder but only about a litre of ice. Melting snow roughly doubles your fuel consumption compared with boiling liquid water, so plan gas carefully.
This guide covers efficient melting, a snow vs ice yield table, fuel figures consistent with our boiling point and fuel calculator, passive melting tricks, why you should not eat snow, and why melted snow still needs treatment. It belongs to our water section — see also water purification methods.
Step by step
-
1
Collect clean, dense snow or ice
Dig below the surface away from trails, huts and animal tracks. Old snow and ice give far more water per pot than powder.
-
2
Start with seed water
Pour a few centimetres of liquid water into the pot before adding snow. It stops scorching and speeds up melting.
-
3
Add snow gradually, lid on
Feed snow in small amounts and press it down. Use a lid and a windscreen to save fuel.
-
4
Boil to treat it
Melted snow can carry germs. Bring it to a rolling boil for 1 minute, 3 minutes above 2,000 m.
-
5
Store it warm
Fill insulated or upside-down bottles and keep one in your sleeping bag so tomorrow’s water does not freeze.
How to melt snow for drinking water
In winter or above the snow line, liquid water is often scarce — but snow is everywhere. Turning it into drinking water is simple in principle and wasteful in practice, unless you know a few tricks. The biggest problems are the huge volume of fresh snow, the energy needed to turn ice into water, and the risk of scorching an almost empty pot.
From snow to safe drinking water
- CollectClean, dense snow or ice, dug from below the surface.
- SeedA little liquid water in the pot first.
- MeltAdd snow gradually, lid on, windscreen up.
- TreatRolling boil 1 min (3 min above 2,000 m).
- StoreInsulated bottles, kept warm.
Why seed water matters
Snow is a poor conductor of heat and is mostly air. If you put a pot full of dry snow over a flame, the thin layer touching the metal melts, soaks into the snow above, and leaves the pot bottom almost dry. The metal overheats, the water that does form picks up a burnt taste, and thin aluminium or titanium pots can warp or discolour. Water, by contrast, spreads the heat and melts snow quickly.
So always start with seed water: a few centimetres of liquid water from your bottle, or the last bit from the previous batch. Keep a small reserve for this purpose in a bottle inside your jacket. If you have none, put a handful of snow in the pot, heat gently while stirring and squashing it until the first water forms, then keep adding small amounts.

Efficient snow melting step by step
 1Set up out of the wind
Put the stove on a firm, level base and use a windscreen that leaves a gap for air. Never fully enclose a canister stove — the canister can overheat.
 2Pour in seed water
Pour 2–3 cm of liquid water into the bottom of the pot from the bottle you keep inside your jacket. No liquid water? Melt a handful of snow slowly while stirring.
 3Add snow in portions
Add snow or ice chips a handful at a time and press them into the water with a spoon. The pot should never hold more dry snow than water.
 4Lid on, sack of snow ready
Keep the lid on and lift it only to add snow. A stuff sack of clean snow next to the stove saves walking and keeps the melt going.
 5Keep some water back
When you fill your bottles, leave a little water in the pot as seed for the next batch instead of emptying it completely.
 6Boil the final batch
Once you have enough, bring the water to a rolling boil for 1 minute (3 minutes above 2,000 m) to treat it, then fill your bottles.
What it should look like
- Always a water layer: the snow floats in or sits on visible water; the pot base is never dry.
- Snow turns grey and slumps within seconds of touching the water — a sign that the heat goes into the snow, not into the metal.
- No smell of burning, no crackling from the pot base, no dark ring on the bottom.
- Steady level rise: with dense snow, the water level climbs noticeably with each portion. If it barely moves, switch to denser snow or ice.
Snow vs ice: how much water do you get?
Snow varies enormously in density. Fresh, cold powder may be 90–95 % air, while old spring snow and firn are much denser, and ice is almost pure water. The denser the source, the fewer trips to the snow bank, the less time and the less energy wasted heating air.
| Source | Typical density | Volume for 1 L water | Notes |
|---|---|---|---|
| Fresh powder | ≈ 50–100 kg/m³ | ≈ 10–20 L | Most air, slowest to melt |
| Settled snow | ≈ 200–300 kg/m³ | ≈ 3–5 L | Common after a few days |
| Old wet / spring snow, firn | ≈ 400–550 kg/m³ | ≈ 2–2.5 L | Good choice, dig into a drift |
| Ice (lake, stream, icicles) | ≈ 900 kg/m³ | ≈ 1.1 L | Best yield — break into chips |
Density depends on temperature, wind and age of the snow. Wind-packed drifts and the lower layers of a snowpack are usually denser than the surface.

Melting snow vs melting ice
Snow
- Available everywhere
- Low yield per pot, especially powder
- Needs seed water to avoid scorching
- Surface snow may be contaminated
Ice
- Up to 10–20× more water per pot than powder
- Melts evenly, less air to heat
- Needs breaking into chips
- Only take ice from safe places — never walk on unknown ice
If there is an open stream or a spring under the snow, use it: liquid water saves you the entire melting energy. Streams often keep running under snow bridges, and you can sometimes hear them. Approach banks carefully, as snow bridges can collapse. Our guide to finding water covers where water hides in winter.
How much fuel does melting snow take?
Physics is unforgiving here. Melting 1 kg of ice at 0 °C takes about 334 kJ — almost as much as heating the same water from 0 to 80 °C. Starting from snow at −10 °C, turning it into boiling water needs roughly 775 kJ per litre, about twice the 385 kJ needed to boil liquid water starting at 8 °C. That is why melting snow roughly doubles your fuel consumption.
Energy per litre (physics, before stove losses)
Using the same stove model as our boiling point and fuel calculator — a 2.6 kW canister stove with 55 % efficiency behind a windscreen and 40 % in a breeze, and about 46 kJ of energy per gram of gas — the numbers look like this:
| Task | Calm / windscreen | Breeze |
|---|---|---|
| Boil liquid water (8 °C start, 1 min boil) | ≈ 17 g | ≈ 22 g |
| Melt snow (−10 °C) to cold water | ≈ 15 g | ≈ 22 g |
| Melt snow (−10 °C) and boil 1 min | ≈ 32 g | ≈ 44 g |
| Per person per day, ≈ 4 L melted and boiled | ≈ 140 g | ≈ 200 g |
Model estimates. Real consumption varies with stove, pot, altitude and cold. Gas canisters lose pressure below about 0 °C — keep them warm.
Saving fuel when melting snow
- Windscreen and lid: the two biggest savings, as with all boiling.
- Dense snow or ice instead of powder.
- Keep canisters warm in your jacket or sleeping bag; use winter gas mixes or liquid-fuel stoves in real cold.
- Heat-exchanger pots or wide pots with a lid transfer more heat.
- Do not boil what you do not need to: if you use a filter or tablets for drinking water, melting alone may be enough — but only if you are confident your filter has not frozen.
- Use the campfire where fires are allowed — see fire in wet weather for lighting fires in snow.
How much water you need in winter is often underestimated: cold air is dry and you lose a lot through breathing. The water needs calculator suggests around 4 litres per day for a typical adult on an active winter day, including cooking water.
Melting snow without a stove
Fuel is precious, so let free energy do some of the work:
- Body heat: put a little water and some snow in a bottle and carry it inside your jacket, between clothing layers. Top up with snow as it melts. Do not fill a bottle with pure snow and put it against your skin — it chills you.
- Sun: spread snow thinly on a dark tarp, bin bag or rock tilted towards the sun and collect the melt in a pot. On sunny spring days this works surprisingly well.
- Beside the fire: hang a cloth bag of snow near (not over) a fire with a pot underneath, or set a pot of snow at the edge of the embers.
Passive melting is slow and still needs treatment afterwards, but every litre you do not melt on the stove saves roughly 15–20 g of gas.
Three ways to melt snow without fuel
 1Body heat
A bottle with some liquid water and a little snow, carried between clothing layers — never pure snow against the skin. Top up with snow as it melts.
 2Sun and a dark surface
Spread snow thinly on a dark tarp, bin bag or rock tilted towards the sun, and let the melt run into a pot at the low edge.
 3Beside the fire
Hang a cloth bag of snow near — not over — the fire, with a pot underneath to catch the drips. Only where fires are allowed.
Why you should not eat snow
Eating snow to quench thirst is tempting, but in the cold it works against you. Your body has to supply the energy to melt the snow and warm the water to body temperature — roughly 490 kJ, or about 115–120 kcal, per litre. That heat comes from your core. When you are already cold, tired or short of food, eating snow speeds up heat loss and can push you towards hypothermia. It also chills and irritates the mouth and throat, and it delivers very little water for the effort.
A small handful of snow when you are warm, active and well fed is not dangerous in itself — it is simply inefficient and unhygienic. The better habit is to drink warm water from an insulated bottle and to melt snow at every stop. Staying warm starts with the right clothing layers; the wind chill calculator shows how quickly wind makes cold dangerous.
Does melted snow need purifying?
Yes. Snow falls through the air as clean precipitation, but on the ground it collects dust, soot, pollen, bird and animal droppings, and anything that people leave behind near trails, huts and camps. Freezing does not reliably kill bacteria, viruses or protozoa — many survive for months in ice. Treat melted snow like any other wild water:
- Boiling is the natural choice, because you are heating the water anyway. A rolling boil for 1 minute (3 minutes above 2,000 m) handles all pathogens.
- Filters work on melt water, but frost can destroy hollow fibres invisibly. In winter keep the filter in your sleeping bag and in an inner pocket — see filtering water.
- Chemical tablets work in cold water but need much longer contact times; follow the label for cold water.
Collecting clean snow
- Collect upwind and uphill of camp, away from the toilet area
- Avoid snow near trails, huts, roads and animal tracks
- Skip yellow, brown, grey or pink ("watermelon") snow
- Remove the top few centimetres; dig into a clean drift
- Use a dedicated clean bag or stuff sack for snow
- Take ice only from safe places — never venture onto unknown ice
Collecting clean snow and ice
 1Choose the spot
Collect upwind and uphill of camp, well away from the toilet area, trails and animal tracks. Agree on one clean collection area for the whole group.
 2Remove the surface
Scrape off the top few centimetres with the pot or a shovel and take the denser, clean layer underneath — it also gives more water per pot.
 3Use ice where it is safe
Icicles, frozen splash ice at stream edges or blocks from a drift give the best yield. Break them into chips — and never step onto ice of unknown thickness.
A winter water system that works
In winter your water system revolves around the stove and your insulation. Choose a pot of at least 1–1.5 litres with a lid for one or two people, carry enough gas (see above) and a windscreen, and keep a litre of seed water liquid at all times. Wide-mouth bottles in insulated sleeves, carried upside down, keep water drinkable during the day; a vacuum bottle keeps it hot. At night, one warm, well-closed bottle goes into your sleeping bag — our guides to water containers and sleeping gear explain the details.
Plan your evening routine: melt and boil enough water for dinner, a hot drink, a warm bottle for the night and the first litres of the next morning in one session while the stove is running. Good cookware and a solid kit list make this efficient. Winter water is one of the skills that separates a pleasant snow trip from a miserable one — practise it close to home first, as recommended in bushcraft for beginners.

| Symptom | Likely cause | Fix |
|---|---|---|
| Burnt taste, dark pot base | Too little seed water, dry snow over the flame | Always keep a water layer; add snow in small portions |
| Water level barely rises | Fluffy powder, mostly air | Dig into a wind-packed drift or use ice chips |
| Weak flame, slow melting | Cold canister losing pressure | Warm the canister in your jacket; winter gas mix or liquid fuel |
| Gas runs out early | Wind, no lid, powder snow | Windscreen with an air gap, lid on, plan about double the summer gas |
| Bottles frozen in the morning | Left outside the sleeping bag | One warm bottle in the bag, the others upside down and insulated |
| Grey or gritty water | Surface snow with dust, needles, soot | Collect below the surface; let it settle, pour off, then boil |
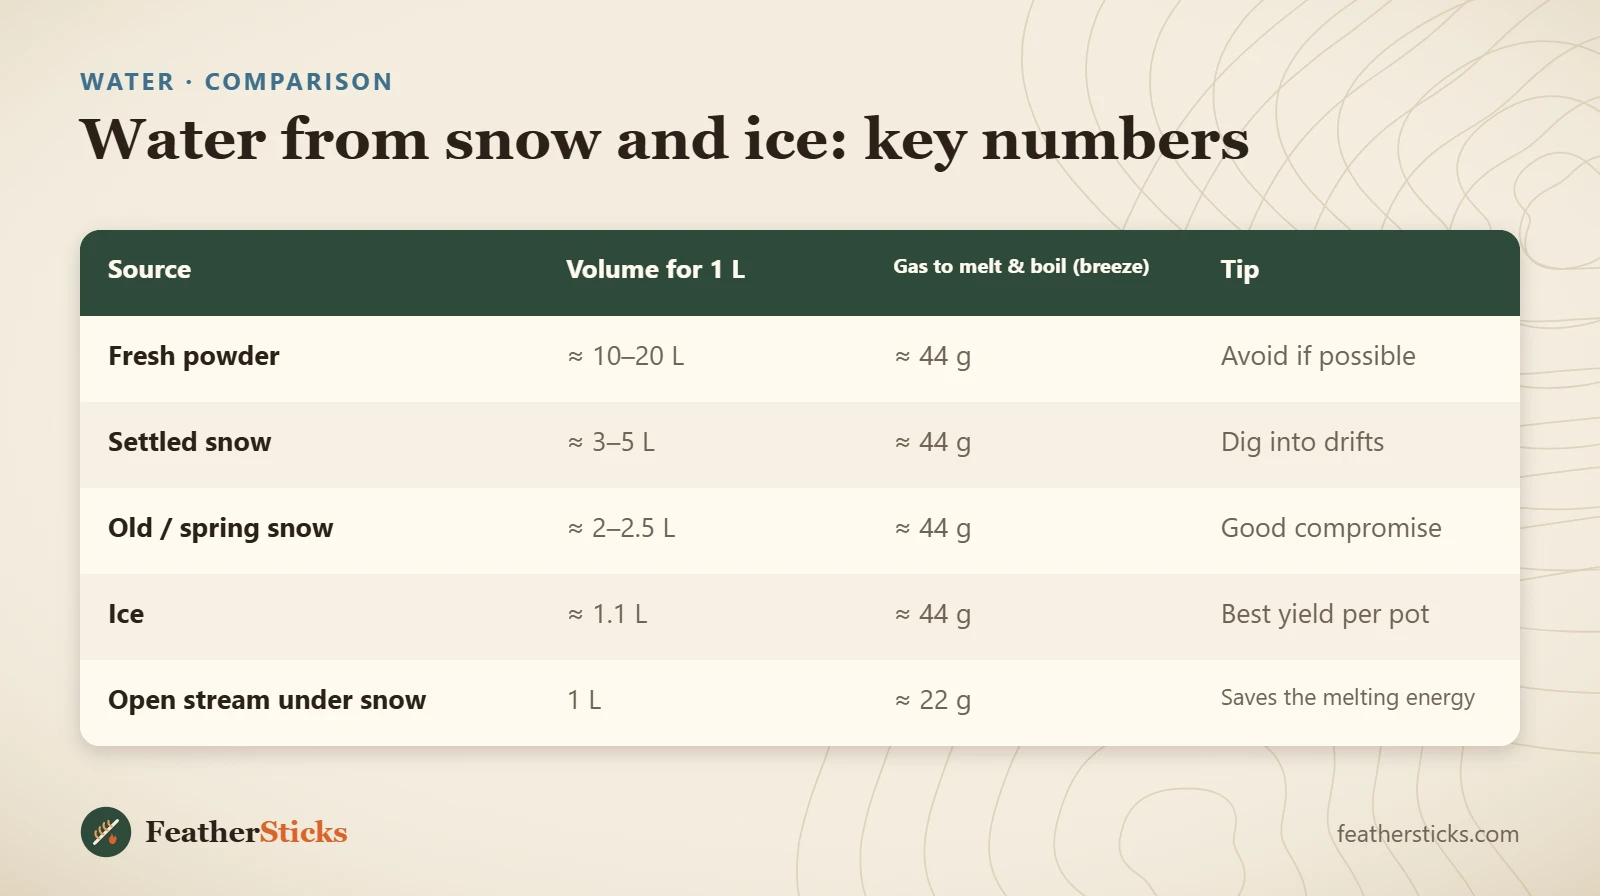
| Source | Volume for 1 L | Gas to melt & boil (breeze) | Tip |
|---|---|---|---|
| Fresh powder | ≈ 10–20 L | ≈ 44 g | Avoid if possible |
| Settled snow | ≈ 3–5 L | ≈ 44 g | Dig into drifts |
| Old / spring snow | ≈ 2–2.5 L | ≈ 44 g | Good compromise |
| Ice | ≈ 1.1 L | ≈ 44 g | Best yield per pot |
| Open stream under snow | 1 L | ≈ 22 g | Saves the melting energy |
Common mistakes
- Heating a pot full of dry snow without seed water — it scorches.
- Melting fluffy powder when denser snow or ice is available.
- Eating snow when already cold.
- Skipping treatment because snow looks clean.
- Running a stove inside a closed tent or snow shelter.
- Carrying too little gas — melting snow roughly doubles consumption.
- Letting a wet filter freeze overnight.
What you need
- Stove (winter gas mix or liquid fuel) and windscreen
- Pot of 1–1.5 L or more with lid
- Extra fuel — about double your summer amount
- Insulated wide-mouth bottles and a vacuum bottle
- Stuff sack for collecting snow
- Chlorine dioxide tablets as backup