Water
Water Containers for Bushcraft and Hiking: Bottles, Bladders, Canteens
The best water containers for bushcraft combine at least one single-wall metal bottle that you can boil water in with light plastic bottles or a collapsible bladder for capacity. Steel is tough and fire-proof, titanium is light, plastic is cheap and versatile, and soft bladders weigh almost nothing when empty. What you need depends on how much water you carry between sources, how you treat it and whether it can freeze.
This guide compares materials, capacities and weights, explains which containers are boil-safe, how to keep water liquid in winter and how to keep containers clean. It is part of our water section — pair it with water purification methods for the full system.
Step by step
-
1
Work out how much you carry
Use the water calculator to find your need between two sources, then add a 20 % reserve. That is your minimum capacity.
-
2
Start with one metal bottle
A single-wall steel or titanium bottle can go into the fire to boil water — your insurance if other treatment fails.
-
3
Add light capacity
Top up with PET bottles, soft flasks or a collapsible bladder. They weigh little and roll up when empty.
-
4
Mark dirty and clean
Keep raw and treated water in clearly marked containers so they never mix, especially when using a filter.
-
5
Protect from frost
In winter, carry bottles upside down in insulated sleeves and take them into your sleeping bag at night.
What does a good water container system look like?
Most experienced bushcrafters do not rely on a single container. They build a small system: one rugged metal bottle for boiling and emergencies, one or two light bottles for everyday drinking, and a collapsible bag for camp or long dry stretches. Each part covers a weakness of the others. A metal bottle is heavy but can go into a fire; a plastic bottle is light but cannot; a bladder carries a lot but can puncture.
Your total capacity depends on the gap between water sources, the temperature and your effort. The water needs calculator works out how much to carry at once, including a 20 % reserve. On a mild day in forested country with streams every couple of hours, 1.5–2 litres may be plenty; in summer heat or on ridges without water, you may need 3–4 litres or more, plus water for dinner if you camp away from a source.
A proven one-person system
- Boil & emergency
- 1 L single-wall stainless steel bottle, with a nesting steel cup
- Everyday drinking
- 1 L plastic bottle (PET or wide-mouth Tritan/HDPE)
- Camp & dry stretches
- 2–4 L collapsible bladder or water bag
- Filter side
- Marked soft pouch or bag for raw water
- Treatment
- Filter + chlorine dioxide tablets, or stove + pot

Marking raw and treated water
Whatever system you choose, decide once how you mark raw water and stick to it on every trip — the value of a marking lies in never having to think about it. A common convention is red for raw and blue or no marking for treated. Use something you can see and feel in the dark: a band of coloured tape around the shoulder, a knot in the carry cord or a completely different bottle shape. The raw-water container should be the one that fits your filter; treated water goes only into containers that never touch the source.
Materials compared: steel, titanium, aluminium and plastic
Stainless steel
Single-wall stainless steel bottles are the classic bushcraft choice. You can set them into embers to boil water, they survive drops onto rock and they do not hold flavours. They are the heaviest option per litre and conduct heat in both directions — hot water makes them too hot to hold, cold makes them painful to touch in winter. Choose one without paint or plastic parts near the base if you plan to heat it, and always remove the cap before heating.
Titanium
Titanium bottles and mugs offer the fire-proof advantage of steel at roughly half the weight. They heat quickly, do not corrode and are very strong for their weight. The downside is price, and titanium develops hot spots, which matters more for cooking than for boiling water. Our guide to bushcraft cookware compares titanium, steel and aluminium pots in more detail.
Aluminium
Aluminium bottles are light but almost always have an inner lining to protect the water from the metal. That lining makes them unsuitable for heating over a fire. Aluminium canteens without lining exist, but they dent easily. For boiling, stick to steel or titanium; for carrying, plastic is lighter.
Plastic: PET, Tritan, HDPE and soft flasks
Plastic containers are the lightweight backbone of most water systems. A used PET drink bottle weighs only 25–40 g per litre and fits most squeeze filters. Wide-mouth bottles made of Tritan or HDPE are tougher, easy to fill, easy to clean and good for UV pens and tablets. Soft flasks and collapsible bottles fold flat when empty. None of them may be heated directly, though good wide-mouth bottles tolerate hot water within the manufacturer’s stated limit — useful for a hot water bottle at night.
| Material | Boil in it? | Weight | Durability | Winter | Notes |
|---|---|---|---|---|---|
| Single-wall stainless steel | Yes (cap off) | Heavy | Excellent | Cold to touch, freezes | Best all-rounder for bushcraft |
| Titanium | Yes (cap off) | Light | Excellent | Cold to touch, freezes | Expensive |
| Lined aluminium | No | Light | Dents | Freezes | Lining damaged by heat |
| Double-wall vacuum steel | NEVER | Very heavy | Good | Excellent insulation | Hot drinks, winter |
| Tritan / HDPE wide-mouth | No | Medium | Very good | Hot water within limits | Easy to clean, good for tablets |
| PET drink bottle | No | Very light | Fair | Freezes, cracks when frozen | Fits many filters, cheap |
| Soft flask / bladder (TPU/PE) | No | Very light | Can puncture | Hose freezes first | Packs flat when empty |

Capacities and weights of typical water containers
The weight of an empty container matters less than you might think — a litre of water weighs a kilogram, far more than any bottle. But on long trips every item adds up, and the ratio of empty weight to capacity tells you how efficient a container is. The figures below are typical ranges; individual products vary.
| Container | Capacity | Empty weight | Boil-safe |
|---|---|---|---|
| PET drink bottle | 0.5–1.5 L | ≈ 20–45 g | No |
| Soft flask / collapsible bottle | 0.5–1 L | ≈ 25–60 g | No |
| HDPE / Tritan wide-mouth bottle | 1 L | ≈ 100–180 g | No |
| Lined aluminium bottle | 1 L | ≈ 130–170 g | No |
| Titanium bottle | 0.8–1.1 L | ≈ 100–160 g | Yes |
| Single-wall stainless bottle | 0.8–1.2 L | ≈ 180–280 g | Yes |
| Military-style canteen with steel cup | ≈ 1 L | ≈ 350–550 g | Cup yes, plastic canteen no |
| Vacuum-insulated bottle | 0.5–1 L | ≈ 300–550 g | Never |
| Hydration bladder with hose | 2–3 L | ≈ 150–250 g | No |
| Collapsible water bag / carrier | 4–10 L | ≈ 60–300 g | No |
Empty weight per litre of capacity (typical midpoints)
The classic military canteen: is it worth it?
The military-style canteen — a plastic or aluminium bottle with a nesting steel or aluminium cup in a fabric or felt cover — remains popular in bushcraft. Its real strength is the cup: it slides under the bottle, goes straight onto a fire or stove and works as a pot for tea, soup and boiled water. The cover insulates, and if you wet it on a hot day, evaporation cools the water slightly.
The drawbacks are weight (often 350–550 g for about a litre) and the fact that the bottle itself usually cannot be heated. With surplus items, check that the materials and any coatings are food-safe and undamaged. If you like the concept but want less weight, pair a single-wall stainless bottle with a nesting steel cup — then the bottle is fire-proof too.

Which water containers are boil-safe?
Being able to boil water in your bottle is a genuine safety advantage: if your filter freezes, clogs or breaks, you can still boil water for 1 minute (3 above 2,000 m) — as long as you can make a fire. Only single-wall metal containers without lining or plastic parts qualify.
- Remove the cap before heating, always. A closed bottle builds pressure and can burst or blow the cap off.
- Stand it at the edge of embers, not in open flames, and turn it so it heats evenly.
- Use a glove, stick or pot grabber to lift it — the neck gets as hot as the body.
- Paint and plastic parts such as coloured coatings or rubber bumpers will burn; remove them or choose a plain bottle.
Boiling water in a steel bottle
 1Cap off — always
Unscrew the cap completely and put it somewhere safe, away from the fire. A closed bottle builds pressure and can burst or shoot the cap off.
 2At the edge of the embers
Stand the bottle upright at the edge of a bed of embers, not in open flames. It should stand firmly and not be able to tip over.
 3Turn it for even heat
Turn the bottle a quarter turn now and then with a stick or glove so that it heats evenly. Once it boils, keep it at a rolling boil for 1 minute (3 above 2,000 m).
 4Lift it with a glove or cloth
The neck is as hot as the body. Lift the bottle with a glove, a folded cloth or a forked stick, keep your face out of the steam and set it down on flat ground.
Getting a fire going reliably is the other half of this insurance — see fire starting basics. In many places open fires are banned; a small stove can heat a metal bottle or pot just as well.
Hard bottles vs soft bladders
Hard bottle vs soft bladder
Hard bottle
- Robust, easy to fill from streams
- Easy to clean and inspect
- Metal versions can boil water
- Bulky even when empty
- Easy to check how much is left
Soft bladder / flask
- Very light, rolls up when empty
- Large capacity for camp (4–10 L)
- Hydration hoses allow drinking on the move
- Can puncture or leak at seams
- Harder to clean; hard to see how much remains
Hydration bladders encourage regular sipping, which helps many people drink enough. But they hide how much water is left, are fiddly to refill and clean, and the hose freezes quickly in winter. Many bushcrafters prefer bottles in side pockets of the backpack where they can be reached without taking it off. A large collapsible water bag is one of the most useful camp items: fill it once at the source and you have water for cooking, washing and the next morning without repeated trips — and you can camp at a sensible distance from the water, as recommended in choosing a camp site.
Water containers in winter: keeping water liquid
Frozen water is useless, and a frozen bottle can crack. Water freezes from the top down, so the lid and the neck freeze first — which is why a bottle carried upside down stays usable longer. In real cold, insulation and body heat are your main tools.
Winter water checklist
- Carry bottles upside down so the lid freezes last
- Use insulated bottle sleeves or wrap bottles in a spare fleece
- Choose wide-mouth bottles — narrow necks freeze shut
- Fill with warm water in the morning; start the day with a hot drink
- Carry one vacuum bottle for hot drinks
- Keep bottles inside your jacket or in the middle of the pack
- Take a warm, tightly closed bottle into your sleeping bag at night
- Avoid hydration hoses or blow water back into the bladder after drinking
A hot water bottle in your sleeping bag is an old trick: boil water, fill it into a single-wall metal bottle or a heat-tolerant plastic bottle rated for hot liquids, close it tightly and wrap it in a sock. It warms your feet, and by morning you have drinkable water that has not frozen. Check the seal carefully — a leak in a down sleeping bag is a serious problem. More winter sleep tips are in our sleeping gear guide, and melting snow is covered in water from snow and ice.
The hot water bottle trick
 1Fill with boiled water
Pour freshly boiled water into a single-wall steel bottle or a plastic bottle rated for hot liquids. Use a funnel or pour slowly — spills scald.
 2Close tightly and test
Screw the cap on firmly and hold the bottle upside down for a moment. Not a single drip may appear; a leak in a down sleeping bag is a serious problem.
 3In a sock, at your feet
Slide the bottle into a sock and put it at the foot end of your sleeping bag. It warms your feet, and in the morning you have liquid water.
Cleaning and hygiene: keeping containers safe
A perfectly treated litre of water becomes unsafe again the moment it enters a dirty bottle. Biofilm builds up in threads, lids, bite valves and hoses, especially with sugary drinks. The most important rule in the field is separation: one container is for raw water, the others only for treated water. Mark them with tape, a coloured cord or different bottle types.
How to clean water containers after a trip
 1Empty and rinse
Rinse with warm water immediately after the trip; do not leave drink residues standing, as sugar feeds biofilm.
 2Wash with a bottle brush
Use warm water and a little washing-up liquid and scrub the whole inside. Do not forget the threads, the lid and any valve — that is where residues hide.
 3Disinfect occasionally
Fill with a weak disinfectant solution or dissolve a purification tablet, let it stand for the time on the label, then rinse well.
 4Clean hoses and bladders
Pull a hose brush through the drinking tube. Take off the bite valve and clean it separately; it is the part that touches your mouth.
 5Dry completely, caps off
Store open and dry, bottles upside down, caps beside them. Bladders dry best propped open or stored in the freezer.
| Symptom | Likely cause | Fix |
|---|---|---|
| Plastic or stale taste | New bottle, stored closed and damp | Baking soda rinse, air out, store open and dry |
| Black or green spots | Mould or biofilm in threads, valve or hose | Scrub and disinfect; replace hoses and valves you cannot clean |
| Lid leaks | Seal missing, twisted or dirty | Clean and reseat the seal; test upside down before packing |
| Neck frozen shut | Bottle carried upright in the cold | Carry it upside down in a sleeve; choose wide-mouth bottles |
| Bottle cloudy or deeply scratched | Old, worn plastic | Replace it — scratches are hard to clean |
Stale or plastic taste can be reduced with a baking soda rinse. In camp, simple kitchen hygiene — washing hands, keeping cups clean and away from raw water — matters as much as water treatment itself. Our guide to filtering water explains how to avoid cross-contamination between the dirty and clean side of a filter.
Which water container should you choose?
Choosing your containers
Do you want to be able to boil water without a pot?
Yes → Get a single-wall stainless steel or titanium bottle.No → Plastic bottles are lighter; carry a pot for boiling.Do you often face long dry stretches or camp away from water?
Yes → Add a 4–10 L collapsible water bag.No → 2 × 1 L bottles may be enough.Do you use a squeeze filter?
Yes → Choose bottles with a thread that fits the filter; mark one as raw water.No → Wide-mouth bottles are easiest for tablets and UV pens.Will temperatures drop below freezing?
Yes → Wide-mouth bottles, insulated sleeves and one vacuum bottle.No → Any bottle works — keep it in the shade in heat.
Add your containers to the bushcraft kit list, or build a weighted list with the Kit Builder. If you plan to boil a lot of water, check fuel needs with the boiling point and fuel calculator. Water carrying and treatment are part of the foundations covered in bushcraft for beginners — and finding water tells you how often you will be able to refill.
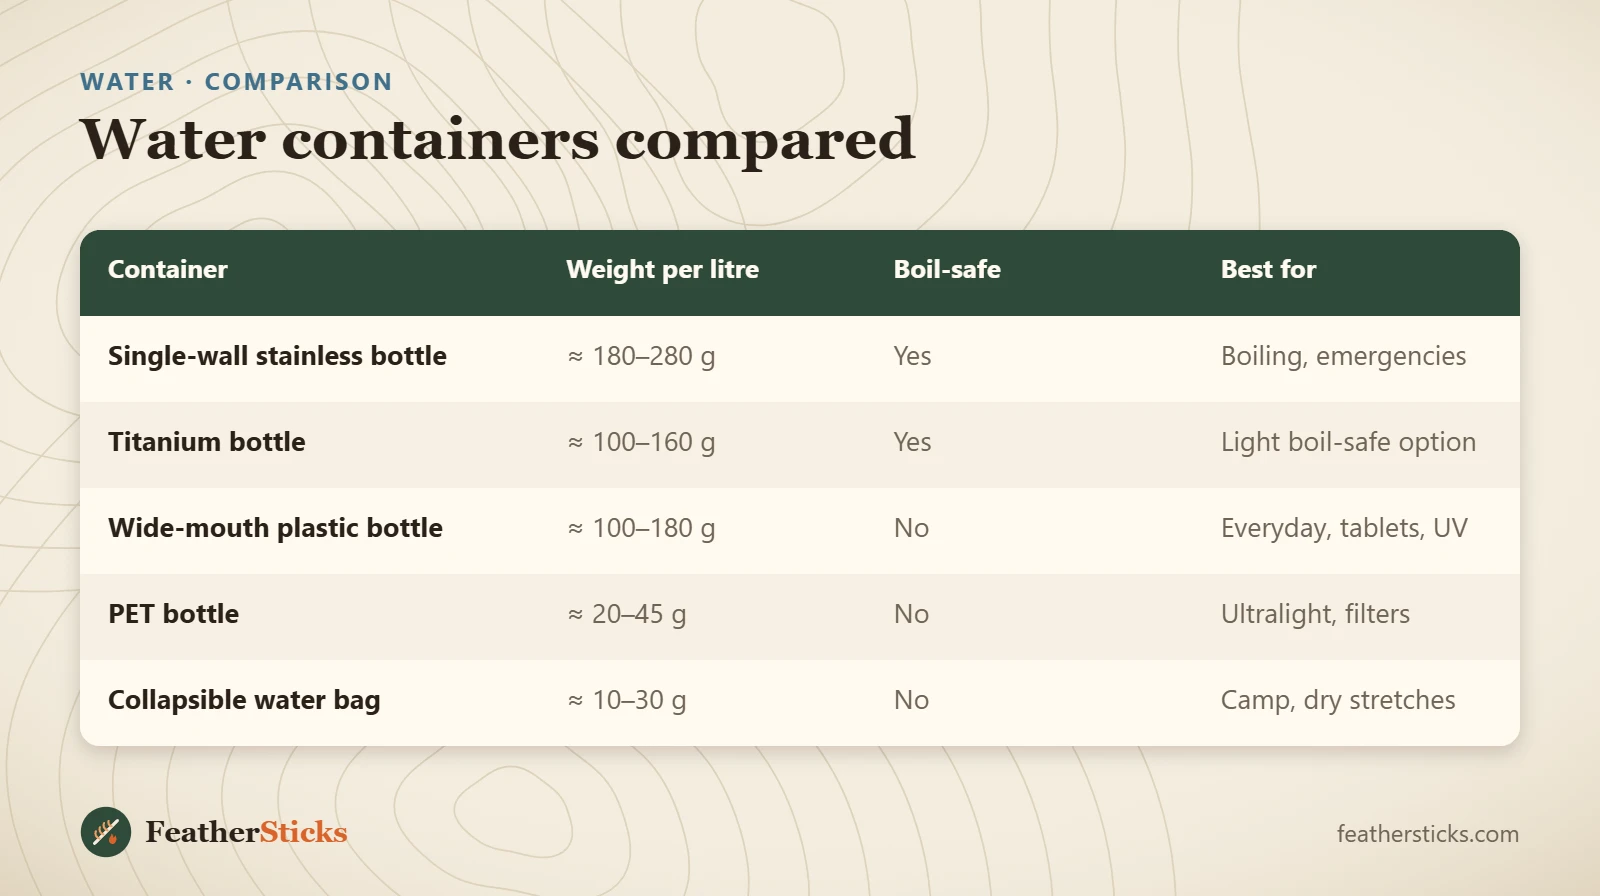
| Container | Weight per litre | Boil-safe | Best for |
|---|---|---|---|
| Single-wall stainless bottle | ≈ 180–280 g | Yes | Boiling, emergencies |
| Titanium bottle | ≈ 100–160 g | Yes | Light boil-safe option |
| Wide-mouth plastic bottle | ≈ 100–180 g | No | Everyday, tablets, UV |
| PET bottle | ≈ 20–45 g | No | Ultralight, filters |
| Collapsible water bag | ≈ 10–30 g | No | Camp, dry stretches |
Common mistakes
- Carrying only plastic bottles and no way to boil water if the filter fails.
- Heating a double-wall, lined or closed bottle.
- Mixing raw and treated water in unmarked containers.
- Relying on a hydration bladder in freezing temperatures.
- Carrying too little capacity for the longest dry stretch.
- Storing bottles wet with caps on, which breeds biofilm.
What you need
- Single-wall stainless steel or titanium bottle (≈ 1 L)
- Nesting steel cup
- Wide-mouth plastic or PET bottle
- Collapsible water bag (4–10 L)
- Insulated bottle sleeve for winter
- Coloured tape or cord to mark raw-water containers
- Bottle brush for cleaning