Gear
Bushcraft Backpacks: Volume, Frame Types, Fit & How to Pack
A good bushcraft backpack holds your whole kit with a little room to spare, puts the weight on your hips rather than your shoulders and survives brambles, sparks and rain. For most overnight trips that means a framed pack of 45–55 litres with a padded hip belt and adjustable back length; winter trips need 65–70 litres.
This guide shows how many litres you need for each trip, how frame types differ, how to fit and adjust a pack step by step and how to pack it so it carries well. The volumes match the suggestions of our Kit Builder; what goes inside is covered in the bushcraft kit list. Part of our bushcraft gear guides.
Step by step
-
1
Pick the volume
Use 30 litres plus 8 litres per day, plus 15 litres for winter and 5 litres if you carry a tent.
-
2
Measure your torso
Measure from the bony bump at the base of your neck down to the top of your hip bones, then choose the matching back length.
-
3
Load it to test
Try packs on in the shop or at home with 10–12 kg inside – an empty pack always feels comfortable.
-
4
Adjust in order
Hip belt first, then shoulder straps, load lifters and sternum strap. Re-check after the first kilometres.
-
5
Waterproof the inside
Use a pack liner or dry bags – a rain cover alone lets water in through the back panel.
What makes a good bushcraft backpack?
Bushcraft packs have a slightly different job from pure hiking packs. You carry steel tools, a cook pot that goes into the fire, sometimes a heavy canvas tarp, and you walk off-trail through brush. At camp the pack becomes your cupboard, seat back and windbreak. That leads to a few priorities:
- A load-bearing hip belt – most of the weight should rest on your pelvis, not your shoulders.
- Tough fabric that resists thorns and abrasion; spark resistance is a bonus if you sit close to the fire.
- Simple access: a big top opening or a front zip so you reach the tarp first in rain.
- Safe attachment points for a saw, axe or sit mat – with sheaths, never loose blades.
- Enough volume without being oversized: every extra litre invites extra weight.
Whether it looks "bushcraft" matters much less than whether it fits you. A well-fitting trekking pack carries a bushcraft kit perfectly well; an ill-fitting canvas classic will hurt after an hour.
What size backpack do I need? Litres by trip length
The Kit Builder suggests pack volume with a simple rule of thumb: 30 litres + 8 litres per day, plus 15 litres in winter (bulkier sleeping bag and clothing) and 5 litres if you carry a tent, rounded up to the next 5 litres. That gives realistic sizes for a typical mid-range kit – with ultralight gear you can go smaller, with a canvas tarp or synthetic winter bag you need more.
| Trip | Summer / autumn, tarp | With tent | Winter, tarp |
|---|---|---|---|
| Day trip (no overnight gear) | 20–30 L | – | 30–40 L |
| 1 night | 40 L | 45 L | 55 L |
| 2 days | 50 L | 55 L | 65 L |
| 3 days | 55 L | 60 L | 70 L |
| 4–5 days | 60–70 L | 65–75 L | 75–85 L |
Rows for 1–3 days follow the Kit Builder formula; day trip and 4–5 days are practical ranges.
Why not simply buy the biggest pack? Because an 80-litre pack tempts you to fill it, weighs more when empty (often 2.5 kg or more) and carries worse when half-empty, as the load slumps. If you are between two sizes, choose the smaller one and strap a foam pad or tarp outside in a waterproof bag. The exception is winter: sleeping bag and parka take a lot of space, and packing them tightly compresses insulation you rely on.
Packed volume of the big items
The sleeping bag is usually the bulkiest single item: a 0 °C synthetic bag can fill 10–15 litres, a down bag of the same rating half of that. A poly-cotton tarp takes far more room than a silicone-coated one. If your kit does not fit, the sleep system and shelter – see sleeping gear and choosing a tarp – are where litres are won.
Frame types: frameless, internal frame or external frame?
The frame transfers weight from the pack bag to the hip belt. The heavier your load, the more important a stiff frame becomes.
| Frame type | Comfortable load | Pros | Cons | Typical use |
|---|---|---|---|---|
| Frameless / soft back | up to ≈ 8 kg | Light, simple, packs flat | Weight hangs on shoulders; needs careful packing | Day trips, ultralight overnights |
| Internal frame (stays or frame sheet) | 10–20 kg | Hugs the body, stable off-trail, adjustable back length | Sweaty back unless ventilated | The standard for bushcraft overnights |
| Trampoline / mesh back | 8–15 kg | Good ventilation | Load sits further from the back; less stable | Summer walking |
| External frame / pack frame | 15–30 kg | Carries heavy and awkward loads, good airflow, bags can be swapped | Bulky, catches on branches, less stable on rough ground | Base camps, firewood and heavy canvas kits |
| Rucksack with simple frame and waist belt (classic canvas style) | 8–15 kg | Robust, repairable, traditional look | Often limited adjustment, heavier | Traditional bushcraft, short approaches |
Load ranges are rough guides for a comfortable carry and depend on fit and fitness.
For most bushcrafters, an internal-frame pack with adjustable back length is the best compromise: it handles a 10–14 kg overnight kit, stays stable when you step over logs and adjusts to your body. External pack frames are experiencing a revival among bushcrafters who carry heavy base-camp kits over short distances; they excel at strapping on awkward loads but are less agile in dense forest.
How to fit and adjust a backpack
A pack that fits well can carry 12 kg more comfortably than a badly fitting one carries 8 kg. The key measurement is your torso length: the distance from the prominent vertebra at the base of your neck (C7) down to an imaginary line between the tops of your hip bones (iliac crest). Ask someone to measure it with a soft tape measure while you stand upright. Choose a pack size or adjustable back system that covers this length – your height alone is not a reliable guide.
Measuring your torso length
 1Find C7
Tilt your head forward. The bump that sticks out most at the base of the neck is the seventh cervical vertebra (C7) – the top end of your torso length.
 2Find the hip crest
Put your hands on your hips and slide them down until you feel the top of the hip bones, thumbs pointing backwards. An imaginary line between the thumbs is the bottom end.
 3Measure along the spine
A helper lays a soft tape measure along the curve of your back from C7 down to that line while you stand upright and relaxed. Measure twice; the results should agree within about a centimetre.
 4Set the back length
Compare the result with the manufacturer's size chart, or slide an adjustable harness up or down until it matches. If you are between two sizes, try both with a load inside.
Adjusting your pack in the right order
 1Load and loosen
Pack 10–12 kg inside and loosen every strap before you put the pack on. If the straps are still tight from last time, the pack sits wherever they hold it – not where your body needs it.
 2Hip belt
Shrug the pack slightly up, place the padded belt centred on your hip bones and pull both ends forward firmly. Check: the padding wraps the bony top of the pelvis and the buckle sits in front, not low on the belly.
 3Shoulder straps
Pull the strap ends down and back until they wrap the shoulders with no gap – without lifting the hip belt. The strap anchor on the pack should sit roughly 3–5 cm below the top of your shoulders.
 4Load lifters
The short straps from the top of the shoulder straps to the pack should run at roughly 45°. Tighten gently: they pull the top of the load towards you, they are not meant to lift it.
 5Sternum strap
Close it about 2–3 finger widths below the collarbones and tighten only until the shoulder straps stop sliding outwards. Breathe in deeply – if it pinches, it is too tight.
 6Stabilisers and re-check
Snug the hip-belt stabilisers, then walk. After 20–30 minutes stop and repeat the sequence from the hip belt upwards – straps settle as the pack warms and moves.
On climbs, tighten the load lifters slightly to keep the pack close; on descents loosen them a little and tighten the hip belt. When you take a break, open the hip belt and sternum strap first so the pack does not drag on your shoulders as you take it off.
What a good fit looks like
Stand side-on to a mirror or ask someone to take a photo from the side. With a well-fitted pack you should see the hip belt padding centred over the top of the pelvis, the shoulder straps lying on the shoulders without a gap, the load lifters rising towards the pack at roughly 45° and the pack standing upright close to your back rather than leaning away. You should be able to slide two fingers under the shoulder straps at the top of the shoulders – the straps guide the load, the hips carry it.

| Symptom | Likely cause | What to try |
|---|---|---|
| Pain on top of the shoulders | Hip belt too loose or too low, shoulders carry the load | Re-seat the belt on the hip bones, tighten it, then ease the shoulder straps slightly |
| Pressure on the hip bones | Belt sits too high or padding too thin | Lower the belt a little, check the belt size, pad the spot with a folded buff |
| Pack pulls you backwards | Heavy items low or far from the back, loose load lifters | Repack heavy items close to the spine; tighten load lifters and compression straps |
| Gap between strap and shoulder | Back length too long for you | Shorten the adjustable back or try the next smaller size |
| Straps press into the neck | Back length too short | Lengthen the back system and re-check your torso measurement |
| Tingling or numb hands | Shoulder straps pressing on nerves and vessels | Loosen shoulder and sternum straps, shift weight to the hips, check the fit |
| Pack sways from side to side | Loose compression and stabiliser straps, half-empty pack | Compress the load, fill gaps with soft items, tighten the stabilisers |
Women's fits, short torsos and young people
Many manufacturers offer packs with an adapted fit, often labelled as women's or short-length models. Typical features are a shorter back length, shoulder straps that sit closer together and curve in an S-shape so they do not press on the chest, and a conically cut hip belt that fits a wider pelvis. These packs are not only for women: people of any gender with a short torso or narrow shoulders often find the better fit there. What counts is what fits your body.
For teenagers, packs with a widely adjustable back system that can grow with them make sense, and the load should stay well below adult levels – adults carry the heavy items such as pot, water and tarp. When trying packs in a shop, the same rules apply to everyone: have at least 10 kg put inside, walk around for ten minutes, climb stairs and pay attention to pressure points at the hips, shoulders and lower back. A pack that already pinches in the shop will not improve in the forest.
How to pack a backpack: heavy close to your back
How you pack changes how a pack carries as much as the pack itself. The rule: heavy, dense items close to your spine at shoulder-blade height, light and bulky items at the bottom, things you need during the day on top or in outside pockets. A load that sits far from your back or low in the pack pulls you backwards and makes you lean forward.
Packing order, zone by zone
 1Liner first
Open a waterproof pack liner inside the main compartment before anything else goes in. Everything below the tarp ends up inside it.
 2Sleeping bag at the bottom
Stuff the sleeping bag (in its own waterproof sack) and sleeping clothes into the bottom. They are light and bulky, form a soft base and are not needed until camp.
 3Heavy core against the back
Place the heaviest, densest items – food bag, pot, water, saw, stove – directly against the back panel at shoulder-blade height. This keeps the centre of gravity close to your spine.
 4Clothing around the core
Pack clothing in a dry bag around and in front of the heavy core so nothing can shift or rattle. Push soft items into every gap.
 5Tarp and rain jacket on top
Close the liner, then put the tarp and rain jacket on top. When the weather turns you can pitch shelter without unpacking the rest in the rain.
 6Lid and hip-belt pockets
Map and compass (navigation basics), headlamp, knife, lighter, snacks and the first aid kit go into the lid and hip-belt pockets – reachable without taking the pack off.

Fill gaps with soft items so nothing shifts. Keep water bottles reachable in side pockets – about 1 litre when water is plentiful, around 3 litres when sources are scarce, as in the Kit Builder; the water calculator gives your personal need. Keep fuel canisters and food separate from the sleeping bag, and anything smelly in a sealed bag. On rough ground or when scrambling, pack a little lower and tighter for better balance.
Three quick checks after packing
- Stand test: set the closed pack on the ground. If it falls forwards or sideways, heavy items sit too far out or to one side – move them towards the back panel and the centre.
- Lift test: lift the pack by the haul loop. It should hang straight and feel compact; a pack that tips backwards has too much weight at the bottom or in the front pocket.
- Twist test: put it on and twist your upper body. Anything that clunks or shifts needs a soft item wedged beside it.
A heavy pack slows you down. The hiking time calculator accounts for pack weight, terrain and breaks, so you can estimate when you will reach camp – and whether you will get there before dark.
Canvas vs synthetic: which backpack material?
Traditional bushcraft packs are made from waxed cotton canvas with leather straps; modern packs from high-tenacity nylon or polyester fabrics with PU or laminate coatings. Both have their place.
Canvas vs synthetic packs
Waxed canvas
- Spark-resistant – a stray ember rarely burns straight through
- Very abrasion-resistant, quiet in the forest
- Repairable with needle, thread and wax
- Heavy: often 2–3 kg for 45–50 L
- Absorbs water unless re-waxed; slow to dry
Synthetic (nylon / polyester)
- Light: 1.2–2 kg for 50 L
- Water-resistant coatings, dries quickly
- Modern frames and adjustable backs
- Melts from sparks and embers
- Can be noisy; coatings age over years
For long approaches, synthetic packs win on weight and carrying comfort. For base camps with a lot of time around the fire, or if you love traditional gear, canvas is robust and pleasant – just re-wax it regularly and keep your sleeping bag in a dry bag. Hybrid designs with canvas outer fabric and modern harnesses combine some of the advantages.
Rain covers, pack liners and dry bags
Almost no backpack is fully waterproof: seams, zips and the back panel let water in, and a canvas pack soaks up rain. There are three ways to keep your kit dry:
- Rain cover: an elasticated cover over the outside. It keeps the pack fabric from soaking up water and stays useful on long rainy days, but water runs down your back and enters through the back panel, and it can blow off in wind.
- Pack liner: a large waterproof bag inside the main compartment. Cheap, light and reliable – the most important of the three.
- Dry bags: separate waterproof stuff sacks, colour-coded by content. They organise the kit and protect the sleeping bag and spare clothes even if the liner fails.

The best combination for bushcraft: a liner or dry bag for the sleeping bag and clothes, the tarp on top so you can pitch it first, and optionally a rain cover. Keep tinder in a sealed tin – wet tinder makes fire in wet weather much harder.
Closing a roll-top liner or dry bag: press out excess air, fold the top over at least three times in tight, flat turns and then clip or tuck it. Fewer turns or a loose roll let water creep in. Keep the rolled end facing up or towards the inside of the pack, never down into a puddle, and check liners for pinholes each season by holding them against a bright light.
Carrying knife, axe and saw safely
Many bushcraft packs have loops or MOLLE webbing for tools. Use them with care: an axe or saw strapped outside can snag on branches, injure you or others in a fall and looks threatening in towns. Carry blades in a sheath or blade cover, with the edge pointing away from your body and ideally inside the pack. Our guides to axes and hatchets, folding saws and bushcraft knives cover safe handling.

How heavy should a loaded bushcraft pack be?
An empty pack weighs 1.2–2.5 kg; canvas designs can weigh more. Add the kit: according to the Kit Builder, a two-day tarp trip has a base weight of around 5.4 kg in summer, 7.5 kg in autumn and 8.5 kg in winter (carried clothing included), plus about 2.4–2.8 kg of food and water. That gives a total of roughly 9–13 kg.
A common rough guide is to keep the total load at or below about 20–25 % of your body weight for multi-day walking. It is not a rule – fitness, terrain and distance matter – but if you are well above it, look at the heavy items first: sleep system, shelter and the pack itself. A lighter pack only makes sense if it still carries your load comfortably; an ultralight frameless pack with 13 kg inside will hurt.
Backpack buying checklist
- Volume matches your usual trips (see the table above)
- Back length fits your measured torso, or is adjustable
- Padded, load-bearing hip belt that sits on your hip bones
- Load lifters and sternum strap
- Tough fabric; canvas if you sit close to fires
- Top or front access to reach the tarp quickly
- Side pockets you can reach for water bottles
- Room for a liner or dry bags inside
Caring for your backpack
Empty the pack completely after each trip, shake out needles and crumbs and let it dry open – never store it damp. Brush off dried mud; wash synthetic packs by hand with lukewarm water and a mild soap if needed, never in the washing machine. Re-wax canvas when water stops beading off, working the wax in with gentle heat. Check buckles, seams and strap anchors before longer trips: a canvas needle and strong thread from the bushcraft basics kit will fix most field damage, and a spare buckle weighs only a few grams.
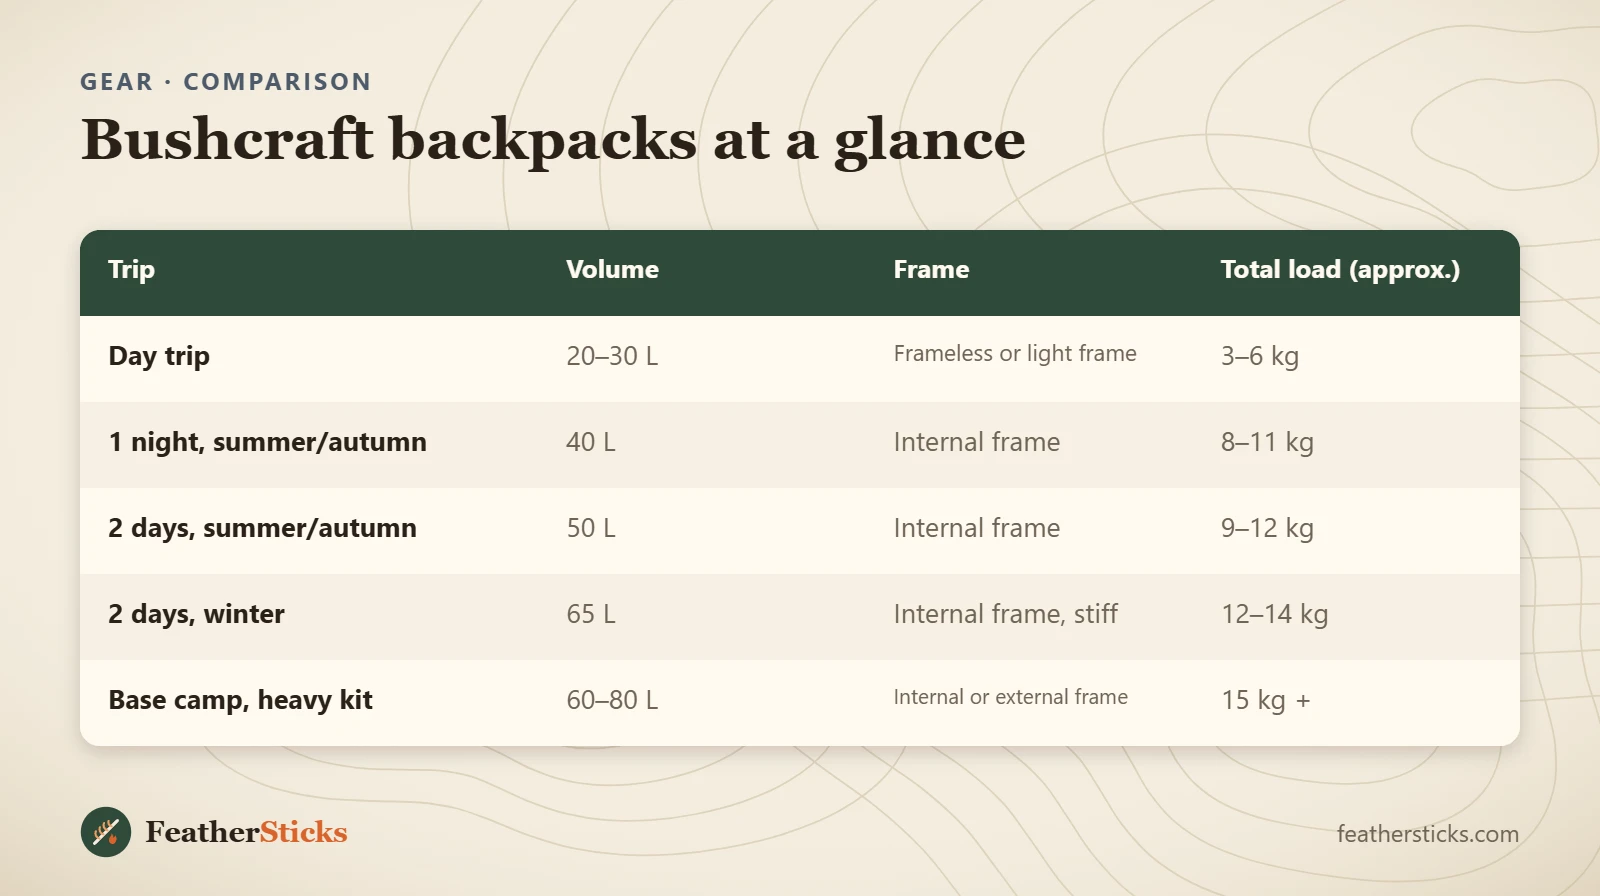
| Trip | Volume | Frame | Total load (approx.) |
|---|---|---|---|
| Day trip | 20–30 L | Frameless or light frame | 3–6 kg |
| 1 night, summer/autumn | 40 L | Internal frame | 8–11 kg |
| 2 days, summer/autumn | 50 L | Internal frame | 9–12 kg |
| 2 days, winter | 65 L | Internal frame, stiff | 12–14 kg |
| Base camp, heavy kit | 60–80 L | Internal or external frame | 15 kg + |
Common mistakes
- Choosing a pack by height or looks instead of measured torso length and fit.
- Buying the biggest pack available – and then filling it.
- Letting the shoulders carry the load because the hip belt is loose or sits too low.
- Packing heavy items at the bottom or far from the back.
- Relying on a rain cover alone without a liner or dry bags.
- Strapping unsheathed axes, saws or knives to the outside of the pack.
What you need
- Backpack 45–55 L (65–70 L for winter)
- Waterproof pack liner
- 2–4 dry bags in different colours
- Rain cover (optional)
- Sheaths or blade covers for knife, saw and axe
- Spare buckle and repair thread