Skills
How to Use a Map and Compass: Complete Navigation Guide
To use a map and compass, you need three core skills: reading the map (scale, contour lines and grid), taking a bearing from the map with the compass, and following that bearing on the ground while measuring distance with pace counting and time. Add magnetic declination, and you can navigate reliably through forest, fog or darkness – with no battery to run out.
This guide takes you from the parts of a baseplate compass to advanced techniques like triangulation, aiming off, handrails and attack points. Every technique is explained step by step with the numbers that matter. It is a key chapter of our bushcraft basics, and it pairs with navigation without a compass for when you have nothing but the sun and stars.
Step by step
-
1
Orient the map
Turn the map until its north lines point the same way as the compass needle and features match the terrain.
-
2
Line up start and target
Place the compass edge on the map from where you are to where you want to go, travel arrow pointing to the target.
-
3
Set the bearing
Turn the housing until its orienting lines are parallel to the map's north–south grid lines, orienting arrow to north.
-
4
Correct for declination
Add or subtract the local magnetic declination printed on the map, if it is large enough to matter.
-
5
Walk the bearing
Hold the compass flat, turn until the red needle sits in the orienting arrow, and walk to landmarks along the travel arrow.
-
6
Measure the distance
Count paces and watch the time so you know when you should reach your target.
Map reading basics: scale, symbols and orientation
A topographic map is a scaled, top-down model of the landscape. Before you touch a compass, learn to read it fluently – most navigation is done with the map alone, by matching what you see on paper to what you see around you.
Map scale
The scale tells you how much the real world has been shrunk. On a 1:25,000 map, 1 cm on the map equals 25,000 cm – that is, 250 m – on the ground. On a 1:50,000 map, 1 cm is 500 m. For walking, bushcraft and off-trail navigation, 1:25,000 is ideal: it shows individual paths, field boundaries, small streams and forest types. 1:50,000 covers more ground and suits long routes and cycling.
| Scale | 1 cm on map = | 1 km on ground = | Best for |
|---|---|---|---|
| 1:10,000 | 100 m | 10 cm | Orienteering, detailed exploration |
| 1:25,000 | 250 m | 4 cm | Hiking, bushcraft, off-trail navigation |
| 1:50,000 | 500 m | 2 cm | Long routes, overview, cycling |
| 1:100,000 | 1 km | 1 cm | Trip planning, driving to trailheads |
Symbols and the legend
Every map series has its own legend, printed on the edge or cover. Learn the symbols for paths and tracks (solid, dashed, dotted lines), forest types (deciduous, coniferous, mixed), water (streams, ponds, marsh), buildings, power lines, boundaries and viewpoints. Power lines and forest edges are excellent navigational features because they are long, straight and hard to miss.
Orienting the map
An oriented map is turned so that north on the map points to north in reality; then everything on the map lies in the same direction as in the landscape. You can orient a map in two ways: by terrain (turn it until a straight path or stream on the map lines up with the real one) or by compass (lay the compass on the map, then turn the map and compass together until the needle points to the top of the map, parallel to the north grid lines). Keep the map oriented as you walk – "thumbing" your position with your thumb on the map makes it easy to follow your progress.
Orienting the map with the compass
 1Bezel on N, edge on a north line
Turn the bezel so that N (0°) sits at the index line. Lay the compass on the map with one long edge along a north–south grid line and the travel arrow pointing to the top of the map.
 2Turn map and compass together
Hold the compass on the map with your thumbs and turn both as one unit. The needle keeps pointing north while the map turns underneath it – do not let the plate slip off the grid line.
 3Stop when red is in the shed
When the red end of the needle sits inside the orienting arrow, the map is oriented. The path, stream or forest edge in front of you now runs the same way as on the paper.
 4Thumb your position
Put the compass away and keep your thumb on your position. At every junction turn the whole map so it stays oriented, then move your thumb along as you walk.
What it should look like: a path that leaves to your left in reality also leaves to the left on the map, and a hill ahead of you lies ahead of your thumb. If not, the map is not oriented – or you are not where you think. The few degrees of declination in Germany do not matter for this.
Orienting by terrain works without a compass: stand on a straight feature you can identify – a path, a forest edge, a power line – and turn the map until the same feature on the map runs parallel to it. Then confirm with a second feature, such as a stream to your right, because a straight path fits the map in two directions 180° apart.
Contour lines: reading the shape of the land
Contour lines join points of equal height. They are what turns a flat piece of paper into a three-dimensional landscape in your head, and they are the most reliable features on the map: paths change and forests are felled, but hills and valleys stay put.
- Contour interval: the height difference between two lines – often 5, 10 or 20 m depending on map series and terrain; check the legend. Every fifth line (index contour) is usually thicker and labelled with its height.
- Close together = steep, far apart = gentle. Lines merging into one indicate a cliff.
- Valleys and spurs: contour lines form a V or U shape. In a valley, the V points uphill (towards higher numbers); on a spur or ridge, it points downhill. Streams always run along valley V's.
- Hilltops appear as small closed rings; a saddle (col) is the low point between two hilltops, like an hourglass.
- Which way is up? Look at the height labels – the tops of the numbers usually face uphill – or at streams, which always flow downhill.

Practice by predicting the terrain before you reach it: "In 300 m the path should cross a stream at the bottom of a steep little valley, then climb gently." When reality matches, you know where you are. When it doesn't, stop and check.
Grid lines and grid references
Most topographic maps are overlaid with a grid of numbered squares. In Germany and much of Europe this is the UTM grid; in the UK it is the Ordnance Survey National Grid; US topo maps show UTM ticks as well. On a 1:25,000 map, each square is usually 1 km × 1 km (4 cm on the map), which makes estimating distance quick.
A grid reference describes a point by its easting (the vertical line, numbers increasing to the right) and its northing (the horizontal line, numbers increasing upwards). Always read eastings first – remember "along the corridor, then up the stairs". A four-figure reference identifies a 1 km square; a six-figure reference narrows it to 100 m by dividing the square into tenths. For emergency calls, rescuers can work with grid references or GPS coordinates; practise reading both.
The grid lines matter for compass work too: their north–south lines are what you align the compass housing with when taking a bearing. Grid north differs slightly from true north and from magnetic north – see declination below.
Parts of a baseplate compass
For map navigation you need a baseplate compass (also called an orienteering or protractor compass): a transparent plate with a rotating, liquid-filled housing. A sighting compass with a mirror adds precision for taking bearings on distant landmarks. Button compasses and compasses on watches are fine for a rough direction but not for map work.
The compass parts you need to know
- Baseplate
- Transparent plate with straight edges for drawing lines on the map, plus rulers and romer scales.
- Direction-of-travel arrow
- Arrow on the baseplate pointing forward – the direction you walk.
- Rotating housing (bezel)
- Ring marked 0–360° (some compasses use other units); turning it sets the bearing.
- Index line
- Mark where the bearing is read off the housing, at the base of the travel arrow.
- Magnetic needle
- Red (north) end points to magnetic north. Keep it away from metal and phones.
- Orienting arrow & lines
- Printed in the housing floor; aligned with the needle and with map grid lines.
- Romer scales
- Scales for reading exact grid references at 1:25,000 and 1:50,000.
- Mirror & sight (optional)
- For accurate bearings to distant objects, typically to within about 1–2°.

Two things on the compass move and one does not. The plate moves with your hands and your body; the bezel moves only when you turn it; the needle never follows either – it always swings back to magnetic north. Almost every compass error comes from mixing up these three: turning the bezel when you should turn your body, or reading the needle when you should be reading the bezel.
Compasses are balanced for a magnetic zone. A compass balanced for the northern hemisphere may drag and stick in the southern hemisphere; "global" needles work everywhere. Keep your compass away from phones, knives, car bodies and power lines while taking a bearing – even a steel belt buckle can deflect the needle several degrees.

How to take a bearing from the map
A bearing is a direction expressed as an angle, measured clockwise from north: 0° (or 360°) is north, 90° east, 180° south, 270° west. Taking a bearing from the map is the core compass skill, and it takes three steps on the map (1–3 below) – the map does not even need to be oriented. Step 4 corrects for declination, steps 5 and 6 take the bearing into the terrain.
From map to landmark: taking and walking a bearing
 1Edge from A to B
Lay a long edge of the baseplate on the map so it joins your position A and your target B. The direction-of-travel arrow must point from A towards B – check this first, because a reversed plate gives a neat but 180° wrong bearing.
 2Turn the bezel to grid north
Hold the plate still and turn the bezel until the orienting lines run parallel to the map's north–south grid lines and N points to the top of the map. Ignore the needle; the map does not need to be oriented.
 3Read at the index line
Read the value where the bezel meets the index line. Here B lies up and to the right of A, and the reading is 50° – plausible, because anything north-east must lie between 0° and 90°.
 4Adjust for declination
Convert the grid bearing into a magnetic bearing. With 3° easterly declination, typical for parts of Germany, subtract it: 50° − 3° = 47°. Turn the bezel until 47 sits at the index line.
 5Turn your body, not the bezel
Take the compass off the map and hold it flat in front of your chest, travel arrow pointing straight ahead. Turn on the spot with your whole body until the needle swings towards the orienting arrow. The bezel stays untouched.
 6Red in the shed – sight and walk
When the red end sits exactly in the orienting arrow, the travel arrow points to B. Pick a landmark on that line, put the compass away, walk to it while counting paces, and repeat.

What it should look like before you walk off
- Travel arrow points from your position towards the target on the map
- Orienting lines parallel to the grid lines, N towards the top of the map (not the bottom)
- Reading fits the direction on the map: north-east 0–90°, south-east 90–180°, south-west 180–270°, north-west 270–360°
- Declination applied in the right direction (map to compass: east subtract, west add)
- Compass held flat and level, away from phone, knife and vehicles
- Red end of the needle inside the orienting arrow – not the white end
Following a bearing on the ground
Take the compass off the map and hold it flat in front of your chest, travel arrow pointing straight ahead. Turn your whole body – not just the compass – until the red end of the needle sits exactly inside the orienting arrow ("put red in the shed"). The travel arrow now points to your target. Look along it, pick a distinctive landmark on that line – a tree, a rock, a gap in the bushes – put the compass away and walk to the landmark. Then repeat. This "leapfrogging" is much more accurate than walking with your eyes on the needle.
In dense forest or fog, landmarks may be only 20–30 m apart. With a partner you can send them ahead and direct them left or right onto the line. At night, a companion with a headlamp makes a perfect moving landmark.
Taking a bearing from the terrain
To find the bearing to a visible object (for example, to identify a hilltop), point the travel arrow at it, turn the housing until the orienting arrow lines up with the needle, and read the bearing. Converting this magnetic bearing to the map means reversing the declination correction.
Walking a bearing: the leapfrog method
- Set bearingFrom the map, corrected for declination.
- Red in the shedTurn your body until the needle sits in the orienting arrow.
- Pick a landmarkTree, rock or gap on the line of travel.
- Walk & countWalk to it while counting paces; repeat.
- Check featuresTick off streams, paths and slopes on the map.
Troubleshooting compass errors by symptom
Compass mistakes rarely announce themselves – the terrain does. Compare what you expected from the map with what you find, and work backwards from the symptom.
| Symptom | Likely cause | Fix |
|---|---|---|
| Terrain runs the wrong way round – you climb where the map says descend | 180° error: travel arrow pointing to A, N set to the bottom of the map, or white end in the shed | Arrow towards the target, N to the top of the map, red end in the shed |
| Bearing in the wrong quadrant (e.g. 140° for a target to the north-east) | Bezel turned to the needle instead of the grid lines | Reset the orienting lines parallel to the grid lines; estimate the direction first |
| You always arrive on the same side of the target | Declination ignored, or drifting around obstacles | Apply declination; after a detour, step back onto the line |
| The error is about twice what you expected | Declination applied the wrong way | Map to compass: east subtract, west add. A wrong sign turns 3° into 6° – about 105 m per km |
| The needle settles differently each time | Compass tilted, or metal and phones nearby | Hold it level; step away from cars and fences; phone and knife in another pocket |
| You walk past the target | Distance not measured | Count paces, note the time, pick a catching feature beyond the target |
Magnetic declination: why your compass doesn't point to true north
The compass needle points to magnetic north, which is not the same as true north (the geographic pole) or grid north (the direction of the map's grid lines). The angle between magnetic north and true north is the magnetic declination (called variation at sea). It depends on where you are and changes slowly over the years as the magnetic pole wanders.
Most topographic maps print the declination, or the grid–magnetic angle, in the margin together with the year and annual change. Online calculators from national geological or geomagnetic services give current values for any location. As a rough guide for 2026: in Germany declination is small and easterly – around 2–5° east, lower in the west and higher in the east; in the UK it is close to zero; in North America it ranges from strongly west in the north-east to strongly east in the north-west. Always check a current source.
Correcting for declination
A simple rule for converting a map (grid) bearing to a magnetic bearing: "East is least, west is best" – with easterly declination, subtract it; with westerly declination, add it. Going from compass to map, do the opposite. Some compasses have an adjustable declination scale so you set it once and forget it.
How far off target an uncorrected error puts you after 1 km
In Germany, with only a few degrees of declination, many hikers ignore it for short legs – but over 1 km even 4° puts you about 70 m to the side, enough to miss a small trekking site or a spring in the forest. In parts of North America, where declination can exceed 15°, ignoring it is simply not an option.
Worked example: which way to turn the bezel
You have taken a grid bearing of 50° from the map, and the map margin gives a declination of 3° east. East is least: 50° − 3° = 47°, so you turn the bezel until 47 sits at the index line. With 3° west you would add it and set 53°. Going the other way – from a bearing you measured on the ground to the map – you reverse the sign: a magnetic 47° becomes 50° on the map with easterly declination.
If you get the direction wrong, the error does not cancel out, it doubles: instead of 3° you are 6° off, roughly 105 m per kilometre. Quick check: with easterly declination the magnetic bearing is the smaller number. With an adjustable declination scale you set the value once and the bezel then shows map bearings directly – check the setting before each trip.
Finding your position: triangulation and back bearings
If you can see identifiable landmarks but don't know exactly where you are, you can fix your position by triangulation (technically a resection). It works best in open terrain with visible hilltops, towers, church spires or distinctive buildings.
- Identify two or, better, three landmarks that you can see and find on the map, ideally 60–90° apart.
- Take a bearing to the first landmark from where you stand.
- Convert it to a map bearing (reverse the declination correction).
- Calculate the back bearing: add 180° if the bearing is less than 180°, subtract 180° if it is more.
- Place the compass on the map with the edge touching the landmark and set to the back bearing (orienting lines parallel to grid lines), and draw a line from the landmark along the edge.
- Repeat with the second and third landmark. Where the lines cross is your position; three lines usually form a small triangle – you are inside it.
A simpler version works with one bearing and a linear feature: if you know you are on a particular path, stream or ridge, one bearing to a landmark is enough – your position is where the back-bearing line crosses that feature.
Aiming off, handrails and attack points
Professional navigators rarely walk long, straight compass legs. They use the landscape to make navigation easier and errors harmless. These four techniques will make you far more reliable than precise compass work alone.
Handrails
A handrail is a long feature that leads roughly in your direction: a path, stream, forest edge, wall, power line or valley. Following it needs almost no concentration. Plan routes as a chain of handrails, with short compass legs in between.
Catching features
A catching feature lies across your route just beyond your target – a road, river or lake shore. If you reach it, you know you have gone too far. It protects you from walking past your destination.
Aiming off
Suppose you want to reach a bridge on a stream. If you take a bearing straight at it and arrive at the stream, you won't know whether the bridge is left or right. Instead, aim off deliberately to one side – say 5–10° to the left. When you hit the stream, you know the bridge is to your right. Each degree of offset moves you about 17 m sideways per kilometre, so 5° gives roughly 90 m of deliberate error per km.
Attack points
For a small target – a spring, a trekking site, a boulder – navigate first to a nearby, easy-to-find feature (a path junction, a stream bend, a hilltop), the attack point. From there, take a short, precise bearing and count paces to the target. The shorter the final leg, the smaller the error.
Aiming off and attack points in practice
 1The problem with a direct bearing
Walk a bearing straight at a bridge and a small error puts you somewhere on the stream – but you cannot tell whether the bridge is to your left or right.
 2Aim off 5–10° to one side
Deliberately add the offset to one side, here to the left. Each degree moves you about 17 m sideways per kilometre, so you land clearly on one side of the bridge.
 3Turn the known way
At the stream you know the bridge lies to your right. The stream now works as a handrail and leads you straight to it.
 4Attack point for small targets
For a spring or a boulder, first go to an easy attack point such as a path junction. From there take a short, precise bearing and count paces to the target.
Direct bearing vs. aiming off
Direct bearing
- Shortest route on paper
- Small errors add up unnoticed
- At a linear feature you don't know which way to turn
- Good for short legs from an attack point
Aiming off
- Deliberate 5–10° error to one side
- You know exactly which way to turn at the feature
- Slightly longer, but far more reliable
- Ideal for targets on streams, paths or forest edges
Measuring distance: pace counting and timing
Direction is only half of navigation – you also need to know how far you have gone. In the forest, with no views, distance estimation is often what separates success from getting lost.
Pace counting
A pace in navigation means a double step: count every time your left (or right) foot touches the ground. Most adults take about 60–70 paces per 100 m on flat ground. Calibrate yours by walking a measured 100 m three times and averaging. Your pace shortens uphill, in thick undergrowth, in snow, at night and with a heavy pack – the pace count calculator adjusts for slope, ground and darkness and converts distances to paces and back.
To keep track over longer distances, use "ranger beads" (pace beads): a cord with two sets of sliding beads. Slide one lower bead every 100 m; after ten, slide one upper bead for a kilometre and reset the lower ones. A pebble moved from one pocket to another works too.
| Condition | Typical adjustment | Paces per 100 m |
|---|---|---|
| Flat trail | Baseline | 64 |
| Uphill | + about 12 % | ≈ 72 |
| Steep uphill | + about 25 % | ≈ 80 |
| Downhill | + about 5 % | ≈ 67 |
| Rough ground / undergrowth | + about 12 % | ≈ 72 |
| Snow or sand | + about 20 % | ≈ 77 |
| At night | + about 10 % | ≈ 70 |
Factors as used by the pace count calculator; combine them for mixed conditions. Calibrate your own baseline.
Timing with Naismith's rule
Timing is the second distance check. Naismith's rule gives a baseline: 1 hour per 5 km plus 1 hour per 600 m of ascent. Langmuir's corrections adjust for descents: add about 10 minutes per 300 m of steep descent, subtract about 10 minutes per 300 m of gentle descent. Then factor in terrain (off-trail can take 1.5 times as long or more), the weight of your backpack and fitness, and add breaks. The hiking time calculator does all of this and gives you an arrival time.
In practice: if you walk at about 4 km/h on a forest track, 250 m takes roughly 4 minutes. If you have been walking twice that long without reaching the expected feature, stop and check.
What to do when you are lost
Everyone who navigates gets "temporarily disoriented" sometimes. The danger is not the mistake, but carrying on and making it worse. Use the STOP method: Stop, Think, Observe, Plan.
Temporarily lost – what now?
Do you know the last point where you were sure of your position?
Yes → Estimate distance and direction walked since then from time and pace count.No → Stay put, calm down, look for identifiable features around you.Can you see identifiable landmarks?
Yes → Triangulate or match contours to the terrain.No → Walk to a nearby high point or clearing only if it is safe and close.Is there a catching feature (road, river, forest edge) you can safely walk to on a bearing?
Yes → Walk a bearing to it, then follow it as a handrail.No → Retrace your steps to the last known point.Is darkness, bad weather or injury approaching?
Yes → Stop, make camp or shelter, call for help if needed.No → Continue carefully, checking every feature.
If night is falling, it is often wiser to stop and set up a simple camp than to stumble on in the dark – see camp setup and choosing a camp site. The sunset calculator tells you how much light you have left. In an emergency, call the European emergency number 112 (911 in North America) and give your grid reference or GPS coordinates.
Map, compass and GPS: practice plan and kit
A phone with offline maps and GPS is an excellent tool – but batteries die in the cold, screens fail in the rain, and signal can vanish in deep valleys. Treat map and compass as your primary system and GPS as a quick position check, or the other way round, but always carry both and know how to use them. Keep the phone warm, in flight mode, with a power bank.
A simple practice plan
- Week 1: On a familiar walk, orient the map at every junction and thumb your position.
- Week 2: Calibrate your pace count; walk measured legs on a forest track.
- Week 3: Take bearings from the map to path junctions and follow them across open woodland.
- Week 4: Plan a route with handrails, aiming off and attack points to a small target.
- Then: Try fog, dusk and short night legs with a partner. Orienteering clubs offer permanent courses that are perfect for practice.
Short compass drills
- Guess first: before you put the compass on the map, estimate the bearing by eye and write it down. Then take it properly. Big differences show you where a 180° or quadrant error would have crept in.
- Compass square: in an open field, put down a marker, then walk four legs on 0°, 90°, 180° and 270° with the same number of paces on each leg. If your technique is clean you finish close to the marker; a consistent miss shows your personal drift.
- Out and back: walk 100 m on a bearing, add or subtract 180° for the back bearing and walk back. You should arrive at your start – a good way to practise the back bearing you need for triangulation.
Navigation kit checklist
- Topographic map 1:25,000 in a waterproof case
- Baseplate compass (ideally with mirror and declination adjustment)
- Pencil and small notebook for bearings and times
- Pace beads or a simple counter
- Watch
- Phone with offline maps, power bank
- Headlamp, whistle and a small first aid kit
Add these to your bushcraft kit list or build a complete list with the Kit Builder. For more field skills, explore all bushcraft skills, from animal tracking – which trains the same observation skills – to essential knots. Planning an overnight trip in Germany? Check the rules in wild camping in Germany and plan your water stops with finding water.
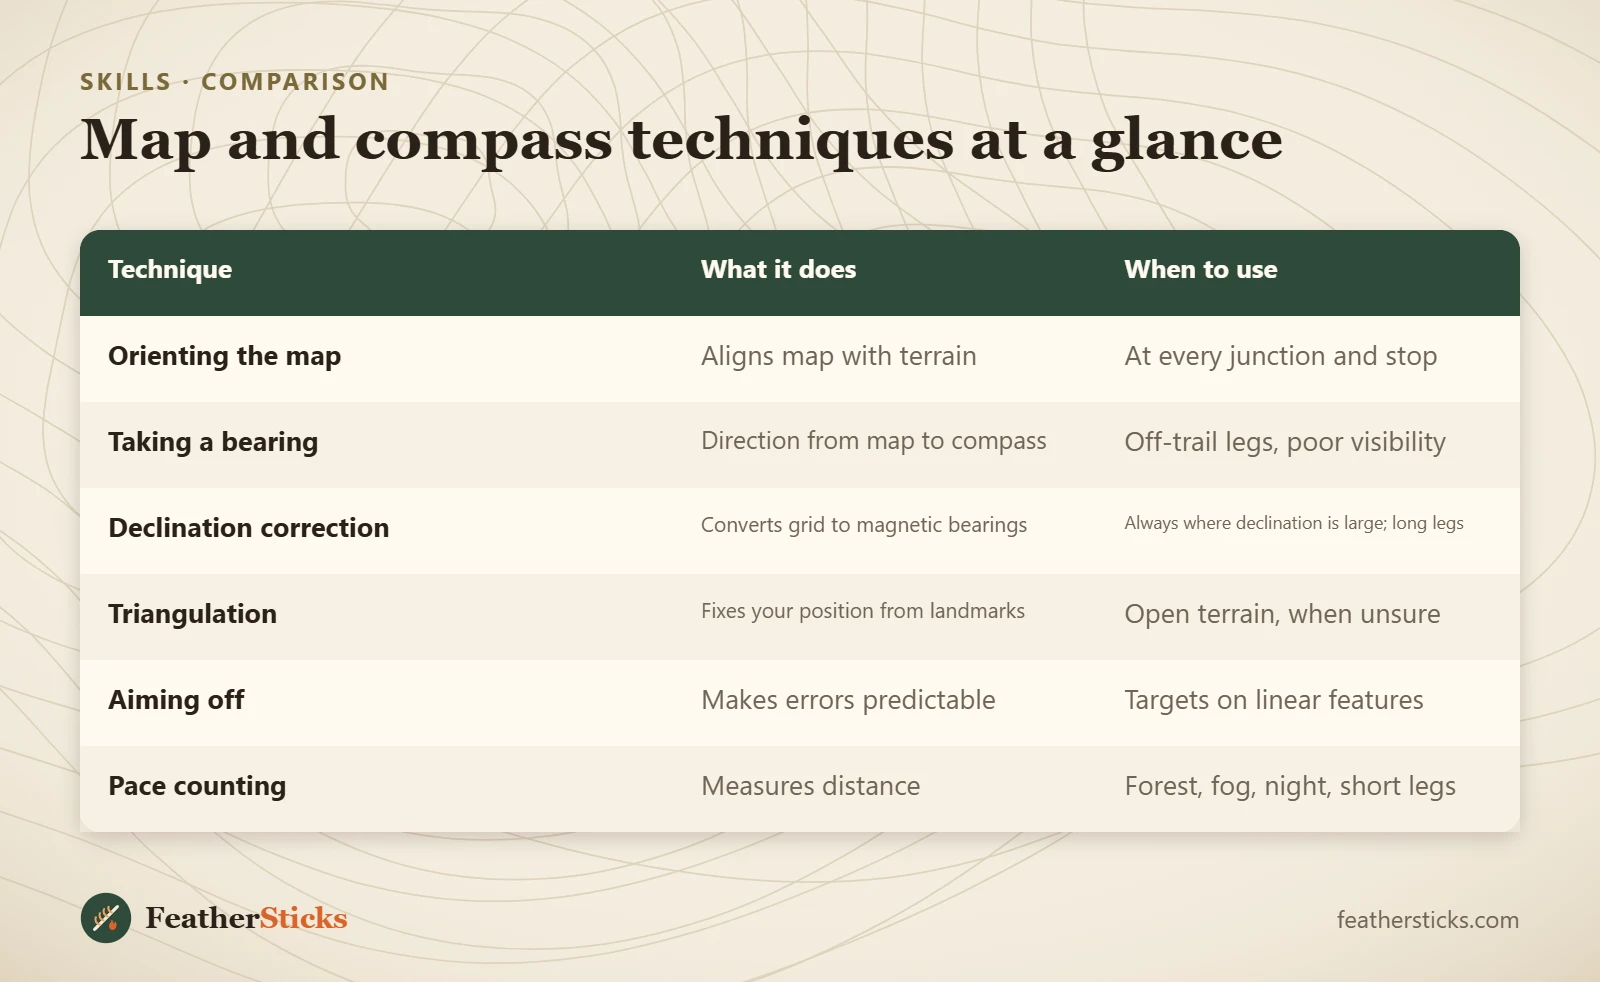
| Technique | What it does | When to use |
|---|---|---|
| Orienting the map | Aligns map with terrain | At every junction and stop |
| Taking a bearing | Direction from map to compass | Off-trail legs, poor visibility |
| Declination correction | Converts grid to magnetic bearings | Always where declination is large; long legs |
| Triangulation | Fixes your position from landmarks | Open terrain, when unsure |
| Aiming off | Makes errors predictable | Targets on linear features |
| Pace counting | Measures distance | Forest, fog, night, short legs |
Common mistakes
- Turning the compass housing to the needle instead of the grid lines when taking a bearing from the map.
- Pointing the travel arrow the wrong way along the line – and walking 180° off course.
- Holding the compass near a phone, knife or car, which deflects the needle.
- Ignoring declination on long legs or where it is large.
- Watching the needle while walking instead of leapfrogging between landmarks.
- Not measuring distance and walking straight past the target.
- Carrying on when the terrain no longer matches the map.
What you need
- Topographic map 1:25,000
- Baseplate or mirror compass
- Waterproof map case
- Pace beads
- Pencil and notebook
- Phone with offline maps and power bank