Fire
Flint and Steel: How to Make Fire the Traditional Way
Flint and steel makes fire by striking a hard, sharp stone against a piece of high-carbon steel: the stone shaves off tiny specks of steel that glow as sparks, a spark lands on char cloth and turns into an ember, and that ember is blown into flame inside a tinder bundle. The method is thousands of years old and still works perfectly today.
This guide covers how it works, what to look for in a striker and stone, how to make char cloth and other char materials, the striking technique, troubleshooting and how flint and steel compares with a modern ferro rod. If you are new to fire craft, start with the fire starting basics and our guide to bushcraft for beginners.
Step by step
-
1
Prepare a tinder bundle
Form a loose bird's nest of fine, dry fibres the size of two fists and have your fire lay built before you strike.
-
2
Hold char cloth on the stone
Grip the stone in your weak hand with a sharp edge facing out. Pin a piece of char cloth on top with your thumb, just behind the edge.
-
3
Strike down at about 30°
Swing the steel down across the stone edge in a fast, glancing stroke. Sparks fly up and some land on the char cloth.
-
4
Grow the ember
When a glowing spot appears on the cloth, blow on it gently until it spreads to the size of a coin.
-
5
Blow the bundle into flame
Place the ember in the nest, fold it loosely around it and blow steadily. When it bursts into flame, set it in your fire lay.
How does flint and steel work?
Contrary to what the name suggests, the spark does not come from the flint. When a hard stone with a sharp edge scrapes along high-carbon steel, it shaves off minute particles of metal. The friction heats them, and because they are so small, they react with oxygen in the air and keep burning for a fraction of a second. What you see as a spark is a glowing speck of steel.
The stone only works because it is harder than the steel. Flint, chert and quartz sit at about 7 on the Mohs hardness scale, while hardened carbon steel is a little softer. The stone therefore bites into the metal rather than the other way round.

The key difference to a ferro rod is heat. Flint and steel sparks are small and comparatively cool, so they will not light dry grass or birch bark directly. They need a material that catches a spark and smoulders: char cloth, charred plant material or prepared tinder fungus.
From spark to flame
- SparkStone shaves a glowing speck off the steel.
- EmberThe spark lands on char cloth and starts it smouldering.
- Tinder bundleThe ember goes into a nest of fine natural tinder.
- FlameSteady blowing turns the smoke into flame.
- Fire layThe burning bundle goes under prepared kindling.
What do you need for flint and steel?
A complete kit fits into a pocket tin, but a weak link in any part is why beginners struggle.
The steel striker
Traditional strikers are C-shaped, oval or D-shaped loops of high-carbon steel that you slip your fingers through. The shape protects your knuckles and gives a secure grip. What counts is the steel: it must be carbon steel with enough carbon content and correctly hardened. Stainless steel and mild steel produce few or no sparks. Old files and some carbon-steel knife spines can work, but striking the cutting edge ruins the blade — see our guide to bushcraft knives for which steels are suitable.
The stone
Any stone harder than the steel with a sharp edge will do. Flint is the classic choice, but chert, quartzite, jasper, agate and clear quartz work too. The edge is what matters: a fresh, crisp edge bites into the steel, while a rounded edge only skates across it.
Char material and tinder box
Char cloth or another charred material catches the spark. Keep it in a small, closed metal tin, traditionally called a tinder box, so it stays bone dry and cannot be crushed. A tin with a tight lid also doubles as your charring container.

Flint and steel kit at a glance
- Striker
- Hardened high-carbon steel, C-shape or oval, about 6–8 cm long
- Stone
- Flint, chert, quartzite, jasper or quartz with a sharp edge
- Char
- Char cloth, charred punkwood, charred cattail or amadou
- Tinder box
- Small metal tin with a tight lid, kept dry
- Tinder
- Dry grass, inner bark fibres, jute twine, cattail fluff
- Backup
- Lighter or ferro rod for emergencies
| Stone | Sparks | Where you find it | Notes |
|---|---|---|---|
| Flint | Excellent | Chalk regions, beaches, gravel | Holds a sharp edge; knaps well |
| Chert | Very good | Limestone areas, river gravel | Close relative of flint, often duller in colour |
| Quartzite | Good | Widespread in rivers and fields | Tougher; edges round off more slowly |
| Jasper / agate | Very good | Gravel beds, rock shops | Hard, fine-grained, attractive |
| Clear quartz | Good | Veins in granite and slate | Brittle; edges chip readily |
Test any stone: if it scratches glass and has a sharp edge, try it against your striker.
How to make char cloth step by step
Char cloth is fabric that has been heated without oxygen until it turns into black, carbonised fibre. It no longer burns with a flame, but it catches the tiniest spark and smoulders. Making it is simple and uses the same principle as producing charcoal.
Use only 100 % cotton or linen: old jeans, T-shirts, flannel or cotton pads. Synthetic fibres melt instead of charring, and blends give patchy results. Thin, loosely woven fabric catches sparks faster; denim is more durable in the pocket. You need a small metal tin with a tight lid, such as a mint tin, with one small hole of 2–3 mm punched in the lid with a nail.
Making char cloth in a tin
 1Cut and fill loosely
Cut cotton or linen into squares of about 5 × 5 cm and lay them loosely in the tin. Packed tight, the middle pieces stay brown.
 2Onto the coals
Shut the lid and set the tin on a bed of hot coals or at the edge of an established fire, never in tall flames. Use a stick or gloves.
 3Watch the smoke
Within a minute or two, smoke and gas jet from the hole. The gas may ignite as a small flame at the hole — this is normal. Keep your face away.
 4Wait until it stops
When no more smoke comes out, usually after 5–15 minutes depending on the heat and fabric, the charring is complete.
 5Cool it closed
Lift the tin out with a stick, plug the hole with a twig and let it cool completely before opening. Opened hot, fresh char glows up and turns to ash.
 6Test the result
Good char cloth is evenly black, flexible and does not crumble. Brown patches need more time; grey ash means it was in too long. Test a corner with one strike.
Other char materials: punkwood, cattail, chaga and amadou
Several natural materials can be charred in the same tin, and some tinder fungi catch a spark without charring once prepared.
Charred punkwood is soft, dry, rotten wood that crumbles between your fingers. Break it into small chunks and char it like cloth. Charred cattail heads or the fluff from them make a fast-catching char. Chaga (Inonotus obliquus), the black, crusty growth found on birch trees, has a rusty-brown inner layer that can take a spark directly when very dry and scraped fine; charring makes it far more reliable.
Amadou is made from the tinder fungus (Fomes fomentarius), the hoof-shaped bracket that grows mainly on beech and birch. Its soft middle layer was traditionally cut out, boiled, dried and pounded into a felt-like sheet that catches sparks well. This page covers tinder use only — do not treat any fungus as food based on descriptions online.
Take fungi only in small amounts, prefer fallen trees or dead wood, and follow local rules: in some protected areas collecting anything is not allowed. Removing growths from living trees can harm them.
| Material | Catches spark | Preparation | Durability |
|---|---|---|---|
| Char cloth (cotton/linen) | Very easy | Char in a tin, 5–15 min | Fragile; store in a tin |
| Charred punkwood | Easy | Dry, then char in a tin | Crumbly |
| Charred cattail | Very easy | Char heads or fluff | Very fragile |
| Chaga | Medium (charred: easy) | Dry, scrape or char | Robust chunks |
| Amadou (tinder fungus) | Easy | Cut, boil, dry and pound | Very durable, reusable |
How to use flint and steel: the striking technique
Most failed attempts come down to angle, edge and grip rather than strength.
The grip
Hold the stone in your non-dominant hand between thumb and fingers with a sharp edge pointing away from you and slightly upward. Lay a piece of char cloth on top of the stone and pin it with your thumb so that its edge sits 2–3 mm behind the stone edge. The sparks fly upwards and backwards over the edge and land directly on the cloth.
Slip the fingers of your dominant hand through the striker so the flat striking face points towards the stone.
The strike
Strike the steel downwards across the stone edge at an angle of about 30°, in a fast, glancing stroke. Think of scraping a thin shaving off the steel rather than hitting the stone. The motion comes from the wrist and forearm; a short, snappy stroke works better than a big swing. Keep your fingers behind the edge so the steel does not hit your knuckles.
After a few strikes, look for a tiny red dot on the char cloth. Stop striking and blow on it gently until it spreads; char cloth smoulders for a minute or more, so there is no need to rush. If sparks dwindle, rotate the stone to a fresh edge — a blunt edge is the most common reason a kit stops working.
Grip, edge and stroke in detail
 1Pick the edge
Turn the stone until a crisp, sharp edge points away from you. A rounded edge only skates over the steel and gives few or no sparks.
 2Pin the char cloth
Lay the cloth on top of the stone and hold it with your thumb so its edge sits 2–3 mm behind the stone edge. Closer, and the steel knocks it off; further back, and the sparks miss it.
 3Grip the striker
Slip your fingers through the loop so the flat striking face points towards the stone. Your knuckles stay inside the C, safe from the edge.
 4Refresh the edge
When sparks become fewer and weaker, rotate the stone a little to a fresh edge instead of striking harder. Knapping off a small flake also restores a sharp edge.
What a good strike looks like
A good stroke sounds like a short, bright scrape, not a dull knock. You see a small shower of orange sparks flying up and back over the stone, and the steel face shows a fresh, shiny scratch. If you hear a clack and see nothing, you are hitting the stone instead of shaving the steel: flatten the angle and let the steel glance off the edge. If sparks fly forward, away from you, your stroke is going up instead of down.
Practice drills
- Spark count: without char cloth, make ten strokes and count the strokes that give visible sparks. Aim for eight out of ten before you move on.
- Target practice: pin a piece of paper on the stone instead of char cloth and check where the spark burns leave tiny marks. They should land on the front edge of the paper.
- Five-strike ember: with dry char cloth, try to catch an ember within five strokes. Repeat until it works nearly every time, then practise with cold hands or in the dark.
From ember to flame: the tinder bundle
An ember is not a fire yet. It needs a tinder bundle, sometimes called a bird's nest: a loose ball of very fine, dry fibres about the size of two fists. Good materials are dry grass, shredded inner bark of cedar, lime or willow, clematis bark, cattail fluff mixed with grass, or unravelled jute twine. Fibres you process for natural cordage are often excellent tinder too.
Make a small depression in the middle of the nest, place the glowing char cloth inside and fold the fibres loosely over it. Hold the bundle at chest height with the wind at your back, so the smoke drifts away from your face, and blow with long, steady breaths. The smoke thickens, turns white and dense, and then the bundle bursts into flame. At that moment, stop blowing and place it straight under your kindling. Bundles can flare suddenly, so keep them away from your face and hair.
From glowing cloth to flame
 1Press a hollow
Push a fist-deep hollow into the middle of the nest with your fingers. The finest fibres belong at the bottom of the hollow, where the ember will sit.
 2Place the ember
Lay the glowing char cloth in the hollow, glowing side up. Grow the glow to about the size of a coin first so it survives the move.
 3Fold loosely
Fold the outer fibres over the ember like a loose parcel. Do not squeeze: the ember needs air, and a pressed ball goes out.
 4Blow at chest height
Hold the nest at chest height with the wind at your back and blow long, steady breaths. The smoke gets thicker, denser and whiter as the fibres heat up.
 5Flame into the lay
As soon as it flames, stop blowing and push the bundle under the kindling of your prepared fire lay. Keep it away from your face and hair.
Build the fire lay before you strike. A teepee or a lean-to lay gives the burning bundle a direct path into thin kindling — our guide to fire lays shows the options, and the fire lay picker suggests one for your weather and purpose. Feather sticks or fatwood shavings on top of the bundle help a lot when conditions are damp.
Troubleshooting: why is my flint and steel not working?
Work through the problem in order: first sparks, then ember, then flame. Each stage has its own typical causes.
Find the problem
Do you get sparks at all?
Yes → Go to the next question.No → Check the steel: stainless or soft steel will not spark. Use a fresh, sharp stone edge and a steeper, glancing stroke.Do sparks land on the char?
Yes → Go to the next question.No → Move the char closer to the edge (2–3 mm behind it) and strike downwards so sparks fly over the stone.Does the char take an ember?
Yes → Go to the next question.No → Your char is damp or under-charred (brown). Dry it or recharge it longer; test with a lighter flame.Does the bundle burst into flame?
Yes → Place it under your kindling right away.No → Use finer, drier fibres, blow longer and steadier, and enclose the ember better in the nest.
Humidity is the silent enemy. Char cloth absorbs moisture from the air, so keep it sealed in its tin, ideally inside a zip bag. In rain or snow, prepare the bundle under a tarp or your body, and read our advice on lighting a fire in wet weather for dry kindling sources.
Flint and steel vs ferro rod: which is better?
A ferro rod is the practical choice for most people: easier, tolerant of wet and able to light untreated tinder. Flint and steel rewards skill and lasts almost forever.
Flint and steel vs ferro rod
Flint and steel
- Small, cool sparks — needs char cloth or amadou
- Striker lasts a lifetime; stones can be found in nature
- Char material must be kept completely dry
- Steeper learning curve, very satisfying
- Traditional, quiet, no manufactured consumables
Ferro rod
- Big, very hot sparks — lights fine natural tinder directly
- Rod wears down with use, eventually needs replacing
- Works after being dunked; just wipe it dry
- Learned in minutes
- The most common modern backup — see how to use a ferro rod

Many bushcrafters carry both: a ferro rod as the reliable workhorse and flint and steel for practice and for the pleasure of the traditional craft. For a friction method that needs no metal at all, look at the bow drill.
A short history of the strike-a-light
Striking sparks is one of the oldest ways of making fire. Before steel existed, people struck flint against iron-rich minerals such as pyrite or marcasite. Ötzi, the Copper Age man found in the Ötztal Alps in 1991, carried tinder fungus in his belt pouch together with traces of pyrite, which researchers interpret as part of a spark-based fire-making kit.
With the spread of iron and steel, the steel striker took over. Strike-a-lights are found in Iron Age and early medieval graves across Europe, and through the Middle Ages and the early modern period the tinderbox with flint, steel and tinder was an everyday household item. Only when friction matches became widespread in the 19th century did it slowly disappear from daily life.
Caring for your striker and kit
High-carbon steel rusts. Wipe the striker dry after use and give it a thin coat of oil or wax now and then; a light patina is harmless, but deep rust pitting weakens the striking face. The face will develop small grooves over the years — that is normal and does not affect sparking.
Add the kit to your bushcraft kit list as a backup or practice set. Refill the tin with char cloth made in the embers of the fire you use for campfire cooking or boiling water.
Fire rules vary by country, region and season. Check local restrictions and fire danger levels, use existing fire rings where required and never leave embers unattended. More fire skills are collected in the fire hub.
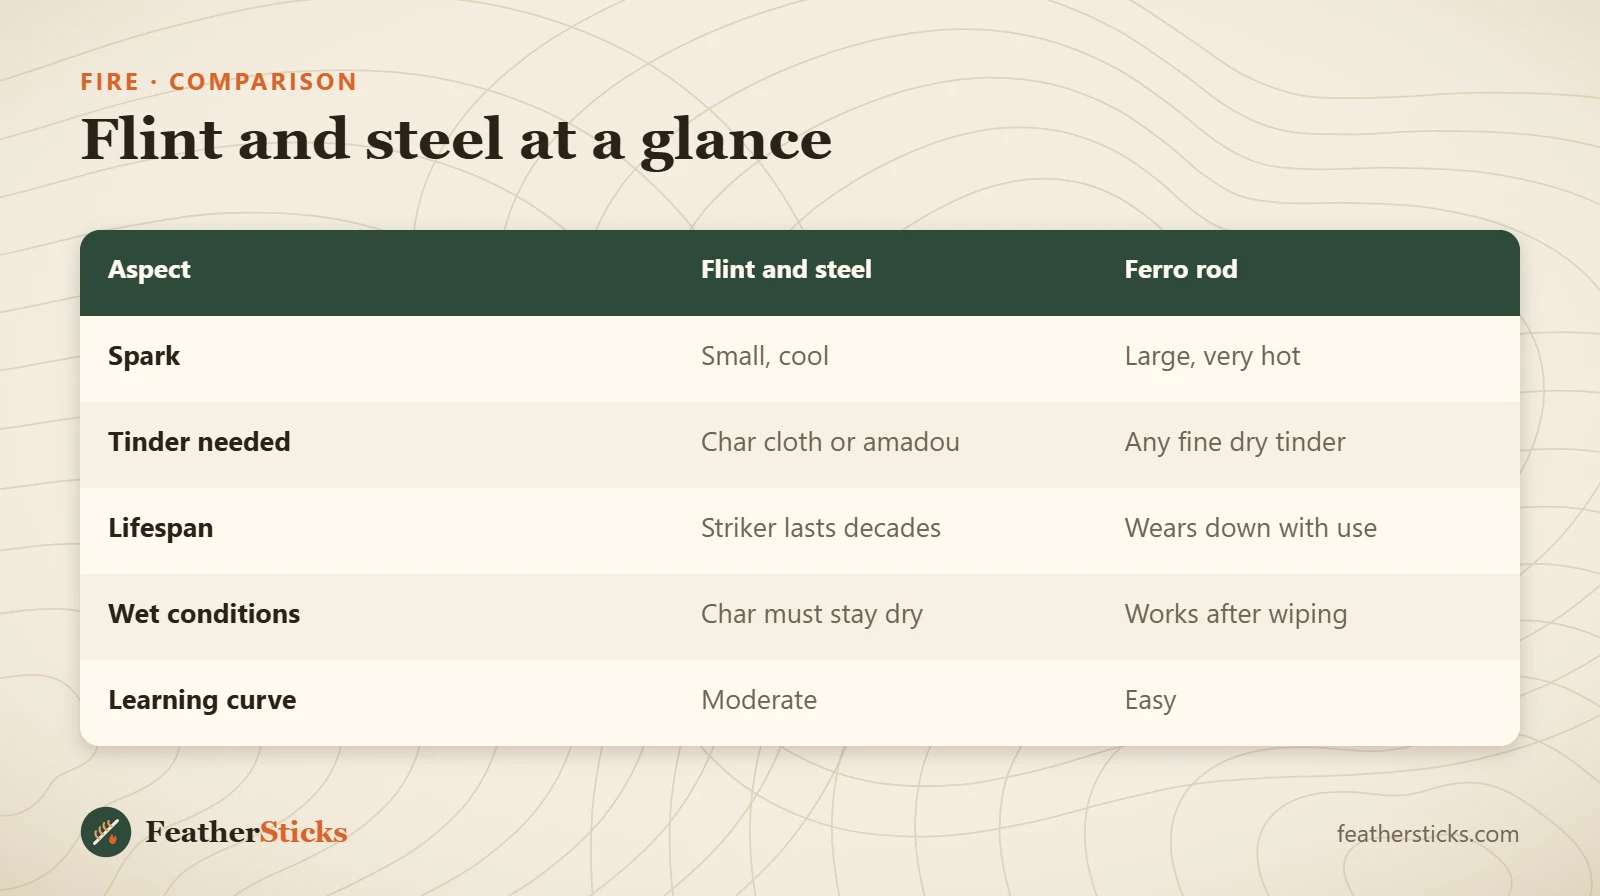
| Aspect | Flint and steel | Ferro rod |
|---|---|---|
| Spark | Small, cool | Large, very hot |
| Tinder needed | Char cloth or amadou | Any fine dry tinder |
| Lifespan | Striker lasts decades | Wears down with use |
| Wet conditions | Char must stay dry | Works after wiping |
| Learning curve | Moderate | Easy |
Common mistakes
- Using a stainless or mild steel striker that barely sparks.
- Striking with a rounded stone edge instead of rotating to a fresh one.
- Trying to light dry grass directly instead of catching the spark on char.
- Opening the char tin while it is still hot, so the cloth burns to ash.
- Letting char cloth get damp in a leaky container.
- Not having the tinder bundle and fire lay ready before striking.
What you need
- High-carbon steel striker
- Flint, chert or quartzite with a sharp edge
- Char cloth in a small metal tin
- Tinder bundle material (dry grass, bark fibres, jute twine)
- Leather gloves or a stick for handling the hot tin
- Lighter or ferro rod as backup