Tools
Carving Tools for Beginners: Sloyd Knife, Hook Knife, Gouges and Axe
The best carving tools for beginners are just two knives: a straight sloyd knife with a 5–8 cm Scandi-ground blade for shaping, and a hook knife for hollowing spoon bowls. Add a folding saw and a strop, and you can carve spoons, spatulas, pot hooks and feather sticks for years before you need anything else.
This guide explains each tool: sloyd knife, hook knife, gouges, carving axe and helpers such as the drawknife, then shows starter sets in tiers, how to judge quality, how to keep the edges keen and how to carve without cutting yourself. It belongs to our bushcraft tools hub; for the techniques themselves, read carving basics.
Step by step
-
1
Start with a sloyd knife
Choose a straight carving knife with a 5–8 cm blade and a Scandi grind. It does 80 percent of all carving work, from roughing to fine detail.
-
2
Add a hook knife for hollows
Pick a single-edged hook knife for your dominant hand, with a medium curve that suits spoon bowls. Double-edged versions cut in both directions.
-
3
Strop before you start
Even new tools benefit from a few passes on a leather strop with polishing compound. A keen edge needs less force and is safer.
-
4
Protect hands and legs
Wear a cut-resistant glove on the holding hand, tape or guard your thumb, and use controlled grips such as the chest lever. Never cut towards your thigh.
-
5
Scale up only when needed
Add a carving hatchet for roughing blanks, then gouges for bowls and cups, once your knife skills and projects demand it.
Which carving tools do you really need?
Green woodworking, the carving of fresh, unseasoned wood, needs surprisingly few tools. Fresh birch, lime (basswood), alder or willow is soft enough to cut with a knife, and the traditional Scandinavian craft of spoon carving grew up around just a knife, a hook knife and an axe. Everything else speeds up specific jobs.
Think in terms of tasks: splitting and roughing (saw, axe, baton), shaping (sloyd knife, drawknife), hollowing (hook knife, gouges) and finishing (knife, spokeshave, optional sandpaper). Buy for the tasks you actually do.
| Tool | Main job | Needed for a first spoon? |
|---|---|---|
| Sloyd knife | Shaping, detail, feather sticks | Yes |
| Hook knife (spoon knife) | Hollowing spoon bowls and cups | Yes |
| Folding saw | Cutting blanks to length, stop cuts | Very helpful, see saws |
| Carving hatchet | Roughing out blanks fast | Optional at first |
| Gouges | Bowls, kuksa-style cups, deep hollows | No |
| Drawknife and spokeshave | Fast shaping of handles and staves | No |
| Strop with compound | Keeping edges razor-keen | Yes |
The sloyd knife: your main carving knife
The sloyd knife comes from the Scandinavian school tradition of teaching woodwork. It has a narrow, straight blade of about 5–8 cm, a point roughly in line with the spine or slightly dropped, and a plain, oval handle that fills the hand in every grip. Shorter blades (5–6 cm) give control for detail; longer ones (7–8 cm) are faster for roughing and long, flat cuts.
Why the Scandi grind?
A Scandi grind is one wide, flat bevel on each side running straight to the edge, with no secondary bevel. The flat bevel acts as a guide: rest it on the wood and it tracks the cut, which makes controlled, shallow slices easy. It is also the easiest grind to sharpen by hand, because you just lay the bevel flat on the stone. Carving knives usually have a fairly low bevel angle, around 20–25 degrees included, which cuts green wood effortlessly but is too fine for heavy batoning.
A general bushcraft knife with a 9–11 cm blade can carve, but its thicker, longer blade is clumsier in tight curves. If you already own one, start carving with it and add a dedicated sloyd knife when you notice the limits.
Sloyd knife at a glance
- Blade length
- 5–8 cm (about 2–3 in)
- Blade thickness
- Thin, typically 2–3 mm
- Grind
- Scandi, no secondary bevel
- Steel
- Carbon steel (easy to sharpen) or stainless (low care)
- Handle
- Oval, 10–12 cm, no finger grooves
- Guard
- None or minimal, so all grips work
Hook knife (spoon knife): left, right or double edge?
A hook knife, also called a spoon knife, has a curved blade for scooping out hollows: the bowl of a spoon, the inside of a ladle or a small cup. Its edge is on the inside or outside of the curve depending on the design, and you usually pull it through the wood with a twisting, scooping motion of the wrist.
Left-handed vs right-handed
Most hook knives are sharpened on one side of the curve only. A right-handed hook knife cuts when held in the right hand and pulled towards you with the edge facing you; a left-handed model is the mirror image. Buying the wrong hand is the classic beginner mistake. Check before ordering: the product usually states the hand, or you can see which side of the hook carries the edge.

Single-edged vs double-edged hook knife
Single-edged
- Safer: the back of the hook is blunt, so you can push on it with your thumb
- More control for beginners
- Easier to sharpen and strop
- Cuts in one direction only; you turn the work more often
Double-edged
- Cuts in both directions, so you follow the grain without turning the spoon
- Suits left- and right-handed users
- No safe spot for the thumb on the back
- Better as a second hook knife once you are confident
Curve radius
The curve decides what the knife can hollow. A tight curve (small radius, roughly 2 cm) digs deep, narrow hollows such as kuksa-style cups and ladles, but it chatters in shallow spoon bowls. An open curve (larger radius, roughly 3–4 cm) makes smooth, shallow cuts for eating spoons and spatulas. Some hook knives combine both: tight at the tip, opening towards the handle. For a first hook knife, a medium or combined curve is the most versatile.
With both hands close together in a small bowl, the hook knife is where beginners most often cut a thumb. Follow this pattern:
Hollowing a spoon bowl with a hook knife
 1Hold by the handle
Grip the blank by its handle in your gloved hand, bowl up and away from your body. Keep your fingers behind the bowl, never where the hook exits.
 2Thumb on the back
Push on the blunt back of the single-edged hook with the taped thumb of your holding hand while the knife hand twists the wrist. Never do this on a double-edged hook.
 3Rim to centre, both sides
Cut from one rim down to the centre, then from the opposite rim. Each cut runs downhill with the grain and leaves a smooth, ribbed surface.
 4Never centre to rim
Cutting from the centre up to the rim goes against the fibres: the grain tears out and leaves rough pits. If a cut catches, come from the other side.
Which hook knife should you buy first?
Are you new to carving?
Yes → Single-edged, for your dominant hand, medium or combined curve.No → Consider a double-edged hook to follow grain in both directions.Do you mainly carve eating spoons?
Yes → Choose a medium to open curve for smooth, shallow bowls.No → For cups and ladles, add a tight-curve hook knife or a gouge.
Gouges and chisels for bowls and cups
Once you move from spoons to bowls, kuksa-style cups or deep ladles, a hook knife gets slow. Gouges remove wood faster and with more control in large hollows. A gouge is a chisel with a curved cross-section; the depth of that curve is called the sweep. Many makers use a numbering system where low numbers are almost flat and high numbers are deep, U-shaped curves, though exact numbers differ between makers.
Straight gouges work well from the rim and on the outside of a bowl. Bent gouges (also called spoon-bent or long-bent) have a curved shank, so the edge can reach the bottom of a hollow at a useful angle without the handle hitting the rim. For green-wood bowls, gouges are pushed by hand or tapped with a wooden mallet; a flat chisel is useful for flattening the base of a bowl or a cup.

| Type | Sweep | Typical width | Use |
|---|---|---|---|
| Shallow straight gouge | Shallow | 20–30 mm | Smoothing bowl exteriors and wide hollows |
| Medium straight gouge | Medium | 20–30 mm | Removing bulk from bowl interiors |
| Deep bent gouge | Deep, U-shaped | 15–25 mm | Hollowing kuksa-style cups and deep bowls |
| Bent gouge, medium sweep | Medium | 20–35 mm | Finishing the inside of bowls |
| Flat chisel | None | 20–25 mm | Flat bases, notches and joints |
Widths are typical ranges for hand-held bowl work, not fixed standards.
The carving axe: roughing out blanks
A carving hatchet removes waste wood many times faster than a knife. You use it to split a log into halves, hew away the bark side and rough out the shape of a spoon or bowl before switching to the knife. A typical carving axe has a light head of about 0.5–0.9 kg and a short handle of 30–40 cm, so it can be held close behind the head for precise, controlled cuts. A bearded head with a long, straight edge lets you choke up on the handle and hew in a slicing motion.
Flat back vs symmetric bevel
A flat-backed (single-bevel) carving axe is ground on one side only, like a chisel. The flat side makes clean, flat surfaces, but it is handed: it works best for either right- or left-handed users and on one side of the blank. A symmetric (double-bevel) carving axe, often with a slightly convex grind, cuts on both sides and is more versatile, so most carvers start with one. A general camp hatchet can rough out blanks too, but its thicker, wedge-shaped profile is designed for splitting rather than clean hewing.
Where your holding hand goes
Hold the blank at its top, hand above the edge, blank standing on the block, so the axe travels down, away from your fingers. A hand that slides down into the strike zone is one glancing blow from a serious injury.

Other helpers: saw, drawknife, spokeshave, sandpaper
A folding saw is the most useful extra tool: it cuts blanks to length and makes stop cuts at the neck of a spoon, where the handle meets the bowl, so the axe or knife cannot split past that line. A drawknife is a long blade with two handles that you pull towards you; it shapes handles, staves and chair legs quickly, ideally on a shaving horse. A spokeshave is a small, plane-like tool for smoothing curves such as spoon handles and bow limbs.
Sandpaper is optional. Many carvers prefer a crisp, faceted knife finish, which also stays smoother when the wood gets wet. If you sand, let the piece dry completely first and work through grits from about 120 to 240 or 320. Finish utensils with a food-safe oil such as raw linseed or walnut oil, and check any oil you use is labelled food-safe.
From log to spoon: which tool does what
 1Split the log
Split a fresh log section in half on a chopping block, with the axe or by batoning. Split through the pith: a spoon containing pith tends to crack as it dries.
 2Draw the spoon
Draw the outline on the flat split face, with the grain running straight along the handle. Grain that crosses the neck makes a weak spoon.
 3Saw the stop cuts
With a folding saw, cut in from both edges towards the neck, stopping just short of the outline, so axe splits cannot run into the handle.
 4Hew the waste
Blank on the block, holding hand on top above the edge, hew the waste downwards towards the stop cuts. Leave a few millimetres outside the line for the knife.
 5Knife and hook knife
Shape outside and handle with the sloyd knife in controlled grips, then hollow the bowl with the hook knife, rim to centre. Let the spoon dry slowly.
Carving sets for beginners: tools in tiers
Pre-packed carving sets are convenient but often include tools you will not use, or a hook knife for the wrong hand. Building your own set in tiers lets you buy better quality where it matters and add tools as your projects grow.
| Tier | Tools | Projects |
|---|---|---|
| 1: Starter | Sloyd knife, strop with compound, cut-resistant glove, thumb guard | Feather sticks, pot hooks, tent pegs, butter spreaders |
| 2: Spoon carver | Tier 1 plus single-edged hook knife and a folding saw | Eating spoons, spatulas, scoops |
| 3: Cups and bowls | Tier 2 plus carving hatchet and one bent gouge | Kuksa-style cups, ladles, small bowls |
| 4: Workshop | Tier 3 plus drawknife, spokeshave, more gouges, sharpening stones | Bowls, handles, staves, larger projects |
Tier 1 and 2 cover almost everything a bushcraft trip needs. See carving basics for first projects.
How to choose good carving tools
Carving tools are simple, so quality shows in a few details. Steel: carbon steel takes a very fine edge and is easy to sharpen, but rusts if left wet; stainless steel needs less care. Laminated blades combine a hard core with a softer outer layer. Hardness: carving blades are usually hardened fairly high so they hold a fine edge, which is why they should never be used for prying.
Handle: plain wood, oval in cross-section, without finger grooves, so it is comfortable in every grip, including reversed ones. Sharpness out of the box: a good carving knife should shave arm hair when new and slice end grain cleanly. Cheap tools often arrive with a coarse, rounded edge that needs significant reshaping. That is fixable, but frustrating for a beginner.
Buying checklist
- Blade length 5–8 cm, thin blade, true Scandi grind
- Bevels flat and even on both sides, no rounded "shoulder"
- Hook knife in the correct hand, with a curve that matches your projects
- Handle without finger grooves, fits your hand in several grips
- Sheath or edge guard included for every blade
- Edge shaves and cuts end grain cleanly out of the box
Care and sharpening: stropping keeps you carving
A carving edge should never get properly dull. Strop little and often: a few passes every 20–30 minutes of carving restore the edge before it fades. For the sloyd knife, lay the bevel flat on a leather strop loaded with polishing compound and pull the knife spine-first, alternating sides. For a hook knife, wrap leather or fine abrasive paper around a dowel that matches the curve, and strop the inside with the edge trailing.
When stropping no longer brings the edge back, go to a stone: a medium stone around 1,000 grit followed by a fine stone of 4,000–8,000 grit, keeping the Scandi bevel flat throughout. Our guide to sharpening in the field covers the technique in detail. After use, wipe blades dry, give carbon steel a thin film of oil and store every tool in its sheath, away from damp wood.
Stropping a sloyd knife
 1Load the strop
Rub a thin layer of compound into smooth leather on a flat backing. Too much compound clogs the leather and rounds the edge.
 2Lay the bevel flat
Rest the whole Scandi bevel on the leather, edge facing away from the direction of travel. Lifting the spine rounds the edge over time.
 3Pull, spine first
Draw the blade backwards with light pressure, 10–15 strokes per side, alternating. Never push edge-first into the leather.
 4Test on end grain
Slice the end grain of a dry stick: clean and shiny means keen. Torn, fuzzy fibres mean more stropping or a fine stone.
Carving safety: gloves, thumb guards and safe grips
Most carving injuries are cuts to the thumb or the holding hand and, more dangerously, the thigh. The femoral artery runs along the inside of the thigh, so never carve over your lap with the blade moving towards your legs, and never cut towards the inner thigh.
- Edge away from your body: the edge moves away from hand, legs and body, except in controlled grips with a short, blocked stroke such as the chest lever and thumb push.
- Cut-resistant glove on the holding hand. It reduces slips into the hand but is not cut-proof; it does not replace good technique.
- Thumb guard: a leather thumb protector or a few wraps of tape protect the thumb of your knife hand during push cuts and hook-knife work.
- Controlled grips: the chest lever grip (knife hand close to your chest, blade edge out, cutting by opening the shoulder blades) and the thumb-push grip give power with very short, controlled blade travel. Learn them in carving basics.
- Brace the work against a log, a chopping block or your chest, not against your knee or lap.
- Safety circle: nobody within arm's length plus blade length; supervise children closely and give them blunt-tipped carving knives first.
- Axe work: holding hand above the edge, blank on the block, never on your thigh.
- Sheathe every tool as soon as you put it down.
Carry a first aid kit with pressure dressings and know how to stop heavy bleeding. Knife carry laws vary by country; transport carving knives packed away and check local rules before you go.
What sharp carving tools and good cuts look like
The wood shows the state of your tools. Before you blame your technique, compare your cuts with these checkpoints; if several fail, strop or sharpen first.
What it should look like
- Knife cuts leave clean, shiny facets with crisp ridges, not a fuzzy surface
- Hook-knife cuts leave a smooth, evenly ribbed surface in the bowl
- Shavings curl and hold together instead of crumbling
- The tool seems to pull itself into the wood; you guide more than push
- The Scandi bevel shows one even, polished band with no rounded edge line
Troubleshooting: common carving problems and fixes
Most problems come from a dull edge, cutting against the grain, or wood that is too dry. Grain direction is covered in carving basics, stones and angles in the sharpening guide.
| Symptom | Likely cause | Fix |
|---|---|---|
| Hook knife chatters | Curve too tight for a shallow bowl, cut too deep, dull edge | Use the open part of the curve, thinner cuts, strop the hook |
| Bowl tears out | Cutting uphill, centre to rim | Cut rim to centre from both sides |
| Knife skates off | Dull edge, or bevel not riding on the wood | Strop; rest the bevel on the wood, lift the spine slightly |
| Edge folds in dry or hard wood | Fine edge in dry wood or knots, twisting or prying | Carve green wood, avoid knots, never lever; hone out damage |
| Blisters on the knife hand | Gripping hard to force a dull edge, long sessions | Strop more often, relax the grip, take breaks |
| Spoon cracks while drying | Pith left in, dried too fast, uneven thickness | Remove the pith, even walls, dry slowly in the shade or a paper bag |
Practice drills for your first carving tools
Short drills build control faster than rushing a finished spoon. Use fresh, straight-grained wood, a stropped edge, glove and thumb guard.
Two drills for beginners
- Try-stick: on a thumb-thick green stick, make five cuts: stop cut, notch, point, feather stick curl, chest-lever shaving
- Judge each cut against the checkpoints above
- Bowl drill: hollow one spoon bowl only with rim-to-centre hook-knife cuts from both sides
Carving tools on a bushcraft trip
On the trail, a sloyd knife and a single-edged hook knife weigh well under 200 g together and fit in a small tool roll. That is enough to carve a spoon, a pot hanger for campfire cooking, tent pegs and a spatula to replace missing cookware. The shavings make excellent tinder, and offcuts go on the fire. Add both knives to your kit list or plan them with the Kit Builder; if you are just starting out, the bushcraft for beginners guide shows where carving fits in.
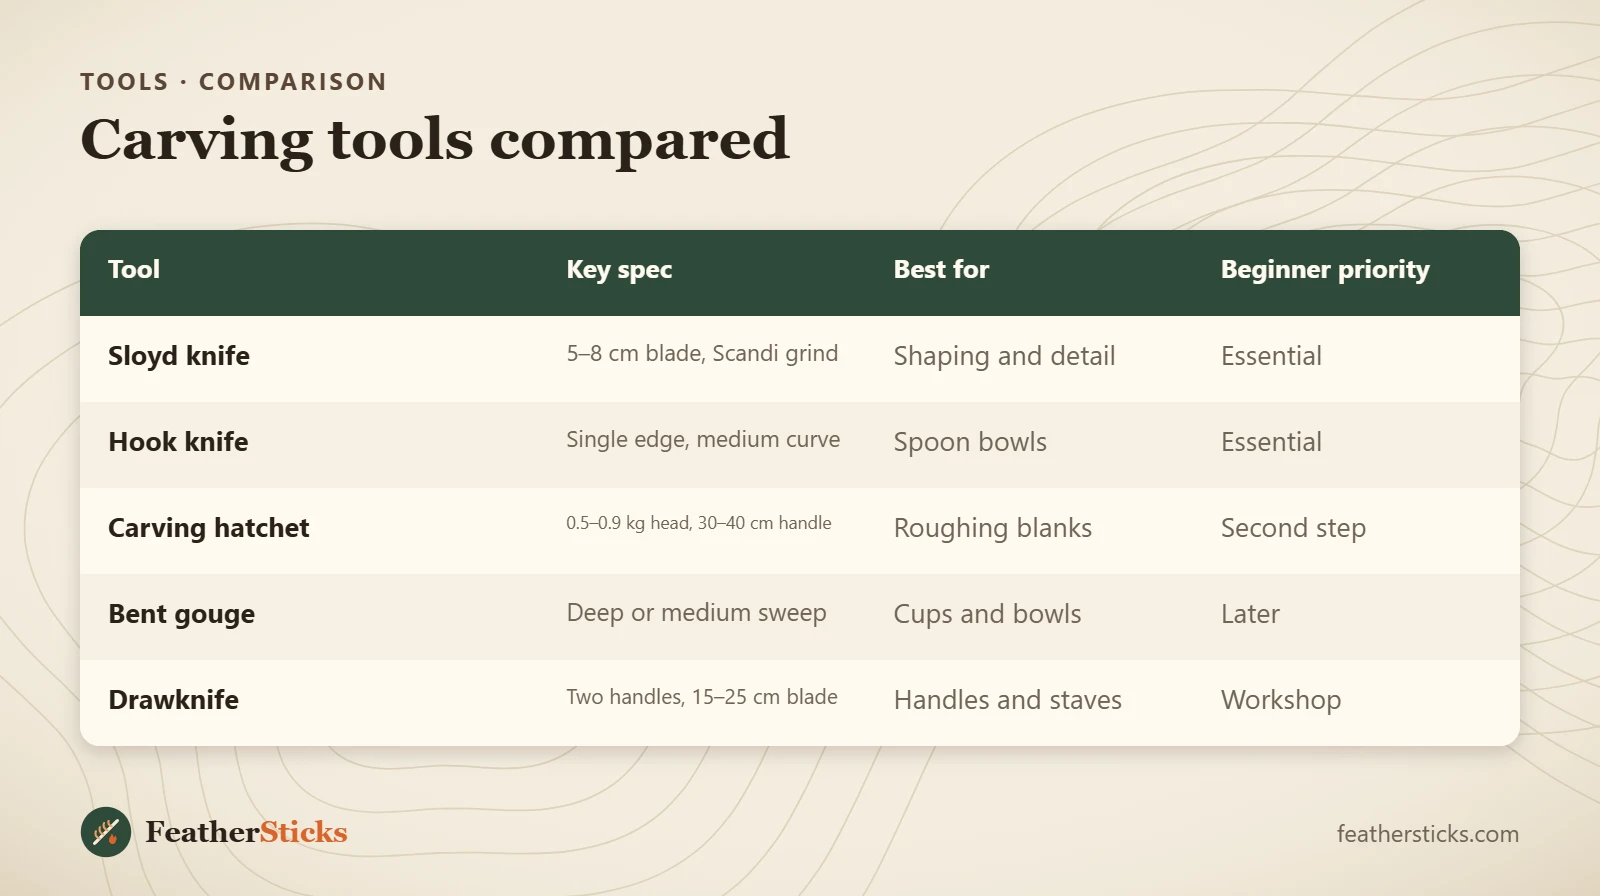
| Tool | Key spec | Best for | Beginner priority |
|---|---|---|---|
| Sloyd knife | 5–8 cm blade, Scandi grind | Shaping and detail | Essential |
| Hook knife | Single edge, medium curve | Spoon bowls | Essential |
| Carving hatchet | 0.5–0.9 kg head, 30–40 cm handle | Roughing blanks | Second step |
| Bent gouge | Deep or medium sweep | Cups and bowls | Later |
| Drawknife | Two handles, 15–25 cm blade | Handles and staves | Workshop |
Common mistakes
- Buying a hook knife for the wrong hand.
- Starting with a large, thick survival knife instead of a thin sloyd knife.
- Carving towards the thigh or over the lap.
- Letting edges go dull instead of stropping every 20–30 minutes.
- Buying a big boxed set with many tools you will not use.
- Using a double-edged hook knife before learning safe hook-knife grips.
- Carving dry, seasoned hardwood as a beginner instead of fresh green wood.
What you need
- Sloyd knife with 5–8 cm Scandi-ground blade
- Single-edged hook knife for your dominant hand
- Leather strop and polishing compound
- Cut-resistant glove and a leather thumb guard
- Folding saw for blanks and stop cuts
- Carving hatchet (optional)
- Food-safe finishing oil