Bushcraft Gear on a Budget: What to Buy First, Skip and Borrow
The smartest budget bushcraft gear strategy is to spend by order of safety and comfort: sleep system and clothing first, then rain protection and footwear, then fire, water, light and first aid, and only then knives and gadgets. Everything else can be borrowed, bought second-hand, improvised from things you already own or skipped for the first few trips.
This guide shows what to buy first, what to leave out, how to inspect used gear, where cheap is fine and where it is dangerous, and how three kit tiers grow from day trips to a first overnight to the cold season. It uses price classes (low, medium, high) instead of amounts, because prices differ by country and change constantly. Not sure what you need in total? Start with the bushcraft kit list and the Kit Builder.
Step by step
-
1

Buy in order of safety
Sleep system and clothing first, then rain gear and footwear, then fire, water, light and first aid. Knives and gadgets come last.
-
2

Skip the extras at first
Leave out survival sets, oversized knives, hammocks and gadgets you cannot yet use. Skills and a few basics beat a full shopping cart.
-
3

Spend where it protects you
Pay for a sleeping bag and pad that match the coldest night, a real rain jacket, fitting boots and a reliable light.
-
4

Buy used, borrow or make
Inspect second-hand gear with a checklist, borrow or rent what you rarely use and improvise cookware, tarps and stoves safely.
-
5

Plan before you buy
Build the list for your next real trip in the Kit Builder, check the weight, and buy only what the list is missing.
What bushcraft gear should I buy first? The order that matters
Most beginners shop in the order that is fun: a knife, then an axe, then a fancy stove, and finally, if money is left, a sleeping bag. That is exactly backwards. A poor knife can still carve a feather stick, but a poor sleeping bag cannot keep you warm at 2 °C, and a cold night is the number one reason people give up after their first trip. Buy in the order of what protects you and keeps you comfortable.
The same order is built into the bushcraft kit list, and our bushcraft guide for beginners explains why: cold and wet are the main risks on an overnight trip, and skill cannot fix them at three in the morning.
The buying pyramid (top = buy last)
- Useful, but skills matter more than steel. One good knife covers most jobs – see bushcraft knives.
- Cheap to start with, but never unreliable: ferro rod plus lighter, treatment for water, a headlamp, a first aid kit.
- A rain jacket that stays waterproof and boots that fit. Wet and blistered ends trips quickly.
- Bag and pad for your coldest night, layers you can add and remove – see sleeping gear and clothing.
Why the pack comes last
A rucksack is the one item you cannot choose well in advance. Its volume depends on your sleeping bag, pad and shelter, and a pack that fits has to be tried on with a realistic load. Borrow or use an old pack for the first trips, then buy once you know how many litres your kit needs. The backpack guide explains fit and volume; the Kit Builder suggests a size from your trip.
What can you skip at the beginning?
Bushcraft marketing sells a lot of things that look like skills in a box. Most of them can wait, and some you may never need. Skipping them is the largest saving available, because it costs nothing and often makes your pack lighter.
| Item | Verdict | Why |
|---|---|---|
| "Survival set" or kit in a tin | Skip | Mostly tiny, low-quality parts you cannot test before buying. Assemble your own from the 10 C's in the kit list. |
| Large knife (blade over about 12 cm) | Skip | Heavier, harder to control and legally awkward – see knife laws. A 9–11 cm fixed blade does the work. |
| Axe or hatchet | Delay | Earns its weight mainly in winter and at base camps. A knife and a folding saw cover most trips; see axes and hatchets. |
| Specialist carving tools | Delay | Buy after you have made a few spoons with the knife you own – whittling projects start with one blade. |
| Hammock system | Delay | Needs straps, an underquilt and the right trees; a tarp and pad are cheaper to start. |
| Multi-tools and gadgets | Skip | Duplicate what a knife, saw and cord already do. |
| Camouflage clothing | Skip | No function in the woods; ordinary muted layers work and may draw less attention. |
| Second pot, pan, lots of cookware | Skip | One pot with a lid and a spoon cook almost everything on short trips. |
What you should not skip is just as clear: warmth, dryness, water treatment, a way to make fire, light, navigation and first aid. Those are the safety items, and we come back to them in "What is never a budget item" below.
A useful test before buying anything: "Which problem does this solve on my next trip, and do I already own something that solves it?" If you cannot name the problem, leave it in the shop. If you can, check the borrow and DIY options first.
Budget bushcraft kit in three tiers: day trips, first overnight, cold season
You do not need the whole kit on day one. The tiers below build up in the same order as the pyramid, and they match the item lists and weights of the kit list and the starter kits in the tools hub. Weights are the typical values used by the Kit Builder; price classes are relative to each other (low, medium, high), not amounts.
| Tier 1: day trips | Tier 2: first overnight | Tier 3: cold season | |
|---|---|---|---|
| Sleep | None (sit mat optional) | Bag, comfort 0 °C (1,300 g); pad R 4+ (550 g); bivvy bag (400 g) | Bag, comfort −10 °C (2,000 g); foam pad under an air pad (R ≈ 6.5) |
| Shelter | Emergency poncho or small tarp as backup | Tarp 3 × 3 m (700 g), groundsheet (200 g), 8 stakes (120 g), cord (150 g) | Same, or a tent (1,800 g) for wind and snow |
| Clothing carried | Rain jacket (350 g), fleece (350 g) | Plus merino base layer (200 g), synthetic jacket (450 g), spare socks | Parka (700 g), thermal leggings, warm hat and gloves |
| Tools | Knife (200 g) and pocket stone: about 250–300 g | Plus folding saw (300 g): about 550–650 g | Plus hatchet (700 g): about 1.2–1.8 kg in all |
| Fire and water | Ferro rod, lighter, tinder; steel bottle (250 g), tablets | Plus filter (90 g), pot 0.9 L (250 g) | Plus fatwood, optional gas stove (350 g) |
| Safety | First aid (250 g), headlamp (90 g), map and compass (100 g), whistle | Same, plus power bank (200 g) | Same, plus spare batteries and extra layers |
| Typical total | Day walk: about 2.5–4 kg with food and water | Base weight about 7.5 kg | Base weight about 8.5 kg |
| Price class | Low | Medium | Medium to high |
Base weight excludes pack, food and water. Used and borrowed items move every tier one price class down.
What each tier adds
 1Tier 1: day trips
Knife, fire starters, bottle, rain jacket, headlamp, first aid, map and compass, and a fleece. Almost everything is low-cost, and most of it may already be in your cupboard.
 2Tier 2: the first night
Tarp and cord, a bag for the expected night low, an insulated pad, a pot and a saw. This is where most of the money and weight goes – and where borrowing helps most.
 3Tier 3: the cold season
A warmer bag, a second pad layer, a parka, a hatchet and optionally a small stove. Add them one at a time as your trips get colder, not all at once.
The tiers also make a good spending plan: finish Tier 1 before you buy Tier 2, and do not buy Tier 3 items until you have spent a few nights in Tier 2 weather. Our guide to the first overnight microadventure shows what a low-risk first night looks like, and trip planning helps you choose a forgiving first location.
Where to save and where not to save
Gear falls into two groups. Some items protect your body from cold, wet and injury; if they fail, you are in trouble. Others only make a task easier or more pleasant; if they fail, you improvise. Spend on the first group, save on the second.

| Item | Save or spend? | What to look for |
|---|---|---|
| Sleeping bag | Spend | The comfort rating, not the limit rating; a bag rated for the coldest night you plan. Ratings follow the EN 13537 / ISO 23537 test standard. |
| Sleeping pad | Spend | R-value for the season: about 2 for summer, 4 or more for autumn, around 6.5 for winter (two pads stacked). See sleep calculator. |
| Rain jacket | Spend | A real waterproof shell with taped seams, a hood that fits and pit zips. A thin shower jacket is not a rain jacket. |
| Footwear | Spend | Fit beats everything: try them on in the afternoon with your own socks – boots and foot care. |
| Headlamp | Spend moderately | Reliable switch, a low and a high mode, a red mode, a battery type you can replace. See headlamps and camp lighting. |
| First aid kit | Never skimp | Build it yourself from the list in first aid kit; cheap pre-packed kits often lack the useful parts. |
| Pot and bottle | Save | Plain stainless steel; a single-wall bottle that can sit in embers. A kitchen pot works. |
| Cord | Save | Plain cord from a hardware shop is fine for guylines; paracord-type cord is nice but not required. |
| Tarp | Save | A basic polyester tarp works; see choosing a tarp. Heavier and bulkier is the price of cheap. |
| Knife and saw | Save, within limits | Good steel in a simple shape is cheap; avoid hollow handles, loose tangs and decorative extras. See knives and saws. |
Why a cheap sleeping bag is a risk
Cheap bags often carry optimistic ratings, are filled with less insulation than the number suggests and are cut so loosely that cold air circulates inside. Choose by comfort rating (for a typical cold-sensitive sleeper) rather than limit rating, and always add a pad: you lose most heat into the ground. If the budget is tight, a lower-rated bag plus a warm layer, a hat and a better pad beats a single expensive bag on a thin mat. Details in the sleeping gear guide.
Buying second-hand outdoor gear: what to inspect
Used gear is the biggest saving available after skipping things. Look at second-hand shops, flea markets, club sales, online classifieds and the cupboards of friends and family; many people buy gear they use twice. The rule is: inspect it in daylight, bring the checklist, and walk away if you find structural damage. Always ask how the gear was stored and how often it was used.
The five inspection checks
 1Tent or tarp: seams, coating, smell
Open it fully. Peeling or sticky seam tape, a sticky or vinegar-smelling coating and mould spots mean the waterproofing is ageing. Check poles, zips and stitching at the tie-outs.
 2Sleeping bag: loft
Squeeze the bag flat and let go: it should spring back to full height. Flat, clumped or damp-smelling insulation is spent. Check zips, stains and repairs.
 3Knife: rust, handle, tang
Surface rust wipes off with fine abrasive and oil. Deep pits near the edge, a bent blade, a cracked handle or a wobbling tang mean skip.
 4Axe: head and handle
Wood should fill the eye with no gap. Look for straight grain, no cracks near the head and a poll that is not badly mushroomed. A handle can be replaced; a cracked head cannot.
 5Rucksack: zips, seams, straps
Run every zip, pull the shoulder straps and hip belt seams, snap each buckle and press the back and hip padding for crumbling foam. A pack with a good frame and worn fabric is fine; failing seams are not.
| Category | Inspect | Walk away if | Risk if you ignore it |
|---|---|---|---|
| Tent / tarp | Seam tape, coating, zips, pole sections, stitching at tie-outs, smell | Peeling tape, sticky coating, mould, bent or missing poles | Leaks in the first rain |
| Sleeping bag | Loft recovery, zips, stains, baffles, smell | Flat clumps, broken zip, damp smell | Cold night |
| Sleeping pad | Inflate and listen; leave it overnight; check valve | Slow leak, delaminated layers | Cold ground, bad sleep |
| Knife | Straight blade, tip, tang, handle cracks, sheath fit | Deep pits at the edge, wobble, cracks | Injury, broken tool |
| Axe | Eye fit, handle grain, cracks, mushroomed poll, bit | Loose head, cracked head, split handle at the eye | Head flying off |
| Rucksack | Zips, buckles, seams, straps, foam padding | Failing seams, crumbling foam, broken frame | Failure on the trail |
When in doubt, ask the seller to set the item up or pack it in front of you. Pay less for anything that needs repair, and add a small repair kit to what you buy.
Restoring old tools
Old knives and axes are often the best bargain, because the steel is good and the work is cleaning. Remove rust with oil and fine abrasive, re-profile the edge, replace a loose wedge or a bad handle and feed the wood; our guide to knife and axe care shows each step, and sharpening covers the edge. Do not grind away large amounts of steel or overheat a blade; and never use an axe with a cracked head.
Buy-used cautions
- Helmets, climbing gear and anything that protects from falls: not a bargain-hunting category, because hidden damage is invisible.
- Water filters and bladders: a used filter may be frozen, clogged or contaminated; buy new or replace the cartridge.
- Knives: check local knife law before you buy or carry.
A cleaned and re-proofed second-hand item is usually still a low or medium price class even when the new equivalent is high. Always wash, dry and test at home first, ideally in your garden overnight, before you rely on it in the woods.
Military surplus and DIY options
Surplus and home-made gear have a long tradition in bushcraft. They are robust and low-cost, but they are rarely light, and the condition varies widely. Treat them as tools with trade-offs rather than as automatic bargains.
Surplus: what usually works
- Wool blankets: heavy but warm, durable and still insulating when damp; they work as an extra layer in a sleep system or by the fire. Check for moth holes and musty smell.
- Ponchos: a poncho doubles as a rain layer and a small tarp. Check the coating, hood drawstring and grommets and tie the hood shut when you use it as a tarp.
- Bivvy bags and ground sheets: simple and useful; verify that seams and zips are intact.
- Rucksacks and canteens: tough, often with simple designs; expect more weight and a less comfortable fit than modern packs.
Surplus items are not automatically waterproof or warm enough. Test each item at home, and remember that some countries restrict the wearing or carrying of military-style items in public – check local rules.
Four low-cost swaps
 1Wool blanket as a warm layer
Fold it under and over you inside or beside a sleeping bag. It is heavy, so it suits car camps and short walk-ins, not long hikes. Replace it with a real bag when your budget grows.
 2Poncho as a tarp
Tie the hood shut, run a ridgeline through the grommets or tie-outs and peg the corners. Keep it low in wind; condensation forms on the underside, so ventilate.
 3Tin-can stove
A clean steel can with air holes burns twigs efficiently – see camp stoves for build and safe use. Coated cans give off fumes the first time you heat them, so burn the coating off outdoors, upwind.
 4Kitchen pot with a bail
A plain steel pot works over a fire if it has a metal handle or a wire bail. Plastic or rubber handles melt, so remove them or choose another pot. Non-stick coatings do not belong on a fire.
DIY options that save money
- Cordage and ridgelines: plain hardware-shop cord, or cord you braid yourself – see paracord for knots and uses.
- Stoves and cook sets: a tin-can stove and a steel pot; see cookware and cast iron if you cook at a base camp.
- Tool handles, pegs and hooks: carve them from wood; this saves money and teaches skill – see whittling projects.
Borrowing, renting and trekking sites with infrastructure
You do not have to own gear to use it. Borrowing and renting are the best way to test equipment before buying, and they are the right answer for items you will use only a few times a year.
Where to borrow or rent
- Friends and family: ask who owns a tent, a pad, a stove or a rucksack and offer a thank-you rather than a fee. Treat the gear well and return it clean and dry.
- Clubs and associations: hiking and mountaineering clubs, scout groups and outdoor societies often lend or rent equipment to members. In Germany, regional sections of the German Alpine Club (DAV) are a typical example.
- Rental shops: many outdoor shops rent tents, bags and packs by the weekend; ask for an inspection before you leave.
- Courses and guided trips: they often include or lend the heavy items, so you can test tarps, stoves and tools before buying them.
Trekking sites and shelters
Some regions offer designated trekking sites, open huts or trail shelters, sometimes with a fireplace, water source and toilet. In the UK, bothies are an example; in Scandinavia and parts of North America trail shelters are common; in Germany, several nature parks run official trekking sites. Rules, booking and fees differ, so check the local operator before you go. A site with infrastructure lets you leave the shelter, stove and some of the water gear at home, which is a quick way to cut the budget and the weight of your first overnight. For the legal side, see wild camping rules.
A good first-night plan is to rent or borrow the sleep system and shelter, wear what you own, bring a pot and a small stove and pick a site you can leave easily. After one or two nights you know what you actually missed – and that tells you what to buy.
Use what you already own
You probably own more bushcraft gear than you think. A sensible first kit starts with a look through your cupboards, and the Kit Builder lets you mark what you already have so only the missing items show up.

| At home | Works as | Watch out |
|---|---|---|
| Steel or enamel pot with a lid | Camp pot | Plastic handles melt; non-stick coatings are not for fires |
| Wool jumper, wool socks, fleece | Insulating layers | Pack a spare pair of socks and keep sleeping clothes dry |
| Winter hat and gloves | Heat-loss protection | Add a thin pair as a spare |
| Old rain jacket | Backup shell | Test it under a shower; old coatings fail |
| Torch or phone light | Emergency light only | Carry a headlamp so both hands stay free |
| Foam yoga mat | Sit mat or extra pad layer | Thin; not enough ground insulation by itself |
| Plastic bags and old drybag | Pack liners | Check for holes; line the pack, not only cover it |
| Cotton jeans and cotton T-shirt | Avoid next to skin in cold or wet | Cotton holds water and cools you; choose wool or synthetic base layers |
The cotton rule matters. Cotton dries slowly and, once wet, takes heat from your body. In warm, dry weather it is fine, but in cold or wet weather choose wool or synthetic layers next to the skin and keep a dry set for sleeping. The details are in bushcraft clothing. An old cotton bandana is still useful as a sun cloth and for filtering sediment, which is why it is one of the 10 C's.
Check the home items for rust, melting parts and missing pieces, pack them as if they were bought, and test them in the garden. If something works, you have saved a purchase; if it does not, you have learned that cheaply.
Weight versus cost: the trade-off
Lighter gear usually costs more. A cheap kit is heavier, and a light kit needs better materials. For bushcraft this trade-off is gentler than for ultralight hiking because your trips are short and your camp is often close to the car or a trail, so a few extra kilograms are acceptable.

If you want to lose weight on a budget, do it in this order:
- Leave things at home: duplicates, "just in case" items that you never used on the last three trips. This is free.
- Swap the heaviest low-risk items: a lighter pot, a smaller tarp or a simple ground sheet instead of a heavy one.
- Then upgrade the big three: the sleep system, the shelter and the pack are where weight and cost sit. A down bag saves 300–600 g compared with synthetic at the same rating, a tarp saves about 1 kg compared with a typical tent – at higher prices for the lighter option.
Weigh everything and enter it into the Kit Builder or a spreadsheet. The weight of each item shows where you gain the most per unit of money. The backpack guide explains why a heavy canvas pack can cost you more in comfort than it saves in budget.
What is never a budget item?
A few items are not for saving. This does not mean the most expensive version, but a version you have tested and trust.

Safety items that stay in the pack on every trip
- First aid kit you know how to use – what goes in
- Headlamp with a spare battery or a small power bank – lighting guide
- Map, compass and the skill to use them – navigation basics
- Two ways to make fire and prepared tinder – ferro rod and a lighter
- Water treatment: filter, tablets or the means to boil – water purification
- Rain jacket and a warm layer, even on day trips
- Whistle, charged phone and a trip plan left at home
These items weigh little, so there is no good reason to skip them. For a few of them, such as the headlamp or the filter, a medium price class is a sensible target; for the rest, a low-priced but tested version is fine. Test them at home: switch the lamp on, strike the ferro rod, run water through the filter, open the first aid kit and check the expiry dates.
Buy, borrow or make it? A decision guide
Use this block for each item on your list. It takes a minute and often saves the most expensive purchase of the year.
Buy, borrow or make it?
Does a failure endanger you (cold, wet, injury, getting lost)?
Yes → Buy it, new or carefully inspected used, and test it. Do not improvise.No → Continue with the next questions.Will you use it more than a few times a year?
Yes → Buy it, used if possible.No → Borrow or rent it.Can you make a safe, working version from things you own?
Yes → Make it (pot, cord, stove, stakes, sit mat).No → Buy a basic version in the low price class.Is it a tool with an edge?
Yes → Buy one good basic tool, or restore an old one; check the law.No → Skip it until a real trip proves you need it.
Plan your budget kit with the Kit Builder
The Kit Builder turns the budget idea into a concrete list. Choose trip length, season, shelter and water availability and it produces the complete list with weights, base weight, consumables and a suggested pack volume. Use it in three steps:
- Generate the list for your next real trip, not an imagined ideal trip.
- Tick off what you already own, can borrow or can make. The remainder is your shopping list.
- Sort the remainder by the buying pyramid and buy from the bottom up. Use the sleep calculator for the bag and pad, and the tarp planner for the tarp size and cord.
Before you buy anything
- Which problem does it solve on my next trip?
- Do I own it, can I borrow it or can I make it?
- Does it belong to the safety group (sleep, rain, fire, water, light, first aid)?
- Have I checked the weight and the pack volume?
- If used: have I inspected it with the category checklist?
- If new: can I return it, and have I tested it at home?
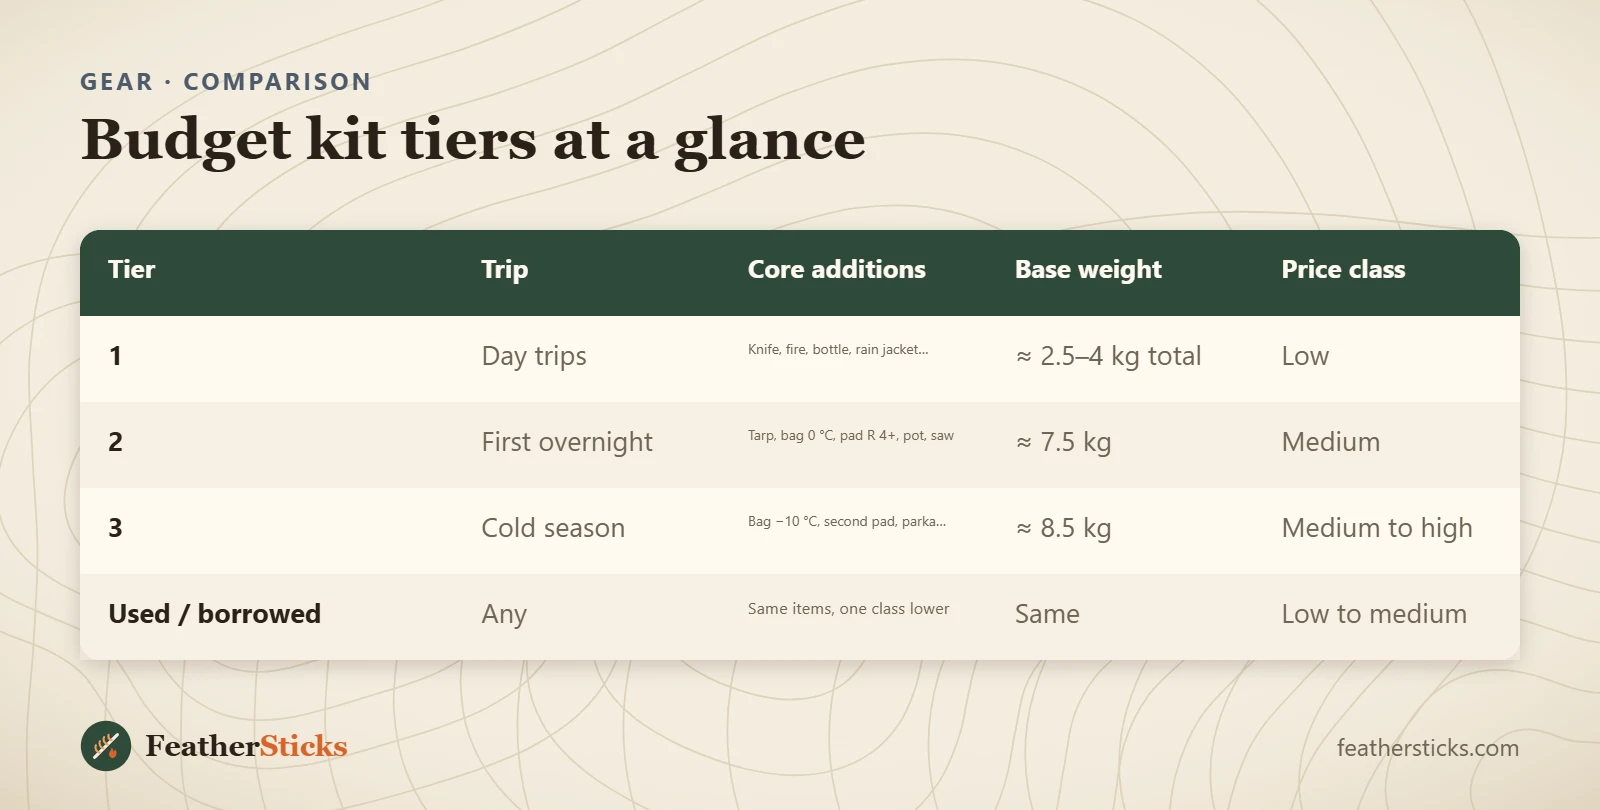
| Tier | Trip | Core additions | Base weight | Price class |
|---|---|---|---|---|
| 1 | Day trips | Knife, fire, bottle, rain jacket, headlamp, first aid | ≈ 2.5–4 kg total | Low |
| 2 | First overnight | Tarp, bag 0 °C, pad R 4+, pot, saw | ≈ 7.5 kg | Medium |
| 3 | Cold season | Bag −10 °C, second pad, parka, hatchet | ≈ 8.5 kg | Medium to high |
| Used / borrowed | Any | Same items, one class lower | Same | Low to medium |
Common mistakes
- Buying knives and gadgets before the sleeping bag, pad and rain jacket.
- Choosing a "survival set" instead of building a kit item by item.
- Buying a sleeping bag by its price and its limit rating instead of the comfort rating for your coldest night.
- Buying a huge knife that is heavy, hard to control and legally awkward.
- Trusting a very cheap ferro rod without testing it and carrying no lighter.
- Buying used gear without inspecting seams, loft, the axe eye or the zips.
- Buying the rucksack first, before you know how much volume the kit needs.
What you need
- Sleeping bag and pad matched to the coldest night
- Rain jacket and boots that fit
- Headlamp, first aid kit, map and compass
- Ferro rod, lighter and tinder
- One good fixed-blade knife and a folding saw
- Basic tarp, cord and steel pot
- Borrowed or used pack
Calculators for this topic
FAQ
What bushcraft gear should I buy first?
How can I start bushcraft with a small budget?
Is second-hand outdoor gear safe to buy?
What can I skip when buying bushcraft gear?
Where should I not save money on bushcraft gear?
Is military surplus good for bushcraft?
Can I use a poncho or wool blanket instead of a tarp and bag?
Is it better to rent or buy a tent for the first overnight?
Check yourself
Completed6 quick questions from this guide. Nothing is sent anywhere.
Related step-by-step guides
-
 1
-
 1
-
 1