Choosing a Tent: Types, Waterproofing, Weight and What Really Matters
To choose a tent, decide first how you travel (on foot, by bike, by car), how many people and how much gear must fit, and in which seasons you will use it. For most walkers a double-wall, three-season dome or tunnel tent for one or two people, weighing roughly 1–3 kg, is the sensible default. Everything else, from fabric to pole material, is a trade-off between weight, storm stability, ventilation and cost.
This camping tent buying guide compares the tent types, explains numbers such as hydrostatic head in plain language, and shows how pitching, ventilation and care matter more than any single specification. If you are still weighing up a roof, read tent vs tarp vs hammock and our tarp guide too. Part of our gear guides.
Step by step
-
1

Match the type to your trip
Dome for all-round use, tunnel for space per weight, pyramid or pole shelters for light packing, hot tents for winter base camps.
-
2

Read the waterproofing numbers
Fly about 1,500–3,000 mm and floor about 3,000–5,000 mm are typical, but seams and pitching matter more than the figure.
-
3

Check weight and packed size
Solo tents typically weigh 1–2 kg, two-person tents 1.5–3 kg. Compare per person, not just the total.
-
4

Think season and wind
Three-season tents suit spring to autumn; pitch the low, stiff end into the wind and use every guyline.
-
5

Plan ventilation
A double wall with vents high and a gap low lets moist air leave and keeps condensation off your bag.
-
6

Dry it, store it loose
Dry the tent fully after every trip and store it loosely in a large sack to protect coatings and seams.
How to choose a tent: start with the trip, not the tent
Most poor tent purchases start with a feature list instead of a use case. A tent that is perfect for a car-camping weekend with the family is a burden on a three-day walk, and an ultralight shelter that shines on a dry ridge becomes frustrating in a wet forest with insects. Before you compare fabrics and pole diameters, answer five questions.
- How do you travel? On foot every gram counts; by bike or kayak packed size matters; by car comfort and head room win.
- How many people? Count people plus gear. A "two-person" tent is a snug fit for two people and nothing else.
- Which seasons? Spring to autumn needs a three-season design; real snow and storms need something stronger.
- What terrain and weather? Open moorland and mountains demand wind stability; sheltered forest allows lighter, simpler designs.
- How much patience do you have? A freestanding dome pitches in minutes; a trekking-pole shelter rewards practice but saves weight.
Write the answers down, then look at the types below. If your answers point to a pitch that rarely happens in your terrain, the tent will disappoint, however good the specification is.

Tent types compared: dome, tunnel, geodesic, pyramid and more
Shape decides how a tent handles wind, how much usable space you get per kilogram and how easy it is to pitch. The table summarises the main families; the notes below add the details that matter when you stand in a field with the bag in your hands.
| Type | Strengths | Weaknesses | Typical use |
|---|---|---|---|
| Dome | Freestanding, quick to pitch, good in wind from any side, easy to move | Less space per kg than a tunnel; two crossing poles flex in strong gusts | All-round trips, beginners, mixed ground |
| Tunnel | Most living space per weight, large vestibule, poles are light | Needs pegs and guylines, must face the wind, weak when pitched side-on | Walking trips, families, rain-prone regions |
| Geodesic / semi-geodesic | Very stable, sheds snow and wind, stands freestanding | Heavier, more poles, more cost, less ventilation if fully closed | Mountains, winter, exposed ground |
| Single-pole, pyramid, tipi | Light, quick, tall interior, one pole and pegs | Often no floor, needs a good pitch, needs pegging out in firm soil | Light packing, group shelters, cold-weather base camps |
| Trekking-pole shelter | Lowest weight, small pack size, uses poles you already carry | Needs pegs, skill and a soft enough surface; single wall means condensation | Experienced lightweight walkers |
| Bivvy tent (hooped bivvy) | Very small, quick, low profile in wind | Tight, little room to sit up, condensation in damp air | Solo minimalist nights, fast-and-light trips |
| Hot tent / cotton tent for a stove | Allows heating and drying in cold weather, spacious | Heavy, needs a safe stove set-up, carbon-monoxide and fire risk | Winter base camps, hunting and trapping camps, car-supported trips |
Weights and sizes vary widely by fabric and design; always compare per person and per pitch.
Dome tents: the all-round default
A dome tent is held up by two or more crossing poles that bend into an arch. Because the poles carry the structure, the tent usually stands on its own, even on rock or a platform where pegs will not go in. That makes it forgiving for beginners and easy to shift a few metres if you pitched in the wrong spot. Domes give the best stability from changing wind directions, but their rounded sides cost headroom in the corners.
Tunnel tents: space for the weight
Tunnel tents use two to four parallel hoops. They offer the most living area and the largest vestibule for each kilogram, which is why they are popular on walking trips. The catch is that they rely on guylines: without tension, the hoops flex sideways. Pitch the low end into the wind, peg every guyline and the tent becomes very strong end-on; pitch it broadside and it flaps and may collapse.
Geodesic and semi-geodesic tents
Poles that cross several times form a self-bracing frame. These tents are the choice for exposed ground and winter conditions because the load is shared across the structure. The price is more weight, a more complex pitch and often a design that is warm but less ventilated.
Single-pole, pyramid and tipi shelters
One central pole (or two poles in a hoop) holds a cone or pyramid of fabric. They are light, quick to pitch and tall inside, so you can sit up or even stand. Many have no sewn-in floor, which saves weight and lets you cook near the door but allows insects and draughts in unless a separate inner is used. They need pegs around the whole perimeter and a flat, peg-friendly surface. Tipis, lavvus and the Kohte get their own guide: tipi and lavvu tents.
Trekking-pole shelters
These use your walking poles instead of dedicated poles and are among the lightest enclosed shelters. They are also single wall in most designs, so condensation is a regular companion, and the pitch needs practice and good peg placement. Treat them as an upgrade for experienced walkers, not a first tent.
Bivvy tents
A hooped bivvy is a low, one-person shelter with a single bendy pole. It protects better than a bivvy bag but gives little space to sit up. It suits solo nights, short stops and minimalist trips.
Hot tents and cotton tents for stoves
Hot tents are built with a stove jack, a fire-resistant panel where a stove pipe passes through the wall. They allow heating and drying on cold winter trips. They are heavy, often pitched with a central pole or frame, and they demand a careful approach: a stove in a tent is a fire hazard and a carbon-monoxide hazard. Use only a stove designed for it, keep fabric well away from hot surfaces, never sleep with a burning stove, ventilate continuously and carry a carbon-monoxide alarm. Cotton and polycotton are spark-resistant, not fireproof. For cooking in and around tents, read camp stoves explained and fire safety first.
Hydrostatic head explained: what does a tent's water column mean?
Hydrostatic head (in German Wassersäule) is a lab measure of how waterproof a fabric is. A tube is placed on the fabric and filled with water; the head is the height of water in millimetres that the fabric resists before water starts to pass through. A rating of 1,500 mm means the fabric held back a 1.5 m column of water. More millimetres means a tighter coating, but it is only one factor in whether you stay dry.

Typical ranges (not guarantees)
The following figures are commonly quoted for three-season tents. They are typical, not official classes, and makers measure in different ways.
| Part | Typical range | What it means in practice |
|---|---|---|
| Fly (roof) | About 1,500–3,000 mm | Enough for sustained rain when the fabric is new and tensioned; rain is rarely the problem if the seams are good |
| Floor | About 3,000–5,000 mm and more | Needs more because your weight pushes water through from wet ground |
| Very light shelter fabrics | Sometimes lower or non-measured | Often rely on coatings and shape; seams and pitch matter even more |
| Budget tents | Often at the low end or less | Fine for fair weather; check seams and re-seal if needed |
These are typical values, not guarantees. Manufacturers measure differently, and coatings age.
Why the number is only half the story
- Seams. Needle holes let water in unless the seams are taped or sealed. A tent with a very high head and untaped seams leaks; one with a moderate head and good tape stays dry.
- Pitching. A slack fly flaps, wets through at contact points and lets the inner touch the outer. Tension helps shed water.
- Condensation. Many "leaks" are condensation. Breathe, cook or dry clothes inside a closed tent and moisture collects on the inside of the fly. See the ventilation section below.
- Wear. Coatings degrade with UV, abrasion, folding and dirt. A ten-year-old tent with a high original rating is not as waterproof as a new one.
- Pressure points. Knees, elbows and wet ground push water through a floor; use a groundsheet and keep sleeping gear on a pad.
In practice: look for a fly in the typical range, a floor above it, taped seams and a design with good ventilation. Then pitch it tight.
Tent fabrics: polyester, nylon, coatings and cotton
The fabric shapes weight, strength, stretch, UV resistance and how the tent behaves in rain. There is no best material, only the best match for your use.
| Fabric | Pros | Cons | Notes |
|---|---|---|---|
| Polyester (PU-coated) | Low stretch, good UV resistance, stays taut when wet, moderate weight | Slightly heavier than nylon for the same strength | Common choice for fly sheets |
| Nylon (PU-coated) | Strong for its weight, light, supple | Stretches and sags when wet, weaker in UV, needs re-tensioning in rain | Often used in floors and light tents |
| Silicone-coated (silnylon, silpoly) | Very light, sheds water well, strong | Slippery seams (sealing is trickier), cannot be taped, sags when wet if nylon | Lightweight tents and shelters |
| PU-coated vs. other coatings | PU is cheap and can be taped | Coating degrades with age and humidity (it can turn sticky) | Re-coating is possible; see care |
| Cotton / polycotton (canvas) | Breathable, quieter, spark-resistant, warm feel | Heavy, absorbs water, slow to dry, needs care against mildew | Used in hot tents and base camp tents |
Sag, UV and weight
Nylon absorbs a little water and loosens: a tent pitched tight in the evening may sag by morning. Polyester stays tauter. UV light weakens all synthetic fabrics over time, nylon more than polyester. Therefore a tent left up for weeks in strong sun ages quickly. Weight differences between fabrics are real but small compared with differences in design: a tunnel tent in a heavier fabric can still be lighter than a dome of the same size.
Cotton and polycotton
Cotton breathes, which reduces condensation, and it tolerates stray sparks better than nylon or polyester. It is also heavy, soaks up rain and needs time to dry. Store it dry; mildew ruins it. Sparks can still burn through it. No tent fabric is fireproof. Keep open fires well away from any tent, keep stoves outside or in the places your tent is designed for, and never light a fire in or beside a closed tent. Follow our fire safety guide and your local fire rules.
Single wall vs double wall: how a tent keeps you dry
A double-wall tent has a breathable inner tent and a waterproof fly with an air gap between them. Moisture from breath and sleeping bags passes through the inner and condenses on the cool fly, away from you. A single-wall tent has one layer; it is lighter and quicker, but moisture collects on the inside, and you must manage it with vents and fabrics.

Double wall vs single wall
Double wall
- Less condensation on you and your bag
- Inner can be mesh for summer ventilation
- Slightly heavier, more fabric
- Pitching order matters in rain
Single wall
- Lighter and quicker to pitch
- Fewer parts to lose or dry
- Condensation on the inside, needs careful venting
- Better in dry or cold air than in humid forests
Inner first, fly first, or pitched together?
The pitching order is a design feature. Check it before you buy, especially if you camp in rain.
- Inner first: the inner goes up, then the fly over it. Quick in dry weather, but the inner may get wet in rain.
- Fly first: the fly goes up with the inner clipped on from below. Keeps the inner dry; ideal for rain.
- Pitched together: inner and fly are attached and go up in one go. Very convenient in rain and in the dark; heavier and harder to dry if one part is wet.
For more on setting up in wet weather, see camping in the rain and the sequence below.
Pitching a tent in rain: the order that keeps the inside dry
 1Choose a raised, free-draining spot
Look for ground a hand's height above its surroundings, not a hollow where water gathers. Check for dead branches above and read choosing a camp site.
 2Lay the footprint, door away from the wind
Spread the groundsheet or footprint, tuck its edges under the tent floor so rain cannot run beneath, and peg the corners. Aim the door away from the wind.
 3Fly first if your tent allows it
Put the fly up first and clip the inner under it. If your tent pitches inner first, work fast and keep the inner door closed. Never leave the inner open to the rain.
 4Peg out and tension the guylines
Pull each guyline away from the tent at about 45° and peg it. Even tension keeps the fly off the inner and sheds water cleanly. Re-check after the first rain; nylon stretches.
 5Keep wet gear in the vestibule
Boots, packs and wet clothing stay in the porch; sleeping gear goes in dry. Shake water off before you enter.
Vestibules, ventilation and condensation
A sleeping person breathes out moisture, and wet gear adds more. When that warm, damp air meets a cold fly it condenses, then drips or wets the inner. Condensation is physics, not a defect, and no tent is immune. You can reduce it:
- Pitch away from the lowest, dampest ground and out of cold air pools near water.
- Open vents high and keep a gap low, so air flows through.
- Keep the fly clear of the inner and peg it taut.
- Cook outside or in the vestibule only if the design is made for it and with good ventilation; never in a closed tent.
- Do not dry wet clothes inside your sleeping area.
- Wipe the inside of the fly with a small cloth in the morning, and pack the wet tent away from your dry gear.
Vestibules
The vestibule is the covered porch between the inner door and the outside world. It stores packs and boots, gives a place to take off wet gear and, in some designs, a sheltered spot for cooking with a stove, with enough ventilation and distance from fabric. Bigger is not always better: a large vestibule adds weight and catches wind. Think about whether you need space for gear or for sitting out a rainy afternoon. See camp stoves for safe stove practice and bivouac and bivvy options for tighter alternatives.
Mesh and winter
Inners with a lot of mesh are cooler and better in summer. In cold weather they let heat escape; some tents offer solid inner panels or closable vents. Winter tents trade ventilation for warmth, which is why careful venting remains important to avoid frost forming inside.
Poles, pegs and guylines
Pole materials
- Aluminium: strong, light, springy and bendable back to shape. The default for good tents. Check the pole is a good diameter and has smooth joints.
- Fibreglass: cheap and flexible, but heavier and prone to splintering. Fine for fair-weather and budget tents, not for storm use.
- Carbon: very light and stiff, but can snap under sudden loads and is costly. Not a first choice for beginners.
A pole repair sleeve and a spare section of cord weigh almost nothing. See building a repair kit.
Pegs
Bundled pegs are often thin and bend in hard soil. Match pegs to the ground: long, grippy pegs for soft soil and sand, short sturdy ones for hard or stony ground. Carry a few spares. If you lose one, you can carve a replacement from a straight hardwood stick: see whittling basics for a safe approach.
Guylines and knots
Good tents come with reflective guylines and tensioners. Learn the taut-line hitch so you can adjust without slipping, and pitch every guyline, not just the obvious ones. The extra tension makes a bigger difference to storm stability than the pole material.
How much should a tent weigh? Weight and packed size per person
A tent is usually the heaviest single item in the pack, apart from the pack itself and your sleeping system. Comparing tents by total weight alone can mislead: a two-person tent that weighs 2.4 kg is 1.2 kg per person if two share it, but 2.4 kg if you carry it alone. Share the tent, carry the poles and fly separately and the load per person drops.
| Capacity | Typical weight | Per person (if shared) | Notes |
|---|---|---|---|
| 1 person | 1–2 kg | 1–2 kg | Compact; little room for gear |
| 2 people | 1.5–3 kg | 0.8–1.5 kg | Best weight per person |
| 3–4 people | 3–5 kg | 0.8–1.7 kg | Family or group tent, bulkier |
| Hot / cotton tents | Several kilograms and more | Varies | Stove, pipe and poles add more |
The Kit Builder uses about 1.8 kg for a 1–2 person tent. See the bushcraft kit list for how that fits into a total pack weight.
Packed size matters too: a tent that fits inside the pack saves hanging gear on the outside. Compressing it too tightly damages coatings; see the care section. If weight is a constant worry, consider whether a tarp or hammock would do the job; the comparison later in this article helps you decide.
Three-season vs four-season tents and wind stability
A three-season tent is built for spring, summer and autumn: good ventilation, moderate wind and rain, light snow at most. A four-season tent (or mountain tent) uses stronger poles, more of them, and less mesh to cope with wind and snow load. It is heavier and can feel stuffy in summer. For most trips in temperate regions, a good three-season tent with solid pitching technique is enough.

Wind stability checklist
- Pitch the low, narrow end toward the wind. Most designs are strongest from that direction.
- Use every guyline and peg, with pegs angled away from the tent at about 45°.
- Pitch the fly taut. A loose fly flaps and tires fabric and seams.
- Choose a sheltered site: trees, a hedge or a hollow of ground reduces wind, but beware widow-makers, branches and cold air pools. See site selection.
- In sudden storms, lower the tent profile or take it down (more in camping in strong wind); no fabric beats a bad site.
Snow
Snow load can collapse a tent. Shake it off at night and clear it before it builds up. In heavy winter conditions use a purpose-built tent and read winter camping.
Capacity, head room and the groundsheet
Tent capacity is how many sleeping mats fit side by side, not how many people are comfortable. Add gear space: a pack, boots, wet clothes and cooking equipment need room in the vestibule or inside. For comfort, many people choose a tent rated for one person more than they are. That adds some weight but leaves a margin for bad weather days.
- Length: check the inner length against your height plus your sleeping bag hood.
- Head room: a dome has the highest point in the middle; a tunnel is tallest at the head end. If you like to sit up and read, stand in the shop and check.
- Doors: two doors and two vestibules help couples; one door is lighter.
- Inner pockets and loops: small but useful for keeping a headlamp and phone in the same place.
Footprint and groundsheet
A separate groundsheet protects the floor from stones and sticks, and from wet ground. Cut it slightly smaller than the tent floor so water does not run between them; if it sticks out, rain can collect under the floor. Heavy-duty tent floors already resist wear; a thin footprint adds protection and keeps the underside clean. See sleeping gear for pads that insulate from the ground.
Where can you pitch a tent? Campsites and wild-camping rules
Rules about where you may pitch a tent depend on the country, region and land owner. In many places you may camp only on campsites. Elsewhere there are exceptions for short stays, hiking trips or specific areas, and some countries have broad access rights. Nature reserves, drinking-water protection zones and forests often have extra restrictions. This is not legal advice: always check the current local rules and ask the land owner when in doubt.
- Read wild camping rules and ethics for the principles of leave-no-trace, low impact and respect.
- Pitch away from paths, water sources and animal trails; leave the site as you found it.
- Check fire rules and fire danger before you light anything, and never cook or burn near a tent. See fire safety.
- Choose your spot with care: look up for dead branches and down for drainage. See site selection.
Buying a tent second-hand: a checklist
A used tent can be an excellent buy, especially if you are on a budget. The risks are age-related: coatings degrade, seams fail and poles weaken even when the tent looks fine. If you can, ask to see it pitched. If not, inspect it carefully and ask when and how it was used and stored. For more on stretching a budget, read building a budget kit.
Four quick checks before you buy a used tent
 1Seams and seam tape
Turn the fly inside out and inspect the tape. Peeling, flaking or sticky tape means a re-seal or a pass.
 2Poles and sleeves
Run the poles through your hands: they should be straight, with no cracks or splinters, and the shock cord should pull them together with tension. Check for bent sections.
 3Zips and fasteners
Run every zip both ways. Missing or stiff teeth, bent sliders and broken toggles are repairable but cost time.
 4Smell and coating
A musty smell means mildew; a sticky or tacky coating means the PU is breaking down. Both are reasons to walk away, or to negotiate hard.
Second-hand tent checklist
- Pitched at least once and inspected in daylight
- All poles, pegs, guylines and the stuff sack included
- No holes, tears, burn marks or melted spots
- Seam tape intact and not peeling
- Floor free of sticky, flaking or cracked coating
- Zips run smoothly
- No mildew smell or staining
- Spare parts available or repair possible (see repair kit)
Tent care: drying, storing, cleaning and seam sealing
A tent that is cared for lasts years longer. Most damage comes from three things: storing it wet, sunlight and rough handling. The routine is simple.
Care routine after a trip
 1Shake out dirt and needles
Open the doors, turn the tent over and shake out grit, needles and sand. Grit wears fabric and zips when packed inside the tent.
 2Dry fully, preferably in the shade
Hang it on a line or drape it indoors. Strong sun for long periods speeds up UV damage, so shade is best. Dry the floor too.
 3Store loose in a large sack
Do not leave it compressed for months: coatings crease and crack. Use a big sack or a breathable bag in a dry, cool place.
 4Seal seams when needed
On a dry, clean tent, apply seam sealer in thin coats to the seams that need it and let it cure fully before packing. Use a sealer that suits the coating; see repair kit.
Cleaning
Use lukewarm water and a soft sponge. Avoid detergents, machine washing and tumble drying; they strip coatings. Rinse well and dry thoroughly. Treat tree sap or bird droppings promptly; they stain and degrade fabric.
UV and age
UV is the silent killer. A tent left pitched for weeks in strong sun may lose strength, especially nylon. Keep it in the shade when possible and do not leave it pitched when you are away.
Small repairs
Patch holes with tape or patches made for tents, carry spare pole sleeves and a few metres of cord. Larger problems are best solved before the trip; see repair kit.
Which tent for me? A simple decision guide
Which tent fits you?
Is most of your camping by car, with comfort a priority?
Yes → A roomy dome or tunnel tent with a large vestibule. Weight matters less; space and head room matter more.No → Go on to the next question.Do you walk long distances and care about each kilogram?
Yes → A light tunnel or small dome for one or two people, or a trekking-pole shelter if you are experienced.No → Go on to the next question.Do you camp in exposed mountains or in snow?
Yes → A geodesic or four-season tent with strong poles.No → Go on to the next question.Do you winter-camp with a stove and want warmth?
Yes → A hot tent made for stoves, with strict stove and carbon-monoxide precautions.No → A freestanding double-wall three-season dome is a safe, flexible default.
If you are on a budget, buy the best seams, poles and ventilation you can afford, in that order; coating numbers and fancy features come last. Also consider the price class for your use: budget tents suit occasional fair-weather trips, mid-range tents suit regular use, and premium tents suit demanding or long-term use.
Tent vs tarp vs hammock
A tent is not the only way to sleep outdoors. A tarp is lighter and more versatile, a hammock suits forests with good trees, and a bivvy is minimal. A tent wins in open ground without trees, where insects are a problem and when you want a closed space for a family. The full comparison is in tent vs tarp vs hammock.
| Tent | Tarp | Hammock | |
|---|---|---|---|
| Weight | Higher | Lowest | Medium |
| Wind protection | Good | Depends on pitch | Needs tarp |
| Insect protection | Very good | None unless added | Bug net possible |
| Needs trees | No | Helps, poles possible | Yes |
| Skill needed | Low | Medium to high | Medium |
| Condensation | Common | Low | Low |
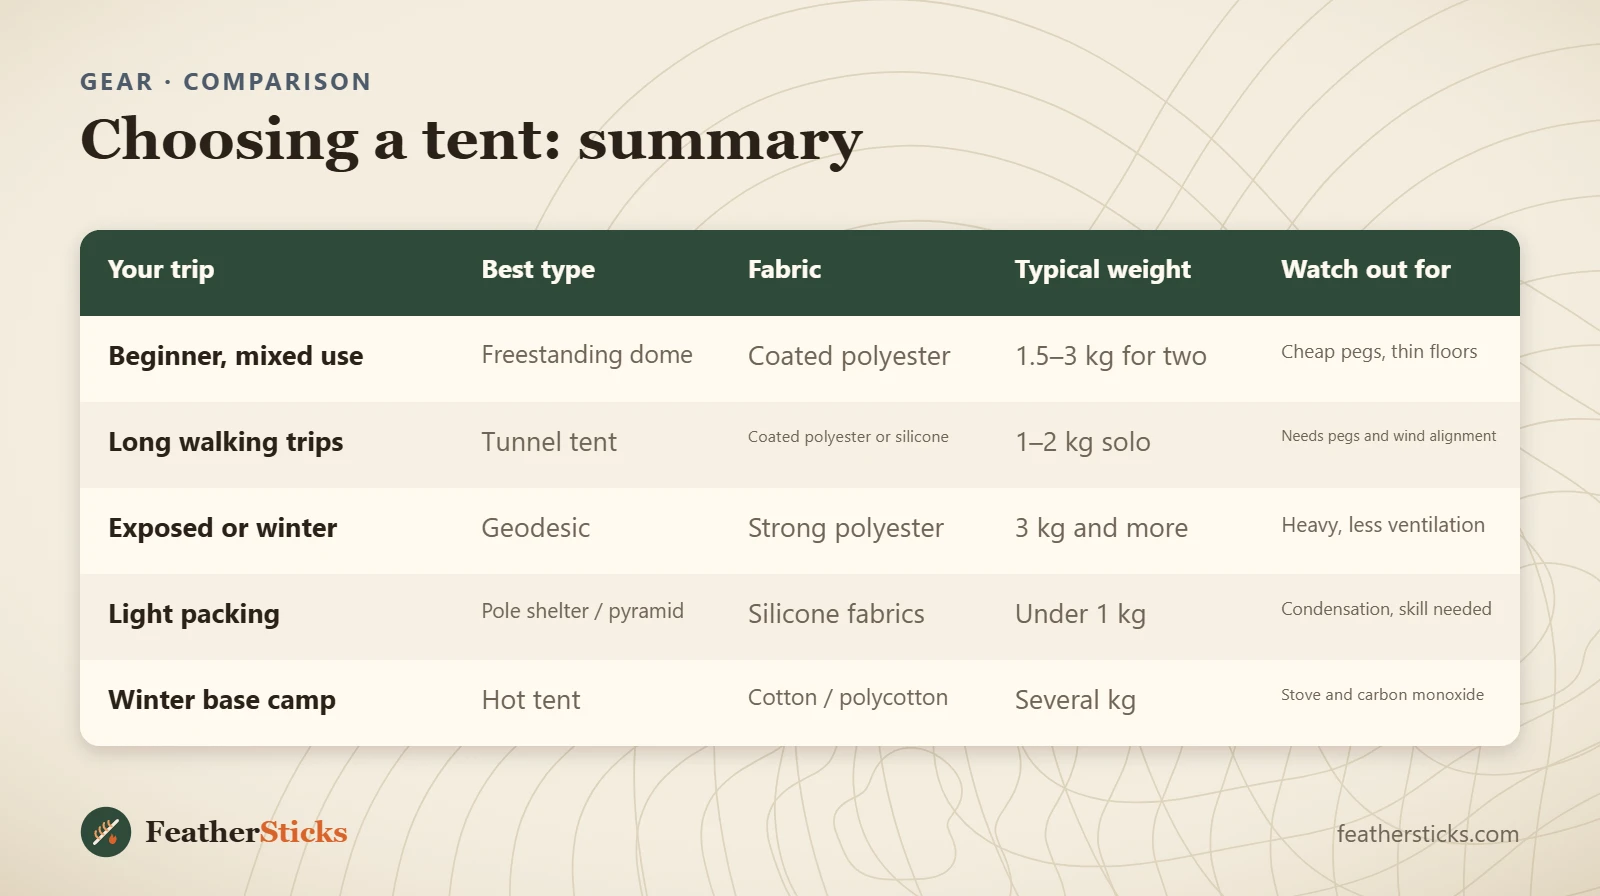
| Your trip | Best type | Fabric | Typical weight | Watch out for |
|---|---|---|---|---|
| Beginner, mixed use | Freestanding dome | Coated polyester | 1.5–3 kg for two | Cheap pegs, thin floors |
| Long walking trips | Tunnel tent | Coated polyester or silicone | 1–2 kg solo | Needs pegs and wind alignment |
| Exposed or winter | Geodesic | Strong polyester | 3 kg and more | Heavy, less ventilation |
| Light packing | Pole shelter / pyramid | Silicone fabrics | Under 1 kg | Condensation, skill needed |
| Winter base camp | Hot tent | Cotton / polycotton | Several kg | Stove and carbon monoxide |
Common mistakes
- Buying on a single number such as hydrostatic head while ignoring seams, ventilation and pitch.
- Choosing a tent for the exact number of people with no room for gear.
- Pitching a tunnel tent broadside to the wind or leaving guylines unused.
- Using a stove or open flame inside a closed tent: fire and carbon-monoxide risk.
- Storing a damp tent, or compressing it for months, which ruins coatings.
- Pitching in a hollow where water and cold air collect.
- Ignoring second-hand warning signs such as sticky coatings or peeling seam tape.
What you need
- Tent with fly, inner, poles and pegs
- Groundsheet slightly smaller than the floor
- Extra pegs for the ground you expect
- Pole repair sleeve and a few metres of cord
- Seam sealer and tent repair patches
- Large, breathable storage sack
- Small cloth for wiping condensation
- Carbon-monoxide alarm if you use a stove in a hot tent
FAQ
How do I choose a tent?
Is a tunnel tent or a dome tent better?
What does hydrostatic head mean for a tent?
Is a higher hydrostatic head always better?
How much should a tent weigh per person?
What is the difference between a 3-season and a 4-season tent?
Can I use a stove in a tent?
How do I stop condensation in my tent?
Check yourself
Completed6 quick questions from this guide. Nothing is sent anywhere.
Related step-by-step guides
-
 1
-
 1
-
 1