Whittling Projects for Beginners: Eight Bushcraft Carving Projects for Camp
Whittling projects for beginners work best when every piece is something you will use at camp the same day: a tent peg, a pot hanger, a toggle, a spatula, a roasting stick. Each one is small, takes between ten minutes and two hours, and trains one or two cuts that the next project needs. Together they are the practice route from your first notch to a carved spoon.
This guide gives you eight bushcraft carving projects with wood, size, time and illustrated steps, plus the shared basics: green or dry wood, grain, stop cuts, splitting and a sharp knife. The grips themselves are taught in wood carving for beginners; when you are ready for a bowl, continue with carving a spoon. New to bushcraft? Start at bushcraft for beginners or browse all bushcraft skills.
Step by step
-
1

Get green wood, with permission
Use hazel, willow or birch from prunings or windfall, with the owner's permission. Never cut living trees for carving without it.
-
2

Clear your blood circle
Sit down and check that nobody is within arm plus blade length. Work beside your knee, never over your thigh.
-
3

Carve a try stick first
Practise a stop cut with ramp, a V-notch, a square notch and a hook notch on one stick before any project.
-
4

Make a peg and a pot hook
The tent peg trains points and ramp notches, the pot hook adds a fork and adjustable notches.
-
5

Add toggle, spatula, skewer, tongs
Each small tool adds one skill: grooves, thinning, food-safe wood and thin even tapers.
-
6

Test under load
Hang an empty pot on the hook, drive the peg, pull the toggle. Fix weak spots before you rely on them.
Which whittling projects should a beginner start with?
Start with the projects that teach the cuts every later project reuses. A tent peg needs only a point and one notch. A pot hanger adds a fork and several notches. A toggle teaches a groove around a round piece. A spatula teaches thinning, which is the hardest part of a spoon. Work through them in order and the first spoon will feel like a small step, not a leap.
The numbers below are typical sizes for adults and a sharp knife. They are starting points, not rules: adjust length and thickness to your gear.
| # | Project | Difficulty | Time | Tools | Wood |
|---|---|---|---|---|---|
| 1 | Tent peg with a notch | Easy | 10–20 min | Knife, saw | Green hazel, birch or ash, 20–25 cm × 2–3 cm |
| 2 | Pot hanger (adjustable) | Easy–medium | 30–60 min | Knife, saw | Forked green hardwood, 40–60 cm |
| 3 | Toggle | Easy | 10–15 min | Knife, saw | Straight hardwood, 6–8 cm × 1.5 cm |
| 4 | Spatula / butter spreader | Medium | 1–2 h | Knife, saw, baton | Split birch, sycamore or cherry, 20–25 cm |
| 5 | Try stick | Easy | 45–90 min | Knife | Green hazel or willow, 30–40 cm × 2–3 cm |
| 6 | Tongs | Medium | 30–60 min | Knife, saw | Split green hazel, birch or sycamore |
| 7 | Cooking skewer / roasting stick | Easy | 10–15 min | Knife | Hazel, willow or birch, 60–80 cm × about 1 cm |
| 8 | Tent-peg mallet | Medium | 1–2 h | Knife, saw, axe | Dense hardwood log, dry and sound |

Wood, grain and knife: the basics behind every project
Green or dry wood?
Fresh green wood is soft and carves with little force, so it is safer and kinder to your edge. Choose it for the spatula, tongs, toggle and skewer. Dry, sound wood is harder but does not shrink afterwards, which suits a mallet head or a toggle that must keep its size. Rotten wood that crumbles is never suitable. The full comparison of species is in the carving guide; for identifying what you hold, see tree identification and wood types.
Reading the grain
Wood fibres run along the stick like straws. Cut so that the edge exits out of the fibres ahead of it ("downhill") and the shaving lifts cleanly; cut the other way and the blade dives in and tears out. If a cut starts to dig, turn the piece round. Thin shavings are always better than thick ones.
Stop cuts: the cut that makes every notch
A stop cut is a cut across the grain that marks where a shaving must end. You can press it with the knife and rock the edge, or saw it with a small folding saw, which is faster and straighter on thick pieces. Then take a sloping cut towards it from 2–3 cm away: the chip comes free at the stop cut, and the split cannot run past it. Every notch in this guide is a stop cut plus a slope.
Splitting and rough shaping
For boards (spatula) and thick blanks you split first. A knife and a wooden baton do this for pieces up to about 10 cm; see batoning. A hatchet is faster for bigger logs; see axes. Always remove the pith, the soft centre, from a blank, or it cracks as it dries.
A sharp knife is a safe knife
A dull knife needs force, and force is what turns a slip into an injury. Strop it before each session and every 20–30 minutes while carving; the routine is described in sharpening a knife and tool care. A sharp knife also leaves clean, shiny surfaces, so you can see at once which cuts went well.
| Project | Better wood | Why |
|---|---|---|
| Tent peg | Green hardwood, or dry sound wood | Green is easy to point; dry will not shrink in the soil much |
| Pot hanger | Green hardwood | Green wood chars slowly near heat; thin dry sticks can burn through |
| Toggle | Dry or green, dense | Dry keeps its size and the groove stays tight |
| Spatula | Green, split birch, sycamore or cherry | Easy thinning; dry slowly afterwards |
| Tongs | Green, supple hazel or birch | Green wood bends without breaking |
| Skewer | Green hazel, willow or birch | Mild taste, moisture slows scorching |
| Mallet | Dry, dense hardwood | Hard, heavy head lasts longer |
Project 5: the try stick with every notch type
Although it is number five in the table, the try stick comes first in practice. It is a straight green stick of 30–40 cm and 2–3 cm thickness on which you carve each notch once. It costs nothing, takes 45–90 minutes, and shows you which cuts tear and which come clean. The grips are in the carving guide; here the focus is on the notches themselves.

| Notch | How to cut it | Used for |
|---|---|---|
| Stop cut + ramp | Stop cut across the grain, then a sloping cut into it from 2–3 cm away; depth up to a third of the diameter | Tent peg, pot hanger, anything a cord should sit in |
| V-notch | Two angled cuts meeting in a V, deepened a little at a time | Cord seats, splitting guides, decoration |
| Square notch | Two stop cuts about 2 cm apart, waste removed in thin layers | Joints, holding a crossbar |
| Pot-hook notch | Like the ramp notch, but the stop side slightly undercut so a line cannot slip out | Adjustable pot hanger |
What a good try stick looks like
- Stop cuts are straight lines, not ragged grooves.
- Notch walls are flat and shiny, and the bottom is clean with no hanging fibres.
- The point has three or four even facets meeting in one tip.
If a notch tore out, you probably cut uphill or took too thick a shaving. Turn the stick and cut the other way. Keep the stick: it shows your progress and is a handy measure.
Project 1: how to carve a tent peg (with a notch)
The wooden tent peg is the classic first project. Saw thumb-thick green hazel, birch or ash to 20–25 cm. Chamfer the top so it does not split when struck. Carve a point of 5–6 cm with three or four flat facets: a long thin point breaks in stony soil. About 3–5 cm below the top, cut a ramp notch to about a third of the diameter. Seat the guy line in the notch under the flat shoulder, so it cannot ride up.
Carving a tent peg, cut by cut
 1Carve the point
Hold the head, cut away from you towards the tip. Aim for three or four flat facets over 5–6 cm. The blade always ends in the air beside the stick.
 2Stop cut
Press the edge straight across the grain 3–5 cm below the head and rock it, or saw in. Keep the cut shallow at first; you will deepen it from both sides.
 3Ramp notch
Slope thin cuts into the stop cut from 2–3 cm away, deepening both in turns to about a third of the diameter. Never lever the chip out; it can split the peg.
 4Drive it
Strike the head with a baton, leaning the peg away from the pull of the line, at roughly 45°. Seat the line in the notch.
Drive wooden pegs with a baton, a log or a carved mallet (project 8), never with the back of an axe. Pegs for a tarp shelter hold best in damp soil; in sand or snow, bury a longer peg or use a stick as a deadman. Hard, stony ground splits wooden pegs, so carry a few spare.
Project 2: carving a pot hanger (adjustable pot hook)
A pot hanger holds a billy over the fire at a height you can change. It is a forked green stick of 40–60 cm with the side branch cut to a hook of 4–6 cm, and two or three ramp notches along the stick so it can hang from a crossbar or tripod line at different heights. Use green hardwood: a thin dry stick close to the flames can burn through. Fire height and cooking set-ups are in campfire cooking, the place for the flames in building a fire pit, suitable pots in bushcraft cookware.
Making a pot hook
 1Choose a fork
Find a green hardwood stick of 40–60 cm with a side branch at a sharp angle. The branch should leave the stick upwards when the stick hangs down.
 2Cut the branch back
Saw the side branch to 4–6 cm so it forms a hook. Round the cut edges with the knife so the pot handle slides on easily.
 3Cut the notches
Carve ramp notches 8–10 cm apart near the top. Cut each in several thin passes; one deep cut can split the stick.
 4Check the hook
The pot handle (bail) must sit in the hook with no chance of sliding out. Test with an empty pot first.
For hotter fires, keep the hook a little longer than you think, and hang the hanger so it never touches embers. If the hook chars, carve a new one: it takes ten minutes. Never hang a heavy pot of water on a hook you have not load-tested at ground level.
Project 3: toggles and simple fixings
A toggle is a short stick with a groove around the middle. Tie a cord into the groove and the toggle becomes a quick-release fastener for tarp lines, bags and gear loops: push it through a loop and it locks, pull it out and it frees. It is the fastest project here, 10–15 minutes, and teaches a groove cut around a round piece.
Use dense, straight hardwood about 1.5 cm thick, sawn to 6–8 cm. Chamfer both ends so they do not catch. Cut two stop cuts a little apart in the middle, then slope into each from outside and rotate the stick until the groove runs all the way round. Tie the cord in with a clove hitch or a constrictor-style hitch; see knots and paracord for cord choices.
Carving a toggle
 1Saw a short piece
Saw a piece of 6–8 cm from a straight stick about 1.5 cm thick, gripping the stick firmly with your other hand well clear of the blade.
 2Groove all round
Chamfer the ends, cut two stop cuts in the middle and slope into each. Rotate the piece as you cut until the groove is continuous and shallow.
 3Tie it and use it
Tie the cord into the groove. Push the toggle through a cord loop: the loop locks around it, and pulling it out frees it. Test it with your full weight on a spare cord.
The same stick makes a button for a tarp ridge line or a handle for a cord. Larger fixings, such as lashing poles for a camp tripod, are explained in lashings and camp structures.
Project 4: spatula or butter spreader
The spatula is the bridge to spoon carving: splitting, a drawn outline, stop cuts and, above all, thinning. Split a green log of 5–10 cm through the centre, then split off a board of about 1.5 cm, leaving the pith behind. Draw the outline: a blade 5–7 cm wide narrowing to a handle of about 2 cm. Thin the blade towards the tip to 3–4 mm.
From log to spatula
 1Split a board
Split the log through the centre and take a board of about 1.5 cm from the part away from the pith. A baton and the knife are enough.
 2Draw and stop-cut
Draw the outline in pencil. Saw or press stop cuts at the neck, where the handle meets the blade, so waste breaks off cleanly.
 3Remove the waste
Cut away from the handle with thin shavings, brace your hands and cut towards the waste side, never towards your holding hand.
 4Thin the blade
Thin gradually from the neck towards the tip to 3–4 mm, working both faces equally. Round the handle and chamfer every edge.
For a butter spreader use the same steps at 15–18 cm with a blade of 2–3 cm. Let the finished piece dry slowly in a paper bag, and finish it with a thin coat of food-safe drying oil, as described in the spoon guide. Oily rags can ignite by themselves: spread them flat outdoors to dry.
Project 6: tongs from green wood
Wooden tongs lift pot lids, move hot stones and turn food at the edge of the fire. They are one rod, split lengthwise and bent: choose a straight, supple green hazel, birch or sycamore about 2 cm thick and 30–40 cm long. Split it into two flat halves of equal thickness, or carve a thin even taper on each arm while the wood is wet, then bend the arms into a U around a round form and let them dry in that shape.
Taper the tips thinner so they grip, and keep the grip ends thicker so the spring does not snap. Green wood bends without breaking; dry wood does not, so do not wait. Wooden tongs scorch in heat: use them at the edge of the fire, never in the flames, and replace them when charred.
Project 7: cooking skewer and marshmallow stick (food-safe wood)
A roasting stick is a 60–80 cm green rod of about 1 cm. Peel the last 10–15 cm of the tip, because bark tastes bitter and may carry dirt, then carve a point with four facets. The stick is long enough to keep your hand away from the heat. It is a good job for children, with an adult beside them; see bushcraft with kids.
Anything that touches food must be safe. Hazel, willow and birch are common, mild choices. Resinous conifers can taste of resin. Some woods are toxic: never use yew, laburnum or rhododendron, and if you cannot identify the wood with certainty, do not use it for food. Our guide to tree identification helps you learn the common species.
Before a stick touches food
- Species identified with certainty and known to be harmless
- Green rod, not rotten or mouldy
- Bark peeled from the part that goes into the food
- Tip clean, with no loose splinters
- Stick has not lain on the ground in the dirt or near chemicals
Project 8: a tent-peg mallet
A mallet drives pegs without damaging their heads. Take a dense, dry log round of about 10–12 cm diameter and 15–20 cm long for the head, and a straight handle of about 30–35 cm and 3 cm thick. The simplest design is one piece: a thick head with a narrower handle carved from the same log. Cut the handle with stop cuts and a saw, shave it round with chest-lever cuts, and leave the head thick. For a heavier mallet and splitting wedges, see carving a mallet and wedges.
Do not use a mallet with cracks along the grain. Do not strike hard objects with it, and never use your knife as a chisel against a mallet. A baton for batoning is a similar tool, but a mallet head should have a flat face and be heavier.
Safety: blood circle, grips and first aid
Most carving injuries are cuts to the thumb or holding hand. The serious ones are to the thigh, which is why the rules are simple and non-negotiable.
- Blood circle: check your arm plus blade length is free of people, gear and guy lines. Stop when anyone steps in.
- Cut away from your body: use the chest-lever and thumb-push grips from the carving guide. Know where the blade goes if the wood gives way.
- Sit, brace beside the knee: never over the thigh or between your legs.
- Cold, tired or hurried hands slip: stop earlier than you think.

Carving with children
Children need soft green wood, a rounded-tip knife, one grip at a time and an adult beside them. The roasting stick or a try stick are good first projects. Our guide bushcraft with kids covers knife rules in detail.
Carrying the knife
Carving at home is rarely a legal question; getting there with the knife can be. Carry it sheathed (a snug leather sheath you made yourself is ideal) and packed away, not on your belt in public, and check local rules. Germany, the UK and the US differ, and nothing here is legal advice. See knife laws overview.
Where can you get wood? Legal and ethical notes
All wood belongs to somebody, including dead branches and windfall. Never cut a living tree or branch for carving without permission. Rules on collecting dead wood differ by country, region and land type, and nature reserves are stricter. Ask the landowner or forester, and treat this as orientation, not legal advice.
- Prunings from gardens and orchards are excellent small carving wood.
- Hazel and willow rods from coppice work suit pegs and hooks.
- Windfall after storms may still be green inside, if the owner agrees.
- Tree surgeons often have fresh birch or alder.
Take only what you use and cut cleanly. Rules for camping and wood on wild sites are discussed in wild camping and camp setup.
Troubleshooting: what went wrong and how to fix it
| Symptom | Likely cause | Fix |
|---|---|---|
| Peg splits when driven | No chamfer, dry or knotty wood, or thick point | Chamfer the head, use green straight grain, shorten the point |
| Notch tears out | Cutting uphill or too thick shavings | Turn the piece, take thin cuts, stop-cut first |
| Pot hook snaps | Branch angle too weak, dry wood, or cut too deep | Use green hardwood, leave a thicker hook, cut notches in thin passes |
| Toggle slips out of its loop | Groove too shallow or too wide | Deepen slightly, or use a longer toggle |
| Spatula blade cracks | Pith left in, or dried too fast | Remove pith, dry slowly in a paper bag |
| Tongs snap when bent | Wood too dry or too thick | Use fresh green rod, thin the arms |
| Knife slips or skates | Dull edge or angle too flat | Strop, raise the edge slightly, avoid knots |
A typical beginner mistake is to carve everything in one session. Stop when your hands tire. Your next cuts will be cleaner after a rest, and the sharper edge will return after stropping.
What to do next
When the spatula feels comfortable, the spoon is next: carving a spoon adds a hook knife and a bowl. Tools are in carving tools. Pegs and hooks fit naturally into camp setup. Add a small carving kit to your Kit Builder list.
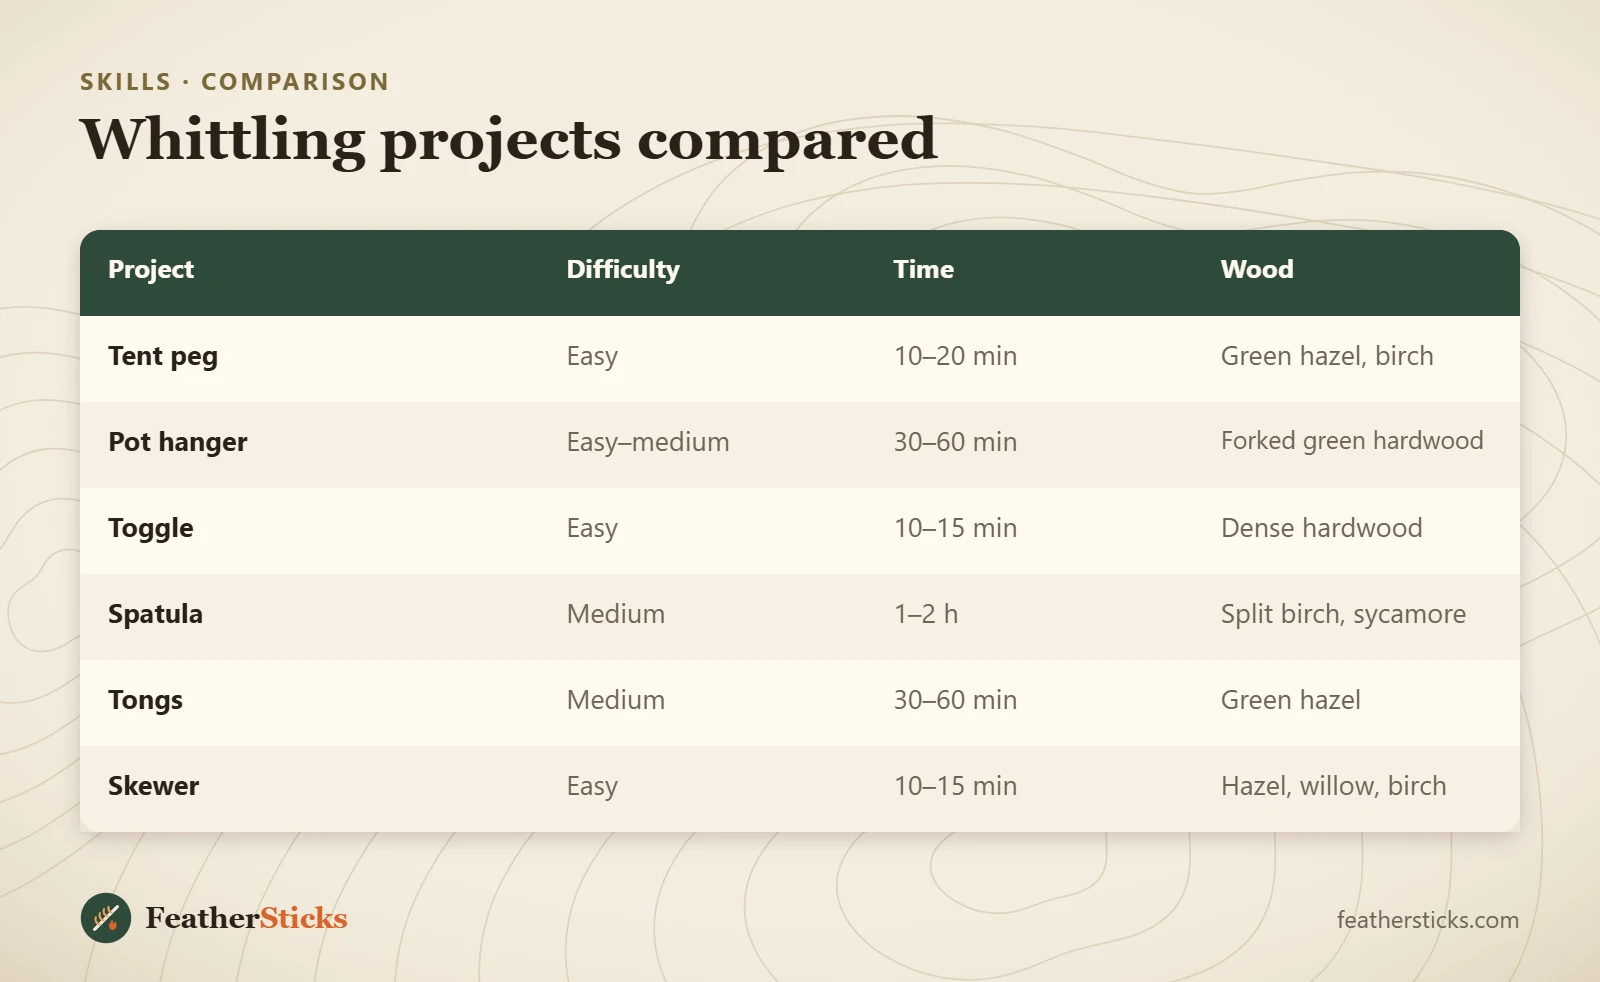
| Project | Difficulty | Time | Wood |
|---|---|---|---|
| Tent peg | Easy | 10–20 min | Green hazel, birch |
| Pot hanger | Easy–medium | 30–60 min | Forked green hardwood |
| Toggle | Easy | 10–15 min | Dense hardwood |
| Spatula | Medium | 1–2 h | Split birch, sycamore |
| Tongs | Medium | 30–60 min | Green hazel |
| Skewer | Easy | 10–15 min | Hazel, willow, birch |
Common mistakes
- Carving towards the thigh or over the lap instead of beside the knee.
- Skipping the try stick and attempting a spatula first.
- Using dry, knotty wood for a tent peg and splitting it.
- Hanging a thin dry hook right in the flames.
- Using unknown or toxic wood for anything that touches food.
- Taking thick shavings with a dull knife and forcing the cut.
- Cutting living branches without permission.
What you need
- Sharp fixed-blade knife with a strop
- Small folding saw for stop cuts and cutting to length
- Wooden baton for splitting and driving pegs
- Pencil for outlines
- Cord for toggles and tests
- Thumb tape or glove for the holding hand
- First aid kit with pressure bandage
FAQ
What are good whittling projects for beginners?
How do you carve a tent peg?
How do you make a pot hanger for a campfire?
Which wood is safe for skewers and food?
Should I whittle green or dry wood?
Is it safe to whittle with children?
Can I cut branches in the forest for whittling?
What do I do if I cut myself while whittling?
Check yourself
Completed6 quick questions from this guide. Nothing is sent anywhere.
Related step-by-step guides
-
 1
-
 1
-
 1