Pot Hangers & Cooking Tripods: How to Hang a Pot Over a Campfire
A pot hanger for the campfire lets you hang a pot with a wire bail over the flames and control the heat simply by raising or lowering it. The three classic designs are the dingle stick (one angled stick on a fork), the cooking crane or pot gallows (two forked uprights and a crossbar) and the cooking tripod (three lashed poles with a chain). Add an adjustable, notched pot hook and you can switch from a rolling boil to a gentle simmer in seconds.
This guide shows how to build each one step by step, which pots can hang and how heavy they get, how to carve the notched hook, which wood to use, how to keep cord away from the heat and how to pack everything down without a trace. It belongs to the outdoor cooking hub and builds on campfire cooking and the bushcraft basics.
Step by step
-
1

Pick a pot with a bail handle
Only pots and kettles with a wire bail hang safely. Check the weight when full: water adds 1 kg per litre.
-
2

Gather sticks with permission
Use fallen, sound wood or cut green wood only where the landowner allows it. Green wood goes nearest the heat.
-
3

Build the support
Set up a dingle stick, a crane with two forks and a green crossbar, or a lashed tripod over a small fire.
-
4

Carve an adjustable pot hook
Cut a green forked branch to a short hook and carve 2–4 notches near the upper end, always away from your body.
-
5

Hang the pot and set the height
Low in the flame tips to boil, 10–20 cm above the coals to simmer, higher to keep warm.
-
6

Lift off safely, then pack down
Lift the hot pot with a glove and a stick, put out the fire, scatter the sticks and leave no trace.
Which pot hanger should you build?
Build the simplest pot hanger that fits your pot and your site. For one person and a light pot, a dingle stick is up in five minutes. For a group, two pots or a long evening, a crane is more stable and keeps the whole fire free. On rocky or frozen ground where nothing can be driven in, or for a heavier pot, a cooking tripod stands on its own three feet.
All three do the same job: they hold the pot by its bail above the fire, so you can control heat by height instead of by building the fire up or down. That is the core idea behind every hanging method in campfire cooking setups, and it is why the old word for an adjustable hanger, the trammel, survives in many languages. In the glossary you will find it under pot hanger.

| Design | Build time | Load | Ground | Best for |
|---|---|---|---|---|
| Dingle stick | 5–10 min | Light: one small pot or kettle | Soil you can push into, or a rock to pin the butt | Solo, quick brew, one-pot meals |
| Crane (pot gallows) | 15–20 min | Medium: one or two pots side by side | Soil firm enough to drive in two forks | Groups, base camps, long evenings |
| Tripod | 15–20 min plus lashing | Medium to heavy, depending on poles | Any level ground, also rock or frost | Heavier pots, hard ground, open sites |
| Adjustable pot hook | 30–60 min to carve | Same as the support | – | Fine height control on any of the above |
Times and loads are rough guides for sound sticks of the sizes given below.
Which pots can hang over a fire?
A pot can hang only if it has a wire bail handle – the loop of wire that swings over the top. Billy cans, many stainless steel camp pots, camp kettles and cast iron camp ovens have one. Pots with short folding side handles, plastic or silicone grips or a single long handle cannot hang safely: they tip, slip off the hook or melt. The billy can section of our cookware guide explains why the bail is the most useful feature a fire pot can have.
Weight: what the hanger really carries
Water weighs 1 kg per litre, so the contents quickly outweigh the pot. A 1 L stainless billy weighing 200–350 g carries roughly 1.3 kg when full; a 1.5 L kettle about 2 kg. A cast iron Dutch oven is in another league: a 30 cm (12-inch) camp oven typically weighs 6–9 kg with its lid, before any stew goes in – see Dutch oven sizes. Choose the hanger for the full weight, and add a margin, because a pot that swings or is stirred loads the hanger more than a still one.

| Pot | Typical full weight | Suitable hanger | Notes |
|---|---|---|---|
| Billy can or steel pot, 1 L | about 1.3 kg | Any: dingle stick, crane, tripod | The classic; tall shape hangs well |
| Pot, 2 L | about 2.5 kg | Crane or tripod; sturdy dingle stick | Use a lid to save time and fuel |
| Camp kettle, 1.5 L | about 2 kg | Crane or tripod | Spout tips water when the bail is off-centre |
| Group pot, 5 L | about 6 kg | Crane with thick bar or sturdy tripod | Check the bar for sagging before filling |
| Cast iron Dutch oven, 30 cm | 6–9 kg empty, 10 kg+ full | Thick-pole tripod with chain, or on coals | Bake on embers; hang only for soups and stews |
Weights are approximate: pot weight plus about 1 kg per litre of water. Thin aluminium pots dislike direct flames – see camp cookware.
A lid keeps ash out and shortens boiling noticeably; the boil time calculator estimates time and fuel. A bail with a small dip in the middle keeps the pot level on the hook.
How to set up a dingle stick
The dingle stick is the fastest pot hanger there is: one long stick, its butt end pinned to the ground, resting on a forked support so that the tip reaches out over the fire. The pot hangs from a notch or short wire at the tip. It works like a lever – the pot pushes the tip down and the butt up – so the butt must be held down by a rock, a hooked peg or by pushing it firmly into soft ground.
Dingle stick in four steps
 1Choose a long stick and a fork
A sound stick of about 1.5 m, 4–5 cm thick at the butt, and a forked support stick that reaches about knee high. Green or freshly fallen hardwood is best for the part over the fire.
 2Pin the butt end
Lay a heavy rock on the butt, drive a hooked peg over it or push it into firm soil. Without this, the pot lifts the butt and the whole stick tips into the fire.
 3Prop it on the fork
Set the fork about a third of the way from the butt so the stick rises at roughly 30–45° and the tip ends above the fire. Cut a small notch on the underside near the tip.
 4Hang the pot and adjust
Hang the bail in the notch or on a short piece of wire. Slide the fork towards the butt to raise the tip, towards the fire to lower it, or turn the stick sideways to swing the pot off the heat.
What it should look like: the stick sits firmly in the fork without rolling, the butt does not move when you press on the tip, and the pot hangs straight down over the centre of the fire, not over the edge.
A dingle stick suits a single billy or a small kettle. It is less suited to heavy pots, because the long lever multiplies the load on the butt and fork. If the tip sags noticeably when you hang the full pot, use a thicker stick, move the fork closer to the tip or switch to a crane. The classic variant without a fork – a stick pushed into the ground at an angle with a rock on its base – is shown in the cooking without a grate section.
How to build a cooking crane (pot gallows)
The crane, also called pot gallows, is the workhorse of camp kitchens: two forked sticks driven into the ground on either side of the fire, with a straight crossbar lying in the forks. One or two pots hang from the bar on hooks. Because the supports stand to the side, the fire area stays free for a grill grate or a pan on stones at the same time.
Building a crane
- Cut two forks Two sturdy Y-sticks about 80–100 cm long and 3–4 cm thick. Sharpen the lower ends with a few cuts away from your body.
- Drive them in Set them 1–1.2 m apart on opposite sides of the fire, each at least 30 cm from the flames, forks at the same height. Tap them in with a wooden baton, never with the back of a knife.
- Lay the crossbar A straight green pole 3–4 cm thick rests in both forks, at least 60 cm above the fire. Push down on the middle: it should flex a little, not crack.
- Add hooks Hang one notched pot hook per pot. Two hooks let you boil water on one side and simmer on the other.
The numbers match our campfire cooking guide: forks 1–1.2 m apart, green crossbar 3–4 cm thick, at least 60 cm above the flames. If the ground is too hard to drive the forks in, wedge them between stones or use a tripod instead. A small folding saw cuts the bar cleanly; a light hatchet or a machete also works where it is legal to carry one.
How to build a cooking tripod with a tripod lashing
A cooking tripod is three poles bound together near the top with a tripod lashing and spread into a free-standing frame. A chain, wire or cord with a hook hangs from the crossing point, and the pot hangs below. Tripods stand on rock, frozen ground and gravel where no fork can be driven in, and three legs carry a heavier pot than one angled stick.
Cooking tripod in four steps
 1Three poles side by side
Lay three straight poles of 1.5–2 m and 4–5 cm thickness next to each other, tips level. Mark the lashing point about 30 cm below the tips.
 2Tie the tripod lashing
Start with a clove hitch on an outer pole, make about six loose wraps around all three, two frapping turns in each gap and finish with a clove hitch. Plan about 6 m of cord.
 3Stand it up and spread
Lift the tripod, swing the middle leg to the back and spread the outer legs until the feet are about 1 m apart. Set the feet into small scrapes on firm, level ground.
 4Hang chain and pot
Tie the hanger to the crossing above the lashing. Keep the cord high and use chain or wire for the part that hangs over the fire, then hook on the pot.
The full knot sequence with drawings is in our guide to how to tie a tripod lashing. The most common beginner mistake is wrapping too tightly: the legs then cannot spread, and the tripod stands tall and narrow and tips easily. Loose wraps that still let the poles move, then frapping turns to lock them, give a wide, stable stance.
Checkpoint: press down on the crossing with your full hand. The feet should dig in, not slide outwards, and the tripod should not twist. On smooth rock, set each foot against a stone; on soft ground, push the feet a few centimetres in. The pot should hang in the middle between the three feet. If it hangs closer to one leg, the tripod is lopsided and can tip when you stir.
Tripod sizes
For a small fire and one pot, poles of 1.5–1.8 m are enough and are easier to find; at about 2 m you get more room for a taller flame and can stand comfortably next to the pot. Thicker poles (5 cm and up) are worth it for a group pot or for hanging a Dutch oven by its bail.
How to carve an adjustable pot hook
An adjustable pot hook, or trammel, is a green stick with a short hook at the lower end for the bail and two to four notches near the upper end. You hang it over the crossbar (or into a cord loop) by one of the notches. Use the topmost notch and the pot hangs at its lowest; use a notch further down the stick and the pot rides higher. It is the classic second whittling project after a tent peg – see the pot hanger project in our whittling guide.
Carving a notched pot hook
 1Find a forked green branch
A branch 40–60 cm long and about thumb to two fingers thick, with a side branch near one end. Hazel, maple, ash or birch carve well. Mark where to shorten the side branch.
 2Cut the side branch to a stub
Saw the side branch off a few centimetres from the main stick. This short stub is the hook that holds the bail; the other end of the stick is the upper end.
 3Carve the notches
Near the upper end, make a stop cut across the grain, then slope a cut into it from 2–3 cm below. Keep each notch no deeper than a third of the thickness, with a flat stop face on top.
 4Hang it and test
Hook a notch over the bar and the bail onto the stub. Fill the pot, hang it and watch for a minute: the notch should hold firmly without the stick rolling off.
Carving the notch is just two cuts: the stop cut, which defines the flat face that rests on the bar, and the ramp, a sloping cut from below that removes the chip. Always cut away from your body and away from the hand that holds the stick, and keep your knife hand braced. The grips and the notch types are explained in bushcraft carving, and any sharp bushcraft knife with a fixed blade does the job.
| Check | Good | Fix if not |
|---|---|---|
| Notch depth | Up to a third of the thickness | Deeper notches snap under load: carve a new hook |
| Stop face | Flat, square to the stick | A sloping face lets the bar slide out: recut the stop cut |
| Hook stub | Short and solid, angled upwards | A long, thin stub bends open: shorten it |
| Wood | Green, sound, no cracks | Dry or cracked sticks can break or char through |
Other ways to adjust the height
- Chain and S-hooks: hook the pot into a higher or lower chain link. Robust, fire-proof and quick, but it adds weight to the pack.
- Adjustable hitch: on a cord hanger, an adjustable hitch such as the taut-line hitch slides up and down. Keep the knot well above the heat – see knots for camp jobs.
- Bail notches: a hook with notches along its lower part, into which the bail is moved, is another common design.
Height = heat: how high should the pot hang?
The height of the pot over the fire is your heat control. Flames are hottest at their tips, and coals radiate strong, even heat upwards. Low and in the flame tips brings water to a rolling boil fastest; 10–20 cm above glowing coals is the classic simmering height for soups, stews and porridge; higher up, the pot just keeps warm. Most cooks use both: boil on the young fire, then simmer once it has burnt down to coals.

| Position | Heat | Use it for | Watch out for |
|---|---|---|---|
| In the flame tips | Very high, uneven | Boiling water, quick soup | Soot, boiling over, scorched bottoms with thick food |
| 10–20 cm above coals | Medium, steady | Simmering, stews, porridge, rice | Coals fade: rake in fresh ones or lower the pot |
| 30 cm and higher | Low | Keeping food or water warm, melting snow slowly | Not hot enough to make water safe |
Heights are approximate and vary with fire size, wood and wind.
To make water safe, bring it to a rolling boil for 1 minute, or 3 minutes above 2,000 m, as explained in boiling water. Use the young, flaming fire for this, and save the coals for cooking food. Dense, dry hardwood gives the best coals; the firewood calculator estimates how much wood an evening of cooking needs, and fire lays shows which structure burns down to an even coal bed.
Green or dead wood? Choosing sticks for a pot hanger
Use green wood for every part close to the heat – the crossbar, the tip of a dingle stick and the pot hook – because living wood is full of water and chars slowly. Dead, sound hardwood is fine for supports that stand outside the fire and for short use over it, such as boiling a single pot of water, as long as it is not rotten, cracked or bending. Dry softwood and thin dead sticks can burn through or snap within one meal.
Green wood vs dead wood for pot hangers
Green wood
- Chars slowly, survives hours near the heat
- Flexible: bends before it breaks
- Carves easily (pot hooks, notches)
- Must only be cut with the landowner's permission
- Heavier; leaves fresh cuts on trees
Dead hardwood
- Often lying around; no living tree damaged
- Fine for forks and legs outside the fire
- OK for short use over the flames
- Check for rot: tap it, bend it, look at the ends
- Dry wood can burn through over a long evening
Permission and rules
Cutting living trees or branches almost always needs the landowner's permission, and in parks and nature reserves it is usually forbidden. Collecting dead wood is allowed in some places and restricted in others. Rules differ by country and region – this is no legal advice, so check locally. In many countries, campsites and fire spots sell or supply wood; buying a few poles or bringing a light metal tripod is often the simplest legal solution. Lying, fallen branches are also the first choice for Leave No Trace.
Which species?
Hazel, ash, maple, birch, willow and beech are common choices: straight, strong and non-toxic. Avoid wood you cannot identify near food, and never use yew, laburnum or holly for anything that touches the pot or the food, as our campfire cooking guide warns. Our tree identification guide helps you recognise the common species.
Typical stick sizes at a glance
- Dingle stick
- about 1.5 m, 4–5 cm at the butt
- Crane forks
- 80–100 cm long, 3–4 cm thick
- Crane crossbar
- green, 3–4 cm, at least 60 cm above the fire
- Tripod poles
- 1.5–2 m, 4–5 cm thick
- Pot hook
- 40–60 cm, green, with a side branch
Cord, wire or chain: what holds up near the fire?
Cord and fire do not mix. Synthetic cord such as paracord melts at temperatures a flame reaches instantly, and natural cord chars and weakens long before it visibly burns. Hot air rising from the fire is enough to soften synthetic cord well above the flames. Keep every piece of cord high and away from the heat – on a tripod at the lashing and the top of the hanger – and use chain, wire or a wooden hook for the last part above the fire. Our campfire cooking guide recommends metal chain or wire for the last 50 cm above the fire.

| Material | Near heat | Use it for | Note |
|---|---|---|---|
| Steel chain | Fire-proof | Last 50 cm above the fire, adjustable height via links | Heavy; gets hot – handle with gloves |
| Steel wire | Fire-proof | Short hanger, S-hooks, dingle stick tip | Light; bend thicker wire for heavier pots |
| Green wood hook | Chars slowly | Pot hook, crossbar | Check for charring during long cooking |
| Natural cord, tarred twine | Chars, weakens | Lashings and hangers well above the heat | Replace if darkened or brittle |
| Paracord, nylon, polyester | Melts | Lashings only, far from flames and hot air | Never near the pot |
A couple of metres of steel wire weigh almost nothing and turn any stick into a safe hanger. Natural cordage made from bark or plant fibre, as shown in natural cordage, is fine for lashing a tripod – just keep it high.
Pot hanger safety: footing, spills, burns and children
A hanging pot full of boiling water is the most dangerous object in camp. Most injuries happen when a hanger tips, the bail slips off the hook or someone lifts the pot and spills it. Five habits prevent nearly all of them.
- Stable footing: build only on firm, level ground. Forks driven in deep, tripod feet in scrapes, the butt of a dingle stick pinned. Test every hanger with your hand – and with the full, cold pot – before you light the fire.
- Small fire, right size: a compact fire is easier to cook over and does not reach the wooden parts. Follow the campfire safety rules, including at least 5 m from tents and hammocks and 3 m from synthetic tarps.
- Gloves and a stick: bails, chains and wire get hot enough to burn. Lift pots with leather gloves and a stick or pot hook through the bail, never with bare hands, and wear wool or cotton near the fire rather than synthetic fleece – see bushcraft clothing.
- Clear the swing path: before lifting a pot off, know where you will put it down: flat ground, out of walkways, not next to children.
- Never leave it unattended: a pot that boils dry can damage the pot, and a charring crossbar can drop the pot into the fire.
Children at the cooking fire
Mark a no-play zone of at least a metre around the fire and the hanger, and agree that children walk, never run, there. A tripod or crane is a tempting climbing frame and a dingle stick a tempting lever, so explain why they are hands-off. Older children can carve a pot hook under supervision or help build the crane before the fire is lit – ideas are in campfire with kids.
Before you hang the pot
- Fire allowed today, site clear of dry grass, roots and overhanging branches
- Hanger tested with the full pot while the fire is still unlit
- Cord only high up; chain, wire or wooden hook over the flames
- Crossbar and hook are green and free of cracks
- Gloves, a lifting stick and a flat place to set the pot down
- Water and a first aid kit within reach
- Children briefed on the no-play zone
Packing down and leaving no trace
A pot hanger is built in minutes and should disappear just as quickly. First put the fire out: drown it, stir it and drown it again until the ashes are cold to the touch. Then pull the forks and the tripod legs, fill the holes with soil and press them flat, and untie every lashing – cord left in the woods can trap animals for years.
Scatter the sticks well away from the fire site, cut ends down or facing away from paths, so the place looks as untouched as you found it. Fresh cuts on living trees cannot be hidden, which is one more reason to use fallen wood whenever possible. If you camp in the same place for several nights, as at a base camp, leave the hanger standing until the last day, but take it down before you go.
Pack-down sequence
- Lift off the potWith gloves and a stick; set it on flat ground to cool.
- Put out the fireDrown, stir, drown until cold to the touch.
- DismantleUntie lashings, coil the cord, pull forks and legs.
- RestoreFill holes, scatter sticks, check for wire, foil and cord.
Troubleshooting: common pot hanger problems
Most problems come from the ground, the wood or the cord.
| Symptom | Likely cause | Fix |
|---|---|---|
| Dingle stick tips into the fire | Butt not pinned, fork too far from the butt | Add a heavy rock or hooked peg; move the fork nearer the tip |
| Crossbar sags or cracks | Bar too thin or dry, pot too heavy | Use a thicker green bar or a second hook to share the load |
| Forks lean inwards | Driven in too shallow, soft ground | Drive deeper, angle them slightly outwards, or switch to a tripod |
| Tripod twists or slides | Wraps too tight, feet on smooth ground | Retie with looser wraps; set feet in scrapes or against stones |
| Pot hangs crooked | Bail off-centre, hook stub too long | Centre the bail; shorten the stub |
| Cord darkened or stiff | Too close to heat or rising hot air | Replace it; use chain or wire over the fire |
| Water will not boil | Pot too high, no lid, wind | Lower into the flame tips, add a lid and a windbreak |
In windy weather, a hanging pot loses heat quickly and flames lean away from it. Build a windbreak on the windward side, lower the pot a little and use a lid; in strong, gusty wind or dry conditions, do not light a fire at all. For a quiet morning brew without any of this, a small stove from camp stoves is often the better choice – and the only one during fire bans. Coffee lovers can find the hanging-kettle method in camp coffee, and a pot hanger is just as useful when you keep a fire going overnight for a hot drink at dawn.
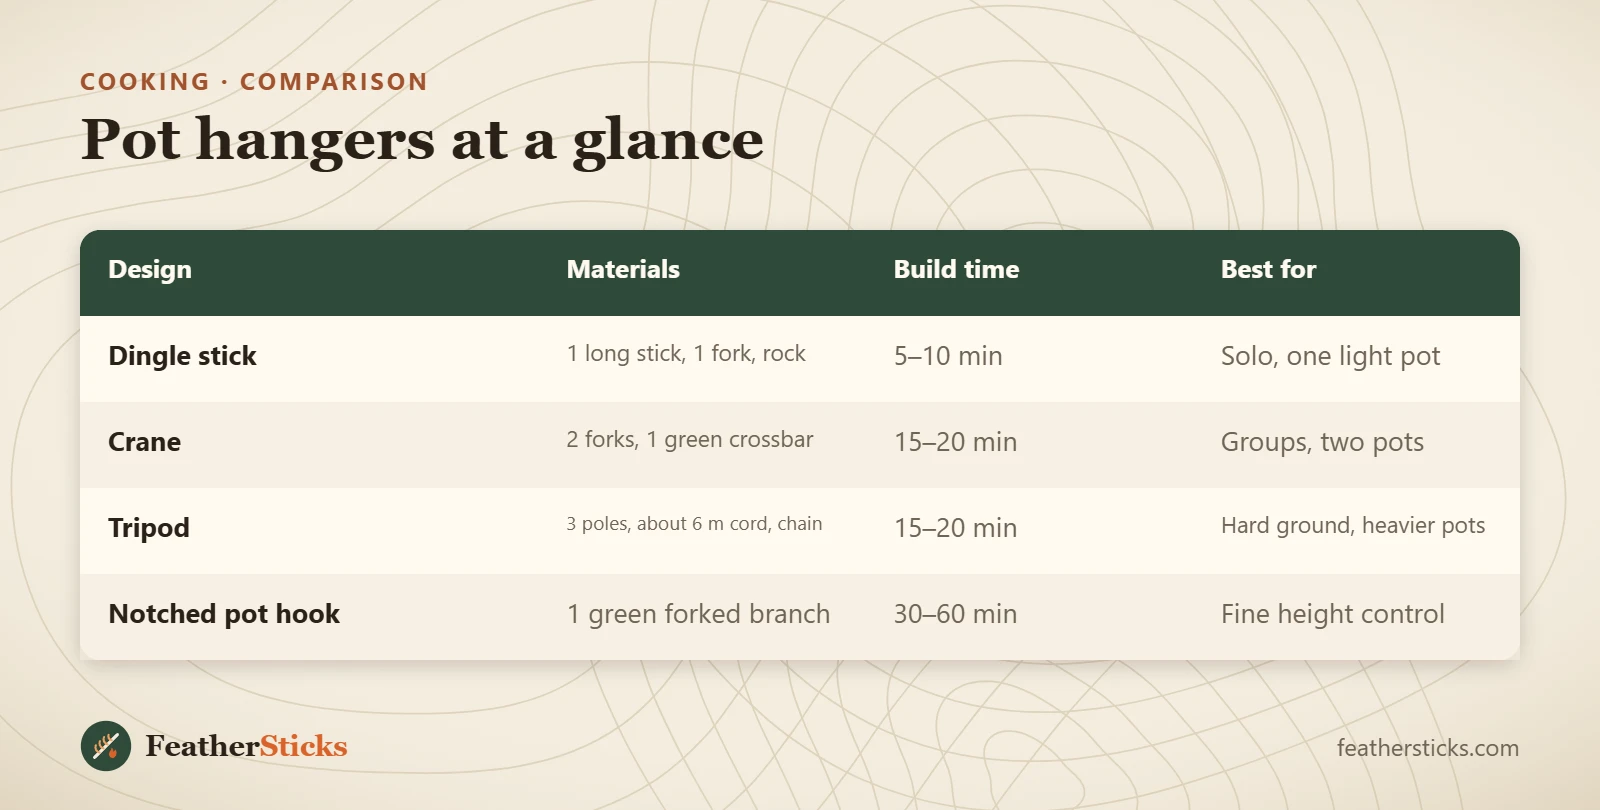
| Design | Materials | Build time | Best for |
|---|---|---|---|
| Dingle stick | 1 long stick, 1 fork, rock | 5–10 min | Solo, one light pot |
| Crane | 2 forks, 1 green crossbar | 15–20 min | Groups, two pots |
| Tripod | 3 poles, about 6 m cord, chain | 15–20 min | Hard ground, heavier pots |
| Notched pot hook | 1 green forked branch | 30–60 min | Fine height control |
Common mistakes
- Hanging pots with plastic or folding side handles instead of a wire bail.
- Leaving the butt of a dingle stick unpinned, so the pot levers it into the fire.
- Using a thin, dry crossbar that chars or cracks under a full pot.
- Running paracord or other synthetic cord down to the pot, where it melts.
- Lashing a tripod so tightly that the legs cannot spread, making it tall, narrow and wobbly.
- Carving notches deeper than a third of the stick, so the hook snaps.
- Lifting the pot with bare hands or without a clear place to set it down.
What you need
- Pot or billy can with a wire bail and lid
- Fixed-blade bushcraft knife
- Folding saw
- Leather fire gloves
- 2 m of steel wire or a short chain with S-hooks
- About 6 m of natural cord or tarred twine for a tripod
- Water container for extinguishing
FAQ
What is a dingle stick?
How do you make an adjustable pot hook?
How tall should a cooking tripod be?
How high should a pot hang over a campfire?
Can you use paracord to hang a pot over a fire?
Can you hang a Dutch oven from a tripod?
Check yourself
Completed6 quick questions from this guide. Nothing is sent anywhere.
Related step-by-step guides
-
 1
-
 1
-
 1