Lashings & Camp Structures: How to Tie a Square Lashing, Tripod Lashing and More
Knowing how to tie a square lashing – plus its three relatives, the diagonal, shear and tripod lashing – turns loose poles and a few metres of cord into a cooking tripod, a pot hanger, an A-frame for a shelter ridge or a camp table. A lashing is not a knot: it is a series of tight wraps around two or more poles, squeezed even tighter by frapping turns between them, and locked with a simple hitch at each end.
This guide shows all four bushcraft lashings wrap by wrap, tells you how much cord each one needs, which poles to use, what you can build and how to test it before you trust it. Lashings belong to the core bushcraft skills; they build directly on the essential knots and are part of our bushcraft for beginners guide.
Step by step
-
1

Pick poles and cord
Collect dead, dry, straight poles 3–5 cm thick and 4–6 mm cord. Never cut living trees without the owner's permission.
-
2

Anchor with a clove hitch
Tie a clove hitch on one pole right next to the crossing and pull it snug. This anchor carries every turn that follows.
-
3

Make three tight wraps
Wrap the cord around both poles three times. Lay every turn beside the last and pull each one tight before the next.
-
4

Add two frapping turns
Pass the cord between the poles and around the wraps twice. Pull hard: frapping turns squeeze the wraps until nothing moves.
-
5

Tie off and test
Finish with a clove hitch on the other pole. Push, pull and load the structure low to the ground before you rely on it.
What is a lashing – and when do you lash instead of knot?
A knot joins rope to rope or rope to an object. A lashing joins pole to pole. That difference matters: two round sticks touch at a single point, so a single knot around them lets them pivot, slide and scissor. A lashing solves this with two kinds of turns that work against each other.
- Wraps go around both poles. They hold the poles together and carry the load.
- Frapping turns go between the poles, around the wraps. They pull the wraps towards each other and take out every last bit of slack – much like tightening a belt one more hole.
- A start hitch and a finish hitch anchor the cord. In most lashings both are clove hitches.
In the drawings on this page the three parts are colour-coded: cream for wraps, orange for frapping turns, green for the hitches. In reality it is one continuous piece of cord.

Lash, knot or notch?
Not every joint in camp needs a lashing. A ridgeline between two trees is a job for knots; a pot hook is carved; a peg is hammered. Lash when two rigid pieces have to stay at a fixed angle to each other under load.
| Job | Best method | Why |
|---|---|---|
| Crossbar on two uprights (rack, table, bed frame) | Square lashing | Holds poles that touch and cross at roughly a right angle |
| Two braces that cross in the middle of a frame | Diagonal lashing | Pulls poles together that spring apart and do not touch firmly |
| Two poles into an A-frame or a longer pole | Shear lashing (round lashing for extending) | Wraps hold the poles parallel; spreading the legs tightens it |
| Three poles into a free-standing tripod | Tripod lashing | Loose wraps let the legs spread and lock against each other |
| Cord to a tree, tarp to a ridgeline | Knots – see knot-for-task table | No rigid joint needed, must be adjustable |
| Pot hook, tent peg, toggle | Carving – notches and hooks | A carved notch needs no cord at all |
Which cord for bushcraft lashings – and how much do you need?
Almost any cord will lash, but some make life much easier. The ideal lashing cord has a slightly rough surface so the wraps grip the bark and each other, very little stretch, and enough thickness to pull hard without cutting into your hands. Smooth, stretchy cord is the usual reason a first lashing works loose overnight.
| Cord | Grip | Stretch | Good for | Watch out |
|---|---|---|---|---|
| Sisal or jute, 5–6 mm | Very good | Low | Camp furniture, scout-style pioneering, practice | Weakens when it rots; dry it before storing |
| Tarred twine (bank line), 2–3 mm | Very good | Low | Small racks, pot hangers, tripods of thin poles | Thin: add a wrap or two and pull with a toggle |
| Paracord, about 4 mm | Medium – slippery | Noticeable | What most people carry; fine if every turn is pulled hard | Stretches when wet; re-tighten after rain |
| Polyester or polypropylene cord, 4–6 mm | Medium | Low | Long-lasting structures on your own land | Smooth types slip; melted ends are sharp |
| Natural cordage, withies, roots | Good | Low | Fully natural builds – see natural cordage | Variable strength, test every joint |
How much cord per lashing?
The classic rule of thumb from pioneering: allow about 1 m of cord for every 2.5 cm of combined pole diameter – or, easier to calculate, 40 cm of cord per centimetre. Add the diameters of all poles in the joint and multiply. The rule is generous on purpose: it leaves enough for both hitches and something to grip while you pull. Running out one turn before the end means starting again.
| Poles in the joint | Combined diameter | Cord to cut |
|---|---|---|
| 2 poles of 3 cm | 6 cm | about 2.5 m |
| 2 poles of 4 cm | 8 cm | about 3 m |
| 2 poles of 5 cm | 10 cm | about 4 m |
| 2 poles of 8 cm | 16 cm | about 6.5 m |
| Tripod: 3 poles of 5 cm | 15 cm | about 6 m |
Planning values for 5–6 mm cord. Thin cord of 2–3 mm uses noticeably less per turn, but cut generously until you know your own lashings.
A cooking tripod needs one length of about 6 m plus a hanger cord; a rack with six square lashings and one diagonal lashing on 4 cm poles swallows around 22 m. Count your joints before you leave home – the bushcraft kit list and the Kit Builder help you decide how much cord goes in the pack, and the tarp and cordage planner covers what the shelter needs on top.
Start and finish knots: clove hitch and timber hitch
You only need two hitches for all four lashings. Both are covered in detail in the hitches section of our knots guide; if you are unsure which knot suits another job, the Knot Finder sorts them by task.
Clove hitch – start and finish of almost every lashing
The clove hitch is two turns around a pole with the second turn trapping the first. It is quick, uses little cord and, crucially, can be slid along the pole and tightened right against the crossing before you load it. As a start hitch, leave a short end of about a hand's width and twist it around the standing part so it gets buried under the first wraps. As a finish hitch, tie it as two half hitches, one after the other, and work each one tight against the lashing.

Timber hitch – the start of the diagonal lashing
The timber hitch is a loop that tightens itself: pass the end around both poles, around the standing part and then twist it back around itself at least three times. Under tension it grips harder; without tension it falls open. That is exactly what a diagonal lashing needs, because its first job is to drag two poles together that do not want to touch.

How to tie a square lashing, step by step
The square lashing joins two poles that cross and touch – usually at about a right angle, but it works at any angle as long as the load pushes the poles together or along each other. It is the lashing you will tie most: every crossbar on an upright, every rung, every table top.
The path of the cord is always the same: over the crossbar, behind the upright, over the crossbar, behind the upright. If you remember that the cord never crosses a pole diagonally, you cannot go wrong.
Square lashing, wrap by wrap
 1Clove hitch on the upright
Tie a clove hitch around the upright directly below the spot where the crossbar will sit, then rest the crossbar on top of the hitch. The hitch now also acts as a small shelf that stops the crossbar sliding down.
 2Learn the path
Lead the cord up and over the front of the crossbar, around behind the upright, down over the crossbar on the other side and behind the upright again. That is one complete wrap. The typical error is crossing diagonally over the joint – that belongs to the diagonal lashing.
 3Three wraps, side by side
Repeat until three wraps lie next to each other: on the crossbar each new turn goes outside the last, behind the upright each new turn goes inside. Pull every single turn tight; slack you leave now cannot be removed later.
 4Two frapping turns
Now change direction: pass the cord between the poles, in front of the upright and behind the crossbar, around the wraps. Make two turns and pull each as hard as you can – you will see the wraps bite into the bark.
 5Clove hitch on the crossbar
Finish with a clove hitch on the crossbar, pushed tight against the lashing. Tuck the leftover end under the wraps or coil it around the pole. Then grab both poles and try to twist them: a good square lashing does not move.
Checkpoint – what a good square lashing looks like: three neat wraps on each side of the upright with no turn riding over another; two frapping turns visibly squeezing them; both hitches hard against the joint; no movement when you twist the poles against each other with both hands.
How to tie a diagonal lashing
The diagonal lashing is for poles that cross but do not sit firmly against each other – typically the two braces of an X in the middle of a frame, where there is a gap that has to be pulled shut. Its wraps run diagonally across the joint in both directions, forming a cross of cord over the cross of poles.
Diagonal lashing in four moves
 1Timber hitch around both poles
Tie a timber hitch around both poles at the crossing and pull. The hitch tightens itself and draws the two poles together. Keep tension on the cord from now on, or the hitch relaxes.
 2Three wraps beside the hitch
Make three wraps around both poles in the same direction as the timber hitch, each turn lying next to the last. All of them pass through the same pair of opposite angles.
 3Three wraps across
Change direction and make three wraps through the other pair of angles, so they cross the first set at the centre of the joint. Again: side by side, each pulled tight.
 4Frap twice, finish with a clove hitch
Take two frapping turns between the poles, around both sets of wraps, and pull hard. Finish with a clove hitch on one of the poles, snug against the lashing.
Checkpoint: seen from the front, the cord forms a clear plus sign over the X of the poles, three strands in each direction. The gap between the poles is closed, and the braces no longer rattle when you shake the frame.
Square or diagonal – which one where?
Which lashing does this joint need?
Do the poles lie side by side, pointing the same way?
Yes → Two poles: shear lashing. Three poles: tripod lashing.No → They cross – go on.Do the poles touch firmly where they cross?
Yes → Square lashing, even if the angle is not exactly 90°.No → There is a gap or the poles spring apart – go on.Can you close the gap by hand without bending anything hard?
Yes → Diagonal lashing: the timber hitch pulls the poles together.No → Re-fit the poles first. A lashing should not have to fight a bent pole.

Shear lashing and round lashing: A-frames and longer poles
The shear lashing joins two poles that lie side by side. Spread the free ends and you get shear legs – an A-frame that carries a ridge pole, the end of a washing line or one side of a camp table. The trick is restraint: the wraps must be firm but not as tight as you can pull, because spreading the legs tightens the lashing by itself.
Shear lashing for an A-frame
 1Clove hitch on one pole
Lay the two poles side by side with the butt ends level. Tie a clove hitch around one of them, about where you want the legs to cross – for an A-frame roughly a forearm's length from the top.
 2Six wraps around both poles
Wrap around both poles six times, working away from the hitch, each turn snug against the last. Firm, not strangled: if the wraps are bone-tight, the legs will not open or the cord will snap when you force them.
 3Frap twice, then clove hitch
Pass the cord between the two poles and make two frapping turns around the wraps, pulling them together in the gap. Finish with a clove hitch on the other pole, next to the lashing.
 4Spread the legs
Stand the pair up and pull the feet apart. The poles lever against the frapping turns and the lashing locks. If the legs open with no resistance, the wraps were too loose – re-tie rather than hope.
Round lashing: making a pole longer
Leave out the frapping turns and you have a round lashing, used to join two poles end to end. Overlap the poles by at least a quarter of their length, tie one round lashing near each end of the overlap – eight to ten very tight wraps each – and finish with a clove hitch around both poles. Because there is no frapping, tightness comes from the wraps alone; a small wedge driven between the poles under the wraps takes up the last slack. An extended pole is fine for a flag, a tarp prop or a light ridge line support, but it is always weaker than a single pole: never use it where it carries weight overhead.

How to tie a tripod lashing
The tripod lashing is a shear lashing for three poles. It is the fastest way to a free-standing structure: a camp tripod for the pot, a stand for a water bag, a lantern post, the core of a tipi-style frame. Three legs stand on any ground and need no hole and no guy line.
Tripod lashing in four steps
 1Lay out three poles
Lay three poles of equal length side by side with the butt ends level. Tie a clove hitch around one of the outer poles, about 30 cm from the tips.
 2Six loose wraps
Wrap around all three poles six times. Keep the wraps neat but deliberately loose – you should just be able to push a finger under them. Tight wraps are the classic mistake: the legs then refuse to spread, or the middle pole is levered out.
 3Frap both gaps, clove hitch
Make two frapping turns in the gap between the first and second pole, then two in the gap between the second and third. Pull them firm. Finish with a clove hitch on the other outer pole.
 4Stand it up and spread
Lift the bundle upright, swing the middle leg out to the back and pull the two outer legs apart to the front until the feet form a triangle with sides of about 1 m. The poles twist against the lashing and lock.
Checkpoint: the tripod stands without wobbling, the three tips cross neatly above the lashing, and when you press down on the crossing with your full hand the feet dig in instead of sliding outwards. On hard or frozen ground, set the feet into small scrapes or against stones.
Variant: the figure-of-eight tripod lashing
Many scout handbooks teach a second version in which the wraps are woven – over the first pole, under the second, over the third and back. The figure-of-eight pattern builds the spacing between the poles into the wraps, so the legs spread very easily; in return it is a little less rigid. Both versions work. Learn the plain version above first, because it is the same movement as the shear lashing, and try the woven one when a tripod of thick poles refuses to open.
What to build: camp tripod, pot hanger, A-frame, table and rack
With four lashings you can build nearly all classic camp furniture. Start with the tripod – one lashing, immediate use – and work up to frames with several joints. Always decide first where the structure goes: the camp zones put the kitchen downwind of the sleeping place and everything with a fire on mineral soil, away from roots and overhanging branches.
Cooking tripod and pot hanger
Three poles of about 2 m, 4–5 cm thick, lashed about 30 cm below the tips, with the feet about 1 m apart: that is a camp tripod tall enough to hang a pot over a small fire. Tie a hanger cord to the crossing above the lashing and hang the pot from a carved pot hook, so you can lift it off without touching the cord. To adjust the heat, shorten the cord with an adjustable hitch or carve a hook with several notches.

A tripod is only one way to get a pot over the flames. Our campfire cooking setups compare it with a pot crane and with cooking directly on coals, camp cookware explains which pots have a usable bail handle, and a small burner from the camp stoves guide is the answer wherever open fires are not allowed.
A-frame for a shelter ridge
Two poles with a shear lashing make an A-frame; a ridge pole laid into the crotch and resting on the ground at the far end gives you the skeleton of a ridge-pole shelter. A square-lashed crossbar half-way up stops the legs from spreading and turns the A into a rigid triangle. The same frame carries the ridge of a lean-to where there is no suitable tree, props up the open side of a tarp shelter or forms the entrance of a debris shelter.
Camp table, wash stand and drying rack
A wash stand is simply a tripod with three short crossbars square-lashed between the legs at hip height; a bowl sits on the bars. A camp table is two A-frames or four uprights with two long rails and a top of thin poles, each square-lashed or woven on with one continuous cord. A drying rack is the frame from the drawing above: two posts, a top bar, two crossed braces. Racks keep wet clothes, boots and pots off the ground and are among the most useful half-hours you can spend in a camp that lasts more than one night – see the base camp section for where they belong.
Raised bed frame
A bed off the ground is warmer and drier than any mat on wet soil. The simplest frame is two thick logs as rails with a platform of springy poles lashed across, raised only a hand or two above the ground. Keep it low: you get all the insulation benefit with none of the fall risk, and there are no legs that can fold. Lash every third or fourth cross pole with a square lashing and let the others lie in between.
| Structure | Poles | Lashings | Cord (4 cm poles) | Time |
|---|---|---|---|---|
| Cooking tripod | 3 × about 2 m | 1 tripod lashing | about 5 m + hanger | 15–20 min |
| A-frame for a ridge pole | 2 legs, 1 crossbar, 1 ridge pole | 1 shear, 2 square | about 10 m | 20–30 min |
| Drying rack with braces | 2 posts, 1 bar, 2 braces | 6 square, 1 diagonal | about 22 m | 45–60 min |
| Wash stand | 3 legs, 3 short bars | 1 tripod, 6 square | about 24 m | 45–60 min |
| Low bed frame | 2 rails, 10–15 cross poles | 8–10 square | about 30 m | 1–2 h |
Cord from the 40 cm-per-centimetre rule with 5–6 mm cord; times for someone who has practised each lashing a few times.
Choosing poles: dead standing wood, diameters and the law
The best lashing poles are dead, dry and straight: thin trunks that died standing in dense young woodland, or straight branches caught off the ground. They are light, stiff and already seasoned. Wood lying on wet ground is often rotten on the underside – push a thumbnail into it and bend the pole over your knee before you rely on it. If it creaks, cracks or feels spongy, it is firewood, not furniture.
Pole sizes that work
- Rack bars, table tops, bed slats
- 2–3 cm thick
- Tripod legs, A-frames, rack posts
- 3–5 cm thick, about 2 m long
- Ridge poles and rails that carry weight
- 6–8 cm thick
- Taper
- As little as possible; thick end down
- Bark
- Leave it on – it gives the cord grip
Cut poles to length with a folding saw – it leaves square ends that stand well and wastes nothing. Trim side branches flush with a knife or small hatchet, always cutting away from the hand that holds the pole, because every stub is a place where the cord hangs up and a wrap ends up riding over another. A shallow flat or notch carved where two poles cross stops round wood from rolling and makes any lashing far more stable; the cuts are described in carving basics.
If no natural poles are available or allowed, bring your own: bamboo canes, hazel bean poles or broom handles from a garden centre are ideal for practising in the garden, and a set of three light poles turns any picnic place into a training ground.
Load and stability checks: test before you trust
A lashed structure fails in one of four ways: a pole breaks, a lashing slips along a pole, the whole frame racks sideways into a parallelogram, or a foot sinks or slides. None of these announces itself politely. The answer is the same every time – test deliberately, low to the ground and with more load than the structure will ever see in use.
Before you use any lashed structure
- Twist every joint with both hands: no pole may rotate or slide in its lashing
- Push the frame sideways and lengthways: it must not rack – if it does, add a diagonal brace
- Load it gradually with roughly twice what it will carry, starting with your hands, never with a jump
- Check the feet: level, on firm ground, set into scrapes or against stones if the ground is hard
- Hang the full pot of cold water first, before there is a fire underneath
- Re-check after rain, after a cold night and after any heavy load – cord stretches and shrinks
- Keep children away while you test, and show them afterwards what may and may not be pulled on
Triangles are what make frames rigid. A rectangle of four poles and four square lashings can still fold flat, however tight the lashings are; a single diagonal brace stops it. That is why the tripod is so forgiving and why every rack and table gains from one brace per side. When in doubt, add a brace rather than another wrap.
Natural cordage and withies: lashing without rope
Lashings are older than rope from a shop. Any long, flexible, tough plant material will do, and for a structure you will dismantle and leave to rot, natural bindings are the tidiest choice of all – nothing synthetic can be forgotten in the woods.
- Hand-twisted cord from nettle or lime bast is strong enough for a tripod or rack. How to make it is described in natural cordage: the reverse wrap. Plan generously – a single tripod lashing takes several metres.
- Withies are thin, fresh shoots of willow or hazel, twisted along their length until the fibres separate and the shoot becomes as supple as rope. Hold the thick end, twist the thin end, and work the twist down the shoot before you bend it. A withy is wrapped two or three times around the joint and its end tucked under itself; it will not take a clove hitch.
- Split spruce roots and strips of fresh bark make flat, grippy bindings for light racks. Use them wet; they shrink and tighten as they dry.
The same rules apply as for poles: take living shoots, roots and bark only with the owner's permission and never from protected areas. Test every natural binding harder than you would test cord, because its strength varies from piece to piece, and never use it for anything that hangs over a fire or carries more than light loads.
Bought cord or natural binding?
Bought cord
- Known, even strength
- Takes hitches and frapping turns well
- Re-usable for years
- Must be packed out to the last scrap
Withies, roots, hand-made cord
- Free, on the spot, biodegradable
- Tightens as it dries
- Variable strength – test every joint
- Needs permission to harvest, takes time
Troubleshooting: why lashings slip, rack and work loose

| Symptom | Likely cause | Fix |
|---|---|---|
| Crossbar slides down the upright | Start hitch too far from the joint, or smooth peeled poles | Re-tie with the clove hitch directly under the crossbar; carve a shallow notch or leave the bark on |
| Joint rotates when twisted | Too few or slack frapping turns | Undo the finish hitch, pull the frapping turns hard with a stick, add a third |
| Whole frame leans into a parallelogram | No triangles – only square lashings | Add a diagonal brace on each side; lash it square at the posts |
| Lashing loose the next morning | Stretchy cord, or cord that was wet when tied and has dried | Re-tighten the frapping turns; use low-stretch cord; re-check after weather changes |
| Lashing very tight after rain, cord creaks | Natural fibre swells and shortens when wet | Normal for sisal and jute; ease the frapping if poles start to bend |
| Tripod legs will not spread | Wraps too tight | Re-tie with wraps you can push a finger under, or use the figure-of-eight variant |
| Tripod flops open and slides | Wraps too loose or too few frapping turns; feet on hard ground | Re-tie firmer; set the feet in scrapes or tie a cord around all three feet |
| Wraps climb over each other | Turns not laid side by side, stubs on the pole | Trim stubs flush; guide each turn into place with your thumb before pulling |
| Cord runs out before the finish hitch | Cord cut too short | Start again with a length from the 40 cm-per-centimetre rule – do not skip the hitch |
Practice drills: from first lashing to camp furniture
Lashings are a rhythm, and rhythm comes from repetition. Three broom handles and four lengths of cord are enough to learn everything on this page at home.
A practice plan for one afternoon
- Ten clove hitches Tie the clove hitch on a pole ten times, five of them as two half hitches at the end of a cord under tension. The hitch has to be automatic before the lashing can be.
- Square lashing against the clock Tie a square lashing, twist-test it, untie it. Repeat until three in a row pass the test. Speed comes by itself; a practised lashing takes three to five minutes.
- Count out loud Say "over, behind, over, behind" for the wraps and count them: three wraps, two frapping turns. The count stops you from adding a lazy fourth wrap instead of pulling the third one tight.
- Tripod, then load Tie a tripod lashing, stand it up and hang a full water container from it. Take it down, tie it tighter and looser on purpose and feel the difference when you spread the legs.
- One small frame Build the braced rack from the drawing at table-top size: two posts, a bar, two braces. It contains six square lashings and one diagonal – everything you need for real camp furniture.
Lashing practice is also one of the best group and family activities at camp: every child can wrap, the result is visible at once and a wash stand or a tripod for the water bottle is something to be proud of. Ideas for age-appropriate jobs are in bushcraft with kids. A natural next step is to carve the hooks, toggles and pegs that go with your structures – see carving a spoon for the same knife grips on a bigger project.
Taking it all down: leave no trace
A lashed structure is finished when it has been taken apart again. Frames left standing in the woods are litter with good intentions: they trap wildlife in forgotten cord, invite others to build on them, and annoy landowners enough to close places to everyone.
Dismantling checklist
- Untie every lashing instead of cutting it – the finish hitch first, then unwind
- Count your cords: as many go back into the pack as came out
- Pick up every offcut and melted end of synthetic cord
- Scatter poles where you found them, or stack them where the owner wants them; do not leave "ready-made" frames
- Pull out posts and fill the holes; brush out the scrapes for tripod feet
- Natural bindings may stay with the wood to rot – synthetic cord never
- Leave the fire place as described in fire safety: leave no trace
Dry your cords at home before you store them, check them for cuts and glazed, melted spots, and retire anything doubtful to practice duty. Sisal and jute in particular rot quickly when packed away damp. The whole routine of breaking camp is described in breaking camp; how to dry and care for the rest of your tools is covered in tool care.
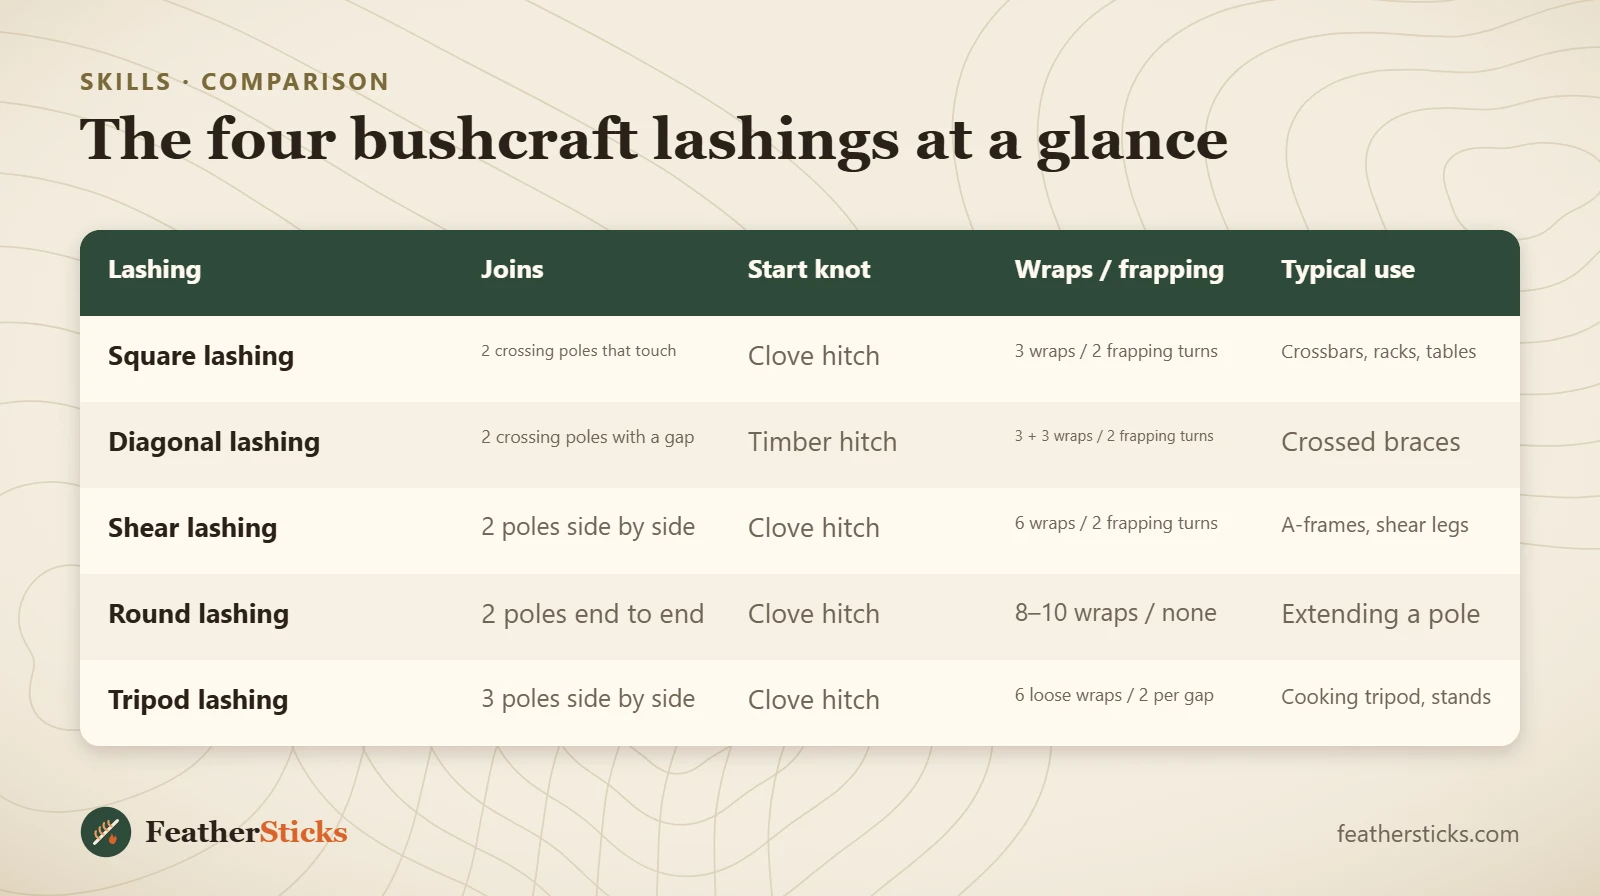
| Lashing | Joins | Start knot | Wraps / frapping | Typical use |
|---|---|---|---|---|
| Square lashing | 2 crossing poles that touch | Clove hitch | 3 wraps / 2 frapping turns | Crossbars, racks, tables |
| Diagonal lashing | 2 crossing poles with a gap | Timber hitch | 3 + 3 wraps / 2 frapping turns | Crossed braces |
| Shear lashing | 2 poles side by side | Clove hitch | 6 wraps / 2 frapping turns | A-frames, shear legs |
| Round lashing | 2 poles end to end | Clove hitch | 8–10 wraps / none | Extending a pole |
| Tripod lashing | 3 poles side by side | Clove hitch | 6 loose wraps / 2 per gap | Cooking tripod, stands |
Common mistakes
- Skipping the frapping turns – wraps alone always work loose.
- Letting wraps ride over each other instead of laying them side by side.
- Tying the start hitch a few centimetres away from the joint.
- Wrapping a tripod lashing as tight as a square lashing, so the legs cannot spread.
- Building only rectangles: without a diagonal brace every frame racks.
- Using rotten poles from the wet ground or cutting living trees without permission.
- Trusting a structure overhead or with a pot of boiling water before testing it cold.
What you need
- Three or four pre-cut lashing cords of 3–4 m, 4–6 mm thick
- One longer cord of about 6 m for a tripod
- Folding saw for cutting poles to length
- Fixed-blade knife for trimming stubs and carving notches and hooks
- Work gloves for pulling thin cord hard
- Short stick as a pulling toggle
Calculators for this topic
FAQ
How do you tie a square lashing?
What is the difference between a square lashing and a diagonal lashing?
How much rope do I need for a lashing?
How do you make a tripod for cooking over a fire?
What are frapping turns?
What is the best cord for lashings?
Why does my lashing keep coming loose?
Can I cut poles in the forest for camp structures?
Check yourself
Completed6 quick questions from this guide. Nothing is sent anywhere.
Related step-by-step guides
-
 1
-
 1
-
 1