Knife Care and Axe Care: Rust, Oil, Handles and Storage
Good knife care is four short jobs after every trip: wipe the tool clean, dry it completely, put a thin film of oil on the steel and store it in a dry place outside its leather sheath. The same routine, plus a little linseed oil on the wood a few times a year, is all the axe handle care a working axe needs. It takes about five minutes and prevents nearly every problem people later try to fix with sandpaper.
This guide covers the routine in detail, carbon steel knife care compared with stainless, patina versus rust, how to remove rust from a knife, which oils are food-safe, linseed oil and the real fire risk of oily rags, loose axe heads, leather sheaths, saws and folding knives, storage, wet-weather trips and a care calendar. It belongs with our guides to bushcraft knives, axes and hatchets and sharpening in the tools section.
Step by step
-
1

Clean off sap and dirt
Wipe blade, axe head and saw clean right after the trip. Resin comes off with a little oil or alcohol. Always wipe from the spine side, never along the edge.
-
2

Dry everything completely
Dry the steel, the handle and the junction between them with a cloth, then leave the tools in the open air for an hour. Sheaths and masks dry separately at room temperature.
-
3

Oil the steel thinly
Put two or three drops of oil on a cloth and wipe a thin film over blade, spine and axe head. Use a food-safe oil on anything that cuts food.
-
4

Feed wood and leather
Rub a thin coat of linseed oil into wooden handles a few times a year and wipe off the excess. Dry the oily rags flat outdoors: crumpled up, they can self-ignite.
-
5

Store dry, out of the leather
Keep the tools in a dry room with the knife beside its sheath, not inside it. Check the axe head for tightness before the next trip.
Knife care after every trip: clean, dry, oil, store
Steel does not rust because it is old. It rusts because it stayed wet, dirty or salty for too long. The whole point of an after-trip routine is to shorten that time to zero before the tools go back on the shelf. Do it the same evening you come home, before the pack is put away, because a knife that spends a week in a damp sheath at the bottom of a rucksack will show it.
The five-minute routine
- CleanDamp cloth, a drop of washing-up liquid for food residue, oil or alcohol for resin.
- DryCloth first, then air. Pay attention to the handle junction and the axe eye.
- OilTwo or three drops on a cloth, wiped out to a film you can barely see.
- CheckEdge, handle, wedge, sheath stitching. Note what needs work.
- StoreDry room, knife beside the sheath, axe masked.
Clean
Wipe the blade with a damp cloth from the spine towards the edge, or along the blade from handle to tip with the cloth pinched over the spine. Your fingers never travel along the cutting edge. Dried food and fat come off with warm water and a drop of washing-up liquid. Resin from pine and spruce, which you will collect when splitting fatwood or making feather sticks, dissolves in oil or alcohol; plain water just smears it. Fixed-blade knives may be rinsed under the tap. They do not belong in a dishwasher: heat, salt and detergent attack the edge, the steel and every natural handle material.
Dry
Water hides where two materials meet: at the junction of blade and handle, under handle scales, in the lanyard hole, in the eye of an axe and in the slot of a folding saw. Dry with a cloth, then leave everything in the open air for an hour before oiling. Warm air from a distance is fine; a hot stove or radiator is not, because it cracks wood and shrinks leather.
Oil
Oil works by keeping water and oxygen away from the steel, so a closed film matters and thickness does not. Put two or three drops on a cloth and wipe both sides of the blade, the spine and, on a full-tang knife, the exposed steel around the handle. Then wipe again with a dry part of the cloth. If you can see runs or the blade feels greasy, it is too much: thick oil collects dust and soaks into the sheath.
Check and store
While the tool is in your hand, look at it properly. Is the edge chipped or shiny in places? Is the handle cracked? Has the axe head moved? Then put it away dry, as described in the storage section. Care does not put an edge back on a dull tool, so if the knife no longer slices paper, the next stop is the strop or the stone.

Carbon steel knife care vs stainless: what really differs
Carbon steel knife care is not harder than caring for stainless, only less forgiving. A simple carbon steel has almost no chromium to protect it, so a wet blade can show orange spots within hours, and acidic food such as onion, tomato or citrus leaves dark marks within minutes. In exchange it sharpens quickly and takes a very fine edge, which is why so many bushcraft and carving knives use it.
Stainless steel contains enough chromium (by the usual definition at least about 10.5 %, in knife steels usually more) to form an invisible, self-healing oxide layer. The word is "stain-less", not "stain-proof": salt water, sweat, a wet leather sheath and long contact with food acids will pit stainless blades as well, typically as small dark dots rather than an orange film. Background on the steels themselves is in carbon vs stainless steel.
| Carbon steel | Stainless steel | Coated blade | |
|---|---|---|---|
| After cutting food | Wipe at once, rinse soon | Wipe, rinse the same day | Wipe; the edge itself is bare steel |
| After rain or wet wood | Dry within the hour, oil in the evening | Dry in the evening | Dry edge and any worn spots |
| Oil film | After every trip, and in camp when wet | Before storage and after salt water | On the edge bevel and scratches |
| Typical damage | Orange surface rust, later pits | Small dark pits, rust at the junction | Rust creeping under chipped coating |
| Natural protection | Patina builds with use | Chromium oxide layer | The coating, where intact |
| Storage in leather | Never for long | Not for long | Not for long |
Axe heads are almost always carbon steel and are cared for exactly like a carbon blade. Most saw blades are carbon steel too, often with a thin coating that should not be sanded off. Laminated blades have a carbon core between softer or stainless sides: the exposed line at the edge needs the same attention as a full carbon blade.
Patina vs rust: which is which, and should you force a patina?
Both are iron oxides, but they behave in opposite ways. Patina is a thin, dark, tightly bonded layer that forms slowly when carbon steel meets mild acids and air. It is grey, blue-grey or almost black, feels as smooth as the steel around it and does not come off on your finger. Once formed it slows further corrosion. Rust is the orange to red-brown, loose form. It is rough, rubs off as a brown smear, holds moisture against the steel and keeps growing underneath itself until it leaves pits.

A quick test: wipe the spot with a white cloth and a drop of oil. Patina leaves the cloth almost clean. Rust leaves a brown mark, and you can feel it with a fingernail on the flat of the blade.
Forcing a patina
You can let a patina grow by itself, simply by using the knife on food and wood, or speed it up with a mild household acid. A forced patina gives a new carbon blade a head start and makes it less reactive with food. It is not a rust-proof coating: a patinated blade left wet will still rust, only more slowly.
Forcing a patina with vinegar
- Degrease Wash the blade with washing-up liquid or wipe it with alcohol. Fingerprints and oil leave blotches, so do not touch the steel afterwards.
- Apply the acid Wrap the blade in kitchen paper soaked in warm vinegar, or stand it in a tall glass of vinegar with the tip resting on a folded cloth. Mustard dabbed on with a sponge gives a mottled pattern instead of an even grey.
- Wait and watch Check after 10 minutes and again every few minutes. Most blades are evenly grey after 10–20 minutes. Longer does not protect better; it only etches the surface rougher.
- Rinse and neutralise Rinse under running water and wipe with a little baking soda dissolved in water, then rinse again. Any orange bloom that formed while drying wipes off with a cloth.
- Dry, oil, hone Dry completely and oil. Acid also attacks the fine apex of the edge, so finish with a few strokes on the strop.
Do not expect anything from this on stainless steel, and keep acids away from coated blades and from the handle. A patina wears bright again on the bevel wherever you sharpen, which is normal.
How to remove rust from a knife (or axe head)
How to remove rust from a knife depends on how deep it goes. Always start with the mildest method and stop as soon as the orange is gone, because every abrasive also removes sound steel and changes the finish. The same steps work on axe heads and on uncoated saw blades.
Removing rust in four stages
 1Judge the depth
Look at the blade in good light. A thin orange film that smears when wiped is surface rust and comes off in a minute. Dark spots that you can feel with a fingernail are pits: the rust in them can be removed, the hollows stay.
 2Light rust: oil and fine steel wool
Lay the knife flat on the table edge with the cutting edge pointing away from you. Put a drop of oil on the spot and rub lengthwise with grade 0000 steel wool and light pressure, fingers on the flat of the blade. A rust eraser or a cork with a little metal polish works the same way.
 3Deeper rust: paper on a block
Wrap wet-and-dry paper around a small block, add oil and work along the blade, starting at 400 grit and refining with 600 and 1000. The block keeps the surface flat. Stay off the cutting edge itself: the edge is repaired on a stone, not with paper.
 4Clean, dry and oil
Wipe off the dark slurry, wash the blade, dry it and oil it. Grey shadows where the rust sat are harmless and blend into the patina. If the rust reached the edge, finish on the stone and strop.
| Method | Good for | Watch out |
|---|---|---|
| Oil and a rough cloth or cork | Fresh orange bloom from one wet night | Often enough; try it first |
| Baking soda paste on a cloth | Light film, food-contact blades | Rinse and dry well afterwards |
| 0000 steel wool or rust eraser with oil | Surface rust on blades and axe heads | Also thins a patina; steel wool fibres rust, so wipe them off |
| Wet-and-dry paper 400 → 1000 on a block | Rust with beginning pits | Changes the finish; keep strokes lengthwise and even |
| Vinegar bath, checked every 10–15 min | Heavily rusted old tools and axe heads | Etches steel grey and attacks the edge; rinse, neutralise with baking soda, oil at once |
| Power tools, wire wheels, coarse flap discs | Restoration work by experienced people | Easily overheat a thin edge and ruin the temper; not for knives |
Wear gloves when using steel wool or abrasive paper near an edge, and keep the edge pointing away from the working hand.
When is a rusty blade beyond saving?
Pitting on the flat of a blade is cosmetic. Pits in the edge are different: each one is a tiny notch that will keep breaking out, so the edge has to be ground back on a coarse stone until it runs through sound steel, as described under how edges get dull. Rust that has crept deep under handle scales or into the pivot of a folder, or a blade that has lost visible thickness, is a reason to retire the tool from hard work such as batoning.
Food-safe oils vs tool oils: what goes on which tool
There are two different jobs here, and mixing them up causes most of the confusion. Non-drying oils stay liquid and protect steel. Drying oils react with air, harden and protect wood. A third group, greases and waxes, is for leather and long storage.
| Product type | Use on | Food contact | Notes |
|---|---|---|---|
| Food-grade mineral oil (white oil) | Blades, axe heads, saw blades, pivots | Yes | Does not go rancid or gum up; the simplest all-round choice |
| Camellia oil | Blades, carving tools | Yes | Traditional tool oil, thin, almost odourless |
| Cooking oil (olive, sunflower, rapeseed) | Blades, in camp for a few days | Yes | Fine as a stopgap; turns sticky and rancid in storage |
| General-purpose tool and gun oils | Axe heads, saws, tools that never touch food | Check the label; many are not | Good rust protection and creeping ability |
| Boiled linseed oil | Wooden handles, axe hafts | No (contains drying agents) | Cures in about a day; rags can self-ignite |
| Raw linseed oil, tung oil | Wooden handles, spoons | Pure food-grade types only | Cures in days to weeks; rags can self-ignite |
| Beeswax or leather grease | Sheaths, masks, long-term steel storage | Beeswax yes | Seals against water; use sparingly on leather |
For a knife that cuts bread, cheese and sausage on a trip, use an oil you would not mind eating: mineral oil sold for chopping boards, or camellia oil. If you used a workshop oil, simply wash the blade with washing-up liquid before it touches food. Axes and saws can take any light tool oil. Thick grease on blades is for storage only, and has to be wiped off before use.
A practical field solution is a scrap of cotton with a few drops of mineral or camellia oil, kept in a small tin or zip bag in the sharpening kit. Because these oils do not cure, such a cloth does not heat up. Never keep a cloth with linseed or tung oil the same way.
Axe handle care: linseed oil on wooden handles
Axe handle care means keeping the wood from swinging between soaked and bone-dry. Wood that dries out shrinks, cracks and loosens in the eye; wood that stays wet swells, turns grey and eventually rots. A drying oil soaks into the surface fibres, hardens there and slows the exchange of moisture, while leaving the grippy feel of bare wood. Linseed oil is the classic choice for hickory and ash axe hafts and for the wooden handles of knives, carving tools and frame saws. Iron cookware is a separate case: a cast iron pan gets a baked-on oil layer, described in seasoning and caring for cast iron.
Many new axes come with a varnished handle. Varnish protects well in the shop but is slippery when wet, causes blisters in long sessions and cannot be refreshed in spots. Sanding it off and oiling instead is a matter of preference, not a requirement.
Oiling an axe handle with linseed oil
 1Sand lightly
Mask the bit. Sand the handle with 180–240 grit paper along the grain until old varnish, grey fibres and grime are gone. Wipe off the dust. A handle that is already oiled only needs cleaning.
 2Rub in a thin coat
Put a little linseed oil on a rag and rub it into the wood from the head to the knob. Give the end grain at the bottom of the handle and the wood showing at the top of the eye extra oil: end grain drinks moisture fastest.
 3Wait, then wipe off everything
Let the oil soak in for 20–30 minutes, then wipe off every bit that is still on the surface. Oil left standing cures into a sticky skin. Let the handle cure for about a day before the next coat or before use.
 4Deal with the rags at once
Hang the oily rags flat and singly outdoors until they are stiff and dry, or sink them in water in a metal can with a lid. Never leave them crumpled in a bin, a bucket or a pocket.
How often?
A new or freshly sanded handle takes two or three thin coats on consecutive days. After that, oil it two to four times a year, or whenever the wood looks pale and dry or feels rough after a wet trip. A traditional rule of thumb for new wood says once a day for a week, once a week for a month and once a month for a year; it is generous but does no harm as long as each coat is wiped off.
Boiled or raw linseed oil?
"Boiled" linseed oil contains added drying agents and cures in roughly a day. Raw linseed oil has no additives and needs days to weeks, during which the handle stays slightly tacky. For tool handles the boiled type is more practical. For anything that goes in the mouth, such as the spoon from our spoon carving guide, use only pure, food-grade oil. Both kinds carry the same rag-fire risk.
Knife handles
Unsealed wooden knife handles get the same treatment in miniature: a few drops, rubbed in with a fingertip, wiped off after 20–30 minutes. Stabilised wood, plastic, rubber and micarta need only washing. Birch-bark and leather-washer handles like a little wax now and then.
Loose axe head: checks, re-wedging basics and when to replace the handle
An axe head that moves on its handle is a safety problem, not a care problem. A head that leaves the handle in mid-swing travels far and fast. Check it before every session, as described in our axe maintenance section, and stop working the moment something moves.
Four quick checks
- Look at the top of the eye. The wood should fill the eye completely, with the wedge sitting firmly in its slot. Dark gaps, a sunken or missing wedge and cracked wood are warning signs.
- Look below the head. A step, a bright ring of clean wood or a line of rust-free steel shows that the head has crept upwards.
- Try to move it. With the mask on, hold the handle and try to twist and rock the head. Any click or movement counts.
- Inspect the handle. Look for cracks running out of the eye, for splits along the grain and for chewed wood just below the head from overstrikes.
Tightening a loose axe head: the basics
 1Find the cause
A gap around the wood at the top of the eye or a head that shifts by hand means the fit is gone. Stop using the axe until it is repaired; do not "just finish this log".
 2Seat the head
With the mask on and the head pointing up, rap the end of the handle firmly on a chopping block a few times. The handle stops, the heavy head travels on and drives itself down onto the taper. Hands stay on the handle, well below the head.
 3Tighten or renew the wedge
Drive the wooden wedge deeper with a mallet. If it is loose, split or missing, pull the remains and fit a new, dry hardwood wedge. A small steel cross wedge driven in at an angle to the wooden one spreads the wood in the other direction and locks it.
 4Trim and seal
Saw off what stands too far above the head, leaving the wood 3–5 mm proud so it can mushroom over the eye. Soak the fresh end grain with linseed oil to slow moisture exchange.
Tighten it or replace the handle?
Is the handle cracked at or below the head, or is the wood in the eye soft, dark and crumbly?
Yes → Replace the handle. No wedge fixes broken or rotten wood.No → Go on to the next question.Does the head sit fully down on the handle, with only the wedge loose or sunken?
Yes → Drive the wedge deeper or fit a new one, add a steel cross wedge.No → Seat the head on a block first, then wedge.After seating and wedging, can you still move the head by hand?
Yes → The wood has shrunk or been crushed too far: hang a new handle.No → Oil the end grain and check again before every session.

Why soaking the head in water makes it worse
Standing a loose axe in a bucket overnight is the best-known quick fix, and it does make the head tight for a day or two. The wood swells against steel that cannot give way, so the fibres are crushed. When the handle dries again it shrinks back from a smaller starting size, and the head is looser than before. Meanwhile the inside of the eye rusts and the wet end grain starts to rot. Soaking the head in oil for days is less harmful to the steel but softens the wood without fixing the fit. The real cures are mechanical: seating, wedging or a new handle.
Preventing a loose head
Most heads loosen because the axe was stored too warm and too dry: next to a stove, on a radiator shelf, in a car in summer. Keep it somewhere cool with normal room humidity, oil the end grain at both ends of the handle, and avoid overstrikes by working on a proper block as shown in safe axe use.
Leather sheath and axe mask care
A sheath or mask has one job: to keep the edge away from you and your gear. Leather does it quietly and lasts for decades, but it soaks up water like a sponge and holds it against the steel. Tanning residues in leather also react with steel, which is why a blade can rust in a sheath that feels dry. If you make your own sheath, the same rules apply from day one.
- After a wet trip, take the knife out, wipe out the mouth of the sheath and let it dry slowly at room temperature, mouth downwards or stuffed loosely with paper. Never dry leather on a radiator, by the fire or in hot sun: it shrinks, hardens and cracks.
- Clean with a barely damp cloth. Grit inside a sheath scratches the blade every time it is drawn; tap it out, or rinse plastic sheaths under the tap.
- Feed the outside once or twice a year with a thin layer of leather grease or beeswax-based dressing, worked in with a cloth and buffed. This keeps water out and the leather supple.
- Do not soak it in oil. Heavily oiled leather goes soft, and a soft sheath no longer holds its shape around the edge. A firm sheath with a welt (a strip of leather along the seam, see knife sheaths) is a safety feature.
- Check stitching, rivets, the belt loop and the strap or buckle of the axe mask. Green deposits around brass rivets are harmless and wipe off; cut stitches on the edge side are not and need repair before the next trip.
Plastic and thermoformed sheaths need less care but trap water just as well. Most have a drain hole; make sure it is open, and dry the knife before it goes in.
Saw blade care and cleaning a folding knife pivot
Saw blades: resin off, oil on
A saw that binds in every cut is often not dull but dirty. Resin builds up on the sides of the blade and between the teeth and turns into a sticky brake. Brush the sawdust out, then wipe the blade with a cloth and a little oil or alcohol, always working from the back of the blade towards the teeth so that neither the cloth nor your fingers run along the tooth line. Dry the blade and wipe on a thin film of oil before folding it away, and clean the slot in the handle, where wet sawdust sits against the steel.
Leave coated blades as they are; sanding the coating off makes them rust faster. Impulse-hardened teeth cannot be filed, so a blade that is clean and still cuts slowly is replaced. The details are in saw maintenance.
Folding knives: the pivot collects everything
The pivot and the blade slot of a folding knife fill up with pocket lint, sand, resin and food. That is unpleasant on a knife used for meals and, worse, it can stop a lock from engaging fully. Clean it without taking it apart; most folders are not meant to be dismantled, and doing so can void a warranty.
Cleaning a folding knife pivot
 1Brush it out
Open the blade fully and lay the knife down with the edge pointing away from you. Brush lint and grit out of the pivot and the blade slot with an old toothbrush; a wooden toothpick or a pipe cleaner reaches the corners. Keep fingers out of the path of the blade.
 2Wash and dry
Rinse in warm water with a drop of washing-up liquid, working the brush around the pivot, then rinse clear. Shake the water out and leave the knife open on a cloth until the inside is completely dry. Warm air from a distance speeds this up.
 3One drop of oil
Put a single drop of oil on the pivot, open and close the blade a few times with care, and wipe off what comes out. Use a food-safe oil if the knife cuts food. Check that the lock engages fully and that the pivot screw, if there is one, has no play.
Multitools are cleaned the same way, one tool at a time. Hook knives and gouges get a wipe and a drop of oil like any carbon blade; their edges are covered in sharpening carving tools.
Storing knives and axes: dry, and not in the leather sheath
For a weekend, a dry knife in a dry sheath is fine. For weeks or a whole winter, store the blade out of the leather, lying next to its sheath. This one habit prevents the classic surprise of a knife that went into the drawer clean in autumn and comes out in spring with a line of rust where the leather touched it.

Storage checklist
- A dry, evenly heated room. Sheds, cellars and garages swing between damp and dry and are hard on steel and wood alike.
- Blades clean, dry and oiled; for storage over months a slightly thicker film or a thin coat of wax.
- Knife beside the sheath, or in a simple cardboard or paper sleeve. Mask on the axe, but only when both are dry.
- Axe in a cool spot away from heaters and direct sun, hanging or lying flat, not standing on a concrete floor.
- Folding saw closed and dry; cord-tensioned wooden frame saws slackened.
- A sachet of silica gel in a closed tool box helps; an airtight box without one traps moisture.
- Out of reach of children, and edges covered. See bushcraft with kids for sensible rules at home.
- A look at everything every couple of months. Rust found early is a one-minute job.
If tools live permanently in a packed rucksack, take them out after each trip anyway. A pack that was put away slightly damp is the worst storage place there is. Packing them again is quick with the Kit Builder or our kit list. Laws on carrying and transporting knives and axes differ from country to country; store and transport tools sheathed and packed, and check the rules where you live.
Field care on a wet trip
Three days of rain is where care routines are tested. You cannot keep tools dry, but you can stop them from staying wet for long.
- Wipe before sheathing, every time. Keep one dry cloth for this in a chest pocket.
- Oil in the evening. When the day's work is done, wipe knife, axe head and saw with the oil cloth from your kit. It takes a minute and fits well into the evening routine of setting up camp.
- Keep tools off the ground. Hang the axe by its mask strap and the saw from a branch stub under the tarp. An axe left stuck in a stump overnight sits in wet wood full of tannins and will carry a black-and-orange line by morning.
- Dry the sheath when you can. Near the fire means where your hand is comfortable for a long time, not closer. The knife can ride on a neck cord or in a pocket of the pack lid meanwhile.
- Clean food off at once. Fruit, onions, cured sausage and salt mark carbon steel quickly. Rinse, wipe, done. More on kitchen hygiene outdoors under campfire cooking.
- Do not clean a blade by stabbing it into the soil. Sand dulls the edge in one push.
| Conditions | Main risk | What to do |
|---|---|---|
| Steady rain, wet wood | Tools never dry; sheath soaked | Wipe before sheathing, oil each evening, dry the sheath at the fire from a distance. See fire in wet weather |
| Coast, salt spray, sea water | Fast rust on carbon steel, pitting on stainless | Rinse with fresh water the same day, dry, oil generously |
| Frost and snow | Condensation when cold steel enters a warm tent or hut | Let tools warm up, then wipe dry and oil; see winter camping |
| Resinous softwood | Sticky blades, binding saw | Oil or alcohol on a cloth; clean the saw before the resin hardens |
| Oak, chestnut and other tannin-rich wood | Blue-black stains on carbon steel | Harmless; wipe and oil. Stains become part of the patina |
| Hot, dry summer | Handles shrink, heads loosen | Shade, no hot car boot; check the head before each use |
The square spine that throws sparks from a ferro rod is bare steel too and benefits from the same wipe of oil. If the weather turns and you have no oil at all, cooking fat or lip balm on a cloth is better than nothing for a night or two. A wet trip is also when hands are cold and slippery, so slow down, and keep the first aid kit where you can reach it.
Care calendar: what to do when
Care is easy to keep up when it is tied to fixed moments rather than to the calendar on the wall: every use, every trip, and two bigger sessions a year, for example before the autumn season and again in spring.
| When | Knife | Axe | Saw | Leather |
|---|---|---|---|---|
| Every use | Wipe dry before sheathing | Check head and handle, wipe, mask on | Brush out sawdust, close dry | Keep grit out of the mouth |
| After every trip | Clean, dry, oil, strop, store out of the sheath | Clean and oil the head, look at the wedge | Remove resin, dry, oil | Dry slowly at room temperature |
| Every few trips | Clean the pivot of folders; hone the edge | Touch up the edge with a puck | Check pivot, lock and screws | Wipe clean, check stitching |
| Twice a year | Oil wooden handles; inspect for rust under the guard | Linseed oil on the handle, 1–2 thin coats | Check blade for kinks and missing teeth | Thin coat of leather grease or wax |
| Once a year | Full sharpening; renew the patina if you like | Check wedge and fit closely; sand rough spots | Fit a new blade if it cuts slowly | Repair stitching and straps |
| Before long storage | Slightly thicker oil film or wax | Oil head and end grain; cool room | Oil; slacken cord-tensioned frames | Store dry and apart from the steel |
Adjust to use: a carving knife in daily use is stropped daily, while an axe that splits wood twice a year needs little more than oil and a look at the wedge.
What care does not replace
Oil and wax keep a tool from getting worse. They do not make it cut. Three things sit outside the care routine and are just as important.
Sharpening
A clean, oiled, dull knife is still a dull knife, and a dull knife slips. Stropping after every trip belongs to the routine; everything beyond that is its own skill with its own guide. Angles, stones and the step-by-step technique are in how to sharpen a bushcraft knife, the axe is sharpened with file and puck, and how often to sharpen has its own schedule. If you are unsure whether an edge needs work, the paper and light tests tell you in seconds.
Using the tool within its limits
No oil prevents a chipped edge from prying, twisting in a knot or striking a stone. Most damage comes from use, not from weather: batoning through knots, chopping into the ground, levering with the tip. Good technique, as in carving basics and the knife-safety chapter of bushcraft for beginners, is the cheapest care there is.
Inspection before use
A handle oiled last spring can still have cracked last week. The thirty-second look before the first cut – head tight, handle sound, lock engaging, sheath intact – cannot be done in advance. Build it into the moment you unpack, the same way you check the ground and the wind before lighting a fire.
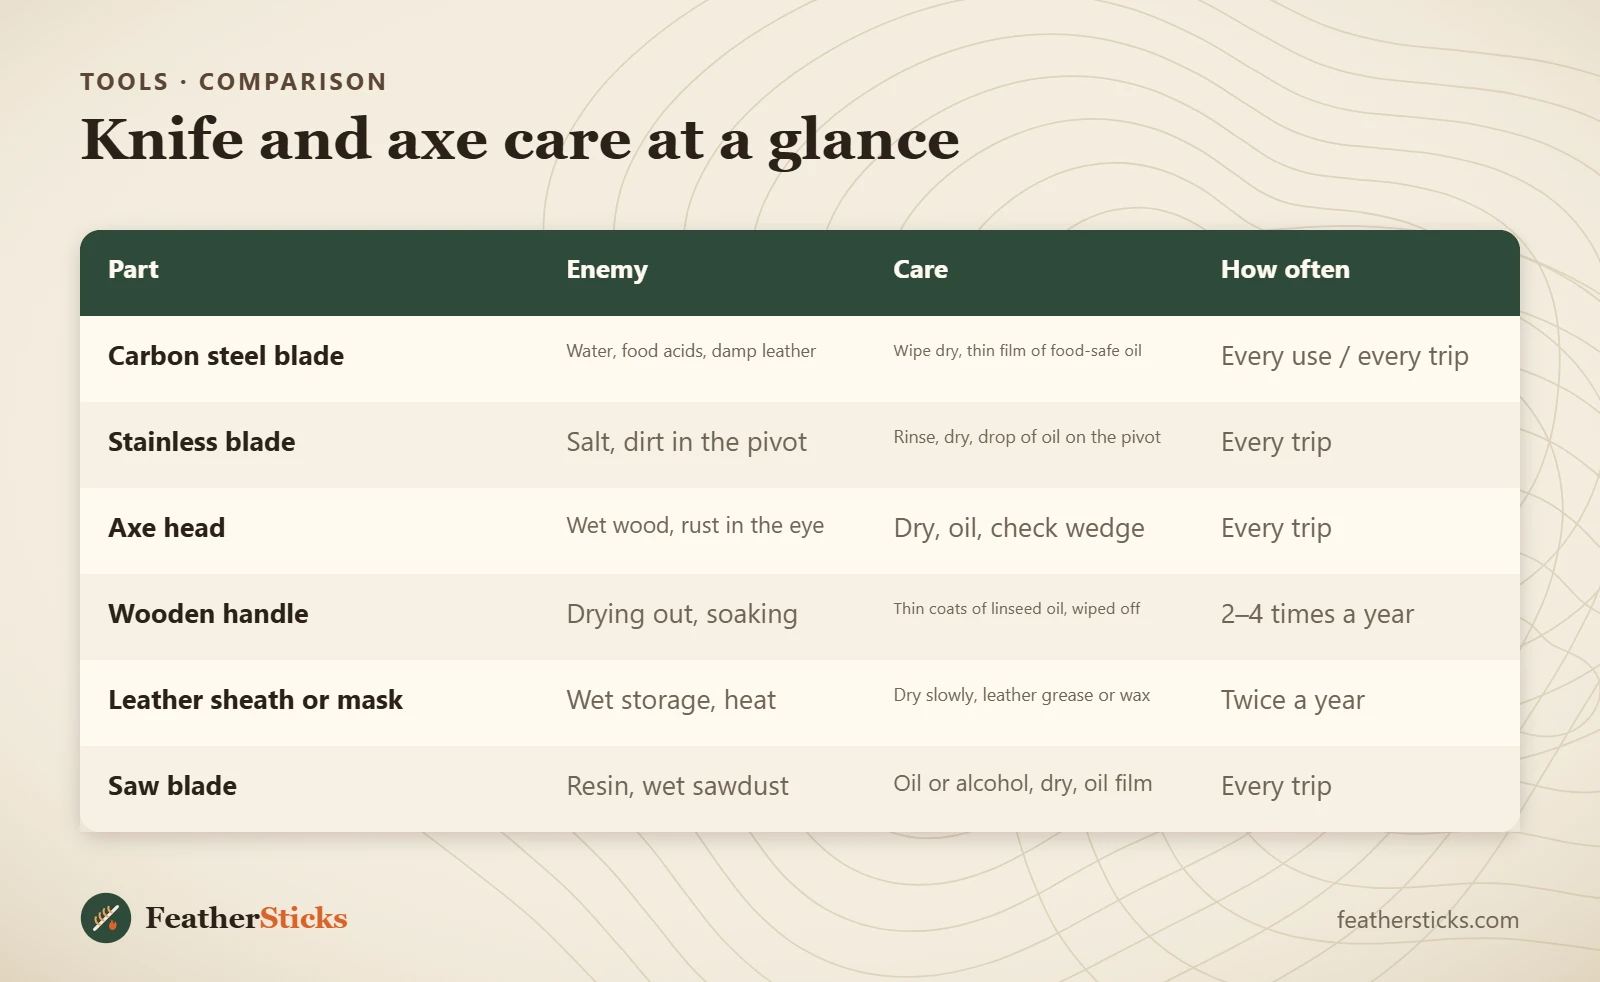
| Part | Enemy | Care | How often |
|---|---|---|---|
| Carbon steel blade | Water, food acids, damp leather | Wipe dry, thin film of food-safe oil | Every use / every trip |
| Stainless blade | Salt, dirt in the pivot | Rinse, dry, drop of oil on the pivot | Every trip |
| Axe head | Wet wood, rust in the eye | Dry, oil, check wedge | Every trip |
| Wooden handle | Drying out, soaking | Thin coats of linseed oil, wiped off | 2–4 times a year |
| Leather sheath or mask | Wet storage, heat | Dry slowly, leather grease or wax | Twice a year |
| Saw blade | Resin, wet sawdust | Oil or alcohol, dry, oil film | Every trip |
Common mistakes
- Putting a wet knife back into its leather sheath and leaving it there until the next trip.
- Leaving linseed-oil rags crumpled in a bin or bag instead of drying them flat outdoors or sinking them in water.
- Standing a loose axe in water: tight for a day, looser than before afterwards.
- Attacking light rust with coarse sandpaper or a wire wheel and grinding away sound steel and the finish.
- Drying leather or a wooden handle on a stove or radiator, which cracks both and loosens the axe head.
- Oiling thickly: sticky blades collect grit, and uncured linseed oil leaves a gummy skin on the handle.
- Treating care as a substitute for sharpening, or working on with a head that has started to move.
What you need
- Cotton cloths: one dry, one lightly oiled, kept in a tin or zip bag
- Food-safe oil (mineral or camellia oil) in a small dropper bottle
- Linseed oil for wooden handles, plus a metal can with a lid for used rags
- Grade 0000 steel wool or a rust eraser
- Wet-and-dry paper in 400, 600 and 1000 grit and a small sanding block
- Leather grease or beeswax dressing
- Old toothbrush and wooden toothpicks for pivots and saw slots
- Spare hardwood and steel wedges for the axe
FAQ
How do I remove rust from a knife without damaging it?
What oil should I use on a carbon steel knife?
Is patina good or bad for a knife?
Can linseed oil rags really catch fire on their own?
How often should I oil an axe handle?
Should I soak a loose axe head in water?
Can I store my knife in its leather sheath?
Does stainless steel need any care at all?
Check yourself
Completed6 quick questions from this guide. Nothing is sent anywhere.
Related step-by-step guides
-
 1
-
 1
-
 1