Saw Care: Folding Saw Maintenance and Replacing a Bow Saw Blade
Saw care is mostly three habits: brush the sawdust out, wipe the resin off with a little oil or alcohol, and put the blade away dry with a thin film of oil. Add a quick check of the lock on a folding saw and the tension on a bow saw, and your saw cuts like new for a long time. When it no longer does, the answer for most modern saws is not a file but a new blade, because their teeth are hardened too hard to sharpen.
This guide covers folding saw maintenance, how to clean saw blade resin without damaging handle or coating, rust prevention, how to replace a bow saw blade safely, and the honest answer to can you sharpen a folding saw. Choosing and using the saw itself is in folding saw vs bow saw; this article is part of the bushcraft tools section and builds on knife and axe care.
Step by step
-
1

Brush out and wipe off resin
Brush sawdust out of the teeth and the handle slot. Wipe resin off with a cloth and a little oil or alcohol, always from the spine towards the teeth.
-
2

Dry, then oil thinly
Dry the blade and slot completely, then wipe on a thin film of oil with two or three drops on a cloth. Never fold a wet saw away.
-
3

Check lock and pivot
Open the folding saw, let the lock click in and try to wiggle the blade. Any side play or a lock that does not engage fully needs attention before the next cut.
-
4

Tension the bow saw safely
Wear gloves, keep fingers out of the lever path and close the lever until the blade rings clearly when plucked and does not twist sideways.
-
5

Replace, don't file, hardened teeth
Dark tooth tips mean impulse-hardened teeth that no file can cut. When the saw slows down or wanders, fit a new blade made for your saw.
-
6

Store and carry covered
Fold and lock the folding saw, put the guard on the bow saw blade, and carry both inside the pack, dry and out of sight.
Which saw needs which care?
All bushcraft saws share one weak point: a thin steel blade with many small teeth that hate resin, rust, soil and twisting. Beyond that, each type has its own extra job. The sizes below are the same as in our blade length guide.
- Folding saws (blades of about 18–33 cm) live in a pocket or pouch. The pivot and the lock carry every stroke, and wet sawdust collects in the handle slot where the blade folds in.
- Bow saws (blades of about 53–76 cm, that is 21–30 in) hold a thin blade under tension in a steel or wooden frame. The tension lever, the two pins at the blade ends and the blade guard are their maintenance points.
- Pocket chain saws are a length of cutting chain with handles or loops. They need cleaning, a drop of oil and careful coiling, and they suffer from kinks and stretched links rather than from a loose pivot.
| Saw | Typical blade | Main care points | Typical failure |
|---|---|---|---|
| Folding saw | 18–33 cm | Resin, handle slot, pivot screw, lock | Binding blade, side play, rust in the slot |
| Bow saw | 53–76 cm (21–30 in) | Tension, pins, blade guard, frame | Slack or kinked blade, lost guard |
| Pocket chain saw | Chain with handles | Clean, oil lightly, coil loosely | Kinked or stiff links, dull teeth |
| Wire saw | Twisted cable | Keep dry, never kink | Snaps at a kink |
Sizes match our saw guide; individual models differ.

How to clean saw blade resin
A saw that suddenly binds in every cut is often not dull but dirty. Pine, spruce and other softwoods leave sap on the sides of the blade and in the gullets between the teeth. It hardens into a sticky brake that increases friction and makes the blade run hot and wander. The cure is the same routine as in saw blade care: brush, dissolve, dry, oil.
Do it the same evening if you can. Fresh resin comes off in a minute; resin that has dried for weeks needs soaking and patience. Resin from fatwood stumps is the stickiest of all, so clean the saw right after harvesting it.
Cleaning resin off a saw blade
 1Brush it out
Open the saw and brush sawdust out of the teeth and the handle slot with an old toothbrush. A wooden toothpick reaches the corners of the slot. Wet sawdust left there holds moisture against the steel.
 2Cleaner on the cloth
Put a few drops of oil, alcohol or a resin cleaner on a cloth, not directly on the saw. That keeps the liquid off a rubber or plastic handle and away from the pivot.
 3Wipe from spine to teeth
With gloves on, lay the saw flat and wipe from the back of the blade towards the teeth, never along the tooth line. Let stubborn resin soak for a few minutes, then wipe again.
 4Dry and oil
Wipe off every trace of cleaner, let the blade and slot air-dry, then wipe on a thin film of oil from two or three drops on a clean cloth.
| Cleaner | Works on | Watch out |
|---|---|---|
| Light tool or mineral oil | Fresh resin, everyday cleaning | Slow on hard resin; protects at the same time |
| Alcohol (spirit, isopropyl) | Fresh and dried resin | Flammable: use away from fire and stove, with ventilation |
| Dedicated resin cleaner | Thick, hardened deposits | Follow the label, wear gloves, test on the handle first |
| Plain water | Sawdust only | Smears resin and starts rust; dry at once |
| Petrol, thinners, acetone, oven cleaner | Not recommended | Harmful vapours, fire risk, can attack coatings and plastic handles |
What a clean blade looks like
Run a dry fingertip along the flat of the blade, well away from the teeth. It should feel smooth, not tacky. The gullets between the teeth should be open, with no dark brown filling. On a coated blade the coating stays as it is; never sand it off, because bare steel rusts faster.
Rust prevention for saw blades
Most saw blades are carbon steel, sometimes with a thin protective coating. Carbon steel rusts when it stays wet, and a folding saw gives water a perfect hiding place: the slot in the handle. A saw folded away wet after a rainy day can show orange teeth after a single night.
- Dry before folding. Wipe the blade on a cloth or your trouser leg, spine first, before you close it. In camp, hang the saw open from a branch stub under the tarp rather than leaving it on the ground.
- Oil in the evening. The same oil cloth you use for your knife covers the saw. Any light tool oil is fine, because saws do not touch food.
- Air out the slot. After a wet trip, leave the folding saw open for a few hours at home so the handle can dry.
- Light rust comes off with a drop of oil and fine steel wool, rubbed along the blade with the teeth pointing away from your hand. Deeper rust is treated as described in removing rust; rust that has eaten into the teeth means a new blade.
Rust check after a wet trip
- Blade dry on both faces and in the gullets
- Handle slot brushed out and left open to dry
- Thin oil film on blade, pivot and lock
- Bow saw guard dried separately before it goes back on
- Pocket chain saw uncoiled, dried and oiled before it goes back into its pouch
In winter, cold steel brought into a warm tent or house gathers condensation. Let the saw warm up first, then dry and oil it – the same rule as for every tool on a winter camping trip.
Folding saw maintenance: lock, pivot and blade change
On a folding saw, every stroke pulls on one screw and one small lock. If the lock does not fully engage, the blade can fold onto your fingers mid-cut. That makes the lock check the most important part of folding saw maintenance, and it takes ten seconds.
The ten-second lock check
- Open the saw fully and listen or feel for the lock clicking home.
- Hold the handle and try to rock the blade gently from side to side and up and down, away from the teeth. A little flex in the steel is normal; a clicking movement at the pivot is not.
- Press the lock release: it should move freely and spring back by itself.
- If your saw also locks in the closed position, check that too, so it cannot flop open in a pocket.
Lock or pivot problem: what now?
Does the lock fail to click in fully?
Yes → Clean sawdust and resin out of the lock area and pivot, add a drop of oil, test again. Still failing: do not use the saw.No → Go to the next question.Does the blade have side play at the pivot?
Yes → If the design has an adjustable pivot screw or knob, tighten it slightly until the play is gone but the blade still folds.No → Go to the next question.Is play still there after tightening, or is the pivot riveted?
Yes → Fit a new blade if worn holes are the cause; a worn or broken handle means a new saw.No → The saw is fine. Oil the pivot and carry on.
How to change a folding saw blade
Many folding saws have a replaceable blade held by the pivot screw or a knob; some need a screwdriver or hex key, a few have riveted blades that cannot be swapped. Read what the maker says for your model and buy blades made for exactly that model, because hole position and lock notch have to match.
Changing a folding saw blade
 1Loosen the pivot
Open the saw on a table, edge away from you, gloves on. Undo the pivot screw or knob as described in the manual. Keep small parts such as washers on a cloth where they cannot roll away.
 2Lift out the old blade
Remove the old blade by its spine, never by the teeth. Wrap it in tape or cardboard before it goes in the bin, so nobody cuts themselves on it.
 3Fit the new blade
Place the new blade so its pivot hole lines up with the handle and its teeth face the open side of the slot, the side it folds into. Refit washers in their original order.
 4Tighten and test
Tighten the pivot until there is no side play but the blade still folds smoothly. Test the lock open and closed several times before the first cut.
How to replace a bow saw blade safely
A bow saw only cuts straight when its blade is taut. Most steel frames use a tension lever at the handle end; older and wooden frames use a wing nut, a screw or a twisted cord. The lever stores a lot of force: opening it suddenly can snap it against your fingers, and a slack blade with sharp teeth flops around. Gloves and a calm, flat work surface make the job safe.

Replacing a bow saw blade
 1Gloves on, open the lever
Lay the saw flat with the teeth away from you. Wearing gloves, lift the lever slowly and keep your fingers out of its path. Some frames have a small safety catch on the lever: release it first.
 2Unhook the old blade
With the tension gone, lift the blade ends off the pins. Handle it by the back and ends, not by the teeth, and wrap it before disposal.
 3Check the tooth direction
The teeth must point away from the frame. Most bow saw blades cut on both strokes; if a blade carries a direction arrow, follow it. Teeth facing into the frame is a common mistake.
 4Seat both holes on the pins
Push the holes at both blade ends fully over the pins. A blade sitting half on a pin can slip off under tension.
 5Close the lever and test
Close the lever in one smooth movement, hands clear. Pluck the blade: it should ring clearly and resist twisting when pushed sideways. Check the teeth once more before you cut.

How tight is right?
Close the lever until the blade "pings" when plucked and does not twist when you push it sideways – the same rule as in the saw guide. A slack blade wanders and binds in the kerf; an over-tightened or kinked blade can snap. If a lever will not close at all, check that both holes really sit on the pins and that the blade length matches the frame.
Wooden take-down frames with a tensioning cord are tightened by twisting a toggle stick in the cord. Twist until the blade rings, lock the toggle against the middle bar, and slacken the cord again after use so the frame does not warp.
Can you sharpen a folding saw?
Usually not. Most modern folding saws and many bow saw blades have impulse-hardened teeth: only the tips are hardened, far harder than the rest of the blade and harder than a saw file. You recognise them by their dark, blue-black tips. Japanese-style folding saw teeth are also ground with several small bevels that a file cannot reproduce. Trying to sharpen them ruins the geometry, so the honest answer to can you sharpen a folding saw is: replace the blade when it is dull.
The good news is that hardened teeth stay sharp through a lot of clean deadwood. What usually dulls them is not wood but soil, stones, sand in bark, or a nail in old timber.

Traditional saws: filing and setting
Saws with non-hardened teeth, such as some traditional bow saw and frame saw blades, can be sharpened. Two jobs are involved:
- Filing restores the cutting points with a small triangular saw file (raker blades also need the rakers kept slightly lower than the cutters).
- Setting bends the teeth alternately left and right. This "set" makes the kerf a little wider than the blade body, so the blade does not rub and bind. Too little set and the saw sticks in wet wood; too much and it cuts roughly and wanders.
Both need a vice, the right file, a saw set tool and practice. Filing and setting are a craft of their own; leave them to experienced users or a sharpening service, and spend your own sharpening time on your knife and axe, where the sharpening angle calculator helps.
| Symptom | Likely cause | Fix |
|---|---|---|
| Saw binds, feels sticky | Resin on the blade | Clean with oil or alcohol, then oil |
| Slow cutting, fine dust instead of crumbs | Dull teeth | New blade (hardened teeth) or filing (traditional) |
| Cut wanders to one side | Teeth damaged on one side, bent blade, slack bow saw blade | Re-tension; replace a bent or damaged blade |
| Missing or chipped teeth | Stone, soil or nail contact | Replace the blade |
| Blade kinked or bent | Twisting in the cut, pinching | Replace; a kink comes back under load |
| Side play at the pivot | Loose screw or worn hole | Tighten if designed for it, else new blade or saw |
Choosing a replacement blade: dry wood or green wood?
A blade change is the moment to match the teeth to the wood you actually cut. The same rules apply as in our TPI guide: coarse teeth clear wet, stringy sawdust in green wood; finer teeth cut dry, hard wood smoothly but clog in sap.
| Wood you cut | Tooth choice | Why |
|---|---|---|
| Green, wet or resinous softwood | Coarse, about 5–7 TPI, or a raker bow saw blade | Big gullets and rakers clear wet sawdust |
| Mixed deadwood, seasoned softwood | All-round, about 7–9 TPI | The best single choice for most trips |
| Dry hardwood, small branches, joints | Fine, 10 TPI and more, or peg teeth | Smooth, controlled cut in hard, dry wood |
TPI ranges are general guidance; makers label and measure teeth differently.
Raker vs peg-tooth bow saw blade
Raker blade
- Groups of cutters plus a lower raker tooth
- Clears wet, stringy sawdust
- Best for green wood and fresh softwood
Peg-tooth blade
- Even row of triangular teeth
- Smoother cut in dry, hard wood
- Clogs sooner in sappy wood
Getting the fit right
- Bow saws: the blade length must match the frame exactly – 53, 61 or 76 cm (21, 24 or 30 in) are the common sizes. A blade that is a few centimetres off will not tension or will not fit at all.
- Folding saws: use blades sold for your model. Other blades may look similar but have the pivot hole or lock notch in a slightly different place, which means a lock that does not hold.
- Spare blade: for a bow saw on a longer trip, a spare blade weighs little, rolls into a loop or packs flat in its guard. Note which blade you carry, so you can plan your kit around it.
Pocket chain saws and wire saws: care in brief
A pocket chain saw is a short loop of cutting chain with a handle or strap at each end. It cuts with both hands pulling alternately and is popular as a back-up in an emergency kit. Its care is simple but different from a blade:
- Clean resin and sawdust off with a brush and a little oil, working the chain through the cloth link by link with gloves on.
- Dry and oil it lightly, then flex the chain so every link moves freely. Stiff links are where a chain jams in the cut.
- Coil loosely into its pouch. Do not knot or kink it; a twisted chain binds and can break.
- Check for cracked links, loose rivets and damaged teeth. Some chains can be touched up with a round file like a chainsaw chain, others cannot; follow the maker's information and replace a damaged chain.
A wire saw needs even less: keep it dry, never kink it, and replace it after heavy use, because twisted cables tend to snap at a worn spot. Both are emergency tools, not replacements for a proper folding saw, as explained in choosing a folding saw.
Storing and carrying a saw
A covered blade protects you, your gear and the teeth. One stone in the bottom of a pack can chip a row of teeth faster than a season of cutting.
- Folding saws travel closed and, where the design allows, locked closed, in a pocket, belt pouch or pack.
- Bow saws always wear their blade guard when not cutting. If the guard is lost, a strip of thick cardboard or a split length of garden hose taped over the teeth is a stopgap until you replace it. Strapped to a pack, the covered blade faces inwards and down; see bushcraft backpacks for attachment options.
- Long-term storage: clean, dry and oiled, in a dry room rather than a damp shed. Wooden frame saws with a cord are slackened.
- Out of reach of children at home, and in camp put the saw away instead of leaving it lying open. Bushcraft with kids has sensible rules for tools around children.
Before the saw goes into the pack
- Blade clean, dry and lightly oiled
- Folding saw closed and the lock engaged
- Bow saw guard on and its clips closed
- Spare blade and a small oil cloth packed for longer trips
- Saw inside the pack or covered on the outside, nothing visible
The saw is one entry on your bushcraft kit list; a few drops of oil and a cloth belong next to it, and a spare pivot screw or blade can live in your repair kit.
Safety and sawing technique that save your blade
Most saw injuries during maintenance happen when a cloth or finger slides along the teeth or a bow saw lever snaps shut. During use, they happen when the blade jumps on the first stroke and lands on the guard hand or knee. The rules are short:
- Wear gloves for cleaning, blade changes and tensioning.
- Wipe from spine to teeth, never along the tooth line.
- Keep fingers out of the path of a tension lever and the folding blade.
- Wrap old blades before disposal.
Technique is the best blade care
Good sawing technique keeps a blade sharp far longer than any cleaning routine:
- Keep the teeth off the ground. Saw on a sawbuck or across a second log, never on soil or stones – see sawing firewood safely.
- Don't twist or yank. If the kerf closes, stop and change the support; forcing the blade kinks it. Saw technique explains how to read the load.
- Light, full strokes. Pressing hard bends the blade and heats the teeth. Let the teeth do the work.
- Check deadwood for stones and nails in bark crevices and old fence posts before cutting.
Cut rounds to length, then split them with an axe or by batoning. The firewood calculator tells you how much you need, so you do not wear out a blade on wood you will never burn. In wet weather, a saw is your best tool for reaching dry wood inside standing dead branches, as described in fire in wet weather. New to all of this? Start with bushcraft for beginners.
| When | Folding saw | Bow saw |
|---|---|---|
| Every use | Brush out, close dry, check lock | Check tension, guard on afterwards |
| After every trip | Remove resin, dry, oil, air the slot | Remove resin, dry, oil, dry the guard |
| Every few trips | Check pivot for play, drop of oil | Check pins, lever and frame |
| When cutting slows | New blade | New blade, or filing for traditional blades |
| Before long storage | Oil, store open or closed in a dry room | Oil, guard on; slacken cord frames |
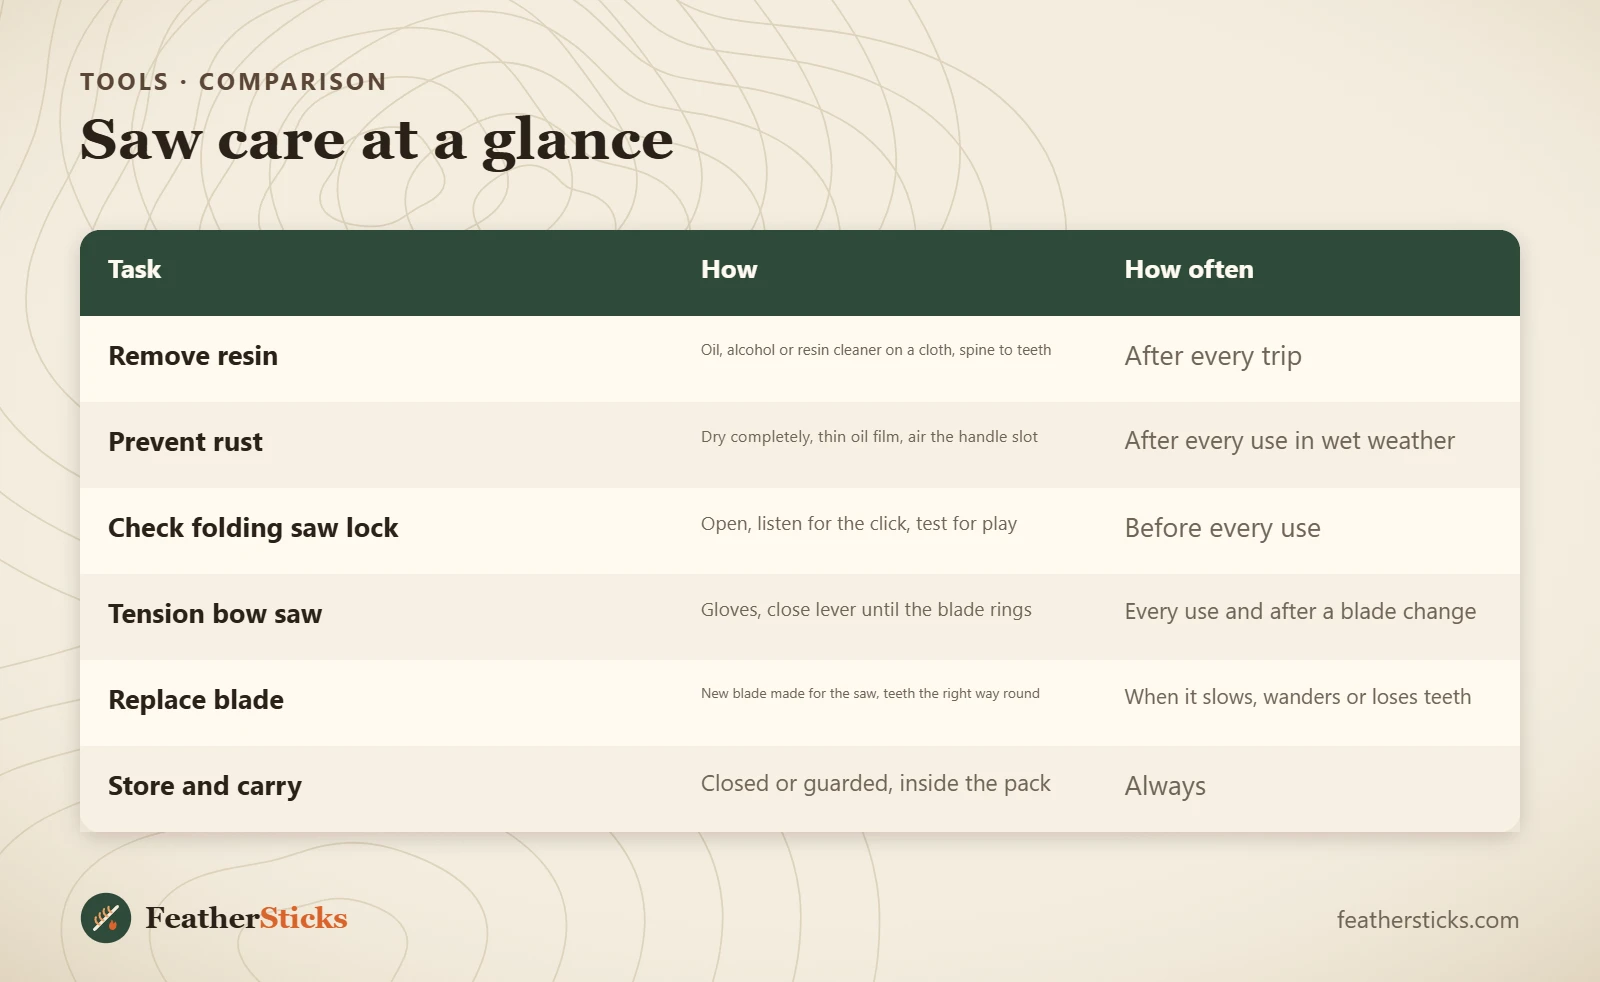
| Task | How | How often |
|---|---|---|
| Remove resin | Oil, alcohol or resin cleaner on a cloth, spine to teeth | After every trip |
| Prevent rust | Dry completely, thin oil film, air the handle slot | After every use in wet weather |
| Check folding saw lock | Open, listen for the click, test for play | Before every use |
| Tension bow saw | Gloves, close lever until the blade rings | Every use and after a blade change |
| Replace blade | New blade made for the saw, teeth the right way round | When it slows, wanders or loses teeth |
| Store and carry | Closed or guarded, inside the pack | Always |
Common mistakes
- Folding the saw away wet and full of sawdust, so the blade rusts in the handle slot.
- Wiping along the tooth line with a bare hand instead of from spine to teeth with gloves.
- Trying to file impulse-hardened teeth instead of fitting a new blade.
- Fitting a bow saw blade with the teeth facing into the frame, or with a hole only half on its pin.
- Using a blade from another model in a folding saw, so the lock no longer holds properly.
- Cleaning with petrol, thinners or acetone, which damage coatings and handles and are a fire risk.
- Carrying a bow saw without its blade guard.
What you need
- Old toothbrush and wooden toothpicks
- Cotton cloths, one with a few drops of light oil
- Alcohol or a resin cleaner in a small, closed bottle
- Work gloves with good grip
- Spare blade made for your saw
- Screwdriver or hex key if your folding saw needs one
- Blade guard for the bow saw
FAQ
Can you sharpen a folding saw?
How do I clean resin off a saw blade?
How do I replace a bow saw blade?
Which way should the teeth face on a bow saw?
How tight should a bow saw blade be?
How do I stop my folding saw from rusting?
Which replacement blade should I buy?
Is it legal to carry a folding saw?
Check yourself
Completed6 quick questions from this guide. Nothing is sent anywhere.
Related step-by-step guides
-
 1
-
 1
-
 1