Winter Camping: How to Stay Warm, Dry and Safe in the Cold
Winter camping works when you manage three things: moisture, insulation from the ground and time. The cold itself is rarely the problem — sweat-soaked layers, a thin sleeping pad on frozen ground and a camp set up in the dark are. Plan around the short daylight, move without sweating, sleep on stacked pads and keep your water and fuel from freezing, and a night at −10 °C can be comfortable.
This guide covers the whole winter night step by step: planning, layering, the sleep system, choosing a site where cold air does not pool, pitching on snow, stoves in the cold, a camp routine that works, and how to recognise frostbite and hypothermia early. It builds on our bushcraft basics and the rest of the shelter guides; for the whole year see bushcraft in winter.
Step by step
-
1

Plan around short daylight
Check sunset before you go and aim to have camp up 1–2 hours before dark. Winter nights in Central Europe last around 15–16 hours.
-
2

Layer to stay dry
Start cool, open zips before you sweat, and put your insulated jacket on at every stop. Keep one dry base layer for the night.
-
3

Pick a safe, sheltered site
Avoid valley bottoms where cold air pools, dead or snow-loaded trees and any avalanche terrain. A slightly raised, sheltered bench is best.
-
4

Stamp a platform and pitch
Stamp the snow flat, let it set for 20–30 minutes, pitch with snow anchors and build a low wall on the windward side.
-
5

Stack your sleep insulation
Put a closed-cell foam pad under an insulated air pad (R 5 or more combined) and use a bag rated for the night low.
-
6

Keep water and fuel liquid
Store bottles upside down and insulated, take a hot bottle to bed, keep gas canisters warm and cook outside the closed tent.
What makes winter camping different?
In summer, a mistake usually means a bad night. In winter it can mean a cold injury. Three things change when temperatures drop below freezing:
- Time: the days are short and the nights long. Every task — pitching, melting snow, cooking — takes longer with gloves on, and darkness arrives early.
- Moisture: sweat, breath and melted snow get into your clothing and sleeping bag. Wet insulation loses much of its warmth, and in freezing weather there is little chance to dry it.
- Conduction: frozen ground and snow pull heat out of your body far faster than cold air does. The pad under you matters as much as the bag around you.
Good winter camping is therefore mostly about routine: doing the right things in the right order, before you are cold, tired and in the dark. The flow below is the backbone of every winter day outside.
A winter camping day in five phases
- PlanCheck sunset, forecast and wind chill; choose a site you can reach with daylight to spare.
- Move dryWalk cool, vent early, eat and drink little and often.
- Make campSite, platform, shelter, then warm layers on at once.
- Water & foodMelt snow, cook, fill bottles hot for the night.
- Sleep warmDry base layer, stacked pads, hot bottle, pee before bed.
Planning a winter camping trip around short days
Around the winter solstice, daylight in Germany lasts only about 7.5 to 8.5 hours depending on latitude, and in northern Scandinavia the sun barely rises at all. That leaves 15–16 hours of darkness; moving safely at night helps you use them. Use the daylight calculator for your exact location and date, and work backwards from sunset.
A good rule: be at your camp site with 1–2 hours of daylight left. Setting up in daylight lets you judge the ground, the trees overhead and the slope above you. It also leaves time to melt snow before the temperature drops further after sunset. Plan shorter distances than in summer — snow, gloves and heavier packs slow you down; the hiking time calculator gives you a baseline, then add a generous margin for snow.
| Time | What | Why |
|---|---|---|
| 08:30–09:00 | Start walking once it is light | Use every hour of daylight |
| 12:00 | Hot drink and a real lunch break | Energy and warmth for the afternoon |
| 14:30–15:00 | Arrive at the camp site | 1–2 h of light for setting up |
| 15:00–16:00 | Platform, shelter, warm layers on | Done before the cold of dusk |
| 16:00–18:00 | Melt snow, cook, fill bottles | Water for evening, night and morning |
| from 18:00 | In the bag with a hot bottle | Long night: bring a book, a spare battery |
Adjust to your own sunset time. In deep cold, allow more time for everything.
Pack a head torch with spare batteries kept in an inside pocket, because cold drains them fast — see lighting for camp. Before you leave, check the forecast and the wind: the wind chill calculator shows how cold −5 °C with a strong wind really feels, and whether exposed skin is at risk.
Layering for winter camping: how to stay dry
The most common winter mistake is not being too cold — it is being too warm while moving. Walking uphill with a pack in a down jacket soaks your base layer with sweat within minutes. When you stop, that moisture chills you, and it will freeze in your clothing overnight. The answer is a flexible layering system that you adjust constantly. Our clothing guide explains fabrics in detail; here is how it works in winter.
Winter layers (outermost first)
- For stops and camp only — never for walking. Put it on the moment you stop.
- Wind and snow protection; vents and pit zips let moisture out.
- Worn while moving in very cold weather; breathes well.
- Wicks sweat away from the skin. No cotton. Bring a dry spare for the night.
Layering through a winter day
 1Insulation off before you start
Start slightly cold — within ten minutes of walking you will be warm. Stow the insulated jacket at the top of the pack where you can grab it quickly.
 2Vent before you sweat
Open front and pit zips, take off your hat or gloves briefly, slow down on climbs. The moment you feel damp at the back, you are already too warm.
 3Insulation on at every stop
Put the insulated jacket on over everything before you feel cold, even for a five-minute stop. Warming up again later costs far more energy.
 4Dry layer for the night
In camp, change into your dry base layer and dry socks before you get into the bag. Damp clothes go inside the bag in a stuff sack or under your legs, not into the cold vestibule.
Hands, feet and head
Extremities get cold first. Carry two pairs of gloves (a thin working pair and warm mittens), a warm hat and a buff. Boots should not be laced tightly, because pressure reduces circulation. At night, put boot liners and tomorrow's socks inside your sleeping bag; keep outer boots in a bag in the tent or vestibule so they do not fill with snow. For footwear choices, see footwear for the outdoors.
Winter sleep system: stacking R-value
A warm winter night starts underneath you. Snow and frozen ground conduct heat away much faster than air, and a sleeping bag compressed under your body insulates very little. That is why pad insulation — measured as R-value — is the key number for winter camping. R-values add up, so the standard winter setup is a closed-cell foam pad under an insulated air pad. The foam also protects you if the air pad punctures, which on a frozen night is a real emergency.

| Night low | Pad R-value (combined) | Sleeping bag | Typical setup |
|---|---|---|---|
| 0 to 5 °C | R 4 | Comfort about 0 °C | Insulated air pad |
| −10 to 0 °C | R 5 | Comfort about −5 to −10 °C | Foam + self-inflating or warm air pad |
| −20 to −10 °C | R 6 | Comfort about −15 °C or lower | Foam + insulated air pad (≈ R 6.5) |
| Below −20 °C | R 7+ | Expedition bag | Winter air pad + foam |
Pad values as in our sleeping gear guide. Use the comfort rating, not the extreme rating, and calculate your own needs with the sleep calculator.
For the bag, look at the comfort temperature (EN ISO 23537), not the lower limit. Our sleeping gear guide explains ratings, down versus synthetic and liners, and the sleeping bag and R-value calculator suggests a bag and pad combination for your expected night low. A liner, a bivvy bag over the sleeping bag or wearing your insulated jacket over the bag's upper half can add warmth on the coldest nights.
Sleep warm on a winter night
- Get into the bag warm — a few minutes of movement or a hot drink first, never shivering
- Dry base layer, dry socks and a hat; not every layer you own (too many compress the bag)
- Hot water bottle (tightly closed, in a sock) at your core or between your thighs
- Pee before bed; a clearly marked pee bottle saves a trip out into the cold
- Snack with fat before sleeping — digestion produces heat
- Breathe out of the hood opening, not into the bag, to keep moisture out of the insulation
Choosing a winter camping site
Where you pitch decides how cold your night will be. On clear, calm nights, cold air flows downhill like water and collects in valley bottoms, hollows and clearings at the foot of slopes. These "cold pools" can be noticeably colder than a site only a little higher up the slope. At the same time, ridges and open hilltops are exposed to wind. The sweet spot is usually a slightly raised, flat bench in open forest, sheltered from the prevailing wind — the general principles are in how to choose a camp site.

Overhead and uphill hazards
Look up before you pitch. Snow on branches adds a lot of weight; dead trees and broken branches ("widowmakers") can come down in wind or under snow load. Keep a distance of at least a tree's length from dead trees. Look uphill too: in hilly or mountain terrain, snow can slide from slopes above you.

Setting up camp on snow
A tent pitched directly on loose snow sinks, sags and leaves you sleeping in lumps. Take time to prepare a firm platform; it pays off all night. A stable, freestanding or four-season tent (see three-season vs four-season tents) is easiest in snow. A tarp works in the forest too, but needs more skill, and in deep snow a snow shelter can be the warmer option. Groups on longer winter camps often use a tipi or lavvu with standing room inside.
Preparing a snow platform and anchoring the tent
 1Stamp a platform
With boots or snowshoes, stamp an area about 50 cm larger than the tent on every side. Walk it in overlapping lines until it no longer gives way.
 2Let it set
Wait 20–30 minutes: the disturbed snow bonds and hardens. Use the time to put on insulation, drink something hot and prepare the anchors.
 3Bury deadman anchors
Normal pegs pull out of snow. Tie the guyline around a stick, a snow stake laid flat or a stuff sack filled with snow and bury it crosswise 20–30 cm deep; stamp the snow on top.
 4Build a wind wall
In exposed spots, cut or pile a low wall of snow blocks on the windward side, a little away from the tent so drifting snow does not bury it.
Dig a small pit in the vestibule: you can sit on the edge with your feet in the pit to put on boots, and cold air sinks into it. Brush snow off the tent regularly during snowfall, because the weight can bend poles and the snow reduces ventilation. Keep the tent's vents open even on cold nights — condensation and frost inside the tent come from your breath, and airflow is the only way to reduce them.
Keeping water from freezing and stoves working in the cold
In winter you often have to make all your water from snow, which takes a lot of fuel and time. Frozen bottles in the morning mean melting snow again before you can even make tea. A few simple habits keep your water liquid.
Keeping water liquid overnight
 1Fill bottles with hot water
In the evening, fill your bottles with hot (not boiling) water. Only use bottles rated for hot liquids and check that the lids seal.
 2One hot bottle in the bag
Put one tightly closed bottle in a sock inside your sleeping bag: it warms you now and is still liquid in the morning. Check the lid twice — a leak in the bag is a serious problem.
 3Others upside down, insulated
Water freezes from the top. Store the other bottles upside down in an insulating cover, so any ice forms at the bottom and the lid does not freeze shut. Bury them in snow or wrap them in clothing rather than leaving them in the open.
 4Melting snow: water first
Put a little water in the pot before adding snow, then add snow bit by bit. A dry pot with only snow can scorch and wastes fuel. More detail in water from snow and ice.
Which stove works in the cold?
Gas canister stoves lose power in the cold because the gas vaporises less readily. Butane is the weakest: it boils at about −0.5 °C and barely works below freezing. Isobutane (about −12 °C) and propane (about −42 °C) mixes perform better, but the pressure still drops as the canister cools while you cook. Liquid-fuel stoves (white gas) are the most reliable in deep cold, though they need more care. Plan your fuel with the boiling point and fuel calculator and add a large margin for melting snow.
| Fuel | Cold performance | Tips |
|---|---|---|
| Butane canister | Poor below about 0 °C | Avoid for winter trips |
| Isobutane/propane canister | Fair to about −10 °C | Keep the canister warm in a jacket or the sleeping bag; stand it on an insulating board |
| Liquid fuel (white gas) | Good, even in deep cold | Practise priming at home; carry a repair kit |
| Alcohol / spirit | Poor; hard to light when cold | Warm the fuel bottle; slow for melting snow |
| Wood fire | Works, but slow and wet in snow | Only where fires are allowed; see fire in wet weather |

Your cookware matters too: a wide pot with a lid melts snow more efficiently than a narrow mug, and a windscreen (used carefully so the canister does not overheat) saves fuel. Keep canisters in your jacket during the day and in the sleeping bag's foot area at night, and start the morning with a canister that has spent the night warm.
Frostbite and hypothermia: recognise them early
Cold injuries develop gradually and are much easier to prevent than to treat. The information here is general first aid knowledge, not a substitute for a first aid course — ideally one with outdoor or winter content.
Frostnip and frostbite
Frostnip is the early stage: the skin — often nose, cheeks, ears, fingers or toes — turns pale, white or waxy and feels numb. It is reversible if you act at once. Frostbite goes deeper: the tissue freezes, feels hard and wooden, and may later blister. Wind makes it happen much faster; check the risk with the wind chill calculator.
Hypothermia
Hypothermia means the body's core temperature drops below about 35 °C. Early signs are persistent shivering, clumsy hands and slowed thinking — often summed up as the "umbles": stumbles, mumbles, fumbles, grumbles. As it worsens, shivering can stop, the person becomes confused, apathetic or drowsy. This is an emergency.
Recognise and act: first steps
 1Check each other
In cold wind, look at each other's faces regularly. White, waxy, numb patches on nose, cheeks or ears are frostnip — you often cannot feel them yourself.
 2Rewarm with body heat
Cover the spot with a warm hand, put cold fingers in your armpits or on a partner's belly. Do not rub the skin and never rub it with snow. Get out of the wind.
 3Watch for the "umbles"
Uncontrolled shivering, clumsiness, stumbling or confusion mean hypothermia is starting. Stop, and act now — do not push on to the planned camp.
 4Insulate, shelter, call 112
Get the person out of the wind, onto insulating pads and into dry layers and a sleeping bag. Give warm, sweet drinks only if they are fully alert and can swallow. For worsening signs or frostbite, call 112.
| Condition | Signs | First steps |
|---|---|---|
| Frostnip | Pale or white, numb skin that is still soft | Rewarm with body heat, out of the wind; do not rub |
| Frostbite | Hard, wooden, white or grey-blue skin; later blisters | Protect from further cold and pressure; do not rewarm if it could refreeze; seek medical help (112) |
| Mild hypothermia | Strong shivering, clumsiness, slurred speech, poor judgement | Shelter, insulate from the ground, dry layers, sleeping bag, warm sweet drinks if alert; call for help if no improvement |
| Severe hypothermia | Shivering stops, confusion, drowsiness, unresponsive | Call 112 immediately; handle gently, keep lying flat, insulate and protect from wind; no rubbing, no alcohol |
Tent, tarp, hammock or snow shelter: which winter shelter?
Every shelter can work in winter, but each asks something different of you. A tent is the easiest start; the others need more experience or the right conditions. Choose by terrain, snow depth, wind and how much you want to practise.
| Shelter | Warmth | Best conditions | Watch out for |
|---|---|---|---|
| Four-season or stable tent | Good (about +3 °C in the sleep calculator) | Open terrain, wind, snowfall, first winter nights | Condensation and frost inside; snow load on the fly |
| Tarp (storm pitch) | Low (about +1 °C) | Forest, calm to moderate wind, fire camps | Snow load; drifting snow; needs pitching skill |
| Lean-to with fire | High while the fire burns | Forest where fires are allowed, dry cold | Wood needs, fire watch, spark damage |
| Hammock | Depends on the underquilt | Forest with healthy trees | Cold air all around; wind below the hammock |
| Bivvy bag | Low (about +1 °C) | Clear, calm nights, light kit | Frost inside the shell, damp down |
| Snow shelter | Very high (around 0 °C inside) | Deep, settled snow, time and a shovel | Carbon monoxide, collapse, avalanche terrain |
Shelter bonuses as used by the sleeping bag calculator; your pad and bag still carry most of the load.
For a first winter night, most people are best served by a tent they already know, pitched on a stamped platform as described above. Add a tarp over the entrance as a sheltered kitchen area if you like. Move on to hammocks, tarps or snow shelters once you have a few cold nights of experience and a bail-out option.
Fire and food in winter: calories, hot drinks and firewood
How much more food do you need in the cold?
Staying warm costs energy. The site's trail food planner adds about 1.5 % to your daily energy needs for every degree below 10 °C — at −10 °C that is roughly 30 % more — and raises the fat share of the menu, because fat carries the most energy per gram. In practice: a hot, fatty dinner (pasta or couscous with butter, cheese, nuts or sausage), a snack in the sleeping bag, and something within reach during the day that does not freeze solid. Chocolate, nut butter, cheese, dried fruit and salami work well; energy bars can become rock hard. More menus are in meal planning for winter trips.
Hot drinks are your heating
Warm, sweet drinks raise morale and help you stay hydrated in dry winter air. Fill a vacuum flask in the morning and keep it for the afternoon; in the evening, make enough hot water for dinner, drinks and the bottle in your sleeping bag. Melting snow takes time and fuel: start early and add a little liquid water to the pot first, as explained in seed water for melting snow. Recipe ideas are in hot drinks for the outdoors.
A campfire in snow
Where fires are permitted, a fire makes winter evenings much more pleasant — but it needs preparation. Clear the snow down to the ground or build the fire on a platform of dead logs, so it does not sink into its own meltwater. For a single pot, a Swedish torch on a log platform is a tidy alternative. Standing dead wood is usually drier than wood lying under snow. Split it to reach the dry core with a saw and an axe or by batoning, and carry reliable tinder such as fatwood. Expect to burn more: the firewood calculator adds a cold surcharge, so three hours of evening warmth at −5 °C already need about 12–14 kg of dry wood. The full routine is in fire in snow and deep cold.
Multi-day winter trips: moisture, navigation and a safety plan
One cold night is mostly about the sleep system. Over several days, the challenge shifts: moisture slowly builds up in clothing and sleeping bags, batteries run down, and navigation in snow is harder than in summer.
- Moisture budget: down bags gain weight and lose loft night by night as body moisture freezes in the outer layers. Air the bag in the sun whenever you can, shake frost off the tent before packing, and consider a synthetic over-bag or a vapour barrier liner for trips of more than two or three nights, as explained in the sleeping gear guide.
- Drying clothes: small damp items such as gloves and socks dry overnight in the sleeping bag — next to your body, not on it. Heavy, wet items do not; pack a second pair of gloves and dry sleep socks instead.
- Navigation: snow hides paths and waymarks, and whiteout or early darkness can turn a familiar route into a puzzle. Carry a map and compass and know how to use them — see map and compass navigation — and keep your phone and GPS warm in an inside pocket. Animal tracks in fresh snow are a bonus: reading tracks is easiest in winter.
- Safety plan: leave your route and return time with someone at home, agree on a time to raise the alarm, and know the distress signals that work in snow. Your first aid kit should include an emergency blanket or bivvy and supplies for blisters and cold injuries.
Your first winter nights: start small
Build up gradually. A first winter night in the garden, close to a car or on a campsite lets you test your sleep system without risk: if you are cold at 2 a.m., you can go inside. Try a night around freezing before one at −10 °C, and add a colder night only when you know your gear and routine work. Go with a partner, and keep your first trips short.
The legal situation is the same as in summer: in Germany, camping in the forest is regulated by the forest and nature conservation laws of each federal state, and national parks and nature reserves are off-limits. Our guide to wild camping in Germany explains the details; elsewhere, check local rules. Designated trekking sites and winter campsites are good places to start. Tell someone your route and return time, check your kit against the bushcraft kit list or the Kit Builder, and pack the essentials from our first aid kit guide; keep the insulated jacket, stove and head torch at the top of your backpack. Once you are confident, a night in a bivvy bag under a tarp or in a snow shelter is the next step.
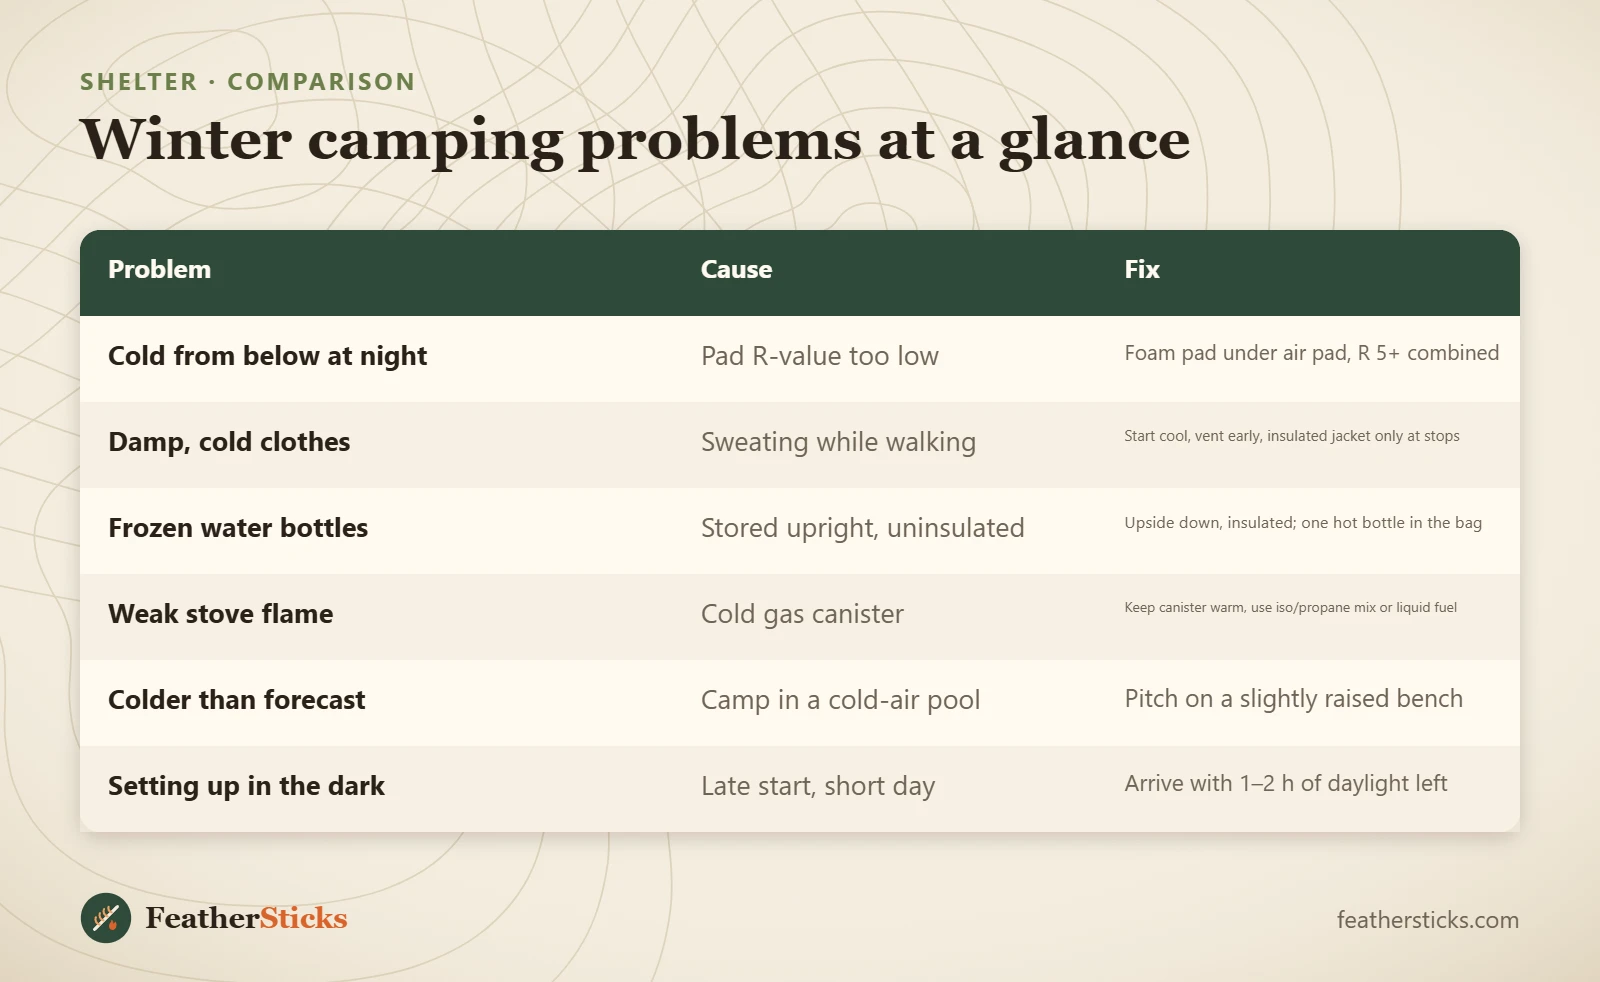
| Problem | Cause | Fix |
|---|---|---|
| Cold from below at night | Pad R-value too low | Foam pad under air pad, R 5+ combined |
| Damp, cold clothes | Sweating while walking | Start cool, vent early, insulated jacket only at stops |
| Frozen water bottles | Stored upright, uninsulated | Upside down, insulated; one hot bottle in the bag |
| Weak stove flame | Cold gas canister | Keep canister warm, use iso/propane mix or liquid fuel |
| Colder than forecast | Camp in a cold-air pool | Pitch on a slightly raised bench |
| Setting up in the dark | Late start, short day | Arrive with 1–2 h of daylight left |
Common mistakes
- Walking in the insulated jacket and soaking every layer with sweat.
- Sleeping on a single air pad on snow instead of stacking foam underneath.
- Pitching in a valley bottom or hollow where cold air pools overnight.
- Camping under dead or heavily snow-loaded trees, or near avalanche terrain.
- Running a stove inside a closed tent.
- Leaving water bottles and gas canisters outside overnight.
- Ignoring early signs of frostnip or hypothermia and pushing on.
What you need
- Winter sleeping bag (comfort rating at or below the night low)
- Closed-cell foam pad plus insulated air pad (R 5+ combined)
- Base, mid and shell layers plus an insulated jacket; dry spare base layer and socks
- Warm hat, thin gloves and mittens, buff
- Stove suited to the cold, windscreen, insulating stove board, lighter and matches
- Insulated bottle covers and a vacuum flask
- Snow shovel and snow anchors or deadman stakes
- Head torch with spare batteries kept warm, first aid kit, phone
FAQ
How cold is too cold for winter camping?
What R-value do I need for winter camping?
How do I keep my water from freezing when winter camping?
Do gas stoves work in winter?
What are the first signs of hypothermia?
How do I stay dry when winter camping?
Is a tent or a tarp better for winter camping?
How many calories do you need when winter camping?
Check yourself
Completed6 quick questions from this guide. Nothing is sent anywhere.
Related step-by-step guides
-
 1
-
 1
-
 1