How to Build a Fire in the Snow: Winter Fire Guide
To build a fire in the snow, you need three things: a platform that keeps the fire out of its own meltwater, more fuel than you would burn in summer, and ignition that stays warm and dry until the moment you use it. Pick a sheltered spot away from snow-laden branches, lay green logs side by side with dry sticks across them, light a compact lay on top and feed it patiently.
This winter fire bushcraft guide explains why snow fires fail, how to choose and prepare the spot, how to gather and process fuel, how to work with cold hands, how to melt snow and stay warm without burning your gear, and how to put the fire out properly. It builds on fire starting and fire in wet weather; for the rest of the cold-weather routine see winter camping.
Step by step
-
1

Choose a safe spot
Pick a sheltered place with open sky above, away from snow-laden branches and at least 5 m from a tent and 3 m from a synthetic tarp.
-
2

Build a platform
Stamp the snow firm, lay green logs of 8–10 cm side by side, then dry sticks of 4–6 cm across them.
-
3

Gather more fuel
Collect dead standing wood, dead lower spruce twigs, birch bark and fatwood. Plan for about 14 kg for a three-hour evening fire at −10 °C.
-
4

Keep ignition warm
Carry lighter, tinder and ferro rod inside your layers. Lay everything out before you take your gloves off.
-
5

Light and feed
Build a compact teepee or log cabin on the platform, light it low and feed small, dry wood until coals form.
-
6

Put it out cold
Let it burn down, stir the embers, douse with water, stir again and check with the back of your hand before you leave.
Why do fires fail in snow?
A fire built straight on snow looks fine for five minutes and then starts to sink. The heat melts the snow beneath it, the meltwater collects in a pit, and the lower sticks sit in water. Wet wood steams instead of burning, the flame loses its base, and the whole lay slumps and drowns. That is the single most common reason a winter fire fails, and it is entirely avoidable with a platform (the fire pit guide covers the same idea for the low-impact pit).
Four more problems stack on top of it:
- Cold fuel. Wood that has been frozen needs more heat before it ignites, and any frost or snow on it has to melt and evaporate first. Small flames cannot manage that, so the early stages of the fire need finer, drier wood than in summer.
- Wet and cold hands. Fine motor skills fade quickly in the cold. Feather sticks, ferro rod strikes and tiny bundles of kindling all need precise fingers, which is exactly what you lose first.
- Short daylight. In winter you have far fewer hours of usable light, and everything takes longer. The sunset and daylight calculator shows how much time you really have.
- Falling snow. Heat from the fire melts snow on overhead branches. A clump of wet snow landing on a young fire can put it out in one go.
The good news: every one of these has a simple countermeasure, and none needs special equipment. The whole strategy fits in one picture.
The snow fire strategy
- SiteOpen sky, wind shelter, distance from camp.
- PlatformGreen logs below, dry sticks across, off the meltwater.
- FuelDead standing wood, split and sorted, plus extra.
- IgnitionWarm lighter and tinder, everything prepared first.
- FireCompact lay, small wood, coals before logs.

Choosing the spot for a winter fire
The best snow fire is the one you never have to rescue, and that starts with the site. Spend a few minutes on it before you cut a single log.
Look up first
Conifers hold a surprising amount of snow, and a fire heats the air above it. Check every branch within reach of the heat plume. If a branch is carrying a heavy load of snow, move the fire; do not hope it stays put. Also look for dead branches, which can fall in wind or when loaded with snow. Our site selection guide covers overhead hazards in more detail. A good rule of thumb is open sky directly above the fire and no snow-laden branches within the reach of the flames and smoke.
Shelter from wind
Wind strips heat from a small fire and blows snow into it. Use the lee of a large log, a bank, boulders or a dense group of trees, but remember the overhead rule. A wall of stacked logs or a packed snow wall on the windward side can add shelter where the terrain offers none.
Distance from tent or tarp
Sparks and radiant heat damage synthetic fabric, and a tent is no place for a fire at all: never light a fire inside a closed tent or snow shelter because of carbon monoxide. As a rule of thumb, keep a fire at least 5 m from a tent or hammock and 3 m from a synthetic tarp, more in wind. If you work under a tarp, keep a synthetic one at least 3 m from the fire, as above, and pitch it angled so heat and smoke escape. Our tent, tarp or hammock comparison helps you decide which shelter suits winter.
Packed snow or dug down to the ground?
There are two honest options. In shallow snow you can clear the snow down to the ground, where the law and the terrain allow it; the fire then sits on mineral soil or forest litter, but you must be careful about leaf litter and roots that can smoulder and about peaty ground, which can burn underground. In deeper snow, stamp an area about 1 m across and let it set for 20–30 minutes, the same procedure used for a tent platform in winter camping. Then build the platform on top. Either way, check what is allowed where you are: many protected areas ban fires altogether or only allow them in marked places.
Site check before you build
- Open sky above the fire, no snow-laden branches within reach of the heat
- No dead branches overhead that could fall
- Wind shelter on the windward side (log, bank, rocks or a wall)
- At least 5 m from a tent, 3 m from a synthetic tarp or pack; more in wind
- Not on peat, roots or thick litter if you dig down to the ground
- Fires are allowed here at all (see the rules section below)
How to build a fire platform on snow
A platform is a raft that spreads the weight of the fire over a larger area of snow and holds the burning wood above the meltwater. It is the foundation for every snow fire, whatever lay you build on top; the glossary and fire lays overview describe the idea, and the fire lay picker always puts a platform underneath when you choose snow.
Green or wet wood below, dry wood on top
The bottom layer should be green or wet logs. Fresh wood contains so much water that it burns slowly and acts as a heat shield for the snow below, so the platform lasts for hours. Use logs of about 8–10 cm diameter, lay them tightly side by side and, if you can, cut them from a fallen live tree or wind-thrown trunk where it is permitted. Then lay dry sticks of 4–6 cm across them as a second layer. The dry layer is where the fire sits; it lets air in from below and keeps the tinder off the cold wet logs.
If green wood is scarce, use thick dead wood for the bottom layer and expect the platform to burn through sooner.
Building a platform on snow
 1Stamp it firm
Tread an area about 1 m across. Loose snow compresses and sets within 20–30 minutes, which gives a firmer base. Do other camp jobs while it sets.
 2Lay the green logs
Place logs of 8–10 cm tightly side by side. Gaps let the fire melt into the snow between them, so close them up with smaller green sticks.
 3Cross with dry sticks
Lay dry sticks of 4–6 cm across the green logs, split faces up. This is the surface the fire sits on and it must be dry.
 4Tinder and teepee
Put your tinder in the centre of the dry layer and build a compact teepee or log cabin over it. Never place tinder directly on the green logs.
 5Re-level when it tilts
Over time the platform sinks unevenly. Check every 20–30 minutes; if one side drops, push sticks underneath on the low side before the lay slides.
A word about stones
Stones are tempting as a fire base or ring, but in the cold they are a risk. Wet or damp stones, especially river stones and porous rock, can trap water inside; when heated the water turns to steam and the stone can crack or burst, throwing hot fragments. Do not use wet stones on a snow fire, and never stones from a stream or lake. A platform of logs is safer, and no stone ring is needed on snow. Where you must build a ring on bare ground, use dry stones that have been out of the water and keep your face away when the fire is new.
What it should look like: a flat, tightly packed raft with no gaps in the green layer, a clear dry surface on top and about a hand's width of margin around the lay. If the snow edges already slump around the platform before you light the fire, it is too narrow: add logs.
Gathering fuel in winter: what burns and how much
Fuel gathering is the most time-consuming part of a winter fire, and it starts with knowing what works in snow. Snow covers the ground, but plenty of dry wood stands above it. Look up, as in wet-weather fire.
Where to find dry fuel in snow
- Standing dead wood. Dead trees and dead branches still attached to living trees are above the snow and often dry inside. Apply the snap test: finger-thick sticks that crack cleanly are usable.
- Dead lower spruce twigs. Dead, grey twigs close to the trunk under a dense canopy stay surprisingly dry and make excellent fine kindling. Snap only dead twigs.
- Birch bark. Peel it from dead, fallen birches only; the oils burn even when damp. Tree identification helps you recognise birch, spruce and pine in winter, even without leaves.
- Fatwood. Resin-rich pine from old stumps lights in the cold and is the best extender you can find in the forest. See fatwood and the guide to natural tinder.
Avoid anything lying on or under the snow: it is wet, frozen or both. Snow-covered kindling melts and soaks.

Process more than you think
In winter a fire eats more wood than the same fire in summer: some of the heat goes into drying and warming the fuel, and a warming fire is hungry because you stand and sit close to it for hours. The firewood calculator gives numbers that you can reproduce. The table below uses its rates for an actively fed evening fire of dry mixed wood, a burn time of three hours and two fire starts.
| Air temperature | Wood to gather | Armloads (about 5 kg) |
|---|---|---|
| +5 °C | about 11 kg | 3 |
| −10 °C | about 14 kg | 3 |
| −20 °C | about 16 kg | 4 |
| −10 °C, damp wood | about 18 kg | 4 |
From the firewood calculator: base rate 3 kg/h for an actively fed fire, plus 2.5 % per °C below 5 °C (capped at +60 %); damp wood × 1.3. Melting snow for water costs extra fuel.
The calculator does not know how much snow you want to melt. Boiling water from snow is slow and fuel-hungry (see water from snow), so add a generous margin if the fire is also your water source. Gather the wood before you light the fire and sort it by size: tinder, matchstick, pencil, thumb and wrist-thick, as in the picture. Stack it under cover or on a bed of branches so snow does not bury it. If the light is fading, remember that gathering in the dark with cold fingers is slow and risky.
Keeping tinder, lighters and fingers working in the cold
You can have a perfect platform and a mountain of dry wood and still fail because the lighter does not light or your fingers will not close. Treat ignition as something you protect from the cold.
Warm and dry means inside your layers
Carry the lighter, a bag of tinder and a piece of fatwood (or a few homemade fire starters) in an inside pocket, close to your body, where body heat keeps them usable. Gas lighters become weak or unreliable in cold air because the fuel pressure falls, so warm them in your hand or pocket before use. A ferro rod is unaffected by cold and still throws hot sparks at low temperatures; only the tinder must be dry and fine. Our guide to tinder lists materials that catch a spark. Matches in a waterproof container are a useful backup.
Gas lighter in winter
- Weak flame in the cold
- Needs to be warmed inside your layers
- Fast and one-handed when it works
- Fails when frozen or wet
Ferro rod in winter
- Sparks as in summer
- Needs dry, fine tinder
- Easy to use with a glove-friendly handle
- Tinder must be kept warm and dry
Prepare everything before gloves come off
The golden rule for cold hands is to prepare everything while your gloves are on. Carve feather sticks, split kindling, build the lay on the platform and lay out the tinder bundle, the ferro rod and the next sizes of wood within reach. Only then take off one glove or glove liner for the shortest time possible. Every minute of bare-hand work in the cold costs dexterity you will want later.
Lighting with cold hands
 1Lay everything out
Sort tinder, matchstick, pencil and thumb-thick wood on a board or bark within reach. Keep your gloves on while you do it.
 2One bare hand, quick strikes
Take off one glove only. Plant the ferro rod tip in the tinder and pull the striker back in short, firm strokes. Do not hold the rod high above the bundle.
 3Feed in small sticks
When the tinder burns, add matchstick-thin sticks a few at a time, as in a wet-weather fire. Stop and wait if the flame struggles.
 4Mittens back on, then warm up
Put your mittens back on right away and hold your hands near the heat. If your fingers are numb or clumsy, stop work and warm them before you do anything fine.
Fire lays that work on snow
On a platform you can use almost any lay, but three work best in winter. Compare them with the fire lay picker, which recommends a platform whenever you choose snow, and read the full descriptions in our fire lays guide.
- Teepee to start. A compact cone of kindling over the tinder catches fast and stays tight. It is the starter for every other lay.
- Log cabin on the platform. Stacked in alternating pairs, a log cabin burns evenly and collapses into a flat bed of coals. It is the practical choice for cooking and melting snow in a pot.
- Long fire for warmth. Two thick logs in a line with the fire between them give long, even heat for sitting or sleeping beside. Use thick logs of wrist-thickness and more and push them together as they burn away.

| Lay | Good for | Wood needed | Notes |
|---|---|---|---|
| Teepee | Starting any fire | Little | Burns hot and fast; use as the starter |
| Log cabin | Cooking, snow melting, coals | Medium | Stable platform for a pot; collapses into coals |
| Long fire | Warmth, a night fire | High | Two thick logs; best with a reflector wall |
| Dakota hole | Not on snow | — | Needs digging; usually not allowed or practical |
For a night fire, the long fire is easier to keep going than a bright fire that you must feed every few minutes; the calculator uses a lower burn rate for it. Keep thick logs in reserve in the lay and push them in as they burn through. Never leave a fire unattended and always check the wind before you settle down beside it.
Melting snow and staying warm at the fire
A winter fire has two jobs: it keeps you warm and it melts snow. Both need planning, because both burn wood.
Melting snow
Never fill a pot with dry snow and put it on the fire: the pot scorches before the snow melts. Start with a little water in the pot, add snow in small portions and stir. Melting snow takes a lot of fuel because snow is mostly air and a pot full of snow becomes only a little water. The full routine, including why you should treat the water, is in water from snow and ice. A log cabin on the platform holds a pot level and gives steady heat.
Sitting at the fire without burning your gear
Radiant heat feels pleasant on the face but it is hard on clothing. Synthetic fabrics such as nylon and polyester melt and stick to skin when a spark lands on them, and down jackets can lose feathers through burn holes. Wear your insulation layers but keep them a safe distance from the flames, check sleeves and hoods, and take off the shell if it begins to smell hot. Wool is more forgiving than synthetics. Dry mittens, hats and socks on sticks at a distance where you can comfortably hold your hand, not right next to the coals.
A reflector wall of stacked green logs, about one metre behind the fire and roughly knee-to-hip height, bounces heat back toward you and also blocks wind. Put the wall behind the fire and sit in front, so the fire is between wall and you.

Cold hands, clumsy fingers and hypothermia
Cold hands are not only uncomfortable; they are an early warning. When the fingers lose fine control, the whole body is often losing heat. Treat clumsy hands as a signal to warm up before you carry on.
- Work in short bursts. Do the fine tasks (ferro rod, feather sticks) in short spells, then warm the hands in your armpits or near the fire.
- Keep your core warm. Put on your insulation layer at every stop. Warm blood goes to the hands only if the body is warm.
- Eat and drink. Food and warm drinks help the body keep making heat.
- Stay dry. Wet gloves and wet sleeves cool the hands faster than anything else. Swap damp liners for dry ones.
Watch yourself and your companions for the warning signs of hypothermia: constant shivering, stumbling, slurred speech, confusion, or unusual drowsiness. If shivering stops while the person is still cold and confused, that is an emergency. Our guide to hypothermia and cold injuries explains what to do; it is general information, not medical advice, and in doubt you should call for professional help. The best response to the first signs is shelter, dry insulation and warmth, with the fire as a help but not the only answer.
Building a fire is a good way to warm up, but a fire should never replace dry clothes, shelter and a good sleep system. In very cold conditions, put on insulation before you build the fire, not afterwards.
Putting a snow fire out properly
Snow is not a fire extinguisher. A deep bed of embers and burning logs on a platform can stay hot underneath a layer of snow for a surprisingly long time, and meltwater can hide glowing coals. A snow fire is only out when you have stirred it, doused it and checked it by hand.
Putting out a winter fire
 1Let it burn down
Stop adding wood well before you plan to leave, so there is only a bed of embers and not big logs to deal with.
 2Spread and stir
Use a stick to pull the embers apart and spread them thin. Separate any burning log ends.
 3Douse and stir again
Pour water a little at a time, stir the embers and pour again. You can use melted snow water if you have it. Expect lots of steam.
 4Check by hand
Hold the back of your hand about 10 cm above the ash. If you feel any warmth, repeat. Feel the logs, too, and not only the ash.
 5Leave no trace
Scatter the cold ash, pull apart the platform logs and carry out any litter. In snow, burnt scars show in spring.
Do not walk away from a platform that still smoulders, even if the surface looks black. Platform logs of green wood char slowly and can hide warmth for a long time. Our campfire safety guide covers extinguishing and checking in more detail, and the general rules apply in winter just as in summer.
Fire rules, bans and leaving no trace in winter
Snow does not always mean that fires are allowed. Rules differ by country, region, land owner and even by day, and this article gives general guidance, not legal advice. Check the current rules before you light a fire.
- Fire bans still apply. In some winters, especially during dry, snow-free spells, forest-fire warnings and local bans are in force even though it is cold. Dry grass, needles and leaf litter burn easily once the snow has gone.
- Protected areas. Many national parks, nature reserves and forests forbid open fires in all seasons or allow them only in marked fire places. Fire rules in Germany are set by each state forest law, so they differ by Bundesland.
- Land owner permission. On private land you need the owner's permission.
- Leave no trace. Use dead wood from the ground and standing dead trees, do not cut living trees without permission, and remove all traces of the fire. Avoid fires where thin snow barely covers the ground and a hot fire could scorch the soil.
When in doubt, use a small stove instead: see camp stoves for options. Read the campfire safety guide and the wider bushcraft basics to build good habits.
Troubleshooting: why is my snow fire not working?
Most snow fire problems have a clear cause. Find your symptom in the table, fix the cause and try again before you burn the last of your tinder.
| Symptom | Likely cause | What to do |
|---|---|---|
| Fire sinks and goes out | No platform, or platform too thin | Rebuild on green logs with dry sticks across; re-level when it tilts |
| Hissing and steam, no flame | Wet or frozen kindling | Split to the dry core, use finer sticks and fatwood, dry the next wood beside the fire |
| Snow clumps drop onto the fire | Snow-laden branches overhead | Move the fire or clear the branches before lighting |
| Lighter will not light | Cold gas, wet or frozen lighter | Warm it inside your layers, use the ferro rod or matches |
| Ferro rod sparks, tinder will not catch | Tinder damp or too coarse | Use fatwood dust, birch bark or fine feather stick curls |
| Fire starts and then dies | Too big a step in wood size | Feed matchstick and pencil sizes longer before thumb-thick wood |
| Fingers too numb to work | Cold core or wet gloves | Stop, put on insulation, warm your hands; see the hypothermia guide |
| Too little heat from a big fire | Wind, no reflector | Add a reflector wall behind the fire and sit in front of it |
Which fire should I build?
Is the snow deep or crusted?
Yes → Build a platform of green logs and dry sticks.No → Clear to the ground where allowed, or still use a platform.Do you need warmth for a long time?
Yes → Build a long fire with a reflector wall.No → A compact log cabin or teepee is enough.Is it windy or snowing heavily?
Yes → Choose a sheltered spot and build a windbreak first.No → Light on the windward side of the lay as usual.
Winter fire checklists
Before you light
- Site: open sky, wind shelter, 5 m from tent, fires allowed
- Snow stamped firm, platform built in two layers
- Fuel sorted by size, enough for the whole evening plus margin
- Tinder, lighter and ferro rod warm and within reach
- Insulation layer and dry mittens ready
Before you leave
- Embers stirred, doused and checked with the back of your hand
- Platform pulled apart, ash scattered cold
- All litter packed out
- No smouldering logs left
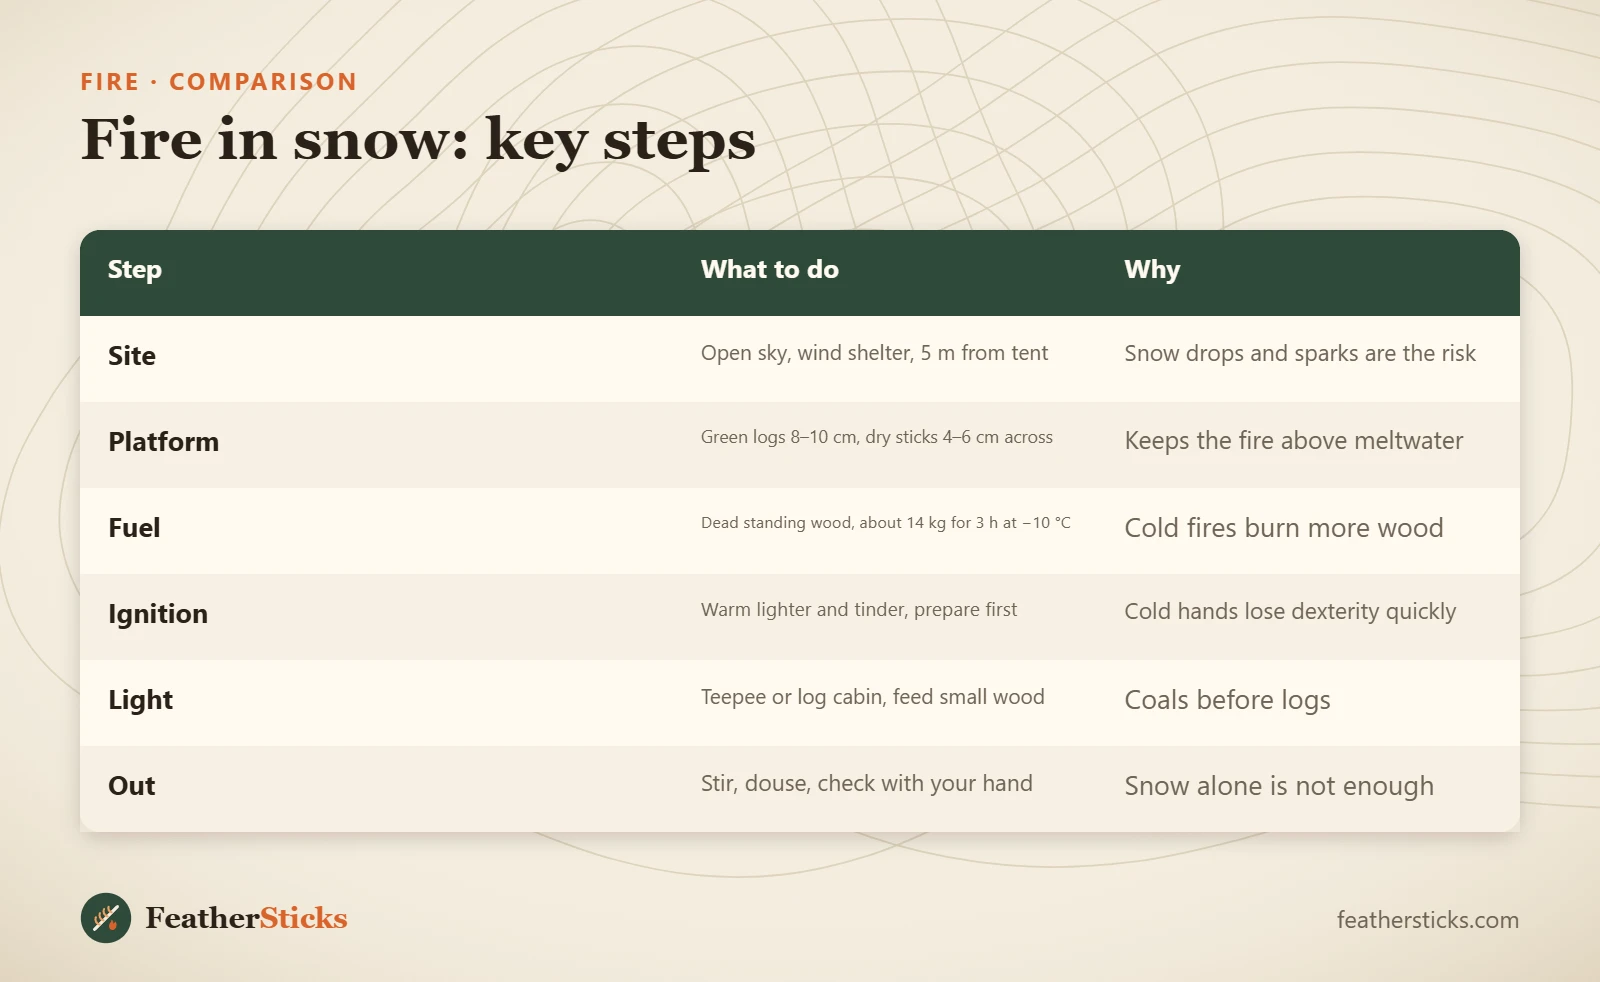
| Step | What to do | Why |
|---|---|---|
| Site | Open sky, wind shelter, 5 m from tent | Snow drops and sparks are the risk |
| Platform | Green logs 8–10 cm, dry sticks 4–6 cm across | Keeps the fire above meltwater |
| Fuel | Dead standing wood, about 14 kg for 3 h at −10 °C | Cold fires burn more wood |
| Ignition | Warm lighter and tinder, prepare first | Cold hands lose dexterity quickly |
| Light | Teepee or log cabin, feed small wood | Coals before logs |
| Out | Stir, douse, check with your hand | Snow alone is not enough |
Common mistakes
- Building directly on snow without a platform and watching the fire drown.
- Lighting under snow-laden branches that drop their load onto the fire.
- Using wet or river stones, which can crack or burst when heated.
- Gathering too little fuel and running out in the cold, dark hours.
- Starting with bare hands before everything is laid out.
- Sitting too close in synthetic clothing and melting it with sparks.
- Pouring snow on the embers and walking away without stirring and checking.
What you need
- Ferro rod with a glove-friendly handle and a lighter kept inside your layers
- Waterproof matches as a backup
- Folding saw and fixed-blade knife or small axe
- Fatwood or wax tinder tabs in a zip bag
- Mittens with thin liner gloves
- Water or a pot for dousing the fire
- Insulated sit pad
FAQ
How do you build a fire in the snow?
Why does a fire sink into the snow?
What wood burns best in winter?
How much firewood do I need for a winter evening?
Does a ferro rod work in the cold?
Do lighters work in freezing weather?
Can I use stones around a snow fire?
How do I put out a fire in the snow?
Are fires allowed in winter?
Check yourself
Completed6 quick questions from this guide. Nothing is sent anywhere.
Related step-by-step guides
-
 1
-
 1
-
 1